Springboot整合elasticsearch以及接口开发
Springboot整合elasticsearch以及接口开发
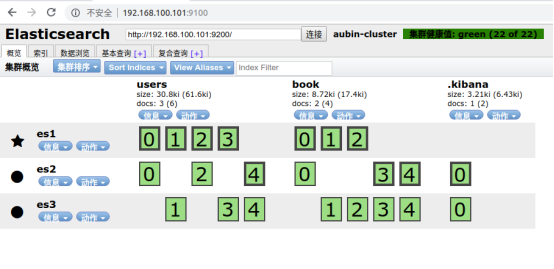
搭建elasticsearch集群
搭建过程略(我这里用的是elasticsearch5.5.2版本)
写入测试数据
新建索引book(非结构化索引)
PUT http://192.168.100.102:9200/book
修改mapping(结构化索引)
POST http://192.168.100.102:9200/book/novle/_mappings

{

  "novel": {

    "properties": {

      "word_count": {"type": "integer"},

      "author": {"type": "keyword"},

      "title": {"type": "text"},

      "publish_date": {"type": "date","format": "yyyy-MM-dd HH:mm:ss||yyyy-MM-dd||epoch_millis"}

    }

  }

}
查看新建索引结果(我这里使用的是elasticsearch-head插件)
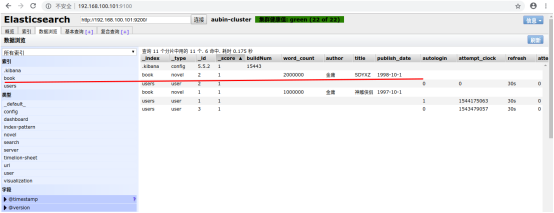
测试数据写入
PUT http://192.168.100.102:9200/book/novel/1

{

"word_count": 1000000,

"author": "金庸",

"title": "神雕侠侣",

"publish_date": "1997-10-1"

}
查看数据写入结果:
Springboot整合elasticsearch
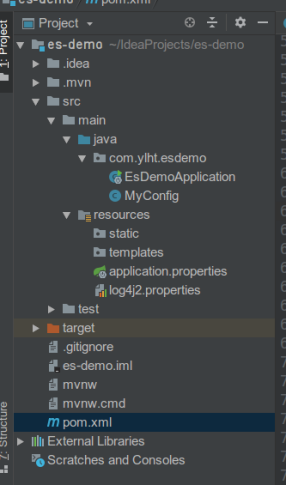
新建springboot项目
目录结构
Pom文件
<?xml version="1.0" encoding="UTF-8"?>

<project xmlns="http://maven.apache.org/POM/4.0.0" xmlns:xsi="http://www.w3.org/2001/XMLSchema-instance"

         xsi:schemaLocation="http://maven.apache.org/POM/4.0.0 http://maven.apache.org/xsd/maven-4.0.0.xsd">

    <modelVersion>4.0.0</modelVersion>

    <parent>

        <groupId>org.springframework.boot</groupId>

        <artifactId>spring-boot-starter-parent</artifactId>

        <!--<version>2.1.1.RELEASE</version>-->

        <version>1.5.6.RELEASE</version>

        <relativePath/> <!-- lookup parent from repository -->

    </parent>

    <groupId>com.ylht</groupId>

    <artifactId>es-demo</artifactId>

    <version>0.0.1-SNAPSHOT</version>

    <name>es-demo</name>

    <description>Demo project for Spring Boot</description>

    <properties>

        <java.version>1.8</java.version>

        <es.version>5.5.2</es.version>

    </properties>

    <dependencies>

        <dependency>

            <groupId>org.springframework.boot</groupId>

            <artifactId>spring-boot-starter-web</artifactId>

        </dependency>

        <!-- https://mvnrepository.com/artifact/org.elasticsearch.client/transport -->

        <dependency>

            <groupId>org.elasticsearch.client</groupId>

            <artifactId>transport</artifactId>

            <version>${es.version}</version>

        </dependency>

        <dependency>

            <groupId>org.elasticsearch</groupId>

            <artifactId>elasticsearch</artifactId>

            <version>${es.version}</version>

        </dependency>

        <dependency>

            <groupId>org.apache.logging.log4j</groupId>

            <artifactId>log4j-api</artifactId>

            <version>2.7</version>

        </dependency>

        <!-- https://mvnrepository.com/artifact/org.apache.logging.log4j/log4j-core -->

        <dependency>

            <groupId>org.apache.logging.log4j</groupId>

            <artifactId>log4j-core</artifactId>

            <version>2.7</version>

        </dependency>

        <dependency>

            <groupId>org.springframework.boot</groupId>

            <artifactId>spring-boot-devtools</artifactId>

            <scope>runtime</scope>

        </dependency>

        <dependency>

            <groupId>org.springframework.boot</groupId>

            <artifactId>spring-boot-starter-test</artifactId>

            <scope>test</scope>

        </dependency>

    </dependencies>

    <build>

        <plugins>

            <plugin>

                <groupId>org.springframework.boot</groupId>

                <artifactId>spring-boot-maven-plugin</artifactId>

            </plugin>

        </plugins>

    </build>

</project>
log4j2.properties
appender.console.type=Console

appender.console.name=console

appender.console.layout.type=PatternLayout

appender.console.layout.pattern=[%t] %-5p %c %m%n

rootLogger.level=info

rootLogger.appenderRef.console.ref=console
MyConfig类
package com.ylht.esdemo;

import org.elasticsearch.client.transport.TransportClient;

import org.elasticsearch.common.settings.Settings;

import org.elasticsearch.common.transport.InetSocketTransportAddress;

import org.elasticsearch.transport.client.PreBuiltTransportClient;

import org.springframework.context.annotation.Bean;

import org.springframework.context.annotation.Configuration;

import java.net.InetAddress;

import java.net.UnknownHostException;

@Configuration

public class MyConfig {

    @Bean

    public TransportClient client() throws UnknownHostException {

        InetSocketTransportAddress es1 = new InetSocketTransportAddress(

                InetAddress.getByName("192.168.100.101"), 9300

        );

        InetSocketTransportAddress es2 = new InetSocketTransportAddress(

                InetAddress.getByName("192.168.100.102"), 9300

        );

        InetSocketTransportAddress es3 = new InetSocketTransportAddress(

                InetAddress.getByName("192.168.100.103"), 9300

        );

        Settings settings = Settings.builder()

                .put("cluster.name", "aubin-cluster")

                .build();

        TransportClient client = new PreBuiltTransportClient(settings);

        client.addTransportAddresses(es1, es2, es3);

        return client;

    }

}
EsDemoApplication类文件
package com.ylht.esdemo;

import org.elasticsearch.action.get.GetResponse;

import org.elasticsearch.client.transport.TransportClient;

import org.springframework.beans.factory.annotation.Autowired;

import org.springframework.boot.SpringApplication;

import org.springframework.boot.autoconfigure.SpringBootApplication;

import org.springframework.boot.autoconfigure.jdbc.DataSourceAutoConfiguration;

import org.springframework.boot.autoconfigure.orm.jpa.HibernateJpaAutoConfiguration;

import org.springframework.http.HttpStatus;

import org.springframework.http.ResponseEntity;

import org.springframework.web.bind.annotation.GetMapping;

import org.springframework.web.bind.annotation.RequestParam;

import org.springframework.web.bind.annotation.RestController;

import javax.xml.ws.Response;

@SpringBootApplication(exclude = {DataSourceAutoConfiguration.class, HibernateJpaAutoConfiguration.class})

@RestController

public class EsDemoApplication {

    @Autowired

    private TransportClient client;

    @GetMapping("/")

    public String index() {

        return "index";

    }

    @GetMapping(value = "/get/book/novel")

    public ResponseEntity get(@RequestParam(name = "id", defaultValue = "") String id) {

        try {

            if (id.isEmpty()) {

                return new ResponseEntity(HttpStatus.NOT_FOUND);

            }

            GetResponse response = this.client.prepareGet("book", "novel", id)

                    .get();

            if (!response.isExists()) {

                return new ResponseEntity(HttpStatus.NOT_FOUND);

            }

            return new ResponseEntity(response.getSource(), HttpStatus.OK);

        } catch (Exception e) {

            e.printStackTrace();

            return new ResponseEntity(HttpStatus.INTERNAL_SERVER_ERROR);

        }

    }

    public static void main(String[] args) {

        SpringApplication.run(EsDemoApplication.class, args);

    }

}
启动项目
(启动项目之前最好先 mvn clean,mvn package,mvn install)
启动方式有多种

- 直接点击绿色三角按钮运行(它右边一个是debug运行)
- 直接运行main方法
- 点击Teminal,输入mvn spring-boo:run
运行出错可以看看我的博客https://i.cnblogs.com/posts?categoryid=1373086
项目正常启动后

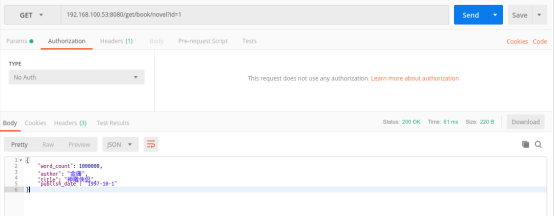
接口测试
我这里使用的ponstman
GET 192.168.100.53:8080/get/book/novel?id=1
结果图
Springboot整合elasticsearch以及接口开发的更多相关文章
- SpringBoot整合ElasticSearch实现多版本的兼容
前言 在上一篇学习SpringBoot中,整合了Mybatis.Druid和PageHelper并实现了多数据源的操作.本篇主要是介绍和使用目前最火的搜索引擎ElastiSearch,并和Spring ...
- SpringBoot整合Elasticsearch详细步骤以及代码示例(附源码)
准备工作 环境准备 JAVA版本 java version "1.8.0_121" Java(TM) SE Runtime Environment (build 1.8.0_121 ...
- ElasticSearch(2)---SpringBoot整合ElasticSearch
SpringBoot整合ElasticSearch 一.基于spring-boot-starter-data-elasticsearch整合 开发环境:springboot版本:2.0.1,elast ...
- springboot整合elasticsearch入门例子
springboot整合elasticsearch入门例子 https://blog.csdn.net/tianyaleixiaowu/article/details/72833940 Elastic ...
- Springboot整合Elasticsearch报错availableProcessors is already set to [4], rejecting [4]
Springboot整合Elasticsearch报错 今天使用SpringBoot整合Elasticsearch时候,相关的配置完成后,启动项目就报错了. nested exception is j ...
- Springboot整合ElasticSearch进行简单的测试及用Kibana进行查看
一.前言 搜索引擎还是在电商项目.百度.还有技术博客中广泛应用,使用最多的还是ElasticSearch,Solr在大数据量下检索性能不如ElasticSearch.今天和大家一起搭建一下,小编是看完 ...
- 😊SpringBoot 整合 Elasticsearch (超详细).md
SpringBoot 整合 Elasticsearch (超详细) 注意: 1.环境搭建 安装es Elasticsearch 6.4.3 下载链接 为了方便,环境使用Windows 配置 解压后配置 ...
- SpringBoot整合elasticsearch
在这一篇文章开始之前,你需要先安装一个ElasticSearch,如果你是mac或者linux可以参考https://www.jianshu.com/p/e47b451375ea,如果是windows ...
- springboot整合elasticsearch(基于es7.2和官方high level client)
前言 最近写的一个个人项目(传送门:全终端云书签)中需要用到全文检索功能,目前 mysql,es 都可以做全文检索,mysql 胜在配置方便很快就能搞定上线(参考这里),不考虑上手难度,es 在全文检 ...
随机推荐
- Java实验--统计字母出现频率及其单词个数
本周的实验要求在之前实现统计单词的基础之上(可以见之前博客的统计单词的那个实验),对其进行修改成所需要的格式,统计字母出现频率的功能,并按照一定的格式把最终结果的用特定的格式在文本中显示出来 统计过程 ...
- java基础 2 static关键字
2. static关键字 变量:静态变量在内存中只存在一份,只在类第一次实例化时初始化一次,同时类所有的实例都共享静态变量,可以直接同过类名 来访问他. 方法:静 ...
- Java中的重写
以下内容引用自http://wiki.jikexueyuan.com/project/java/overriding.html: 如果一个类从它的父类继承了一个方法,如果这个方法没有被标记为final ...
- Meteor事件
使用事件是非常简单的.我们将学习如何使用tag,class 和id作为事件选择器. 让我们创建HTML模板三大要素.第一个是 p 标签,第二个是 myClass 类,最后一个是myId. meteor ...
- Openwrt挂载NTFS硬盘提示“只读”错误的解决方法!
Openwrt是基于Linux代码编写,只支持NTFS格式硬盘的只读权限,否则当挂载的NTFS硬盘写入超过2M左右,就会出现"error:read-only file system" ...
- Opengl ES 1.x NDK实例开发之七:旋转的纹理立方体
开发框架介绍请參见:Opengl ES NDK实例开发之中的一个:搭建开发框架 本章在第六章(Opengl ES 1.x NDK实例开发之六:纹理贴图)的基础上绘制一个旋转的纹理立方体,原理和纹理贴图 ...
- Linux下kill命令的学习,(主要根据man手册进行的翻译)
名字 kill -终止一个进程 格式 kill [-s signal | -p] [--] pid .. ...
- sparse-PCA(稀疏主成分分析)是什么?
不多说,直接上干货! 复杂降维技术有spare-PCA和sparse coding. 最近在科研需要,感谢下面的博主. Sparse PCA 稀疏主成分分析
- How can I pass data from Flask to JavaScript in a template?
https://stackoverflow.com/questions/11178426/how-can-i-pass-data-from-flask-to-javascript-in-a-templ ...
- iOS SHA加密算法的实现
- (NSString *)SHAStringWithSourceData:(NSData *)data type:(SHAType)type{ int shaDigestLength; switch ...