spring cloud微服务实践五
本篇我们来看看怎么实现spring cloud的配置中心.
在分布式系统中,特别是微服务架构下,可能会存在许多的服务,每个服务都会存在一个或多个的配置文件.那怎么多的配置文件的管理就会成为一个大问题.同时,微服务运行过程中还需要动态的修改配置参数.所以spring cloud config就是在spring cloud微服务架构中解决配置文件的管理,刷新,查看等问题的.
注:这一个系列的开发环境版本为 java1.8, spring boot2.x, spring cloud Greenwich.SR2, IDE为 Intelli IDEA
spring cloud config和git
我们先来一个简单的配置,只有server和config的.
添加配置文件
创建一个目录,目录下分别添加3个不同的配置文件
neo-config-dev.properties

neo-config-pro.properties

neo-config-test.properties
里面的配置分别为neo.hello=hello in dev/pro/test
并将目录保存到gitlee/github上.
server 端
接下来开始配置server
pom
<properties>

        <java.version>1.8</java.version>

        <spring-cloud.version>Greenwich.SR2</spring-cloud.version>

    </properties>

    <dependencies>

        <dependency>

            <groupId>org.springframework.cloud</groupId>

            <artifactId>spring-cloud-config-server</artifactId>

        </dependency>

        <dependency>

            <groupId>org.springframework.boot</groupId>

            <artifactId>spring-boot-starter-test</artifactId>

            <scope>test</scope>

        </dependency>

    </dependencies>

    <dependencyManagement>

        <dependencies>

            <dependency>

                <groupId>org.springframework.cloud</groupId>

                <artifactId>spring-cloud-dependencies</artifactId>

                <version>${spring-cloud.version}</version>

                <type>pom</type>

                <scope>import</scope>

            </dependency>

        </dependencies>

    </dependencyManagement>
配置文件
server:

  port: 8001

spring:

  application:

    name: config-server

  cloud:

    config:

      server:

        git:

          uri: https://gitee.com/xingyys/config-repo

           # 配置文件保存的目录,用,分隔

          search-paths: config-repo

          username: username

          password: password

         # 忽略ssl, 或者自行配置秘钥

          skip-ssl-validation: true
Spring Cloud Config也提供本地存储配置的方式。我们只需要设置属性spring.profiles.active=native,Config Server会默认从应用的src/main/resource目录下检索配置文件。也可以通过spring.cloud.config.server.native.searchLocations=file:E:/properties/属性来指定配置文件的位置。虽然Spring Cloud Config提供了这样的功能,但是为了支持更好的管理内容和版本控制的功能,还是推荐使用git的方式。
启动类
添加注解@EnableConfigServer,启动配置中心服务端功能
@SpringBootApplication

@EnableConfigServer

public class ConfigServerApplication {

    public static void main(String[] args) {

        SpringApplication.run(ConfigServerApplication.class, args);

    }

}
测试
直接编译打包就可以测试了,直接访问http://localhost:8001/neo-config/dev返回:
{

    "name": "neo-config",

    "profiles": [

        "dev"

    ],

    "label": null,

    "version": null,

    "state": null,

    "propertySources": [

        {

            "name": "https://gitee.com/xingyys/config-repo/config-repo/neo-config-dev.properties",

            "source": {

                "neo.hello": "hello im dev"

            }

        }

    ]

}
上述的返回的信息包含了配置文件的位置、版本、配置文件的名称以及配置文件中的具体内容,说明server端已经成功获取了git仓库的配置信息。
仓库中的配置文件会被转换成web接口,访问可以参照以下的规则:
- /{application}/{profile}[/{label}]
- /{application}-{profile}.yml
- /{label}/{application}-{profile}.yml
- /{application}-{profile}.properties
- /{label}/{application}-{profile}.properties
以neo-config-dev.properties为例子,它的application是neo-config,profile是dev。client会根据填写的参数来选择读取对应的配置。
client 端
用来获取server端上的配置信息
pom
    <properties>

        <java.version>1.8</java.version>

        <spring-cloud.version>Greenwich.SR2</spring-cloud.version>

    </properties>

    <dependencies>

        <dependency>

            <groupId>org.springframework.cloud</groupId>

            <artifactId>spring-cloud-starter-config</artifactId>

        </dependency>

        <dependency>

            <groupId>org.springframework.boot</groupId>

            <artifactId>spring-boot-starter-web</artifactId>

        </dependency>

        <dependency>

            <groupId>org.springframework.boot</groupId>

            <artifactId>spring-boot-starter-test</artifactId>

            <scope>test</scope>

        </dependency>

    </dependencies>

    <dependencyManagement>

        <dependencies>

            <dependency>

                <groupId>org.springframework.cloud</groupId>

                <artifactId>spring-cloud-dependencies</artifactId>

                <version>${spring-cloud.version}</version>

                <type>pom</type>

                <scope>import</scope>

            </dependency>

        </dependencies>

    </dependencyManagement>
配置文件
config client的配置文件为 bootstrap.properties
spring.cloud.config.name=neo-config

spring.cloud.config.profile=dev

spring.cloud.config.uri=http://localhost:8001/

spring.cloud.config.label=master

spring.application.name=config-client

server.port=8002
- spring.application.name:对应{application}部分
- spring.cloud.config.profile:对应{profile}部分
- spring.cloud.config.label:对应git的分支。如果配置中心使用的是本地存储,则该参数无用
- spring.cloud.config.uri:配置中心的具体地址
- spring.cloud.config.discovery.service-id:指定配置中心的service-id,便于扩展为高可用配置集群。
这些与spring-cloud相关的属性必须配置在bootstrap.properties中,config部分内容才能被正确加载。因为config的相关配置会先于application.properties,而bootstrap.properties的加载也是先于application.properties。
启动类
@SpringBootApplication

public class ConfigClientApplication {

    public static void main(String[] args) {

        SpringApplication.run(ConfigClientApplication.class, args);

    }

}
接口类
@RestController

public class HelloController {

    @Value("${neo.hello}")

    private String hello;

    @RequestMapping("/hello")

    public String from() {

        return this.hello;

    }

}
测试
编译启动config client, 访问http://192.168.1.13:8002/hello返回: hello im dev 配置成功!
配置中心
前面我们已经配置config server和config client,而且也已经可以使用了,但是它还只能单独使用,接下来我们需要对它们进行一些改造,用在微服务架构中.
注册中心
这里的注册中心直接使用前几篇留下的就可以.
server 端的改造
添加依赖
...

        <dependency>

            <groupId>org.springframework.cloud</groupId>

            <artifactId>spring-cloud-starter-netflix-eureka-server</artifactId>

        </dependency>

...
修改配置文件
...

eureka:

  client:

    service-url:

      defaultZone: http://localhost:8000/eureka/

...
启动类
添加注解@EnableDiscoveryClient:
@SpringBootApplication

@EnableConfigServer

@EnableDiscoveryClient

public class ConfigServerApplication {

    public static void main(String[] args) {

        SpringApplication.run(ConfigServerApplication.class, args);

    }

}
记得重新编译,启动
client 端的改造
添加依赖
...

        <dependency>

            <groupId>org.springframework.cloud</groupId>

            <artifactId>spring-cloud-starter-netflix-eureka-server</artifactId>

        </dependency>

...
修改配置文件
同样是 bootstrap.properties
spring.cloud.config.name=neo-config

spring.cloud.config.profile=dev

spring.cloud.config.label=master

spring.cloud.config.discovery.enabled=true

spring.cloud.config.discovery.serviceId=config-server

eureka.client.serviceUrl.defaultZone=http://localhost:8000/eureka/

spring.application.name=config-client

server.port=8002
主要是去掉了spring.cloud.config.uri直接指向server端地址的配置,增加了最后的三个配置:
- spring.cloud.config.discovery.enabled :开启Config服务发现支持
- spring.cloud.config.discovery.serviceId :指定server端的name,也就是server端spring.application.name的值
- eureka.client.serviceUrl.defaultZone :指向注册中心的地址
启动类
@SpringBootApplication

@EnableDiscoveryClient

public class ConfigClientApplication {

    public static void main(String[] args) {

        SpringApplication.run(ConfigClientApplication.class, args);

    }

}
测试
一次启动 discovery, config-server和config-client, 访问http://127.0.0.1:8000/

访问http://localhost8002/hello, 返回hello im dev .
结合消息总线
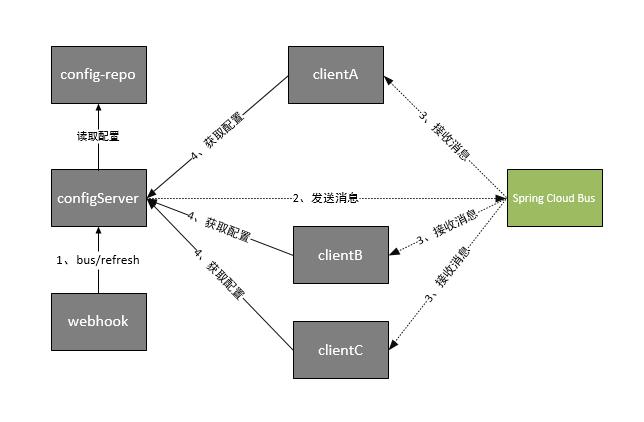
其实上面的配置还有一个问题,就是配置文件更新后,config client不能同步更新,需要重启.针对这个问题,已经有一些的解决方法了,一种是配置 gitlee或github的webhook,另一种就是使用消息总线.我们就来尝试后者.
spring cloud中可以和rabbitmq结合实现.
安装rabbitmq
rabbitmq的安装教程网上有很多,这里为了简单,我们就直接使用docker来安装.
这里我准备了一个虚拟机192.168.1.10, 上面安装了docker
# 拉取rabbitmq镜像

docker pull rabbitmq:management

#  启动镜像

docker run -d -p 5672:5672 -p 15672:15672 --name rabbitmq rabbitmq:management
执行成功后登录rabbitmq, http://192.168.1.10/15672, 用户名/密码为 guest/guest.
client 端的改造
接下来就是修改client端了
添加依赖
...

        <dependency>

            <groupId>org.springframework.cloud</groupId>

            <artifactId>spring-cloud-starter-bus-amqp</artifactId>

        </dependency>

...
配置文件
...

## 添加配置刷新的接口url

management.endpoints.web.exposure.include=bus-refresh

## 开启消息跟踪

spring.cloud.bus.trace.enabled=true

spring.rabbitmq.host=192.168.1.10

## rabbitmq登录使用5672, 15672是web端口,别搞错了!

spring.rabbitmq.port=5672

spring.rabbitmq.username=guest

spring.rabbitmq.password=guest
接口
修改接口HelloController, 添加注解@RefreshScope
@RestController

@RefreshScope

public class HelloController {

    @Value("${neo.hello}")

    private String hello;

    @RequestMapping("/hello")

    public String from() {

        return this.hello;

    }

}
测试
修改配置文件,使用命令curl -X POST http://localhost:8002/actuator/bus-refresh更新,在访问http://localhost:8002/hello
如果返回500错误,请检查rabbitmq连接
改进 server
上面的配置只是针对单个client的,如果要让所有的client都更新,就需要使用curl对每个client操作.所有我们将修改server, 当配置文件修改后,刷新server时,同时刷新所有的client.
添加依赖
        <dependency>

            <groupId>org.springframework.cloud</groupId>

            <artifactId>spring-cloud-starter-bus-amqp</artifactId>

        </dependency>
配置文件
server:

  port: 8001

spring:

  application:

    name: config-server

  cloud:

    config:

      server:

        git:

          uri: https://gitee.com/xingyys/config-repo

          search-paths: config-repo

          username: username

          password: password

          skip-ssl-validation: true

    bus:

      trace:

        enabled: true

  rabbitmq:

    host: 192.168.1.10

    port: 5672

    username: guest

    password: guest

management:

  endpoints:

    web:

      exposure:

        include: bus-refresh

eureka:

  client:

    service-url:

      defaultZone: http://localhost:8000/eureka/
测试
修改配置文件,执行命令 curl -X POST http://localhost:8001/actuator/bus-refresh.
spring cloud微服务实践五的更多相关文章
- spring cloud微服务实践二
在上一篇,我们已经搭建了spring cloud微服务中的注册中心.但只有一个注册中心还远远不够. 接下来我们就来尝试提供服务. 注:这一个系列的开发环境版本为 java1.8, spring boo ...
- spring cloud微服务实践七
在spring cloud 2.x以后,由于zuul一直停滞在1.x版本,所以spring官方就自己开发了一个项目 Spring Cloud Gateway.作为spring cloud微服务的网关组 ...
- spring cloud微服务实践一
最近在学习spring框架.其中spring cloud在微服务方面很火,所以在学习过程中,也做一些记录. 注:这一个系列的开发环境版本为 java1.8, spring boot2.x, sprin ...
- spring cloud微服务实践六
本片我们就来认识下spring cloud中的zuul组件. 注:这一个系列的开发环境版本为 java1.8, spring boot2.x, spring cloud Greenwich.SR2, ...
- spring cloud微服务实践三
上篇文章里我们实现了spring cloud中的服务提供者和使用者.接下来我们就来看看spring cloud中微服务的其他组件. 注:这一个系列的开发环境版本为 java1.8, spring bo ...
- Spring Cloud微服务实践之路-起始
由于各种原因,公司要对现有的营销产品进行微服务化,如果可以,则对公司所有产品逐步进行微服务化. 而本人将探索这条路,很艰难,但干劲十足.整个过会记录下来,以便以后查阅. 感谢公司!感谢领导! 相关书籍 ...
- spring cloud微服务实践四
spring cloud的hystrix还有一个配搭的库hystrix-dashboard,它是hystrix的一款监控工具,能直观的显示hystrix响应信息,请求成功率等.但是hystrix-da ...
- Spring Cloud微服务实践之路- Eureka Server 中的第一个异常
EMERGENCY! EUREKA MAY BE INCORRECTLY CLAIMING INSTANCES ARE UP WHEN THEY'RE NOT. RENEWALS ARE LESSER ...
- 放弃Dubbo,选择最流行的Spring Cloud微服务架构实践与经验总结
http://developer.51cto.com/art/201710/554633.htm Spring Cloud 在国内中小型公司能用起来吗?从 2016 年初一直到现在,我们在这条路上已经 ...
随机推荐
- unctf esayrop wp
目录 题目基本信息 题目漏洞 思路 exp脚本 题目基本信息 题目漏洞 首先在main函数中需要绕过一个if判断才能进入漏洞函数 漏洞函数中很明显的栈溢出漏洞,同时还控制了返回地址不能超过文件映射到内 ...
- ML_Review_GMM(Ch10)
Note sth about GMM(Gaussian Mixtrue Model) 高斯混合模型的终极理解 高斯混合模型(GMM)及其EM算法的理解 这两篇博客讲得挺好,同时讲解了如何解决GMM参数 ...
- python中的with的用法,上下文管理器
with是从Python2.5引入的一个新的语法,它是一种上下文管理协议,目的在于从流程图中把 try,except 和finally 关键字和 资源分配释放相关代码统统去掉,简化try….excep ...
- 时间戳 Flume's Memory Consumption
效率 https://www.cnblogs.com/zhujiabin/p/6168671.html?utm_source=itdadao&utm_medium=referral http ...
- Python中的logging模块就这么用
Python中的logging模块就这么用 1.日志日志一共分成5个等级,从低到高分别是:DEBUG INFO WARNING ERROR CRITICALDEBUG:详细的信息,通常只出现在诊断问题 ...
- 严重性 代码 说明 项目 文件 行 禁止显示状态错误 C1128 节数超过对象文件格式限制: 请使用 /bigobj 进行编译。
严重性 代码 说明 项目 文件 行 禁止显示状态错误 C1128 节数超过对象文件格式限制: 请使用 /bigobj 进行编译. 默认情况下,对象文件最多可存放 65,536 (2^16) 个可寻址的 ...
- python基础之线程、进程、协程
线程 线程基础知识 一个应用程序,可以多进程.也可以多线程. 一个python脚本,默认是单进程,单线程的. I/O操作(音频.视频.显卡操作),不占用CPU,所以: 对于I/O密集型操作,不会占用C ...
- jQuery BlockUI Plugin Demo 2
Overview The jQuery BlockUI Plugin lets you simulate synchronous behavior when using AJAX, without l ...
- 【Leetcode_easy】687. Longest Univalue Path
problem 687. Longest Univalue Path 参考 1. Leetcode_easy_687. Longest Univalue Path; 2. Grandyang; 完
- 单点登录系统(SSO)详细设计说明书(上篇)
1.引言 1.1编写目的 为了单点登录系统(SSO系统)的可行性,完整性,并能按照预期的设想实现该系统,特编写需求说明书. 同时,说明书也发挥与策划和设计人员更好地沟通的作用. 1.2 ...