基于Centos7系统部署cobbler批量安装系统
前言
cobbler是一个可以实现批量安装系统的Linux应用程序。它有别于pxe+kickstart,cobbler可以实现同个服务器批量安装不同操作系统版本
系统环境的准备及下载cobbler
一、系统环境
可以用任何模式来使用,不过要注意在局域网使用桥接容易出现DHCP分配IP换乱的问题,这里我们使用仅主机模式
[root@localhost network-scripts]# ip a ens37: <BROADCAST,MULTICAST,UP,LOWER_UP> mtu  qdisc pfifo_fast state UP qlen

    link/ether :0c::0d:4d: brd ff:ff:ff:ff:ff:ff

    inet 169.254.12.2/ brd 169.254.255.255 scope link ens37   #这是仅主机模式下的网卡

       valid_lft forever preferred_lft forever

    inet6 fe80::20c:29ff:fe0d:4d06/ scope link

       valid_lft forever preferred_lft forever
我使用了两块网卡,不过我这里只使用仅主机模式的网卡 ——169.254.12.2
二、关闭安全服务
不关闭防火墙无法连接
[root@localhost ~]# systemctl stop firewalld                   #关闭防火墙

[root@localhost ~]# setenforce 0                               #关闭selinux
三、下载cobbler及其所需服务程序
[root@songqi ~]# yum install cobbler dhcp tftp-server xinetd syslinux httpd -y
cobbler:核心程序不用多解释
dhcp:负责分配客户端IP,因为客户端没有IP,所以需要dhcp服务
tftp(Trivial File Transfer Protocol,简单文件传输协议):是TCP/IP协议族中的一个用来在客户机与服务器之间进行简单文件传输的协议,提供不复杂、开销不大的文件传输服务。端口号为69。
xinetd:xinetd已经取代了inetd,并且提供了访问控制、加强的日志和资源管理功能,已经成了Red Hat 7 和 Mandrake 7.2的Internet标准超级守护进程
syslinux:syslinux是一个功能强大的引导加载程序,而且兼容各种介质。它的目的是简化首次安装Linux的时间,并建立修护或其它特殊用途的启动盘。它提供pxelinux这个文件,pxelinux.0引导文件引导vmlinux和initrd两个启动文件
httpd:可以使别的主机可以从服务端获取镜像包
yum 安装需要下面两个源
[epel]

name=epel

enabled=

gpgcheck=

baseurl=https://mirrors.aliyun.com/epel/7/x86_64/

[centos]

name=centos base

enabled=

gpgcheck=

baseurl=http://mirrors.163.com/centos/7/os/x86_64/
配置相关服务
第一步、配置dhcp服务
必须提前打开不然后面会报错
[root@localhost ~]# vim /etc/dhcp/dhcpd.conf

subnet 169.254.12.0 netmask 255.255.0.0 {

  range 169.254.1.20 169.254.2.30;

  default-lease-time ;

  max-lease-time ;

  filename "pxelinux.0";                    #加入pxelinux引导程序

}
第二步、配置tftp
安装tftp服务器需要安装xinetd
[root@localhost ~]# vim /etc/xinetd.d/tftp

# default: off

# description: The tftp server serves files using the trivial file transfer \

#       protocol.  The tftp protocol is often used to boot diskless \

#       workstations, download configuration files to network-aware printers, \

#       and to start the installation process for some operating systems.

service tftp

{

        disable                 = no                #把yes改为no 表示开机自启

        socket_type             = dgram

        protocol                = udp

        wait                    = yes

        user                    = root

        server                  = /usr/sbin/in.tftpd

        server_args             = -B  -v -s /var/lib/tftpboot

        per_source              =

        cps                     =

        flags                   = IPv4

}
第三步、启动cobbler、httpd
[root@localhost ~]# systemctl restart cobblerd

[root@localhost ~]# systemctl restart httpd
第四步、检查cobbler配置
[root@ken ~]# cobbler check
The following are potential configuration items that you may want to fix:

1 : The 'server' field in /etc/cobbler/settings must be set to something other than localhost, or
 kickstarting features will not work.  This should be a resolvable hostname or IP for the boot server
 as reachable by all machines that will use it.
2 : For PXE to be functional, the 'next_server' field in /etc/cobbler/settings must be set to something
 other than 127.0.0.1, and should match the IP of the boot server on the PXE network.
3 : Some network boot-loaders are missing from /var/lib/cobbler/loaders, you may run 'cobbler get-loaders'
to download them, or, if you only want to handle x86/x86_64 netbooting, you may ensure that you have
installed a *recent* version of the syslinux package installed and can ignore this message entirely.
 Files in this directory, should you want to support all architectures, should include pxelinux.0, menu.c32,
 elilo.efi, and yaboot. The 'cobbler get-loaders' command is the easiest way to resolve these requirements.
4 : enable and start rsyncd.service with systemctl
5 : debmirror package is not installed, it will be required to manage debian deployments and repositories
6 : The default password used by the sample templates for newly installed machines (default_password_crypted
 in /etc/cobbler/settings) is still set to 'cobbler' and should be changed, try: "openssl passwd -1 -salt '
random-phrase-here' 'your-password-here'" to generate new one
7 : fencing tools were not found, and are required to use the (optional) power management features. install
 cman or fence-agents to use them

Restart cobblerd and then run 'cobbler sync' to apply changes
可以看到有7个错误,需要一一排错
五、排错
问题1.(文中红字标识错误位置)在 /etc/cobbler/setting中
cobbler文件默认是127.0.0.1本地回环地址,需要更改为提供cobbler服务的ip地址169.254.12.2,在384行
server: 169.254.12.2
问题2.(文中红字标识错误位置)在 /etc/cobbler/setting中
netx_server也是默认本地127.0.0.1回环地址,需要修改为提供cobbler服务的ip地址 同样是169.254.12.2,在272行出
next_server: 169.254.12.2
问题3.(可以忽略)
若想解决,直接运行 cobbler get-loaders即可
问题4.未启动rsync
启动rsync并让其开机自启
[root@songqi ~]# systemctl restart rsyncd

[root@songqi ~]# systemctl enable rsync
问题5.直接忽略
问题6.更改密码
[root@songqi ~]# openssl passwd - -salt "" ""

$$$7mft0jKnzzvAdU4t0unTG1
把新生成的密码填写进 /etc/cobbler/setting,也就是 $ 后面的加密数据
default_password_crypted: "$1$123$7mft0jKnzzvAdU4t0unTG1"
问题7.同样忽略
第六步、重启服务并检查
[root@songqi ~]# systemctl restart cobblerd

[root@songqi ~]# cobbler sync
Created symlink from /etc/systemd/system/multi-user.target.wants/rsyncd.service to /usr/lib/systemd/system/rsyncd.service.

[root@songqi ~]# cobbler check

The following are potential configuration items that you may want to fix:

 : Some network boot-loaders are missing from /var/lib/cobbler/loaders, you may run 'cobbler get-loaders' to download them, or,
 if you only want to handle x86/x86_64 netbooting, you may ensure that you have installed a *recent* version of the syslinux
package installed and can ignore this message entirely.  Files in this directory, should you want to support all architectures,
should include pxelinux., menu.c32, elilo.efi, and yaboot. The 'cobbler get-loaders' command is the easiest way to resolve these
 requirements.

 : debmirror package is not installed, it will be required to manage debian deployments and repositories

 : fencing tools were not found, and are required to use the (optional) power management features. install cman or fence-agents
to use them

Restart cobblerd and then run 'cobbler sync' to apply changes.
更改完毕
补充:如果出现 selinux enable 错误提示,关闭防火墙仍无效果时可重启系统便可解决
第七步、挂载光盘并进行数据导入
1.挂载光盘
[root@songqi ~]# mount /dev/cdrom /mnt
2.导入数据(耐心等待)
[root@songqi ~]# cobbler import --path=/mnt --name="centos7.5"

task started: --13_001927_import

task started (id=Media import, time=Wed Mar  :: )
distro : 发行版, 就是我们安装什么版本的linux操作系统的名称 一会我们会导入一个 distro.
profile : 类似于一个 配置文件,类似于你的 bash_profile, 里面包含你可以添加 kernel 参数,对应的kickstart 文件 以及 此profile 对应的 distro 等等.
查看distro
[root@songqi ~]# cobbler distro list

centos7.-x86_64
查看profile
[root@songqi ~]# cobbler profile list

centos7.-x86_64
第八步、准备kickstart
在root目录下找到ks文件,并移动到/var/lib/cobbler/kickstarts/到目录下改名为ks.cfg
[root@songqi ~]# mv anaconda-ks.cfg /var/lib/cobbler/kickstarts/ks.cfg

[root@songqi ~]# vim /var/lib/cobbler/kickstarts/ks.cfg

[root@songqi ~]# cat /var/lib/cobbler/kickstarts/ks.cfg

#version=DEVEL

# System authorization information

auth --enableshadow --passalgo=sha512

# Use CDROM installation media

url --url=http://192.168.182.128/cobbler/ks_mirror/centos7.5/  #这里需要更改为repodata所在的http地址

# Use graphical install

graphical

# Run the Setup Agent on first boot

firstboot --enable

ignoredisk --only-use=sda

# Keyboard layouts

keyboard --vckeymap=us --xlayouts='us'

# System language

lang en_US.UTF-

# Network information

network  --bootproto=dhcp --device=ens33 --ipv6=auto --no-activate

network  --hostname=localhost.localdomain

# Root password

rootpw --iscrypted $$7zu1wIUDgBGEFV1Y$KsLVeaGmyN92.QHr1fqKdTqPu8PDmd8K9V/s3Ru8NxE53NZz4gQKsmP6K0udcXVvDtponekICYUwBD7tYZJqU/

# System services

services --disabled="chronyd"

# System timezone

timezone Asia/Shanghai --isUtc --nontp

# System bootloader configuration

bootloader --location=mbr --boot-drive=sda

autopart --type=lvm

# Partition clearing information

clearpart --none --initlabel

%packages

@^minimal

@core

%end

%addon com_redhat_kdump --disable --reserve-mb='auto'

%end

%anaconda

pwpolicy root --minlen= --minquality= --notstrict --nochanges --notempty

pwpolicy user --minlen= --minquality= --notstrict --nochanges --emptyok

pwpolicy luks --minlen= --minquality= --notstrict --nochanges --notempty

%end
第九步、自定义profile
[root@songqi ~]#  cobbler profile add --distro=centos7.-x86_64
--name=centos7.5_songqi --kickstart=/var/lib/cobbler/kickstarts/ks.cfg

[root@songqi ~]# cobbler sync

task started: --13_002724_sync
第十步、查看删除
查看profile
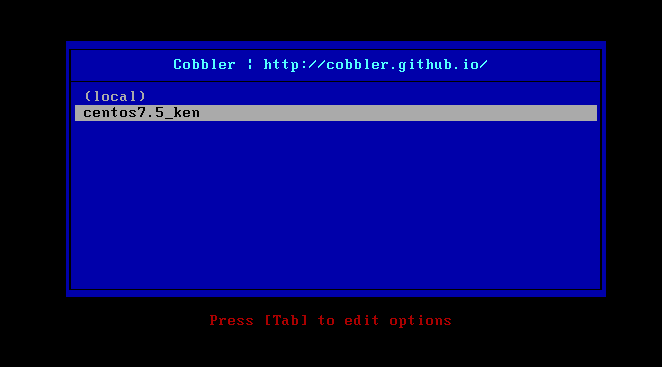
[root@ken ~]# cobbler profile list

   centos7.-x86_64

   centos7.5_ken
删除原有profile
[root@ken ~]# cobbler profile remove --name=centos7.5-x86_64

[root@ken ~]# cobbler profile list

   centos7.5_ken
cobbler自动化安装测试
新建一个虚拟机,需要和cobbler服务器所在同一个虚拟网络中即与我们上面设置的cobbler服务器的主机模式。内存需要3个G以上。

选择第我们自定义的包即可进行自动化安装。

基于Centos7系统部署cobbler批量安装系统的更多相关文章
- 基于CentOS7系统部署cobbler批量安装系统(week3_day5_part1)-技术流ken
前言 cobbler是一个可以实现批量安装系统的Linux应用程序.它有别于pxe+kickstart,cobbler可以实现同个服务器批量安装不同操作系统版本. 系统环境准备及其下载cobbler ...
- 末学者笔记--Centos7系统部署cobbler批量安装系统
[前言]: cobbler是一个可以实现批量安装系统的Linux应用程序.它有别于pxe+kickstart,cobbler可以实现同个服务器批量安装不同操作系统版本. 系统环境准备及其下载cob ...
- 006-(成功环境记录)基于Centos7系统部署cobbler批量安装系统
1.1 cobbler简介 Cobbler是一个Linux服务器安装的服务,可以通过网络启动(PXE)的方式来快速安装.重装物理服务器和虚拟机,同时还可以管理DHCP,DNS等. Cobbler可以使 ...
- centos7系统部署cobbler批量安装系统
系统环境: 一.开启两个网卡.一个仅主机模式,一个桥接模式,主机模式对内提供cobbler服务 [root@localhost ~]# ip a 1: lo: <LOOPBACK,UP,LOWE ...
- cobbler批量安装系统
cobbler是一个可以实现批量安装系统的Linux应用程序.它有别于pxe+kickstart,cobbler可以实现同个服务器批量安装不同操作系统版本. 1.系统环境准备及其下载cobbler 1 ...
- cobbler批量安装系统使用详解-技术流ken
前言 cobbler是一个可以实现批量安装系统的Linux应用程序.它有别于pxe+kickstart,cobbler可以实现同个服务器批量安装不同操作系统版本. 系统环境准备及其下载cobbler ...
- cobbler一键批量安装系统
cobbler是一个可以实现批量安装系统的Linux应用程序.它有别于pxe+kickstart,cobbler可以实现同个服务器批量安装不同操作系统版本. 一.系统环境准备及其下载cobbler 1 ...
- 其他综合-Cobbler无人值守安装系统 CentOS 7
Cobbler 无人值守安装系统 CentOS 7 1.实验描述 1.1 概述 作为运维,在公司经常遇到一些机械性重复工作要做,例如:为新机器装系统,一台两台机器装系统,可以用光盘.U盘等介质安装,1 ...
- cobbler自动化安装系统
笔者Q:972581034 交流群:605799367.有任何疑问可与笔者或加群交流 在很久很久以前,使用kickstart实现自动化安装的时候,我一直认为装系统是多么高大上的活,直到cobbler的 ...
随机推荐
- Windows server 2008系统各类版本的优缺点比较,Windows2008系统标准版 企业版 数据中心版 WEB版等
大家都知道Windows Server 2008 发行了多种版本,以支持各种规模的企业对服务器不断变化的需求.Windows Server 2008 有 5 种不同版本,另外还有三个不支持 Windo ...
- Hypver-V中的快照
应用快照选项的区别: 获取并应用快照:对虚拟机当前的状态进行快照,然后恢复到所选的快照状态 应用:不保存当前虚拟机的状态,直接将其恢复到所选的快照状态
- Java学习---常见的模式
Java的常见模式 适配器模式 package com.huawei; import java.io.BufferedReader; import java.io.IOException; impor ...
- php中上传图片
这里来看看php中如何上传图片的 先看代码check_image.php <html> <head> <title></title> <style ...
- vue实现点击目标元素外页面的其他地方隐藏弹窗。
方法: 步骤1:给页面最外出的元素div加点击事件:@click=“popShow = false”. 步骤2:给点击目标元素加点击事件:@click=“popShow = true”. 备注:pop ...
- JavaScript的DOM_操作行内样式
一.检测浏览器是否支持css CSS 作为(X)HTML 的辅助,可以增强页面的显示效果.但不是每个浏览器都能支持最新的 CSS 能力.CSS 的能力和 DOM 级别密切相关,所以我们有必要检测当前浏 ...
- BZOJ 1192 鬼谷子的钱袋 找规律
题目链接: https://www.lydsy.com/JudgeOnline/problem.php?id=1192 题目大意: 鬼谷子非常聪明,正因为这样,他非常繁忙,经常有各诸侯车的特派员前来向 ...
- BZOJ2599:[IOI2011]Race(点分治)
Description 给一棵树,每条边有权.求一条简单路径,权值和等于K,且边的数量最小.N <= 200000, K <= 1000000 Input 第一行 两个整数 n, k 第二 ...
- 1. Docker基础命令
本文简要介绍Docker的基础命令,目的在于快速入门Dokcer,Docker的完整命令可以参考Docker官方手册. 0. 安装Docker Docker当前分为企业版(Docker Enterpr ...
- Python 多线程 进程与线程相关概念 (一)
0x00 并行和并发 并行:同时做某些事,可以互不干扰的同一时刻做几件事. 并发:也是同时做某些事,但是强调,同一时刻做了几件事. 0x01 并发的解决: 1)队列.缓冲区: 排队就是队列,先进先出. ...