cobbler批量安装系统
cobbler是一个可以实现批量安装系统的Linux应用程序。它有别于pxe+kickstart,cobbler可以实现同个服务器批量安装不同操作系统版本。
1.系统环境准备及其下载cobbler
1)系统环境
添加两块网卡
[root@localhost ~]# ip a
1: lo: <LOOPBACK,UP,LOWER_UP> mtu 65536 qdisc noqueue state UNKNOWN group default qlen 1000
link/loopback 00:00:00:00:00:00 brd 00:00:00:00:00:00
inet 127.0.0.1/8 scope host lo
valid_lft forever preferred_lft forever
inet6 ::1/128 scope host
valid_lft forever preferred_lft forever
2: ens33: <BROADCAST,MULTICAST,UP,LOWER_UP> mtu 1500 qdisc pfifo_fast state UP group default qlen 1000
link/ether 00:0c:29:9d:ab:96 brd ff:ff:ff:ff:ff:ff
inet 192.168.88.5/24 brd 192.168.88.255 scope global noprefixroute ens33
valid_lft forever preferred_lft forever
inet6 fe80::20c:29ff:fe9d:ab96/64 scope link
valid_lft forever preferred_lft forever
3: ens37: <BROADCAST,MULTICAST,UP,LOWER_UP> mtu 1500 qdisc pfifo_fast state UP group default qlen 1000
link/ether 00:0c:29:9d:ab:a0 brd ff:ff:ff:ff:ff:ff
inet 192.168.5.82/24 brd 192.168.5.255 scope global noprefixroute dynamic ens37
valid_lft 6545sec preferred_lft 6545sec
inet6 fe80::fef6:e669:b63e:b381/64 scope link noprefixroute
valid_lft forever preferred_lft forever
2)关闭安全服务
[root@localhost ~]# setenforce 0
[root@localhost ~]# systemctl stop firewalld
3) 下载cobbler及其所需服务程序
yum安装cobbler需要使用下面两个源,大家可以复制下面的代码到自己的yum仓库保存即可
[epel]
name=epel
enabled=1
gpgcheck=0
baseurl=https://mirrors.aliyun.com/epel/7/x86_64/
[centos]
name=centos base
enabled=1
gpgcheck=0
baseurl=http://mirrors.163.com/centos/7/os/x86_64/
[root@localhost yum.repos.d]# yum install cobbler dhcp tftp-server xinetd syslinux httpd -y
2.配置相关服务
第一步:配置DHCP服务
[root@localhost yum.repos.d]# vim /etc/dhcp/dhcpd.conf
subnet 192.168.5.0 netmask 255.255.255.0 {
range 192.168.5.10 192.168.168.5.60;
default-lease-time 600;
max-lease-time 7200;
filename "pxelinux.0";
}
[root@localhost yum.repos.d]# systemctl restart dhcpd
第二步:配置tftp
[root@localhost yum.repos.d]# vim /etc/xinetd.d/tftp
# default: off
# description: The tftp server serves files using the trivial file transfer \
# protocol. The tftp protocol is often used to boot diskless \
# workstations, download configuration files to network-aware printers, \
# and to start the installation process for some operating systems.
service tftp
{
socket_type = dgram
protocol = udp
wait = yes
user = root
server = /usr/sbin/in.tftpd
server_args = -s /var/lib/tftpboot
disable = no #yes改为no
per_source = 11
cps = 100 2
flags = IPv4
}
[root@localhost yum.repos.d]# systemctl restart xinetd
[root@localhost yum.repos.d]# systemctl restart xinetd
第三步:启动httpd,cobbler
[root@localhost yum.repos.d]# systemctl restart httpd
[root@localhost yum.repos.d]# systemctl restart cobblerd
第四步:检查cobbler配置
[root@localhost yum.repos.d]# cobbler check
1 : The 'server' field in /etc/cobbler/settings must be set to something other than localhost, or kickstarting features will not work. This should be a resolvable hostname or IP for the boot server as reachable by all machines that will use it.
2 : For PXE to be functional, the 'next_server' field in /etc/cobbler/settings must be set to something other than 127.0.0.1, and should match the IP of the boot server on the PXE network.
3 : SELinux is enabled. Please review the following wiki page for details on ensuring cobbler works correctly in your SELinux environment:
https://github.com/cobbler/cobbler/wiki/Selinux
4 : Some network boot-loaders are missing from /var/lib/cobbler/loaders, you may run 'cobbler get-loaders' to download them, or, if you only want to handle x86/x86_64 netbooting, you may ensure that you have installed a *recent* version of the syslinux package installed and can ignore this message entirely. Files in this directory, should you want to support all architectures, should include pxelinux.0, menu.c32, elilo.efi, and yaboot. The 'cobbler get-loaders' command is the easiest way to resolve these requirements.
5 : enable and start rsyncd.service with systemctl
6 : debmirror package is not installed, it will be required to manage debian deployments and repositories
7 : ksvalidator was not found, install pykickstart
8 : The default password used by the sample templates for newly installed machines (default_password_crypted in /etc/cobbler/settings) is still set to 'cobbler' and should be changed, try: "openssl passwd -1 -salt 'random-phrase-here' 'your-password-here'" to generate new one
9 : fencing tools were not found, and are required to use the (optional) power management features. install cman or fence-agents to use them
修改配置文件/etc/cobbler/settings
问题1
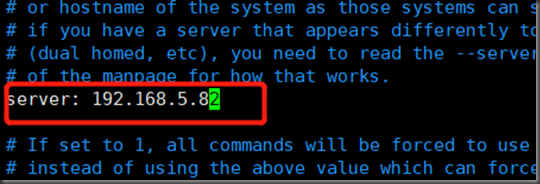
cobbler文件默认是127.0.0.1本地回环地址,需要更改为提供cobbler服务的ip地址 192.168.5.82,在384行
问题2
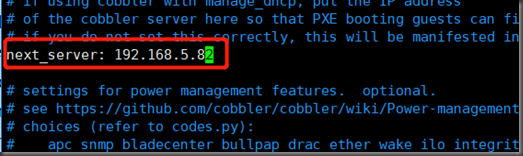
netx_server也是默认本地127.0.0.1回环地址,需要修改为提供cobbler服务的ip地址 192.163.182,128,在272行出
问题3
关闭防火墙,重启虚拟机
问题4:可以忽略
问题5
[root@localhost yum.repos.d]# systemctl restart rsyncd
[root@localhost yum.repos.d]# systemctl enable rsyncd
Created symlink from /etc/systemd/system/multi-user.target.wants/rsyncd.service to /usr/lib/systemd/system/rsyncd.service.
问题6可以忽略
问题7可以忽略pykickstart可以下载,不下载也可以
问题8
[root@localhost yum.repos.d]# openssl passwd -1 -salt '123' '123456'
$1$123$nE5gIYTYiF1PIXVOFjQaW/
123是随机数,123456是设置的密码
[root@localhost yum.repos.d]# vim /etc/cobbler/settings

将生成的密码粘贴过来
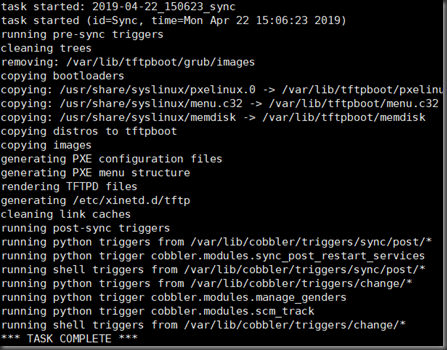
以上问题解决之后,需要同步和重启
[root@localhost yum.repos.d]# systemctl restart cobblerd
[root@localhost yum.repos.d]# cobbler check
[root@localhost yum.repos.d]# cobbler sync
第五步:挂载光盘并进行数据导入
[root@localhost yum.repos.d]# mount /dev/cdrom /mnt
mount: /dev/sr0 写保护,将以只读方式挂载
mount: /dev/sr0 已经挂载或 /mnt 忙
/dev/sr0 已经挂载到 /mnt 上
数据导入(需要一些时间)
[root@localhost yum.repos.d]# cobbler import --path="/mnt" --name="centos7.5"

查看distro
[root@localhost yum.repos.d]# cobbler distro list
centos7.5-x86_64
[root@localhost ~]# ls
anaconda-ks.cfg
[root@localhost ~]# cp anaconda-ks.cfg /var/lib/cobbler/kickstarts/ks.cfg
[root@localhost ~]# vim /var/lib/cobbler/kickstarts/ks.cfg


IP为桥接的ip
第六步:自定义profile
[root@localhost ~]# cobbler profile add --kickstart="/var/lib/cobbler/kickstarts/ks.cfg" --distro="centos7.5-x86_64" --name="centos7.5_ken"/
[root@localhost ~]# cobbler profile list
centos7.5-x86_64
centos7.5_ken
第七步:删除不包含ks文件的profile
[root@localhost ~]# cobbler profile remove --name='centos7.5-x86_64'
[root@localhost ~]# cobbler profile list
centos7.5_ken
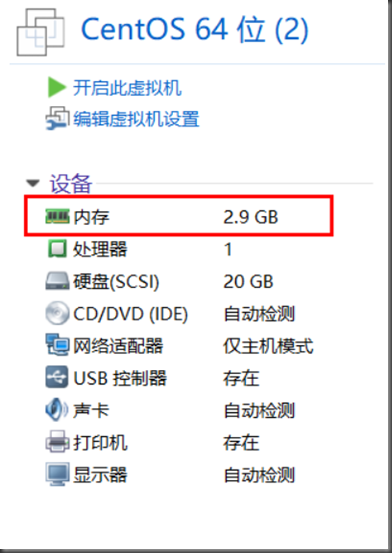
3.cobbler自动化安装测试
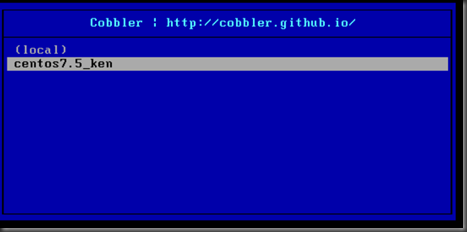
新建一个虚拟机,内存需要3G以上
选择第我们自定义的包即可进行自动化安装。
cobbler批量安装系统的更多相关文章
- 基于CentOS7系统部署cobbler批量安装系统(week3_day5_part1)-技术流ken
前言 cobbler是一个可以实现批量安装系统的Linux应用程序.它有别于pxe+kickstart,cobbler可以实现同个服务器批量安装不同操作系统版本. 系统环境准备及其下载cobbler ...
- 末学者笔记--Centos7系统部署cobbler批量安装系统
[前言]: cobbler是一个可以实现批量安装系统的Linux应用程序.它有别于pxe+kickstart,cobbler可以实现同个服务器批量安装不同操作系统版本. 系统环境准备及其下载cob ...
- cobbler批量安装系统使用详解-技术流ken
前言 cobbler是一个可以实现批量安装系统的Linux应用程序.它有别于pxe+kickstart,cobbler可以实现同个服务器批量安装不同操作系统版本. 系统环境准备及其下载cobbler ...
- 基于Centos7系统部署cobbler批量安装系统
前言 cobbler是一个可以实现批量安装系统的Linux应用程序.它有别于pxe+kickstart,cobbler可以实现同个服务器批量安装不同操作系统版本 系统环境的准备及下载cobbler 一 ...
- 006-(成功环境记录)基于Centos7系统部署cobbler批量安装系统
1.1 cobbler简介 Cobbler是一个Linux服务器安装的服务,可以通过网络启动(PXE)的方式来快速安装.重装物理服务器和虚拟机,同时还可以管理DHCP,DNS等. Cobbler可以使 ...
- centos7系统部署cobbler批量安装系统
系统环境: 一.开启两个网卡.一个仅主机模式,一个桥接模式,主机模式对内提供cobbler服务 [root@localhost ~]# ip a 1: lo: <LOOPBACK,UP,LOWE ...
- cobbler一键批量安装系统
cobbler是一个可以实现批量安装系统的Linux应用程序.它有别于pxe+kickstart,cobbler可以实现同个服务器批量安装不同操作系统版本. 一.系统环境准备及其下载cobbler 1 ...
- cobbler自动化安装系统
笔者Q:972581034 交流群:605799367.有任何疑问可与笔者或加群交流 在很久很久以前,使用kickstart实现自动化安装的时候,我一直认为装系统是多么高大上的活,直到cobbler的 ...
- 一键cobbler批量安装脚本
前几天机房上架180台服务器,太多了,使用了cobbler批量安装,具体的看我上代码,我把配置cobbler的命令给堆积起来,也算是个脚本吧,欢迎拍砖指正,下面我上脚本: #!/bin/bash # ...
随机推荐
- 一、Core基于MVC的全局过滤器验证
一.Core基于MVC的过滤器验证 1.添加一个过滤器.在Startup 中ConfigureServices方法里添加一个Filters 即我们自己授权代码类. public void Config ...
- Ubuntu18.04 安装netstat
关键命令 sudo apt-get install net-tools 参考博客:https://www.cnblogs.com/2sheep2simple/p/10611650.html
- 01Java经典问题
1.利用Dos输出hello world 建立一个Test.java文件,放在e盘: public class Test{ public static void main(String[] args) ...
- (转) Linux权限管理(基本权限、默认权限)
一.文件基本权限 1-1.基本权限的修改 -rw-r--r-- - 第一个"-"表示文件类型(- 文件,d 目录,l 软链接文件) - rw- r-- ...
- (转) weblogic 域,管理服务器,受管服务器,集群和机器的基本知识
weblogic 域,管理服务器,受管服务器,集群和机器的基本知识 1.域(Domain) •它是什么? –是一个逻辑上管理的WebLogic Server组,这些组从管理上当作一个整体来操作 •域里 ...
- 最简单的Android项目
这是我在windows环境下,试验过的最简单Android项目,只用记事本和命令行即可完成. 环境准备 开发环境需要Java SDK(官网下载),Android SDK(官网下载). 首先安装Java ...
- Ubuntu启动器创建
Ubuntu 启动器创建 启动器的本质是一个后缀为.desktop的文件,文件内容如下(这里为我创建的Chrome启动器) [Desktop Entry] Encoding=UTF- Name=Chr ...
- thinkphp5杂谈--项目架构和模板搭建(view视角)
nginx网站配置 项目架构 项目文件夹 视图模板 一种出幺蛾子的访问办法 访问相关特色模块并渲染视图
- c++ copy和operator =
目录(?)[+] 构造函数 拷贝构造函数 赋值函数 C++中一般创建对象,拷贝或赋值的方式有构造函数,拷贝构造函数,赋值函数这三种方法.下面就详细比较下三者之间的区别以及它们的具体实现 1.构造函 ...
- H5 网站支付宝支付(前端部分)包含微信浏览器中的处理方法。
手机网站唤起支付宝支付: H5 网站实现支付宝支付是一个很常见的需求: 实现方式主要是在后台配置和预支付, 前端需要做的就是唤起 支付宝App 然后就可以输入密码支付. 这个其实难度很低, 主要就是在 ...