
SpringCloud-创建服务消费者-Ribbon方式(附代码下载)
场景
SpringCloud-服务注册与实现-Eureka创建服务注册中心(附源码下载):
https://blog.csdn.net/BADAO_LIUMANG_QIZHI/article/details/102535957
SpringCloud-服务注册与实现-Eureka创建服务提供者(附源码下载):
https://blog.csdn.net/BADAO_LIUMANG_QIZHI/article/details/102558004
在上面已经实现服务注册中心和服务提供者的基础上,再创建服务消费者,即使用上面提供服务的一方。
注:
博客:
https://blog.csdn.net/badao_liumang_qizhi
关注公众号
霸道的程序猿
获取编程相关电子书、教程推送与免费下载。
实现
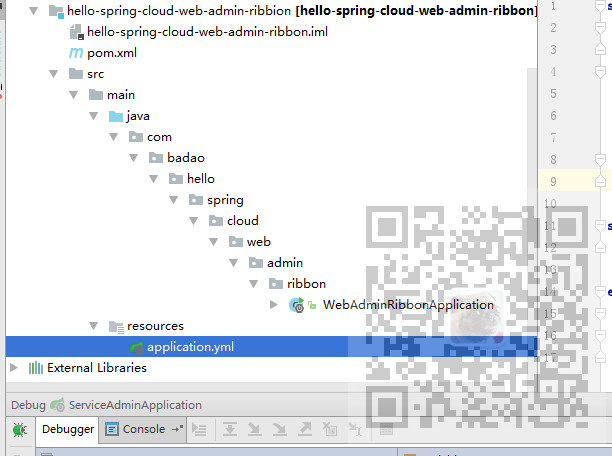
参考上面构建项目的方式,依次建立目录hello-spring-cloud-web-admin-ribbon目录以及在
目录下新建pom.xml,并将其托管。然后新建src/main/java目录和src/main/resources目录并分别进行目录设置。
然后在java下新建包,包下新建启动类,在resources下新建配置文件application.yml。
完成后的目录为:
pom.xml代码:
<?xml version="1.0" encoding="UTF-8"?>

<project xmlns="http://maven.apache.org/POM/4.0.0" xmlns:xsi="http://www.w3.org/2001/XMLSchema-instance"

         xsi:schemaLocation="http://maven.apache.org/POM/4.0.0 http://maven.apache.org/xsd/maven-4.0.0.xsd">

    <modelVersion>4.0.</modelVersion>

    <parent>

        <groupId>com.badao</groupId>

        <artifactId>hello-spring-cloud-dependencies</artifactId>

        <version>1.0.-SNAPSHOT</version>

        <relativePath>../hello-spring-cloud-dependencies/pom.xml</relativePath>

    </parent>

    <artifactId>hello-spring-cloud-web-admin-ribbon</artifactId>

    <packaging>jar</packaging>

    <name>hello-spring-cloud-web-admin-ribbon</name>

    <url>https://blog.csdn.net/badao_liumang_qizhi</url>

    <inceptionYear>-Now</inceptionYear>

    <dependencies>

        <!-- Spring Boot Begin -->

        <dependency>

            <groupId>org.springframework.boot</groupId>

            <artifactId>spring-boot-starter-web</artifactId>

        </dependency>

        <dependency>

            <groupId>org.springframework.boot</groupId>

            <artifactId>spring-boot-starter-tomcat</artifactId>

        </dependency>

        <dependency>

            <groupId>org.springframework.boot</groupId>

            <artifactId>spring-boot-starter-thymeleaf</artifactId>

        </dependency>

        <dependency>

            <groupId>org.springframework.boot</groupId>

            <artifactId>spring-boot-starter-actuator</artifactId>

        </dependency>

        <dependency>

            <groupId>org.springframework.boot</groupId>

            <artifactId>spring-boot-starter-test</artifactId>

            <scope>test</scope>

        </dependency>

        <!-- Spring Boot End -->

        <!-- Spring Cloud Begin -->

        <dependency>

            <groupId>org.springframework.cloud</groupId>

            <artifactId>spring-cloud-starter-netflix-eureka-server</artifactId>

        </dependency>

        <dependency>

            <groupId>org.springframework.cloud</groupId>

            <artifactId>spring-cloud-starter-netflix-ribbon</artifactId>

        </dependency>

        <!-- Spring Cloud End -->

        <!-- 解决 thymeleaf 模板引擎一定要执行严格的 html5 格式校验问题 -->

        <dependency>

            <groupId>net.sourceforge.nekohtml</groupId>

            <artifactId>nekohtml</artifactId>

        </dependency>

    </dependencies>

    <build>

        <plugins>

            <plugin>

                <groupId>org.springframework.boot</groupId>

                <artifactId>spring-boot-maven-plugin</artifactId>

                <configuration>

                    <mainClass>com.funtl.hello.spring.cloud.web.admin.ribbon.WebAdminRibbonApplication</mainClass>

                </configuration>

            </plugin>

        </plugins>

    </build>

</project>
注:
这里的parent标签要与上面的统一的依赖管理对应起来。
要修改指定的程序入口类为自己相应的路径。
然后应用启动类的代码:
package com.badao.hello.spring.cloud.web.admin.ribbon;

import org.springframework.boot.SpringApplication;

import org.springframework.boot.autoconfigure.SpringBootApplication;

import org.springframework.cloud.client.discovery.EnableDiscoveryClient;

@SpringBootApplication

@EnableDiscoveryClient

public class WebAdminRibbonApplication {

    public static void main(String[] args) {

        SpringApplication.run(WebAdminRibbonApplication.class, args);

    }

}
注:
通过 @EnableDiscoveryClient 注解注册到服务中心
然后是配置文件代码:
spring:

  application:

    name: hello-spring-cloud-web-admin-ribbon

  thymeleaf:

    cache: false

    mode: LEGACYHTML5

    encoding: UTF-

    servlet:

      content-type: text/html

server:

  port:

eureka:

  client:

    serviceUrl:

      defaultZone: http://localhost:8761/eureka/
注:
1.服务注册与发现是根据上面的name去寻找。
2.port表示端口号。
3.serviceURL设置eureka的地址,与上面创建服务注册中心时的URL对应。
然后新建配置类注入RestTemplte的Bean并通过@LoadBalanced
注解表明开启负载均衡功能。
在包下新建config包并新建RestTemplateConfiguration配置类
package com.badao.hello.spring.cloud.web.admin.ribbon.config;

import org.springframework.cloud.client.loadbalancer.LoadBalanced;

import org.springframework.context.annotation.Bean;

import org.springframework.context.annotation.Configuration;

import org.springframework.web.client.RestTemplate;

@Configuration

public class RestTemplateConfiguration {

    @Bean

    @LoadBalanced

    public RestTemplate restTemplate() {

        return new RestTemplate();

    }

}

为了体现出负载均衡效果,我们要启动两台service-admin,即启动两个服务提供者。
我们先启动服务注册中心Eureka服务8761端口,再以8762端口启动一个服务提供者,然后点击Run-Edit Configuration,将启动单实例去掉。

然后修改服务提供者的配置文件中端口号为8763,再启动一个服务提供者。
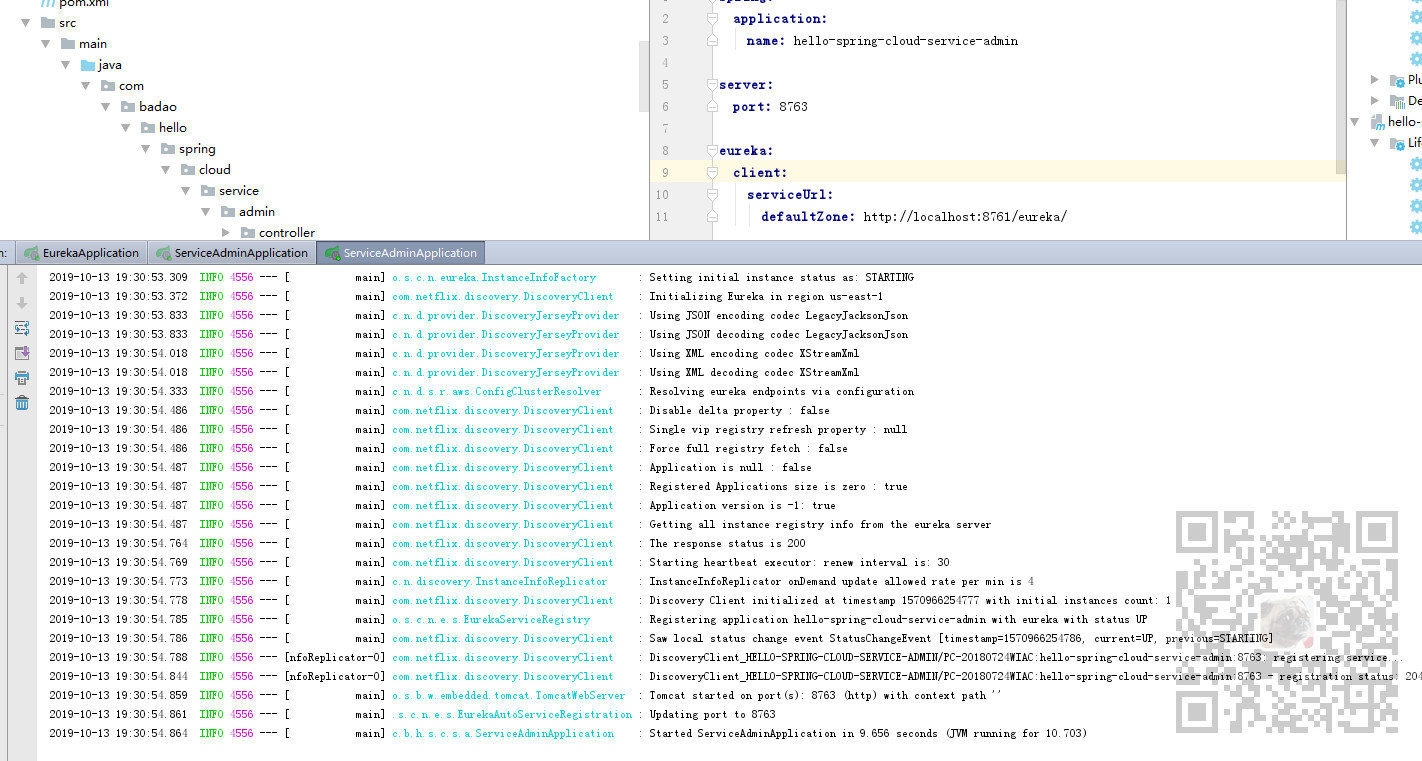
然后我们在Eureka的界面即:http://localhost:8761/刷新就可以看到两个服务提供者。

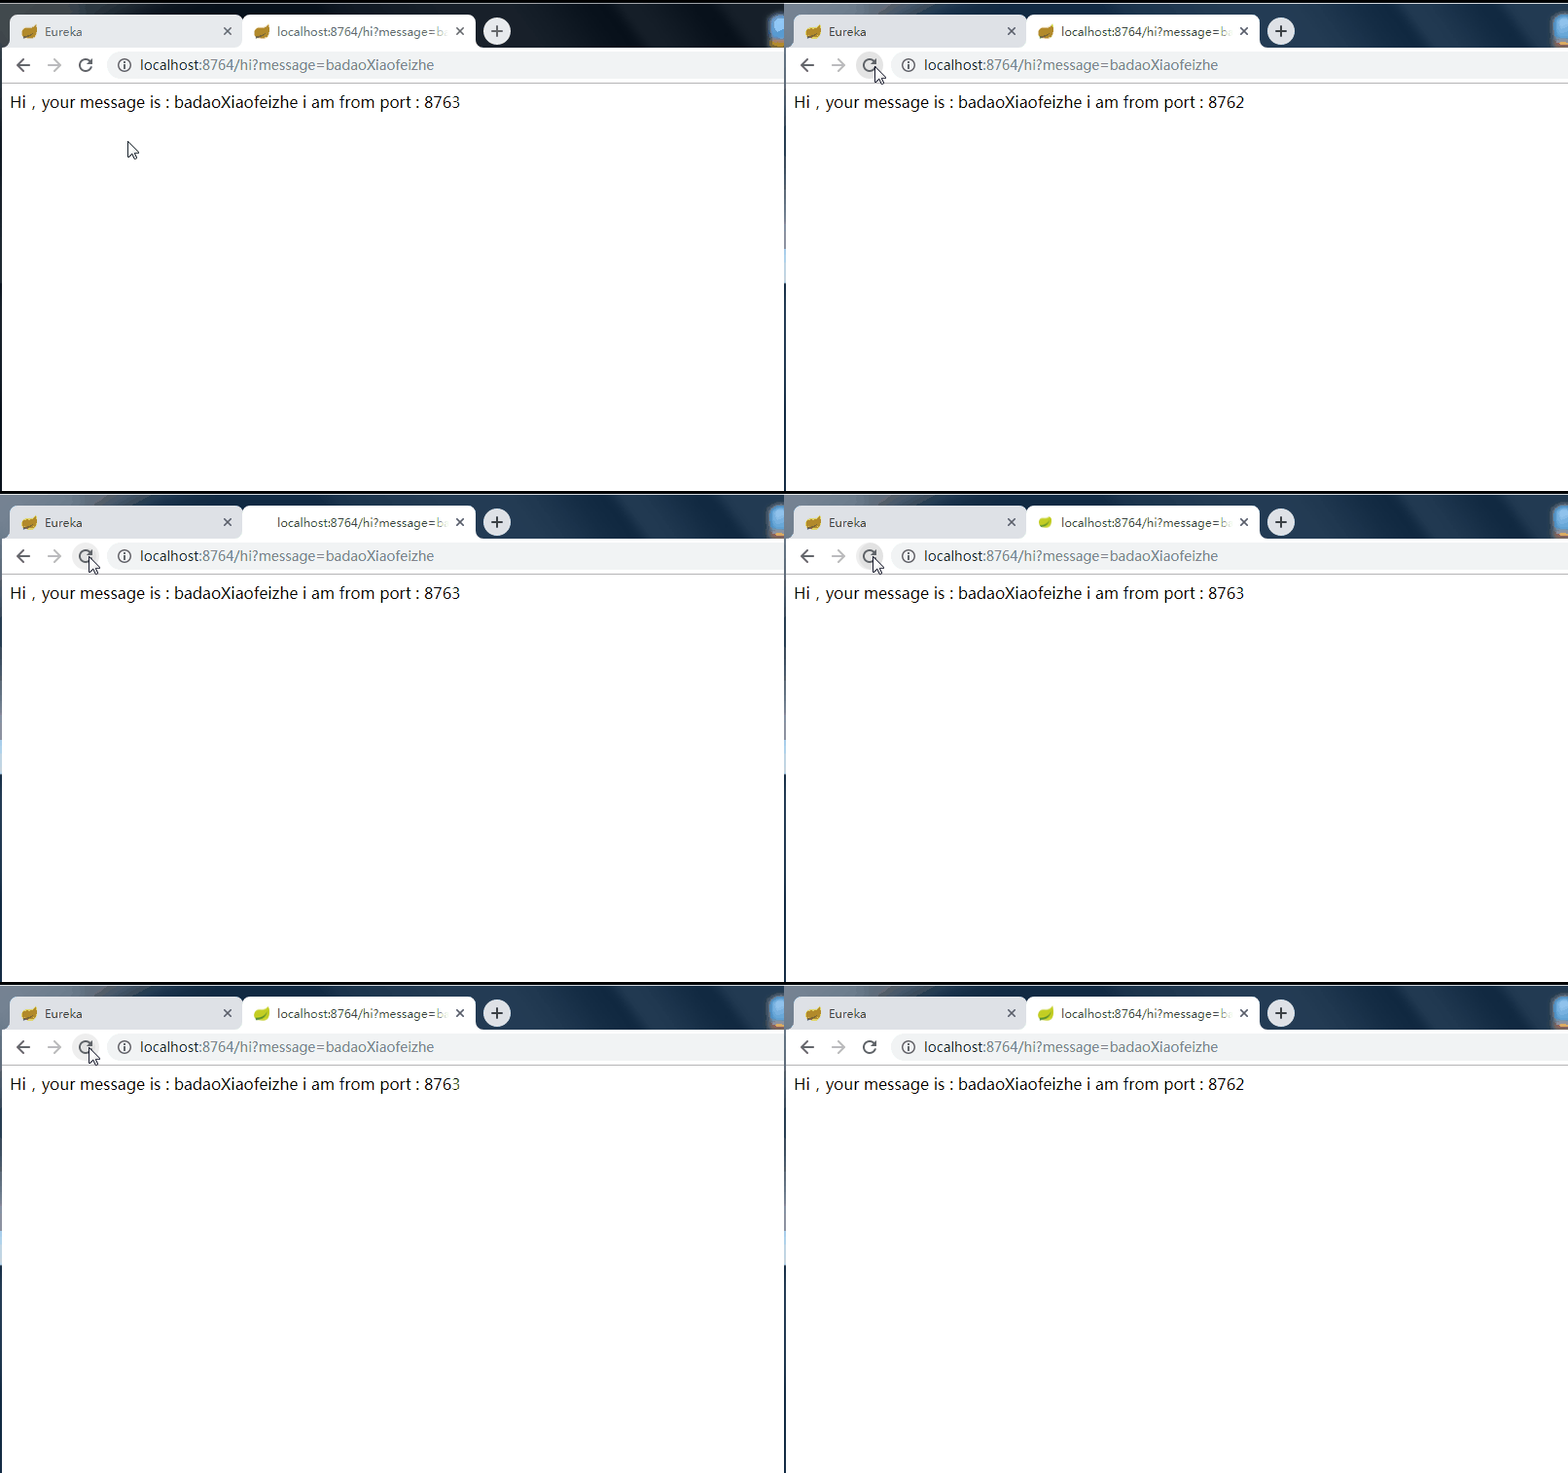
消费者要想实现负载均衡的效果,应该一会访问8762的服务提供者,一会访问8763的服务提供者。
所以我们在服务消费者配置了@LoadBalanced即可实现。
既然是消费服务者,所以要新建调用服务的controller和service
在ribbon包下新建service包,包下新建AdminService
package com.badao.hello.spring.cloud.web.admin.ribbon.service;

import org.springframework.beans.factory.annotation.Autowired;

import org.springframework.stereotype.Service;

import org.springframework.web.client.RestTemplate;

@Service

public class AdminService {

    @Autowired

    private RestTemplate restTemplate;

    public String sayHi(String message) {

        return restTemplate.getForObject("http://HELLO-SPRING-CLOUD-SERVICE-ADMIN/hi?message=" + message, String.class);

    }

}
这里使用的是Ribbon+RestTemlate进行服务的调用,使用RestTeplate的getForObject()方法。其中url参数就是
上面服务提供者的配置文件中的name。
然后再新建controller包,包下新建AdminController
package com.badao.hello.spring.cloud.web.admin.ribbon.controller;

import com.badao.hello.spring.cloud.web.admin.ribbon.service.AdminService;

import org.springframework.beans.factory.annotation.Autowired;

import org.springframework.web.bind.annotation.RequestMapping;

import org.springframework.web.bind.annotation.RequestMethod;

import org.springframework.web.bind.annotation.RequestParam;

import org.springframework.web.bind.annotation.RestController;

@RestController

public class AdminController {

    @Autowired

    private AdminService adminService;

    @RequestMapping(value = "hi", method = RequestMethod.GET)

    public String sayHi(@RequestParam String message) {

        return adminService.sayHi(message);

    }

}
然后运行当前服务消费者的启动程序。
打开浏览器输入:
http://localhost:8764/hi?message=badaoXiaofeizhe
代码下载
https://download.csdn.net/download/badao_liumang_qizhi/11860102
此时的架构
一个服务注册中心,Eureka Server,端口号为:8761
service-admin 工程运行了两个实例,端口号分别为:8762,8763
web-admin-ribbon 工程端口号为:8764
web-admin-ribbon 通过 RestTemplate 调用 service-admin
接口时因为启用了负载均衡功能故会轮流调用它的 8762 和 8763 端口
SpringCloud-创建服务消费者-Ribbon方式(附代码下载)的更多相关文章
- SpringCloud-创建服务消费者-Feign方式(附代码下载)
场景 SpringCloud-服务注册与实现-Eureka创建服务注册中心(附源码下载): https://blog.csdn.net/BADAO_LIUMANG_QIZHI/article/deta ...
- SpringCloud-使用熔断器防止服务雪崩-Ribbon和Feign方式(附代码下载)
场景 SpringCloud-服务注册与实现-Eureka创建服务注册中心(附源码下载): https://blog.csdn.net/BADAO_LIUMANG_QIZHI/article/deta ...
- 创建服务消费者(Ribbon)
概述 在微服务架构中,业务都会被拆分成一个独立的服务,服务与服务的通讯是基于 http restful 的.Spring cloud 有两种服务调用方式,一种是 ribbon + restTempla ...
- 从实例一步一步入门学习SpringCloud的Eureka、Ribbon、Feign、熔断器、Zuul的简单使用(附代码下载)
场景 SpringCloud -创建统一的依赖管理: https://blog.csdn.net/BADAO_LIUMANG_QIZHI/article/details/102530574 Sprin ...
- springcloud-Netflix创建服务消费者
目录 springcloud-Netflix创建服务消费者 Ribbon 创建服务消费者-Ribbon方式 ribbon的架构 Feign 创建包和基本项目结构 创建Feign访问服务的接口和访问co ...
- Dubbo搭建HelloWorld-搭建服务提供者与服务消费者并完成远程调用(附代码下载)
场景 Dubbo简介与基本概念: https://blog.csdn.net/BADAO_LIUMANG_QIZHI/article/details/103555224 Dubbo环境搭建-ZooKe ...
- springCloud学习-服务消费者(rest+ribbon)
1.ribbon简介 spring cloud的Netflix中提供了两个组件实现软负载均衡调用:ribbon和feign. Ribbon 是一个基于 HTTP 和 TCP 客户端的负载均衡器 它可以 ...
- 创建服务消费者(Feign)
概述 Feign 是一个声明式的伪 Http 客户端,它使得写 Http 客户端变得更简单.使用 Feign,只需要创建一个接口并注解.它具有可插拔的注解特性,可使用 Feign 注解和 JAX-RS ...
- 浅淡Webservice、WSDL三种服务访问的方式(附案例)
Webservice Webservice是使应用程序以与平台和编程语言无关的方式进行相互通信技术. eg:站点提供访问的数据接口:新浪微博.淘宝. 官方解释:它是一种构建应用程序的普遍模型,可以在任 ...
随机推荐
- 图解 Spring:HTTP 请求的处理流程与机制【2】
2. HTTP 请求在 Web 容器中的处理流程 Web 容器以进程的方式在计算机上运行,我们知道进程是系统资源分配的最小单元,线程是系统任务执行的最小单元.从这个角度看,Web 容器就像是邮包收件人 ...
- day 38 高级选择器
1.高级选择器 一.高级选择器 1-后代选择器 ***** 儿子.孙子.重孙子 1. .father .wu{ color: red; } 选择父类中特定的子类 2. .father p{ #后代中间 ...
- Java工作流系统-CCBPM如何自动升级?
关键词:工作流快速开发平台 工作流流设计 业务流程管理 asp.net 开源工作流 bpm工作流系统 java工作流主流框架 自定义工作流引擎驰骋工作流引擎ccflow和jflow的升级 ...
- Android PhotoView基本功能实现
Android开发过程中,想必都使用过PhotoView来实现图片展示的功能.在最新版的sdk(android-23)有了一个原生的photoView,并且代码实现也很简单,逻辑也很清晰.我们在实际的 ...
- 侠梦说pinpoint--左侧服务地图调用量和WasOn过滤
前言 这篇文章主要是从pinpoint-web界面入手,我们的目标是弄清楚两个问题: 1. pinpoint左侧服务地图上的调用量数据是怎么查询的? 2.界面查询条件WasOnly是什么意思? 左侧服 ...
- centos6安装pxc
Percona XtraDB Cluster是一种高可用性解决方案,可帮助企业避免停机和中断. Percona XtraDB Cluster具有以下MySQL群集优势: • 具有成本效益的HA和MyS ...
- 如何重置IE浏览器
1.退出所有程序,包括 Internet Explorer.单击“开始”.在“开始搜索”框中键入 inetcpl.cpl 命令,然后按回车键打开“Inetnet 选项”对话框. 2.单击“高级”选项卡 ...
- Oracle procedure 在命令行里面执行出错
One procedure do well in SQL developer but error during exceute it under sqlplus command line: Remem ...
- 错误 找不到Xcode No such file or directory
- SpringSecurity框架下实现CSRF跨站攻击防御
一.什么是CSRF 很多朋友在学习Spring Security的时候,会将CORS(跨站资源共享)和CSRF(跨站请求伪造)弄混,以为二者是一回事.其实不是,先解释一下: CORS(跨站资源共享)是 ...