
SpringCloud-创建服务消费者-Feign方式(附代码下载)
场景
SpringCloud-服务注册与实现-Eureka创建服务注册中心(附源码下载):
https://blog.csdn.net/BADAO_LIUMANG_QIZHI/article/details/102535957
SpringCloud-服务注册与实现-Eureka创建服务提供者(附源码下载):
https://blog.csdn.net/BADAO_LIUMANG_QIZHI/article/details/102558004
SpringCloud-创建服务消费者-Ribbon方式(附代码下载):
https://blog.csdn.net/BADAO_LIUMANG_QIZHI/article/details/102558080
在上面已经实现服务注册中心、服务提供者和以Ribbon方式实现服务消费者的前提下,使用另一种Feign方式实现服务消费者。
Feign
Feign 是一个声明式的伪 Http 客户端,它使得写 Http 客户端变得更简单。使用 Feign,只需要创建一个接口并注解。它具有可插拔的注解特性,可使用 Feign 注解和 JAX-RS 注解。Feign 支持可插拔的编码器和解码器。Feign 默认集成了 Ribbon,并和 Eureka 结合,默认实现了负载均衡的效果
注:
博客:
https://blog.csdn.net/badao_liumang_qizhi
关注公众号
霸道的程序猿
获取编程相关电子书、教程推送与免费下载。
实现
参考上面构建项目的方式,依次建立目录hello-spring-cloud-web-admin-feign目录以及在
目录下新建pom.xml,并将其托管。然后新建src/main/java目录和src/main/resources目录并分别进行目录设置。
然后在java下新建包,包下新建启动类,在resources下新建配置文件application.yml。
完成后的目录为:
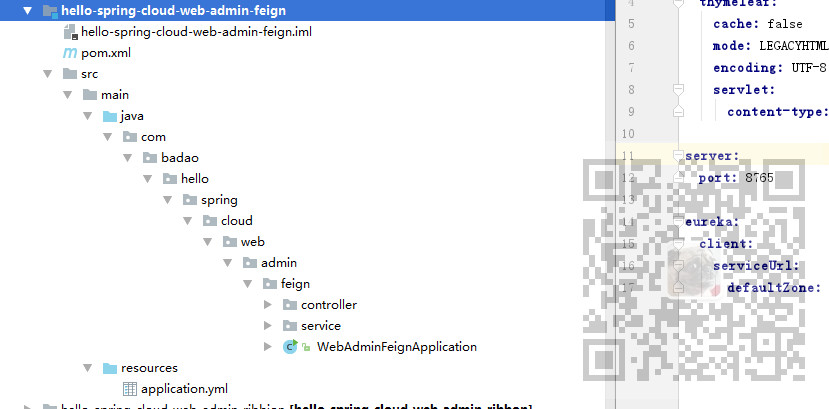
pom.xml代码:
<?xml version="1.0" encoding="UTF-8"?>

<project xmlns="http://maven.apache.org/POM/4.0.0" xmlns:xsi="http://www.w3.org/2001/XMLSchema-instance"

         xsi:schemaLocation="http://maven.apache.org/POM/4.0.0 http://maven.apache.org/xsd/maven-4.0.0.xsd">

    <modelVersion>4.0.</modelVersion>

    <parent>

        <groupId>com.badao</groupId>

        <artifactId>hello-spring-cloud-dependencies</artifactId>

        <version>1.0.-SNAPSHOT</version>

        <relativePath>../hello-spring-cloud-dependencies/pom.xml</relativePath>

    </parent>

    <artifactId>hello-spring-cloud-web-admin-feign</artifactId>

    <packaging>jar</packaging>

    <name>hello-spring-cloud-web-admin-feign</name>

    <url>https://blog.csdn.net/badao_liumang_qizhi</url>

    <inceptionYear>-Now</inceptionYear>

    <dependencies>

        <!-- Spring Boot Begin -->

        <dependency>

            <groupId>org.springframework.boot</groupId>

            <artifactId>spring-boot-starter-web</artifactId>

        </dependency>

        <dependency>

            <groupId>org.springframework.boot</groupId>

            <artifactId>spring-boot-starter-tomcat</artifactId>

        </dependency>

        <dependency>

            <groupId>org.springframework.boot</groupId>

            <artifactId>spring-boot-starter-thymeleaf</artifactId>

        </dependency>

        <dependency>

            <groupId>org.springframework.boot</groupId>

            <artifactId>spring-boot-starter-actuator</artifactId>

        </dependency>

        <dependency>

            <groupId>org.springframework.boot</groupId>

            <artifactId>spring-boot-starter-test</artifactId>

            <scope>test</scope>

        </dependency>

        <!-- Spring Boot End -->

        <!-- Spring Cloud Begin -->

        <dependency>

            <groupId>org.springframework.cloud</groupId>

            <artifactId>spring-cloud-starter-netflix-eureka-server</artifactId>

        </dependency>

        <dependency>

            <groupId>org.springframework.cloud</groupId>

            <artifactId>spring-cloud-starter-openfeign</artifactId>

        </dependency>

        <!-- Spring Cloud End -->

        <!-- 解决 thymeleaf 模板引擎一定要执行严格的 html5 格式校验问题 -->

        <dependency>

            <groupId>net.sourceforge.nekohtml</groupId>

            <artifactId>nekohtml</artifactId>

        </dependency>

    </dependencies>

    <build>

        <plugins>

            <plugin>

                <groupId>org.springframework.boot</groupId>

                <artifactId>spring-boot-maven-plugin</artifactId>

                <configuration>

                    <mainClass>com.badao.hello.spring.cloud.web.admin.feign.WebAdminFeignApplication</mainClass>

                </configuration>

            </plugin>

        </plugins>

    </build>

</project>
注:
这里的parent标签要与上面的统一的依赖管理对应起来。
要修改指定的程序入口类为自己相应的路径。
然后应用启动类的代码:
package com.badao.hello.spring.cloud.web.feign;

import org.springframework.boot.SpringApplication;

import org.springframework.boot.autoconfigure.SpringBootApplication;

import org.springframework.cloud.client.discovery.EnableDiscoveryClient;

import org.springframework.cloud.openfeign.EnableFeignClients;

@SpringBootApplication

@EnableDiscoveryClient

@EnableFeignClients

public class WebAdminFeignApplication {

    public static void main(String[] args) {

        SpringApplication.run(WebAdminFeignApplication.class, args);

    }

}
注:
通过 @EnableDiscoveryClient 注解注册到服务中心
通过 @EnableFeignClients 注解开启 Feign 功能
然后是配置文件application.yml
spring:

  application:

    name: hello-spring-cloud-web-admin-feign

  thymeleaf:

    cache: false

    mode: LEGACYHTML5

    encoding: UTF-

    servlet:

      content-type: text/html

server:

  port:

eureka:

  client:

    serviceUrl:

      defaultZone: http://localhost:8761/eureka/
注:
1.服务注册与发现是根据上面的name去寻找。
2.port表示端口号。
3.serviceURL设置eureka的地址,与上面创建服务注册中心时的URL对应。
与使用Ribbon方式不同的是,这里需要创建service接口,而不是service类。
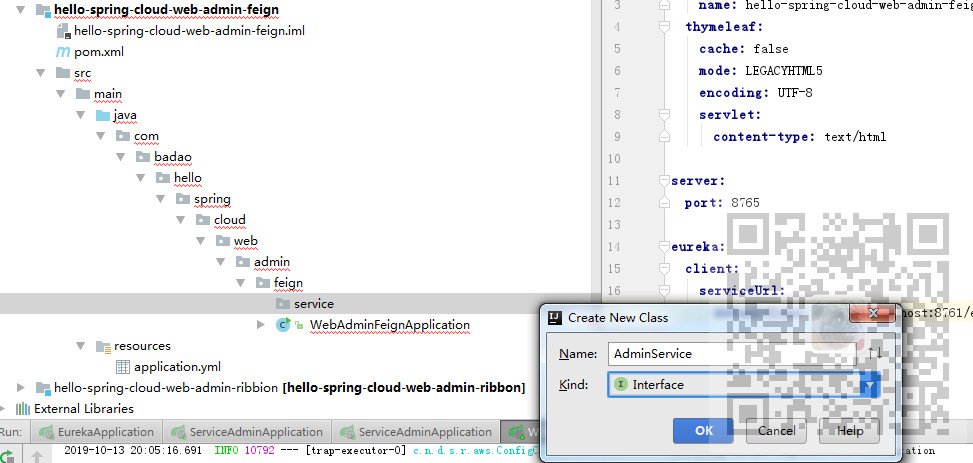
AdminService接口代码:
package com.badao.hello.spring.cloud.web.feign.service;

import org.springframework.cloud.openfeign.FeignClient;

import org.springframework.web.bind.annotation.RequestMapping;

import org.springframework.web.bind.annotation.RequestMethod;

import org.springframework.web.bind.annotation.RequestParam;

@FeignClient(value = "hello-spring-cloud-service-admin")

public interface AdminService {

    @RequestMapping(value = "hi", method = RequestMethod.GET)

    public String sayHi(@RequestParam(value = "message") String message);

}
注:
通过@FeignClient(value =
"hello-spring-cloud-service-admin")来指定调用哪个服务。
这里就是对应上面服务提供者的配置文件的name属性。
import com.badao.hello.spring.cloud.web.feign.service.AdminService;

import org.springframework.beans.factory.annotation.Autowired;

import org.springframework.web.bind.annotation.RequestMapping;

import org.springframework.web.bind.annotation.RequestMethod;

import org.springframework.web.bind.annotation.RequestParam;

import org.springframework.web.bind.annotation.RestController;

@RestController

public class AdminController {

    @Autowired

    private AdminService adminService;

    @RequestMapping(value = "hi", method = RequestMethod.GET)

    public String sayHi(@RequestParam String message) {

        return adminService.sayHi(message);

    }

}
为了体现出负载均衡效果,我们要启动两台service-admin,即启动两个服务提供者。
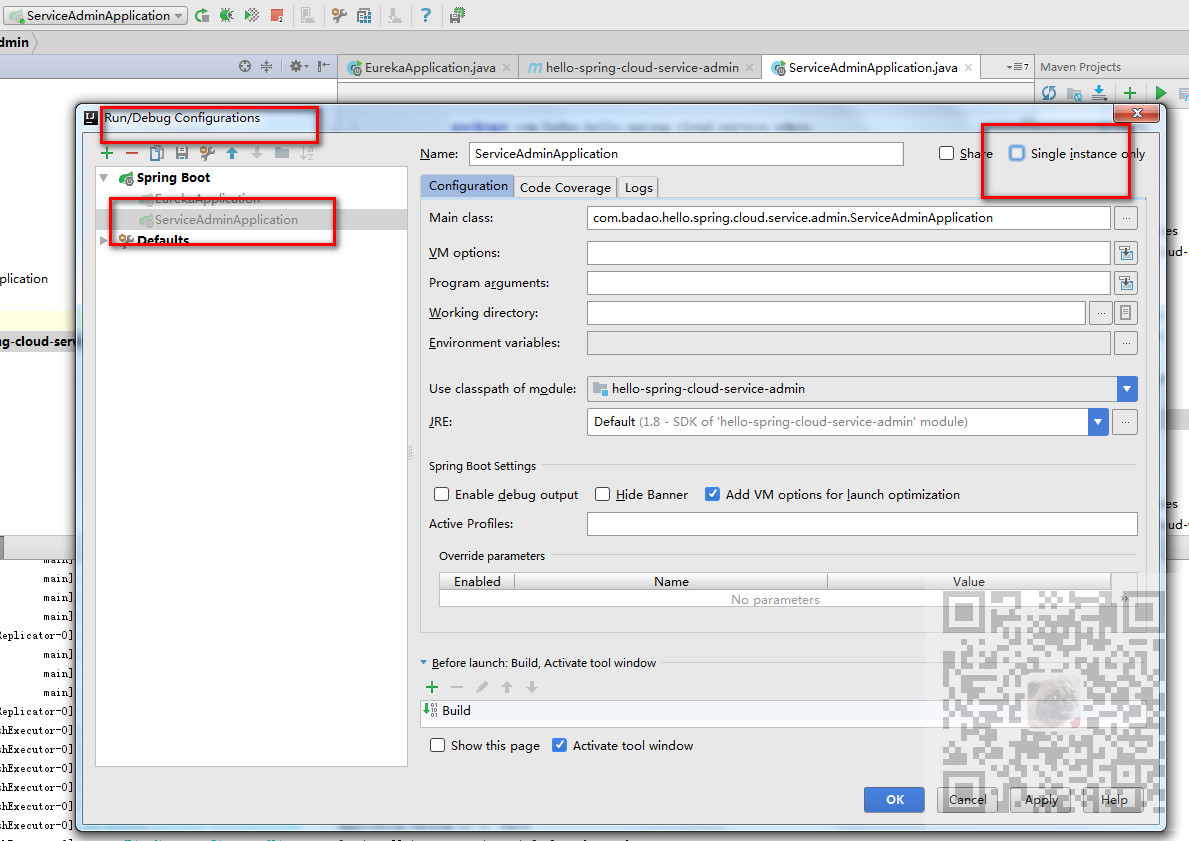
我们先启动服务注册中心Eureka服务8761端口,再以8762端口启动一个服务提供者,然后点击Run-Edit
Configuration,将启动单实例去掉。
然后修改服务提供者的配置文件中端口号为8763,再启动一个服务提供者。
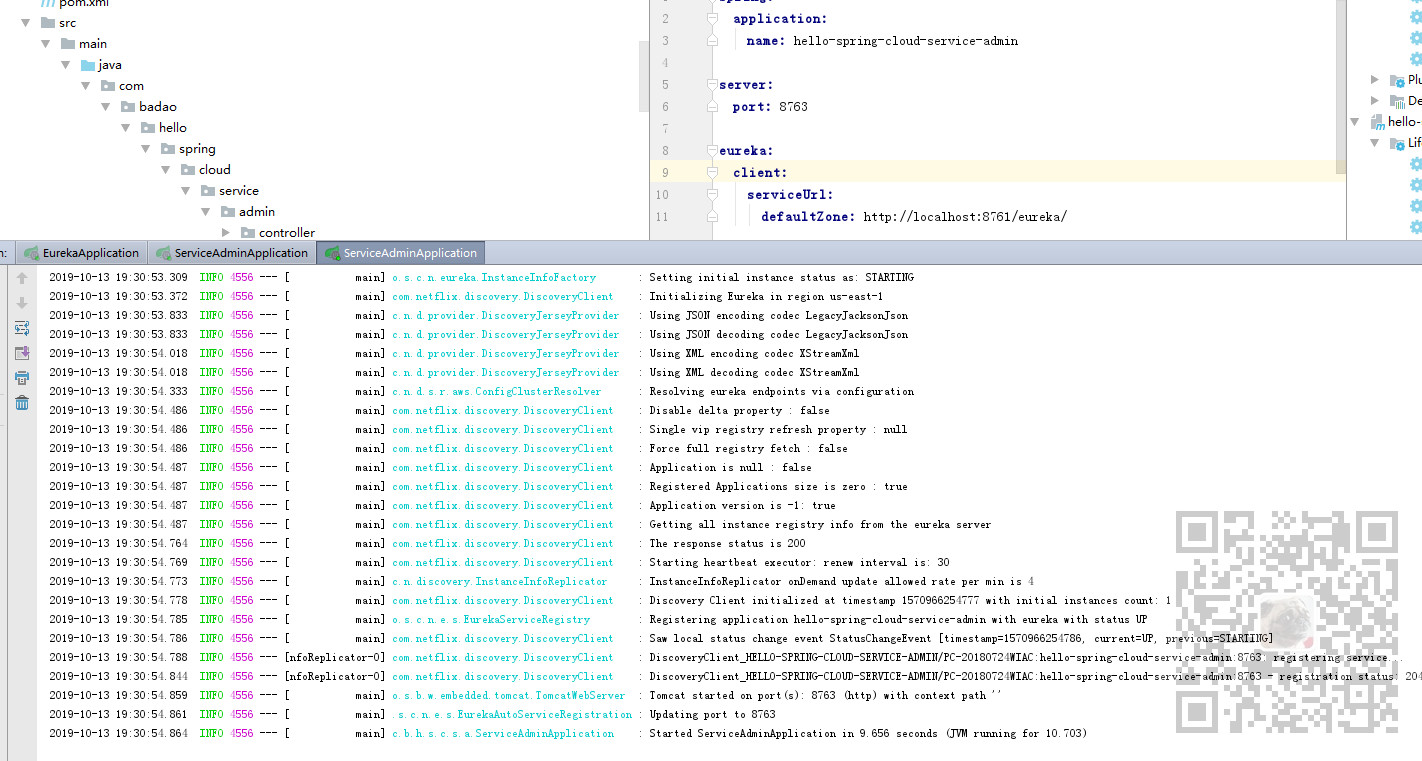
消费者要想实现负载均衡的效果,应该一会访问8762的服务提供者,一会访问8763的服务提供者。
然后运行当前服务消费者的启动程序。
打开浏览器输入:
http://localhost:8765/hi?message=HelloFeign
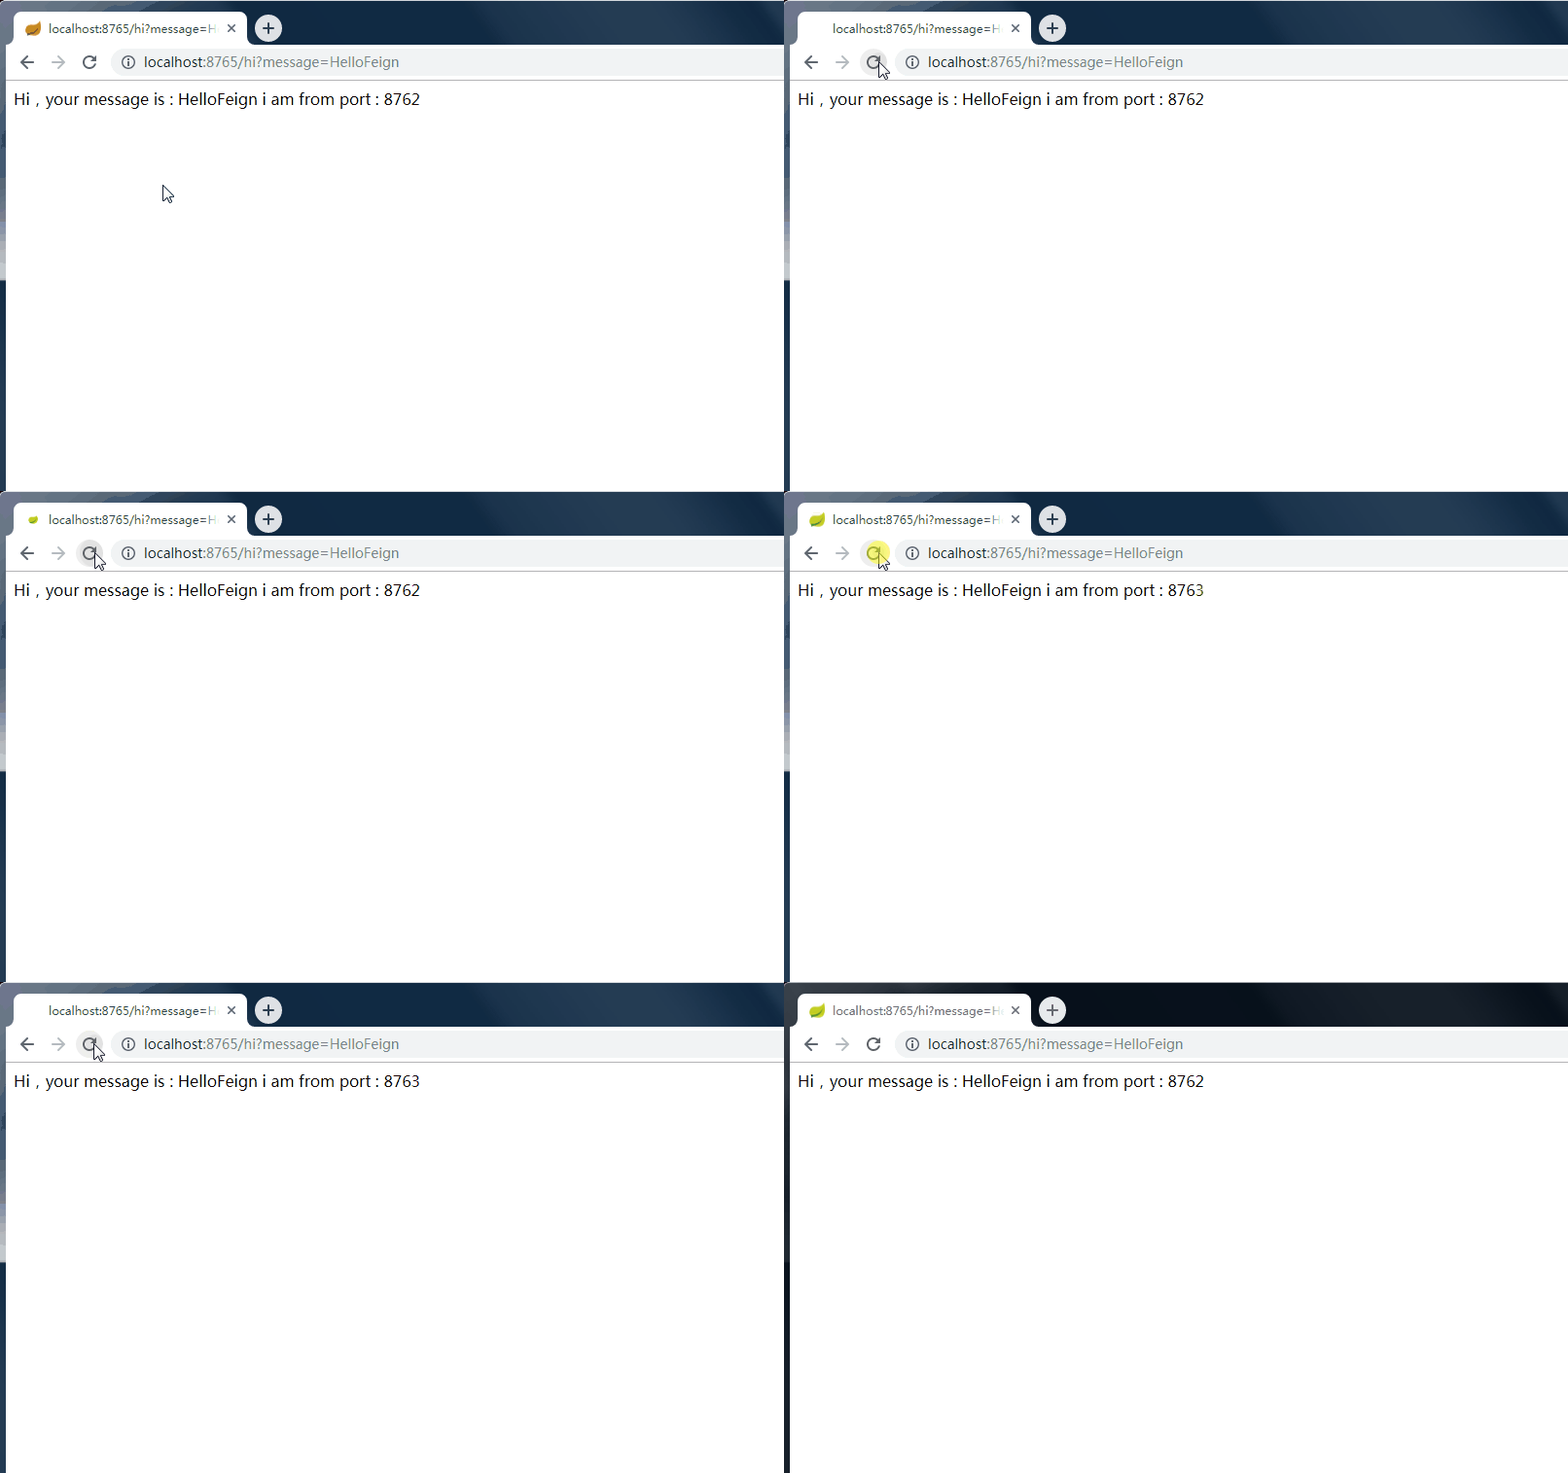
此时的架构
一个服务注册中心,Eureka Server,端口号为:8761
service-admin 工程运行了两个实例,端口号分别为:8762,8763
web-admin-feign 工程端口号为:8765
源码下载
https://download.csdn.net/download/badao_liumang_qizhi/11867357
SpringCloud-创建服务消费者-Feign方式(附代码下载)的更多相关文章
- SpringCloud-创建服务消费者-Ribbon方式(附代码下载)
场景 SpringCloud-服务注册与实现-Eureka创建服务注册中心(附源码下载): https://blog.csdn.net/BADAO_LIUMANG_QIZHI/article/deta ...
- SpringCloud-使用熔断器防止服务雪崩-Ribbon和Feign方式(附代码下载)
场景 SpringCloud-服务注册与实现-Eureka创建服务注册中心(附源码下载): https://blog.csdn.net/BADAO_LIUMANG_QIZHI/article/deta ...
- 创建服务消费者(Feign)
概述 Feign 是一个声明式的伪 Http 客户端,它使得写 Http 客户端变得更简单.使用 Feign,只需要创建一个接口并注解.它具有可插拔的注解特性,可使用 Feign 注解和 JAX-RS ...
- 从实例一步一步入门学习SpringCloud的Eureka、Ribbon、Feign、熔断器、Zuul的简单使用(附代码下载)
场景 SpringCloud -创建统一的依赖管理: https://blog.csdn.net/BADAO_LIUMANG_QIZHI/article/details/102530574 Sprin ...
- Dubbo搭建HelloWorld-搭建服务提供者与服务消费者并完成远程调用(附代码下载)
场景 Dubbo简介与基本概念: https://blog.csdn.net/BADAO_LIUMANG_QIZHI/article/details/103555224 Dubbo环境搭建-ZooKe ...
- springcloud-Netflix创建服务消费者
目录 springcloud-Netflix创建服务消费者 Ribbon 创建服务消费者-Ribbon方式 ribbon的架构 Feign 创建包和基本项目结构 创建Feign访问服务的接口和访问co ...
- SpringCloud学习系列之二 ----- 服务消费者(Feign)和负载均衡(Ribbon)使用详解
前言 本篇主要介绍的是SpringCloud中的服务消费者(Feign)和负载均衡(Ribbon)功能的实现以及使用Feign结合Ribbon实现负载均衡. SpringCloud Feign Fei ...
- springCloud学习-服务消费者(rest+ribbon)
1.ribbon简介 spring cloud的Netflix中提供了两个组件实现软负载均衡调用:ribbon和feign. Ribbon 是一个基于 HTTP 和 TCP 客户端的负载均衡器 它可以 ...
- 创建服务消费者(Ribbon)
概述 在微服务架构中,业务都会被拆分成一个独立的服务,服务与服务的通讯是基于 http restful 的.Spring cloud 有两种服务调用方式,一种是 ribbon + restTempla ...
随机推荐
- 记一次uboot中gunzip解压速度慢的问题排查
背景 在项目中需要用到解压功能,之前还记录了下,将uboot解压代码移植到另外的bootloader中时,碰到的效率问题.最终查明是cache的配置导致的. https://www.cnblogs.c ...
- [ASP.NET Core 3框架揭秘] 异步线程无法使用IServiceProvider?
标题反映的是上周五一个同事咨询我的问题,我觉得这是一个很好的问题.这个问题有助于我们深入理解依赖注入框架在ASP.NET Core中的应用,以及服务实例的生命周期. 一.问题重现 我们通过一个简单的实 ...
- Selenium WebDriver 中鼠标事件
鼠标点击操作 鼠标点击事件有以下几种类型: 清单 1. 鼠标左键点击 Actions action = new Actions(driver);action.click();// 鼠标左键在当 ...
- Idea创建maven项目,报错xxx already exists in VFS
1.问题描述: 我打算在父级maven项目中创建子级project,但是一直报错如下: 2.stackover flow中找到了问题的答案, 地址:https://stackoverflow.com/ ...
- Ubuntu&Mac下使用alias简化日常操作
alias 在Linux系统中用来给指令起别名,用来简化很长的指令. 用法很简单: alias : 查看当前所有别名 alias tmstart = "$CATALINA_HOME/bin/ ...
- java程序员面试答题技巧
答题时,先答是什么,再答有什么作用和要注意什么(这部分最重要,展现自己的心得) 答案的段落分别,层次分明,条理清晰都非常重要,从这些表面的东西也可以看出一个人的 习惯.办事风格.条理等. 要讲你做出答 ...
- Hello! 第一篇博客!
我在博客园开通博客啦 :) 欢迎大家来关注和玩耍,和我互动, Follow 我! 我关心算法和Python!
- 如何运用DDD - 领域服务
目录 如何运用DDD - 领域服务 概述 什么是领域服务 从实际场景下手 更贴近现实 领域服务VS应用服务 扩展上面的需求 最常见的认证授权是领域服务吗 使用领域服务 不要过多的使用领域服务 不要将过 ...
- 这可能是最容易入门的socket教程了
前言: 如今,网络编程已然成为了一个后端开发工程师需要具备的核心技能之一.因此,该博客力求提供最简单.通俗的描述方式,来描绘网络编程中常见的知识点,同时附带代码示例,后期会加上具体的抓包分析,实际项目 ...
- python解析ifconfig 输出成字典
有个需求需要将ifcofig输出解析出来,这里将写的整理出来.方便后续使用. eth0 Link encap:Ethernet HWaddr 00:50:53:b2:23:e6 inet addr:1 ...