cobbler自动化安装系统
笔者Q:972581034 交流群:605799367。有任何疑问可与笔者或加群交流
- 在很久很久以前,使用kickstart实现自动化安装的时候,我一直认为装系统是多么高大上的活,直到cobbler的出现,让自动化批量安装系统变得如此简单。嘿嘿。现在隔壁办公室的财务妹妹都跟我学会了装系统。
- cobbler是基于kickstart来实现自动化安装系统的,cobbler实质是把kickstart经过封装后,以web界面的方式,可以让我们以简单粗暴的方式自定义自已的系统。
安装cobbler
命令行的操作
需要epel源
yum -y install cobbler cobbler-web dhcp tftp-server pykickstart httpd
[root@CentOS6 ~]# cobbler check   #检查还有哪些步骤需要做

The following are potential configuration items that you may want to fix:

1 : The 'server' field in /etc/cobbler/settings must be set to something other than localhost, or kickstarting features will not work.  This should be a resolvable hostname or IP for the boot server as reachable by all machines that will use it.    #设置server端Ip地址

2 : For PXE to be functional, the 'next_server' field in /etc/cobbler/settings must be set to something other than 128.0.0.1, and should match the IP of the boot server on the PXE network.   #PXE设置

3 : change 'disable' to 'no' in /etc/xinetd.d/tftp  #把disable改为no

4 : some network boot-loaders are missing from /var/lib/cobbler/loaders, you may run 'cobbler get-loaders' to download them, or, if you only want to handle x86/x86_64 netbooting, you may ensure that you have installed a *recent* version of the syslinux package installed and can ignore this message entirely.  Files in this directory, should you want to support all architectures, should include pxelinux.0, menu.c32, elilo.efi, and yaboot. The 'cobbler get-loaders' command is the easiest way to resolve these requirements.  #需要下载,运行cobbler get-loaders即可

5 : change 'disable' to 'no' in /etc/xinetd.d/rsync  #disable改为no

6 : file /etc/xinetd.d/rsync does not exist  #没有这个文件

7 : debmirror package is not installed, it will be required to manage debian deployments and repositories  #可忽略

8 : The default password used by the sample templates for newly installed machines (default_password_crypted in /etc/cobbler/settings) is still set to 'cobbler' and should be changed, try: "openssl passwd -1 -salt 'random-phrase-here' 'your-password-here'" to generate new one  #提示需要修改root密码

9 : fencing tools were not found, and are required to use the (optional) power management features. install cman or fence-agents to use them  #高可用软件,也可以忽略

Restart cobblerd and then run 'cobbler sync' to apply changes.
cp /etc/cobbler/settings{,.ori} #备份
sed -i 's/server: 127.0.0.1/server: 172.16.1.101/' /etc/cobbler/settings #解决第一项
sed -i 's/next_server: 127.0.0.1/next_server: 172.16.1.101/' /etc/cobbler/settings #
sed -i 's/manage_dhcp: 0/manage_dhcp: 1/' /etc/cobbler/settings #让cobbler管理dhcp服务
sed -i 's/pxe_just_once: 0/pxe_just_once: 1/' /etc/cobbler/settings #禁止无限重装统
sed -ri "/default_password_crypted/s#(.: ).#\1"`openssl passwd -1 -salt 'oldboy' '123456'`"#" /etc/cobbler/settings #设置密码内嵌命令openssl passwd -1 -salt 'oldboy' '123456'
sed -i 's#yes#no#' /etc/xinetd.d/rsync #把所有yes改为no
sed -i 's#yes#no#' /etc/xinetd.d/tftp #把yes改为no
把下载好的命令传过来解压,由于从官方下载太慢,所以这里使用下载好的直接解压
[root@CentOS6 ~]# rz -E

rz waiting to receive.

[root@CentOS6 ~]# ls

anaconda-ks.cfg  cobbler_load.tar.gz  install.log  install.log.syslog

[root@CentOS6 ~]# tar xfP cobbler_load.tar.gz
[root@CentOS6 ~]# cobbler sync

task started: 2017-04-12_172139_sync

task started (id=Sync, time=Wed Apr 12 17:21:39 2017)

running pre-sync triggers

cleaning trees

removing: /var/lib/tftpboot/grub/images

copying bootloaders

trying hardlink /var/lib/cobbler/loaders/pxelinux.0 -> /var/lib/tftpboot/pxelinux.0

trying hardlink /var/lib/cobbler/loaders/menu.c32 -> /var/lib/tftpboot/menu.c32

trying hardlink /var/lib/cobbler/loaders/yaboot -> /var/lib/tftpboot/yaboot

trying hardlink /usr/share/syslinux/memdisk -> /var/lib/tftpboot/memdisk

trying hardlink /var/lib/cobbler/loaders/grub-x86_64.efi -> /var/lib/tftpboot/grub/grub-x86_64.efi

trying hardlink /var/lib/cobbler/loaders/grub-x86.efi -> /var/lib/tftpboot/grub/grub-x86.efi

copying distros to tftpboot

copying images

generating PXE configuration files

generating PXE menu structure

rendering TFTPD files

generating /etc/xinetd.d/tftp

cleaning link caches

running post-sync triggers

running python triggers from /var/lib/cobbler/triggers/sync/post/*

running python trigger cobbler.modules.sync_post_restart_services

running shell triggers from /var/lib/cobbler/triggers/sync/post/*

running python triggers from /var/lib/cobbler/triggers/change/*

running python trigger cobbler.modules.scm_track

running shell triggers from /var/lib/cobbler/triggers/change/*

*** TASK COMPLETE ***
[root@CentOS6 ~]# /etc/init.d/xinetd restart

Stopping xinetd:                                           [FAILED]

Starting xinetd:                                           [  OK  ]

[root@CentOS6 ~]# /etc/init.d/cobblerd restart

Stopping cobbler daemon:                                   [  OK  ]

Starting cobbler daemon:                                   [  OK  ]

[root@CentOS6 ~]# /etc/init.d/httpd restart

Stopping httpd:                                            [  OK  ]

Starting httpd: httpd: apr_sockaddr_info_get() failed for CentOS6

httpd: Could not reliably determine the server's fully qualified domain name, using 127.0.0.1 for ServerName

                                                           [  OK  ]

sed -i 's#192.168.1#172.16.1#g;22d;23d' /etc/cobbler/dhcp.template   #修改DHCP模版,删除网关,删除DNS
检查cobbler
现在只有三处错误了,可以忽略
[root@CentOS6 ~]# cobbler check

The following are potential configuration items that you may want to fix:

1 : file /etc/xinetd.d/rsync does not exist #这个是程序bug

2 : debmirror package is not installed, it will be required to manage debian deployments and repositories

3 : fencing tools were not found, and are required to use the (optional) power management features. install cman or fence-agents to use them

Restart cobblerd and then run 'cobbler sync' to apply changes.
检查端口
[root@CentOS6 ~]# ss -luntp|grep dhcp

[root@CentOS6 ~]# cobbler sync #把所有更改做同步
注意:一个局域网只能有一个dhcp
挂载
[root@CentOS6 ~]# mount /dev/cdrom /mnt

mount: block device /dev/sr0 is write-protected, mounting read-only
接下来进行web界面的操作
在浏览器输入http://ip/cobbler_web即可访问
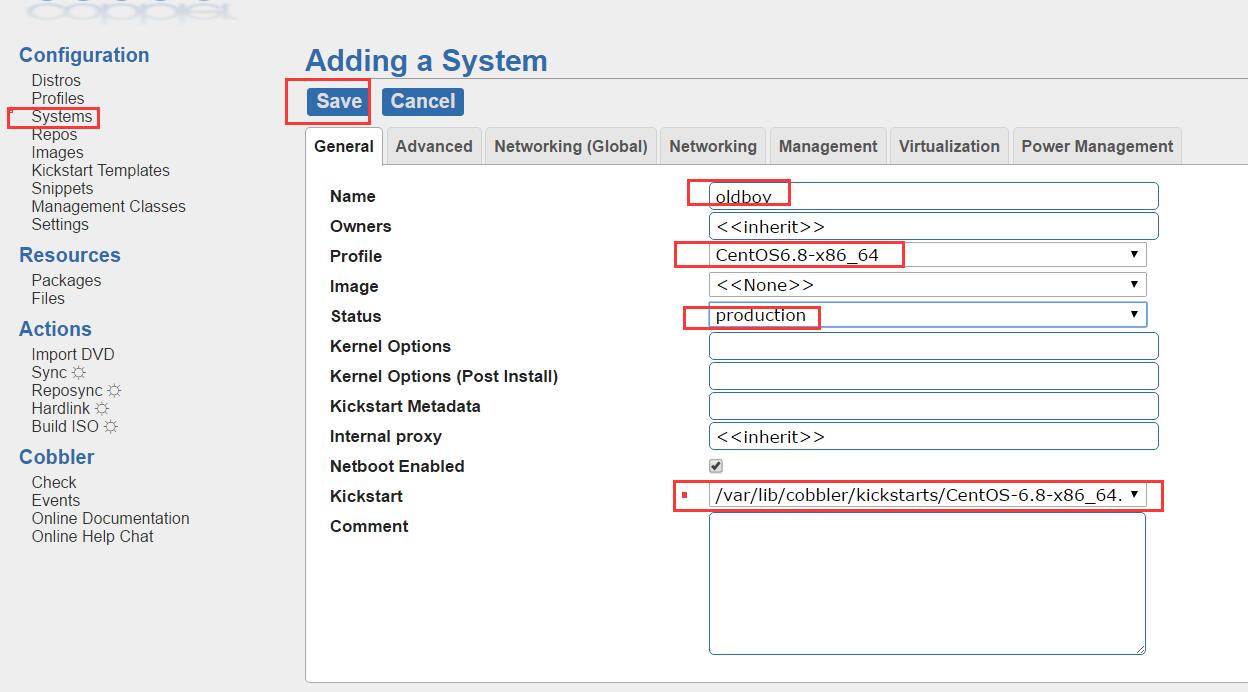
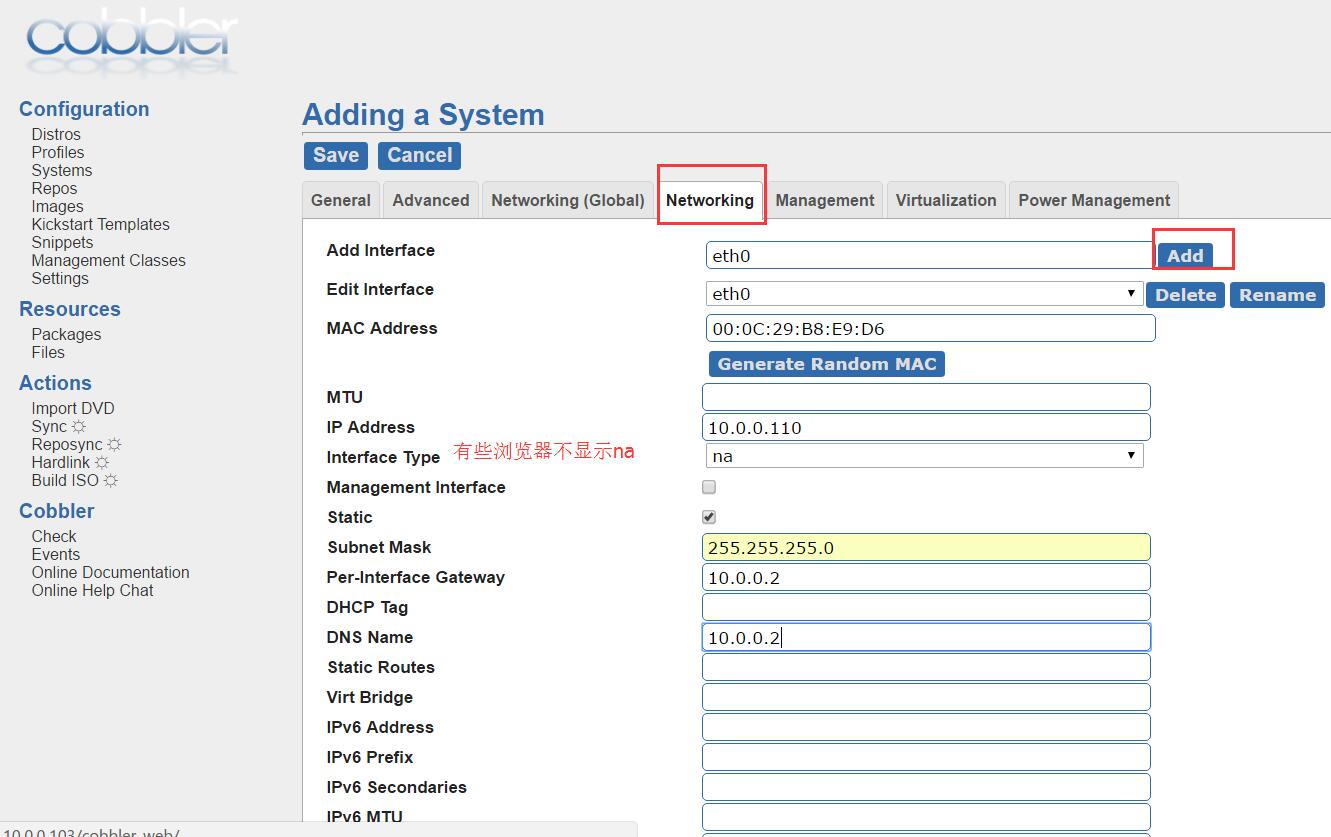
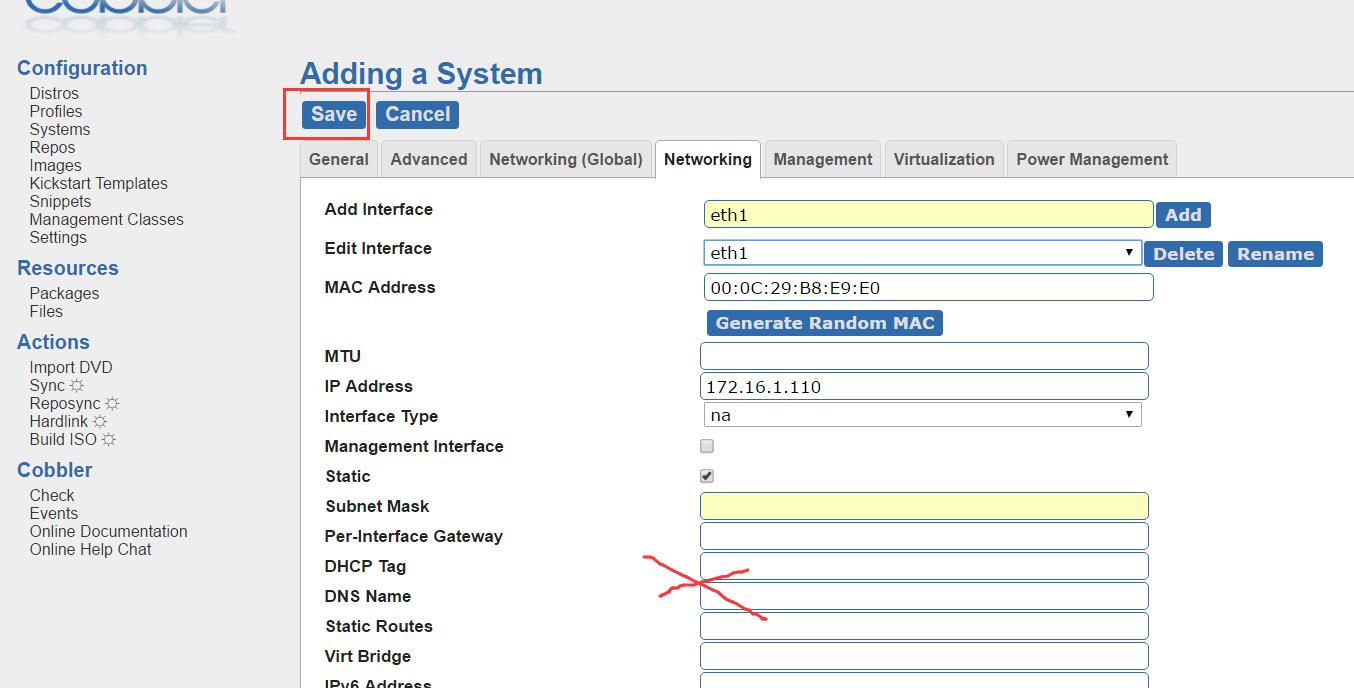
web界面
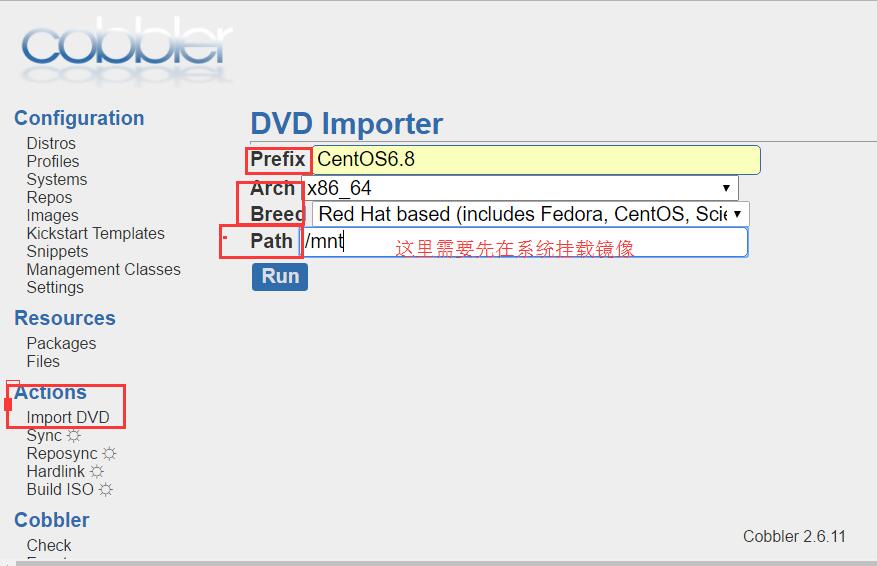
1.导入镜像
- 挂载
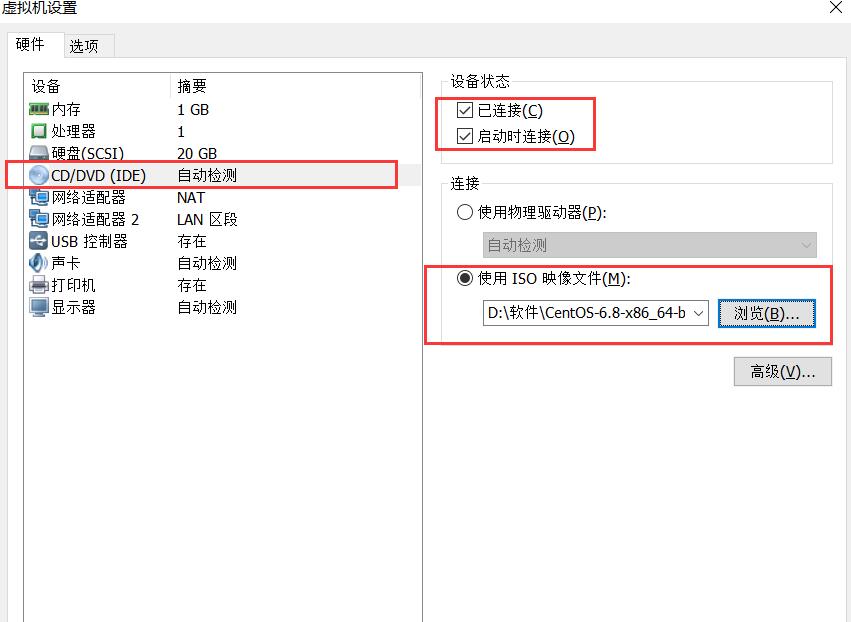
[root@CentOS6 ~]# mount /dev/cdrom /mnt

mount: block device /dev/sr0 is write-protected, mounting read-only

[root@CentOS6 ~]# ps -ef|grep rsync      #通过rsync进行导入的

root      25266   1582 15 17:30 ?        00:00:06 rsync -a /mnt/ /var/www/cobbler/ks_mirror/CentOS6.8-x86_64 --progress

root      25267  25266  0 17:30 ?        00:00:00 rsync -a /mnt/ /var/www/cobbler/ks_mirror/CentOS6.8-x86_64 --progress

root      25268  25267 11 17:30 ?        00:00:05 rsync -a /mnt/ /var/www/cobbler/ks_mirror/CentOS6.8-x86_64 --progress
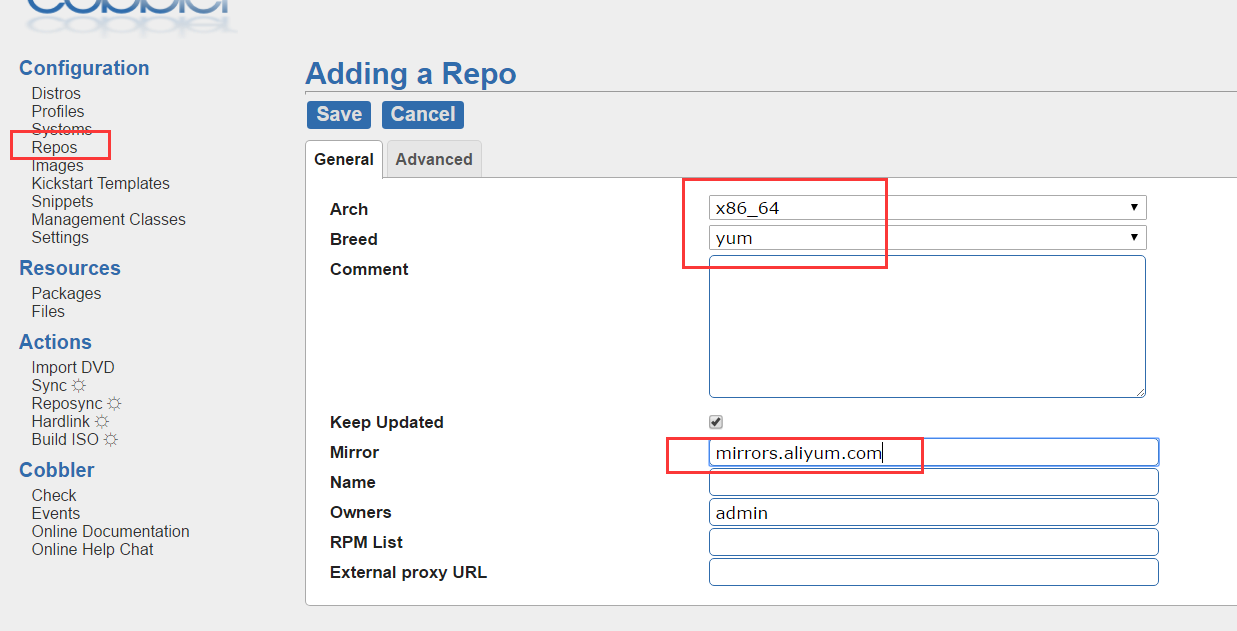
2.如何让cobbler下载yum源
- 导入yum源
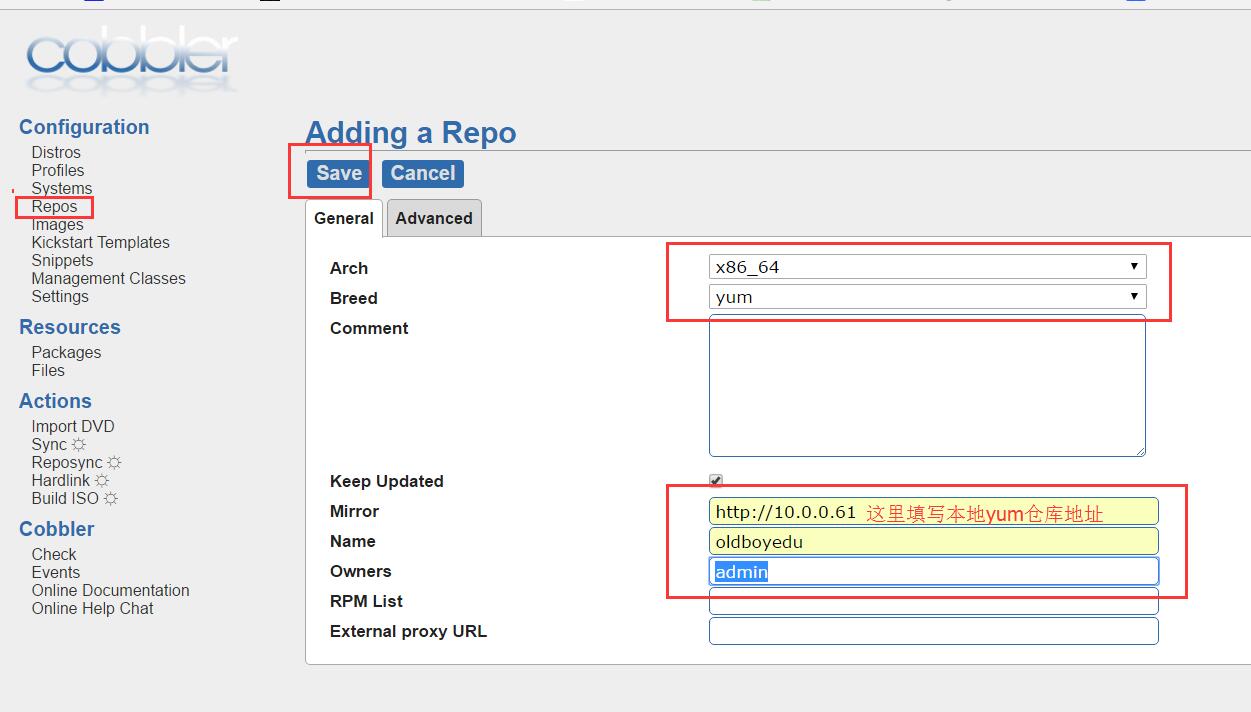
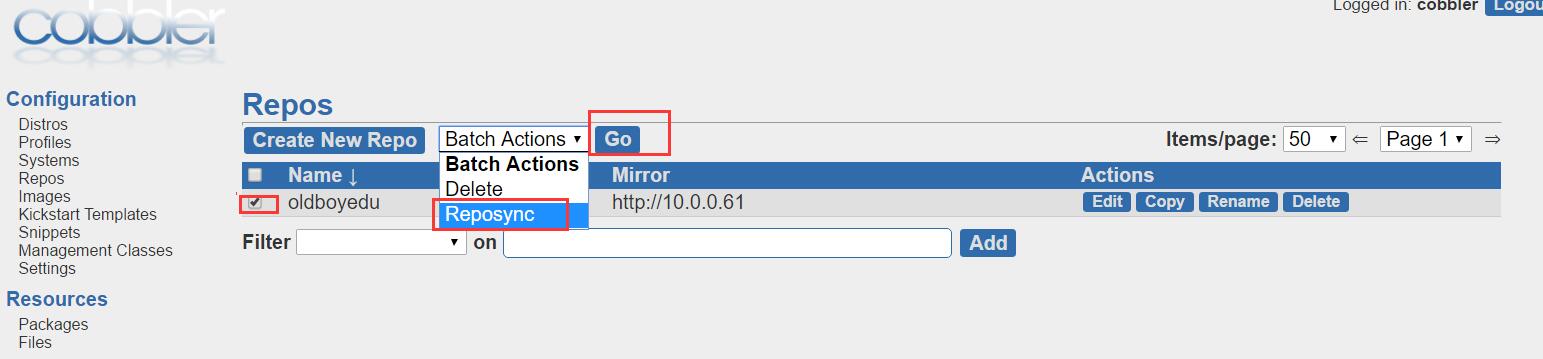
[root@CentOS6 ~]# cd /var/www/cobbler/repo_mirror/

[root@CentOS6 repo_mirror]# ls

oldboyedu
使用公网yum源的方法
装系统的时候关联到本地yum源
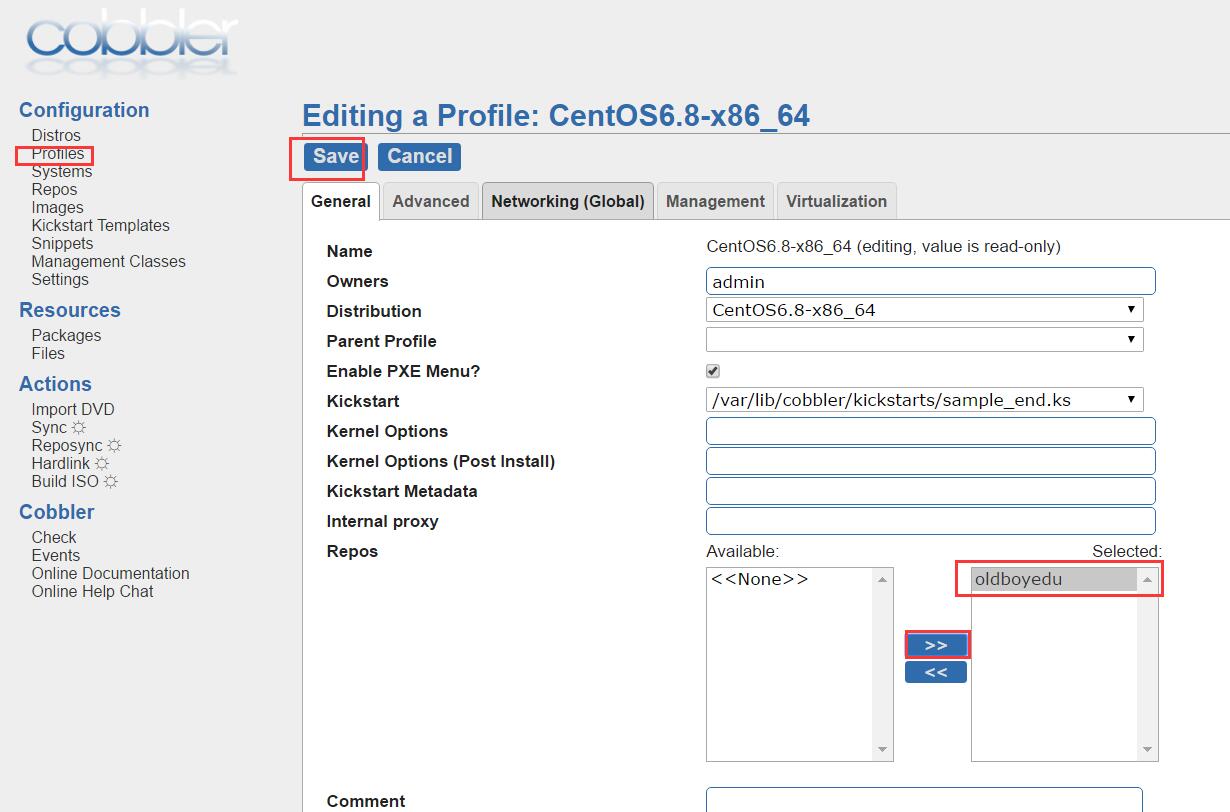
到这一步即可完成以默认的方式安装系统
- 自定义模版
1.创建模版文件
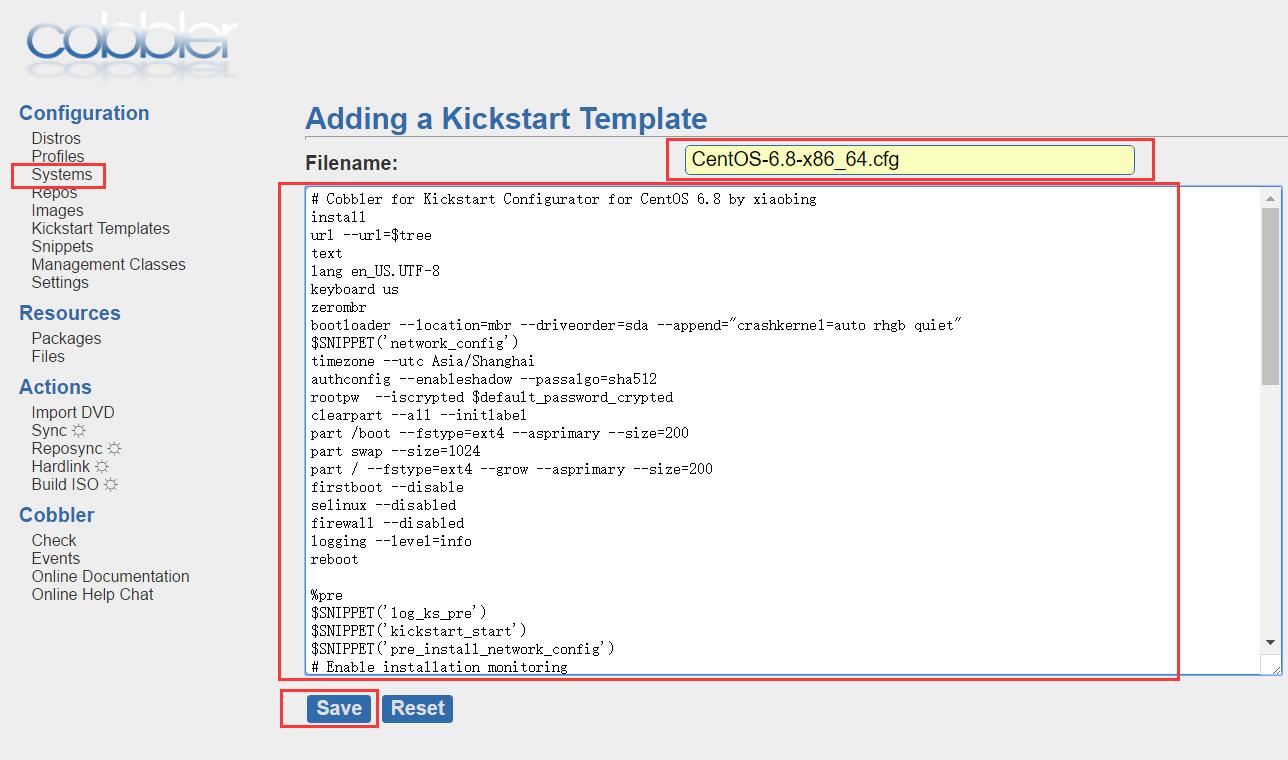
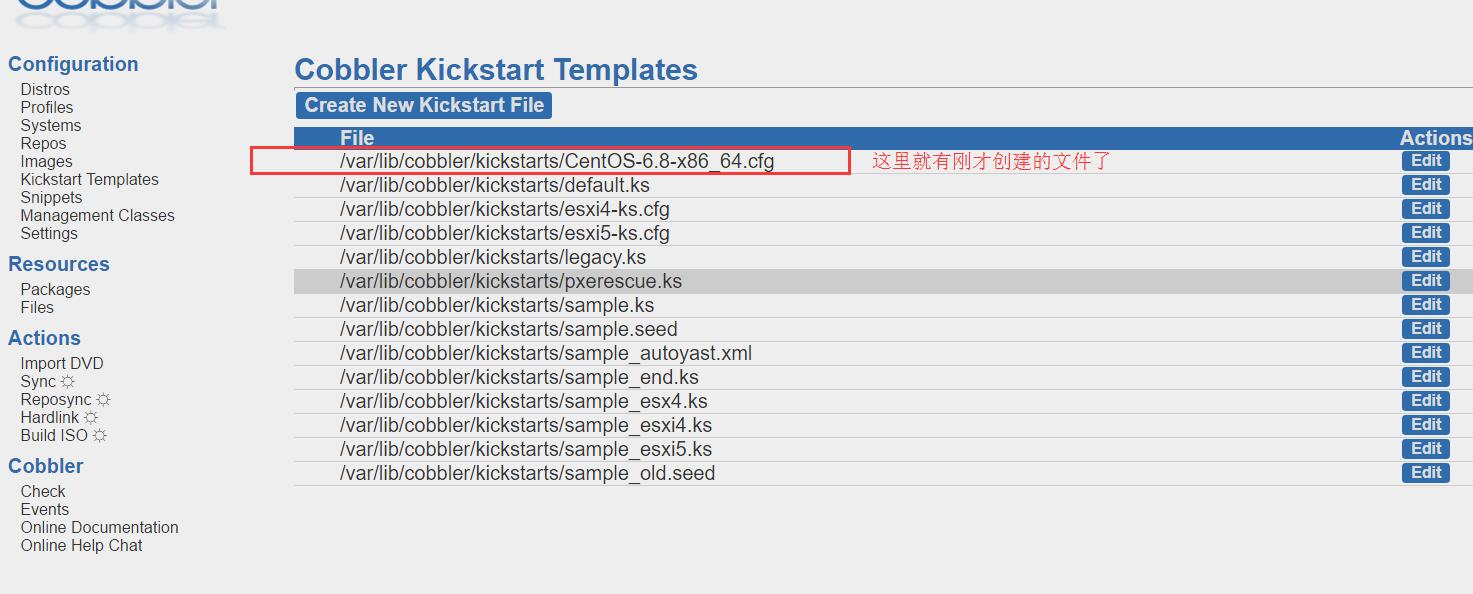
2.创建自定义模版

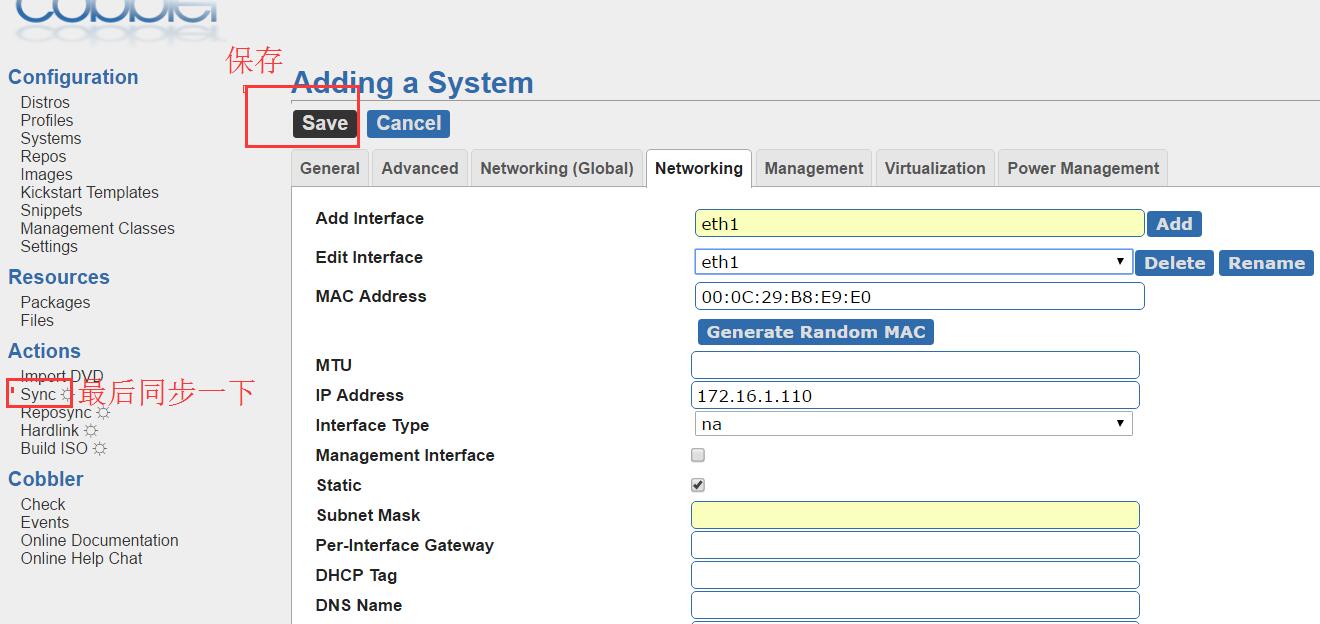
3.同步实据到服务器端
- 开机后就可以喝咖啡了

kickstart无人值守:http://www.cnblogs.com/Csir/p/6699881.html
cobbler自动化安装系统的更多相关文章
- CentOS 7 Cobbler 自动化安装系统
在上一篇Cobbler 安装中,配置好了Cobbler,下面来配置自动化安装 配置cobbler-DHCP # 修改settings中参数,由cobbler控制dhcp [root@cobbler ~ ...
- s33 cobbler自动化安装系统
1. Cobbler介绍 参考链接:http://blog.oldboyedu.com/autoinstall-cobbler/ Cobbler是一个Linux服务器安装的服务,可以通过网络启动(PX ...
- 为cobbler自动化安装系统工具添加epel源
关于cobbler的安装及部署,参考:CentOS 6.5自动化运维之基于cobbler服务的自动化安装操作系统详解http://blog.csdn.net/reblue520/article/det ...
- 基于CentOS7系统部署cobbler批量安装系统(week3_day5_part1)-技术流ken
前言 cobbler是一个可以实现批量安装系统的Linux应用程序.它有别于pxe+kickstart,cobbler可以实现同个服务器批量安装不同操作系统版本. 系统环境准备及其下载cobbler ...
- 末学者笔记--Centos7系统部署cobbler批量安装系统
[前言]: cobbler是一个可以实现批量安装系统的Linux应用程序.它有别于pxe+kickstart,cobbler可以实现同个服务器批量安装不同操作系统版本. 系统环境准备及其下载cob ...
- Cobbler自动化安装
# Cobbler自动化安装 [Cobbler官网](http://cobbler.github.io)  中常用的压缩丶解压缩格式命令和参数详解
Linux中常用的压缩格式后缀名有:①.zip ②.gz ③.bz2 ④.tar.gz ⑤.tar.bz2 ①.zip后缀名格式 1.压缩 语法: ①zip 压缩文件名 源文件 (压缩文件) ...
- 我们编写 React 组件的最佳实践
刚接触 React 的时候,在一个又一个的教程上面看到很多种编写组件的方法,尽管那时候 React 框架已经相当成熟,但是并没有一个固定的规则去规范我们去写代码. 在过去的一年里,我们在不断的完善我们 ...
- 洛谷 P1598 垂直柱状图【字符串+模拟】
P1598 垂直柱状图 题目描述 写一个程序从输入文件中去读取四行大写字母(全都是大写的,每行不超过72个字符),然后用柱状图输出每个字符在输入文件中出现的次数.严格地按照输出样例来安排你的输出格式. ...
- AtCoder Regular Contest 082
我都出了F了……结果并没有出E……atcoder让我差4分上橙是啥意思啊…… C - Together 题意:把每个数加1或减1或不变求最大众数. #include<cstdio> #in ...
- bzoj 1705;poj 3612:[Usaco2007 Nov]Telephone Wire 架设电话线
Description 最近,Farmer John的奶牛们越来越不满于牛棚里一塌糊涂的电话服务 于是,她们要求FJ把那些老旧的电话线换成性能更好的新电话线. 新的电话线架设在已有的N(2 <= ...
- ubuntu下使用nginx搭建流媒体服务器,实现视频点播
首先我们看如何实现视频点播,视频点播支持flv文件及H264编码视频,ACC编码音频的mp4文件: 第一步,创建单独的目录(因为软件较多,容易混乱),下载需要的软件: 我们需要下载nginx,pcre ...
- js根据出生年月日换算年龄
function age_Conversion(date) { debugger var age = ''; var str = date.replace(/年|月/g, "-") ...
- 人生苦短,我用Python 第一篇
一.变量名 自定义变量名只能用 数字.字母.下划线组成. 使用变量前,需对其先赋值 注意:1.变量名不能以数字开头: 2.不能是关键字:例如:'and', 'as', 'assert', ' ...