SpringBoot学习- 5、整合Redis
SpringBoot项目中访问Redis主要有两种方式:JedisPool和RedisTemplate,本文使用JedisPool
1、pom.xml添加dependency
<dependency>

    <groupId>redis.clients</groupId>

    <artifactId>jedis</artifactId>

    <version>2.9.0</version>

    <scope>compile</scope>

</dependency>
2、下面封装一个工具类,utils新建JedisPoolUtil,先只封装读写字符串
package com.jgui.utils;

import com.jgui.config.RedisConfig;

import lombok.Data;

import org.springframework.beans.factory.annotation.Autowired;

import org.springframework.boot.context.properties.ConfigurationProperties;

import org.springframework.boot.context.properties.EnableConfigurationProperties;

import org.springframework.context.annotation.Bean;

import org.springframework.stereotype.Component;

import redis.clients.jedis.Jedis;

import redis.clients.jedis.JedisPool;

import redis.clients.jedis.JedisPoolConfig;

/**

 * @Author: zhaogaojian

 * @Description:

 * @Date: Created in 2020/1/821:54

 */

@Component

public class JedisPoolUtil {

    private  JedisPool jedisPool=null;

    @Autowired

    private  RedisConfig redisConfig;

    private  JedisPool getJedisPool() {

        if(jedisPool==null)

        {

            JedisPoolConfig jedisPoolConfig = new JedisPoolConfig();

            jedisPoolConfig.setMaxTotal(redisConfig.getPoolMaxTotal());

            jedisPoolConfig.setMaxIdle(redisConfig.getPoolMaxIdle());

            jedisPoolConfig.setMaxWaitMillis(redisConfig.getPoolMaxWait());

            jedisPool=new JedisPool(jedisPoolConfig, redisConfig.getHost(),redisConfig.getPort(),redisConfig.getTimeout()*1000,redisConfig.getPassword(),0);

        }

        return jedisPool;

    }

    public  String set(String key,String value, int cacheSeconds)

    {

        String strRet = null;

        Jedis jedis =null;

        try {

            jedis = getJedisPool().getResource();

            strRet=jedis.set(key,value);

            if (cacheSeconds != 0) {

                jedis.expire(key, cacheSeconds);

            }

        } catch (Exception e) {

            //logger.error(e.getMessage(), e);

        } finally {

            if (jedis != null)

                jedis.close(); //注意这里不是关闭连接,在JedisPool模式下,Jedis会被归还给资源池。

        }

        return strRet;

    }

    public  String get(String key)

    {

        String strRet=null;

        Jedis jedis =null;

        try {

            jedis = getJedisPool().getResource();

            strRet=jedis.get(key);

        } catch (Exception e) {

            //logger.error(e.getMessage(), e);

        } finally {

            if (jedis != null)

                jedis.close(); //注意这里不是关闭连接,在JedisPool模式下,Jedis会被归还给资源池。

        }

        return strRet;

    }

}
3、Config文件新建RedisConfig
package com.jgui.config;

import lombok.Data;

import org.springframework.beans.factory.annotation.Value;

import org.springframework.boot.context.properties.ConfigurationProperties;

import org.springframework.boot.context.properties.EnableConfigurationProperties;

import org.springframework.stereotype.Component;

/**

 * @Author: zhaogaojian

 * @Description:

 * @Date: Created in 2020/1/822:51

 */

@Data

@Component

@ConfigurationProperties(prefix = "redis") //把同类的配置信息自动封装成实体类

public class RedisConfig {

    private String host="127.0.0.1";

    private Integer port=6379;

    private Integer timeout=3;  //秒

    private String password="123456";

    private Integer poolMaxTotal=10;

    private Integer poolMaxIdle=10;

    private Integer poolMaxWait=3;//秒

}
4、application.properties增加配置节
#--------------------Jedis配置-------------------

redis.host=127.0.0.1

redis.port=6379

#秒

redis.timeout=5

redis.password=123456

redis.poolMaxTotal=10

redis.poolMaxIdle=10

#秒

redis.poolMaxWait=3
5、修改hello进行测试
    @Autowired

    private JedisPoolUtil jedisPoolUtil;

    @RequestMapping("/hello")

    public String hello() {

        String ret=jedisPoolUtil.set("111","123",60);

        String ret1=jedisPoolUtil.get("111");

        return ret1;

        //return userDao.selectByPrimaryKey(1).getRealname();

        //return "Hello World11";

    }
6、拦截器增加hello排除
public void addInterceptors(InterceptorRegistry registry){

        List<String> excludePath = new ArrayList<>();

        excludePath.add("/login"); //登录

        excludePath.add("/hello"); //测试

        registry.addInterceptor(tokenInterceptor)

                .addPathPatterns("/**")

                .excludePathPatterns(excludePath);

        WebMvcConfigurer.super.addInterceptors(registry);

    }
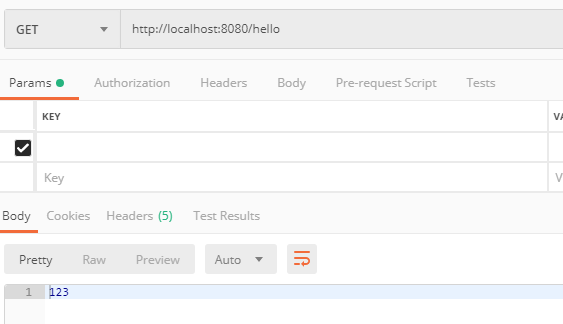
7、运行测试,返回123,工作正常
以上参考
https://www.jianshu.com/p/df57fefe0ab7
https://www.jdon.com/51938
https://blog.csdn.net/MRA__S__/article/details/82051538
https://blog.csdn.net/damanchen/article/details/103770222
等
SpringBoot学习- 5、整合Redis的更多相关文章
- SpringBoot学习:整合Redis
项目下载地址:http://download.csdn.NET/detail/aqsunkai/9805821 pom.xml添加对redis的依赖: <!-- https://mvnrepos ...
- SpringBoot学习笔记:Redis缓存
SpringBoot学习笔记:Redis缓存 关于Redis Redis是一个使用ANSI C语言编写的免费开源.支持网络.可基于内存亦可以持久化的日志型.键值数据库.其支持多种存储类型,包括Stri ...
- SpringBoot学习之整合Mybatis
本博客使用IDEA开发工具,通过Maven构建SpringBoot项目,初始化项目添加的依赖有:spring-boot-starter-jdbc.spring-boot-starter-web.mys ...
- 【快学springboot】11.整合redis实现session共享
前言 这里都是基于前面的项目基础上的.springboot整合redis非常的方便,这也是springboot的宗旨,简化配置.这篇文章就教大家如何使用springboot整合redis来实现sess ...
- SpringBoot学习之整合Druid的简单应用
一.Druid介绍 Druid简介 Druid是目前Java语言中最好的数据库连接池之一.结合了 C3P0.DBCP 等 DB 池的优点,同时加入了日志监控.Druid 是一个分布式的.支持实时多维 ...
- SpringBoot缓存篇Ⅱ --- 整合Redis以及序列化机制
一.Redis环境搭建 系统默认是使用ConcurrentMapCacheManager,然后获取和创建ConcurrentMapCache类型的缓存组件,再将数据保存在ConcurrentMap中 ...
- SpringBoot学习之整合Swagger
Swagger介绍 1.什么是Swagger 作为后端程序开发,我们多多少少写过几个后台接口项目,不管是编写手机端接口,还是目前比较火热的前后端分离项目,前端与后端都是由不同的工程师进行开发,那么这之 ...
- redis(Springboot中封装整合redis,java程序如何操作redis的5种基本数据类型)
平常测试redis操作命令,可能用的是cmd窗口 操作redis,记录一下 java程序操作reids, 操作redis的方法 可以用Jedis ,在springboot 提供了两种 方法操作 Red ...
- 25、springboot与缓存整合Redis
默认使用ConcurrentMapCacheManager 将数据保存在下面的Map中 docker: 安装Redis: 查看官方文档: 添加约束 <dependency> <gro ...
- SpringBoot学习:整合Mybatis,使用HikariCP超高性能数据源
一.添加pom依赖jar包: <!--整合mybatis--> <dependency> <groupId>org.mybatis.spring.boot</ ...
随机推荐
- STM32固件库和自定义工程模板
固件库结构 本文使用的固件库是STM32F10x_StdPeriph_Lib_V3.5.0,可以在官网获取.该固件库包含四个文件夹和一个库的说明文档,如下图所示,stm32f10x_stdperiph ...
- C#中WinFrom保存文件SaveFileDialog类的使用方法
C#中WinFrom保存文件SaveFileDialog类的使用方法 使用的命名空间是:System.Windows.Forms; 常用属性: Title:保存对话框的标题,默认为"另存 ...
- SynchronizationContext(同步上下文)综述
>>返回<C# 并发编程> 1. 概述 2. 同步上下文 的必要性 2.1. ISynchronizeInvoke 的诞生 2.2. SynchronizationContex ...
- Prime_Series_Level-1
0x01 先收集靶机端口,目录信息 1)nmap扫描端口 开启了ssh服务和apache服务,搜索相关漏洞 只有一个ssh用户名枚举,先放着 2)dirb爆破目录 dirb http://192.16 ...
- PHP0014:PHP操作文件
查看源代码 用这种方式抓取网页,和原始网页一模一样. 数组不能用echo 将一个网页保存到本地html文件
- MySQL 8 复制
MySQL 8.0 支持的复制方法: 传统方法(基于二进制日志文件位置) 新方法(基于GTID) MySQL 8.0 支持的同步类型: 异步复制(内置) 同步复制(NDB集群) 半同步复制(半同步复制 ...
- linux 磁盘管理2-硬盘分区
不重启添加硬盘. echo '- - -' > /sys/class/scsi_host/host2/scan #centos7有效 列出块设备 lsblk 显示块设备列表 ...
- C# 数组冒泡排序复习
using System; namespace runoob { class MyClass { static void Main(string[] args) { MyClass1 myClass ...
- Android8.0自定义广播接收不到问题
https://blog.csdn.net/kongqwesd12/article/details/78998151
- C++文件处理(一):读/写txt文件
C++文件处理与C语言不同,C++文件处理使用的是:流(stream) C++头文件fstream定义了三个类型来支持文件IO