
Thymeleaf模板引擎学习
开发传统Java WEB项目时,我们可以使用JSP页面模板语言,但是在SpringBoot中已经不推荐使用JSP页面进行页面渲染了。从而Thymeleaf提供了一个用于整合Spring MVC的可选模块,在应用开发中,你可以使用Thymeleaf来完全代替JSP,或其他模板引擎,如Velocity、FreeMarker等。它的语法与我们以前使用的EL表达式和JSTL标签库十分类似。接下来我们进行学习使用Thymeleaf!
一、新建一个Spring Boot项目添加Thymeleaf依赖:创建Spring Boot可以参考一下这篇博文
   <dependency>

      <groupId>org.springframework.boot</groupId>

      <artifactId>spring-boot-starter-thymeleaf</artifactId>

    </dependency>
二、在SpringBoot的.yml配置文件中添加以下配置:
 server:

   port: 8097

 spring:

   thymeleaf:

     prefix: classpath:/templates/ #获取页面路径

     mode: HTML5

     encoding: UTF-8

     content-type: text/html

     cache: false
三、新建一个Controller进行请求拦截,最后返回一个页面:
 @Controller //此处必须是@Controller注解,@RestController注解不进行解析,则返回页面返回JSON字符串

 public class ThymeleafController {

     //传输简单文字,Model对象,进行信息存储返回到index页面

     @RequestMapping("/hello")

     public String hello(Model model){

         model.addAttribute("name","李小龙");

         model.addAttribute("age","15");

         model.addAttribute("text","那小子真帅");

         return  "index";

     }

 }
四、在resources/templates/新建一个index.html页面,代码如下:
<!DOCTYPE html>

<html xmlns:th="http://www.thymeleaf.org"> <!--Thymeleaf库-->

<head>

    <meta http-equiv="Content-Type" content="text/html; charset=UTF-8" />

    <title>Thymeleaf</title>

</head>

<body>

    <!--基本字段显示-->

    <p style="color:red">hello world</p>

    <p th:text="'姓名:'+${name}"></p>

    <p th:text="'年龄:'+${age}"></p>

    <p th:text="'介绍:'+${text}"></p>

</body>
至此我们启动项目,访问:http://localhost:8097/hello查看以下效果说明:使用Thymeleaf模板进行简单字段传输并渲染到页面成功 !
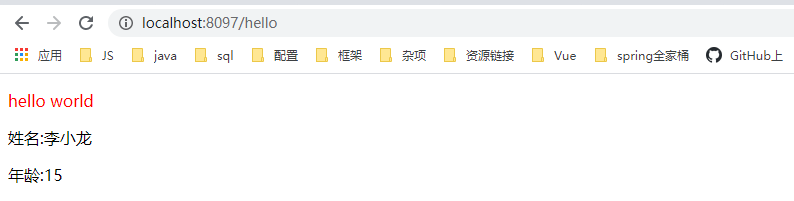
接下来可以在页面中进行条件判断:if、unless、switch,页面效果大家可以试验一番。
  <!--if判断true时才显示-->

    <div th:if="${age} == 16">... do something ...</div>

    <!--unless和if判断条件相反,只有为false时候才会显示-->

    <div th:unless="${age} == 16">...  something ...</div>

    <!--switch判断进行数据匹配判断-->

    <span th:switch="${age}">

        <p th:case="15">李小龙是15岁</p>

        <p th:case="16">李小龙是16岁</p>

        <p th:case="*">没有匹配成功的数据!</p>

    </span>
在Thymeleaf模板中传输对象:1.Controller层、2.HTML层、
   //传输对象

     @RequestMapping("/queryuser")

     public String queryuser(Model model){

         User user = new User();

         user.setName("李小龙");

         user.setAge("16岁");

         user.setText("他对我说:那小子真帅");

         user.setSuccess("并拍了拍了我的肩膀");

         model.addAttribute("myuser",user);

         return "user";

     }
    <!--第一种方式是通过属性获取-->

    <div style="border: 1px solid red;width: 200px;height: 160px;text-align: center; ">

        <p th:text="'尊姓大名:'+${myuser.name}"></p>

        <p th:text="'芳龄:'+${myuser.age}"></p>

        <p th:text="'简介:'+${myuser.text}"></p>

        <p th:text="'动作:'+${myuser.success}"></p>

    </div>

    <!--第一种方式是通过属性选择值-->

    <div style="border: 1px solid blue;width: 200px;height: 160px;text-align: center; ">

        <div th:object="${myuser}">

            <p th:text="'尊姓大名:'+ *{name}"></p>

            <p th:text="'芳龄:'+ *{age}"></p>

            <p th:text="'简介:'+ *{text}"></p>

            <p th:text="'动作:'+ *{success}"></p>

        </div>

    </div>
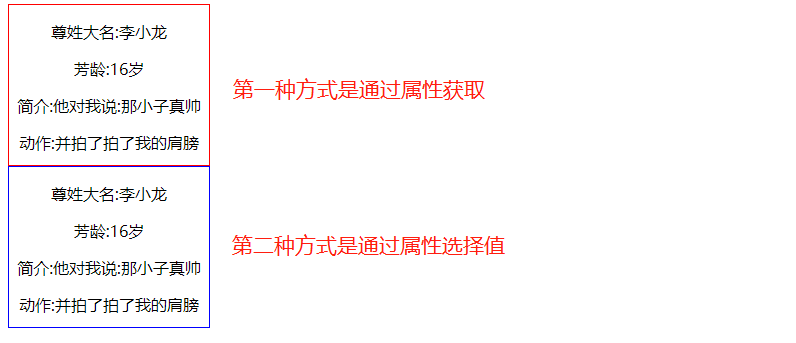
效果如下:
在Thymeleaf模板中传输List、Map集合:1.Controller层、2.HTML层、
     //传输List

     @RequestMapping("/finAllList")

     public String finAllList(Model model){

         List<User> listuser = new ArrayList<User>();

         for (int i=0;i<6;i++){

             User user = new User();

             user.setName("阿里云成立第"+i+"年");

             user.setAge("阿里云第"+i+"岁");

             user.setText("阿里云第"+i+"岁时做了"+i+"件事情");

             user.setSuccess("并拍了"+i+"次我的肩膀");

             listuser.add(user);

         }

         model.addAttribute("ListUser",listuser);

         return "userarry";

     }

     //传输Map

     @RequestMapping("/finAllMap")

     public String finAllMap(Model model){

         Map<String,User> mapuser = new HashMap<String, User>();

         for (int i=0;i<6;i++){

             User user = new User();

             user.setName("阿里云成立第"+i+"年");

             user.setAge("阿里云第"+i+"岁");

             user.setText("阿里云第"+i+"岁时做了"+i+"件事情");

             user.setSuccess("并拍了"+i+"次我的肩膀");

             mapuser.put("mapuser"+i,user);

         }

         model.addAttribute("Mapuser",mapuser);

         return "userarry";

     }
 <!-- 对list集合不为空判断-->

    <table th:if="${not #lists.isEmpty(ListUser)}">

        <tr><td>List序号</td><td>姓名</td><td>年龄</td><td>事件</td><td>动作</td><td>偶数</td><td>奇数</td></tr>

        <tr th:each="user,memberStat:${ListUser}">

            <td th:text="${memberStat.index + 1}"></td>

            <td th:text="${user.name}"></td>

            <td th:text="${user.age}"></td>

            <td th:text="${user.text}"></td>

            <td th:text="${user.success}"></td>

            <td th:text="${memberStat.even}"></td>

            <td th:text="${memberStat.odd}"></td>

        </tr>

    </table>

    <!--对Map集合不为空判断-->

   <table th:if="${not #maps.isEmpty(Mapuser)}">

        <tr><td>Map集合序号</td><td>key</td><td>姓名</td><td>年龄</td><td>事件</td><td>动作</td><td>偶数</td><td>奇数</td></tr>

        <tr th:each="mapuser,memberStat:${Mapuser}">

            <td th:text="${memberStat.index + 1}"></td>

            <td th:text="${mapuser.key}"/>

            <td th:text="${mapuser.value.name}"></td>

            <td th:text="${mapuser.value.age}"></td>

            <td th:text="${mapuser.value.text}"></td>

            <td th:text="${mapuser.value.success}"></td>

            <td th:text="${memberStat.even}"></td>

            <td th:text="${memberStat.odd}"></td>

        </tr>

    </table>
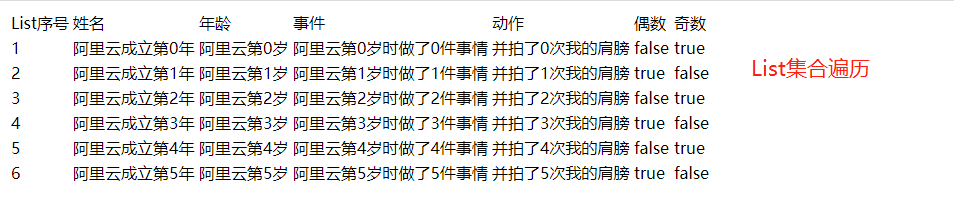
效果如下:
个人总结:
在此个人只是做了一个小例子,各大网友可自行扩展功能业务,学习是永无止境的!
参考博文:
https://www.jianshu.com/p/a842e5b5012e
https://www.cnblogs.com/jiangbei/p/8462294.html
Thymeleaf模板引擎学习的更多相关文章
- Thymeleaf 模板引擎简介
目录 Thymeleaf 模板引擎 官方文档下载 Hello World 新建应用 后台控制器 前端页面 浏览器访问测试 Thymeleaf 模板引擎1.Thymeleaf 是 Web 和独立环境的现 ...
- 狂神说SpringBoot11:Thymeleaf模板引擎
狂神说SpringBoot系列连载课程,通俗易懂,基于SpringBoot2.2.5版本,欢迎各位狂粉转发关注学习. 微信公众号:狂神说(首发) Bilibili:狂神说Java(视频) 未经作 ...
- NVelocity模板引擎学习笔记
NVelocity模板引擎学习笔记 学习模板引擎有一段时间现在做一些总结
- (二)SpringBoot基础篇- 静态资源的访问及Thymeleaf模板引擎的使用
一.描述 在应用系统开发的过程中,不可避免的需要使用静态资源(浏览器看的懂,他可以有变量,例:HTML页面,css样式文件,文本,属性文件,图片等): 并且SpringBoot内置了Thymeleaf ...
- 【Springboot】Springboot整合Thymeleaf模板引擎
Thymeleaf Thymeleaf是跟Velocity.FreeMarker类似的模板引擎,它可以完全替代JSP,相较与其他的模板引擎,它主要有以下几个特点: 1. Thymeleaf在有网络和无 ...
- 三、thymeleaf模板引擎构建前台html, 后台使用 ModelAndView 和 Model 模型
项目源码:https://github.com/y369q369/springBoot.git -> thymeleaf 私聊QQ: 1486866853 1.pom.xml中 ...
- SpringBoot使用thymeleaf模板引擎
(1).添加pom依赖 <dependency> <groupId>org.springframework.boot</groupId> <artifactI ...
- Spring Boot 2.0 整合Thymeleaf 模板引擎
本节将和大家一起实战Spring Boot 2.0 和thymeleaf 模板引擎 1. 创建项目 2. 使用Spring Initlizr 快速创建Spring Boot 应用程序 3. 填写项目配 ...
- Thymeleaf模板引擎的初步使用
在springboot中,推荐使用的模板引擎是Thymeleaf模板引擎,它提供了完美的Spring MVC的支持.下面就简单的介绍一下Thymeleaf模板引擎的使用. 在controller层中, ...
随机推荐
- 油猴脚本 之 网教通直播评论记录抓取 v2.0
先放一个 <油猴脚本 之 网教通直播评论记录抓取>那篇文章的传送门 . 修复内容 将所有表情转为 [符号表情] 字样,而非删除: 修复被禁言用户读取异常,现在被禁言用户表示为 张三 [已禁 ...
- 写给大忙人的Redis主从复制,花费五分钟让你面试不尴尬
相信很多小伙伴都已经配置过主从复制,但是对于redis主从复制的工作流程和常见问题很多都没有深入的了解.咔咔这次用时俩天时间给大家整理一份redis主从复制的全部知识点. 本文实现所需环境 cento ...
- Linux 安装指定jdk版本
操作步骤 卸载系统自带jdk版本 1.查看安装的jdk rpm -qa | grep java 2.卸载系统自带jdk rpm -e --nodeps 包名 下载jdk 当前最新版本下载地址:http ...
- 深入了解C#(TPL)之Parallel.ForEach异步
前言 最近在做项目过程中使用到了如题并行方法,当时还是有点犹豫不决,因为平常使用不多, 于是借助周末时间稍微深入了下,发现我用错了,故此做一详细记录,希望对也不是很了解的童鞋在看到本文此文后不要再犯和 ...
- zip矩阵转至
list01=[1,2,3,4] list02=["a","b","c","d"] for itme in zip(li ...
- Linux下如何查看硬件信息?
我们在 Linux 下进行开发时,有时也需要知道当前的硬件信息,比如:CPU几核?使用情况?内存大小及使用情况?USB设备是否被识别?等等类似此类问题.下面良许介绍一些常用的硬件查看命令. lshw ...
- 升级OPENSSH踩过的坑
安装三个必要依赖包yum install gcc zlib-devel openssl-devel上传安装包,创建一个/tmp目录下,然后解压,将/etc/ssh/目录移动到本地解压安装包,进入安装目 ...
- linux最小化安装命令补全
bash-completion 需要安装bash-completion才能补全,安装后,重新打开一个窗口就能生效.
- linux 在指定文件夹下查找指定字符
grep -r '119090610015743205' /data/html/www/gap_bz_middleware/storage/apiLogs/
- MySql数据库GROUP BY使用过程中的那些坑
MySql数据库GROUP BY使用过程中的那些坑 GROUP BY 语句用于结合合计函数,根据一个或多个列对结果集进行分组. 特别注意: group by 有一个原则,就是 select 后面的所有 ...