iOS:提示框(警告框)控件UIAlertView的详解
提示框(警告框)控件:UIAlertView
UIAlertViewStyleDefault = 0, //默认类型
UIAlertViewStyleSecureTextInput, //安全密码的文本框输入类型
UIAlertViewStylePlainTextInput, //普通文本框的文本框输入类型
UIAlertViewStyleLoginAndPasswordInput //登陆账号和密码输入类型
};
属性:
@property(nonatomic,copy) NSString *message; // 提示信息
@property(nonatomic,readonly) NSInteger numberOfButtons; // 提示框的按钮数量
- (NSInteger)addButtonWithTitle:(NSString *)title;
※返回指定索引值的提示框标题
- (NSString *)buttonTitleAtIndex:(NSInteger)buttonIndex;
※显示提示框
-(void)show;
※点击指定的按钮时提示框消失
- (void)dismissWithClickedButtonIndex:(NSInteger)buttonIndex animated:(BOOL)animated;
※设置输入文本框的索引,返回文本框
- (UITextField *)textFieldAtIndex:(NSInteger)textFieldIndex
协议:代理方法
protocol UIAlertViewDelegate <NSObject>
@optional
※点击提示框上的按钮时触发的方法
- (void)alertView:(UIAlertView *)alertView clickedButtonAtIndex:(NSInteger)buttonIndex;
※提示框将要消失时触发的方法
- (void)alertViewCancel:(UIAlertView *)alertView;
※提示框将要显示时触发的方法
- (void)willPresentAlertView:(UIAlertView *)alertView;
※已经显示提示框时触发的方法
- (void)didPresentAlertView:(UIAlertView *)alertView;
※提示框将要消失是触发的方法
- (void)alertView:(UIAlertView *)alertView willDismissWithButtonIndex:(NSInteger)buttonIndex;
※提示框已经消失时触发的方法
- (void)alertView:(UIAlertView *)alertView didDismissWithButtonIndex:(NSInteger)buttonIndex;
※设置提示框的第一个按钮是否不是取消按钮
- (BOOL)alertViewShouldEnableFirstOtherButton:(UIAlertView *)alertView;
@end
具体的举例如下:
首先在视图控制器视图中创建按钮并添加事件,便于完成提示框的创建:
 - (void)viewDidLoad {

     [super viewDidLoad];

     //在视图中添加按钮事件

     UIButton *button = [[UIButton alloc]initWithFrame:CGRectMake(, , , )];

     [button setTitle:@"点击" forState:UIControlStateNormal];

     [button setTitleColor:[UIColor redColor] forState:UIControlStateNormal];

     button.center = self.view.center;

     //第一种形式:提示框上添加一两个按钮的默认类型

     //[button addTarget:self action:@selector(Clicked_1:) forControlEvents:UIControlEventTouchUpInside];

     //第二种形式:提示框上添加多个按钮的默认类型

     //[button addTarget:self action:@selector(Clicked_2:) forControlEvents:UIControlEventTouchUpInside];

     //第三种形式:提示框的类型为普通文本框输入类型

     //[button addTarget:self action:@selector(Clicked_3:) forControlEvents:UIControlEventTouchUpInside];

     //第四种形式:提示框的类型为安全文本框输入类型

     //[button addTarget:self action:@selector(Clicked_4:) forControlEvents:UIControlEventTouchUpInside];

     //第五种形式:提示框的类型为登陆账号和密码文本框输入类型

     [button addTarget:self action:@selector(Clicked_5:) forControlEvents:UIControlEventTouchUpInside];

     [self.view addSubview:button];

 }
1、第一种形式:提示框上添加一两个按钮的默认类型
 #pragma mark -Clicked1  提示框上添加一两个按钮的默认类型

 -(void)Clicked_1:(UIButton*)sender

 {

     //创建提示框对象

     UIAlertView *alertView = [[UIAlertView alloc]initWithTitle:@"提示信息" message:@"信息输入有误" delegate:self cancelButtonTitle:@"确认" otherButtonTitles:@"取消", nil];

     //显示提示框

     [alertView show];

 }
演示结果:

2、第二种形式:提示框上添加多个按钮的默认类型
 #pragma mark -Clicked2  提示框上添加多个按钮的默认类型

 -(void)Clicked_2:(UIButton*)sender

 {

     //创建提示框对象

     UIAlertView *alertView = [[UIAlertView alloc]initWithTitle:@"提示信息" message:@"多个按钮" delegate:self cancelButtonTitle:@"button1" otherButtonTitles:@"button2", nil];

     //继续添加按钮

     [alertView addButtonWithTitle:@"button3"];

     [alertView addButtonWithTitle:@"button4"];

     [alertView addButtonWithTitle:@"button5"];

     [alertView addButtonWithTitle:@"button6"];

     [alertView addButtonWithTitle:@"button7"];

     //显示提示框

     [alertView show];

 }
演示结果:

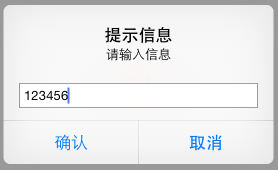
3、第三种形式:提示框的类型为普通文本框输入类型
 #pragma mark -Clicked_3  提示框的类型为普通文本框输入类型

 -(void)Clicked_3:(UIButton*)sender

 {

     //创建提示框对象

     UIAlertView *alertView = [[UIAlertView alloc]initWithTitle:@"提示信息" message:@"请输入信息" delegate:self cancelButtonTitle:@"确认" otherButtonTitles:@"取消", nil];

     alertView.alertViewStyle = UIAlertViewStylePlainTextInput;

     //显示提示框

     [alertView show];

 }
演示结果:
4、第四种形式:提示框的类型为安全文本框输入类型
 #pragma mark -Clicked_4  提示框的类型为安全文本框输入类型

 -(void)Clicked_4:(UIButton*)sender

 {

     //创建提示框对象

     UIAlertView *alertView = [[UIAlertView alloc]initWithTitle:@"提示信息" message:@"请输入信息" delegate:self cancelButtonTitle:@"确认" otherButtonTitles:@"取消", nil];

     alertView.alertViewStyle = UIAlertViewStyleSecureTextInput;

     //显示提示框

     [alertView show];

 }
演示结果:

5、第五种形式:提示框的类型为登陆账号和密码文本框输入类型
 #pragma mark -Clicked_5  提示框的类型为登陆账号和密码文本框输入类型

 -(void)Clicked_5:(UIButton*)sender

 {

     //创建提示框对象

     UIAlertView *alertView = [[UIAlertView alloc]initWithTitle:@"提示信息" message:@"请输入账号和密码" delegate:self cancelButtonTitle:@"确认" otherButtonTitles:@"取消", nil];

     alertView.alertViewStyle = UIAlertViewStyleLoginAndPasswordInput;

     //显示提示框

     [alertView show];

 }
演示结果:

协议代理的方法的使用:
1、首先实现协议:@interface ViewController ()<UIAlertViewDelegate>
2、其次设置代理,以上面的第一种形式提示框举例:
 #pragma mark -Clicked1  提示框上添加一两个按钮的默认类型

 -(void)Clicked_1:(UIButton*)sender

 {

     //创建提示框对象

     UIAlertView *alertView = [[UIAlertView alloc]initWithTitle:@"提示信息" message:@"信息输入有误" delegate:self cancelButtonTitle:@"确认" otherButtonTitles:@"取消", nil];

     alertView.delegate = self; //设置代理

     //显示提示框

     [alertView show];

 }
3、实现协议的方法:
 #pragma mark -<UIAlertViewDelegate>

 //※点击提示框上的按钮时触发的方法

 - (void)alertView:(UIAlertView *)alertView clickedButtonAtIndex:(NSInteger)buttonIndex

 {

     NSLog(@"alertView:clickedButtonAtIndex:");

 }

 //※提示框将要消失时触发的方法

 - (void)alertViewCancel:(UIAlertView *)alertView

 {

     NSLog(@"alertViewCancel:");

 }

 //※提示框将要显示时触发的方法

 - (void)willPresentAlertView:(UIAlertView *)alertView

 {

     NSLog(@"willPresentAlertView:");

 }

 //※已经显示提示框时触发的方法

 - (void)didPresentAlertView:(UIAlertView *)alertView

 {

      NSLog(@"didPresentAlertView:");

 }

 //※提示框将要消失是触发的方法

 - (void)alertView:(UIAlertView *)alertView willDismissWithButtonIndex:(NSInteger)buttonIndex

 {

     NSLog(@"alertView: willDismissWithButtonIndex:");

 }

 //※提示框已经消失时触发的方法

 - (void)alertView:(UIAlertView *)alertView didDismissWithButtonIndex:(NSInteger)buttonIndex

 {

     NSLog(@"alertView: didDismissWithButtonIndex:");

 }

 //※设置提示框的第一个按钮是否不是取消按钮

 - (BOOL)alertViewShouldEnableFirstOtherButton:(UIAlertView *)alertView

 {

     NSLog(@"NO");

     return NO;

 }
刚开始时View中的按钮截图:

点击"点击"按钮时,截图中其他第一个按钮被设置为不是取消按钮(按钮无效)和代理方法执行顺序结果:

-- ::30.239 提示框(警告框)UIAlertView[:] willPresentAlertView:

-- ::30.240 提示框(警告框)UIAlertView[:] NO

-- ::30.763 提示框(警告框)UIAlertView[:] didPresentAlertView:
点击"确认"时,剩下的代理方法执行顺序的结果:
-- ::27.366 提示框(警告框)UIAlertView[:] alertView:clickedButtonAtIndex:

-- ::27.367 提示框(警告框)UIAlertView[:] alertView: willDismissWithButtonIndex:

-- ::27.777 提示框(警告框)UIAlertView[:] alertView: didDismissWithButtonIndex:
总的执行结果为:
-- ::30.239 提示框(警告框)UIAlertView[:] willPresentAlertView:

-- ::30.240 提示框(警告框)UIAlertView[:] NO

-- ::30.763 提示框(警告框)UIAlertView[:] didPresentAlertView:

-- ::27.366 提示框(警告框)UIAlertView[:] alertView:clickedButtonAtIndex:

-- ::27.367 提示框(警告框)UIAlertView[:] alertView: willDismissWithButtonIndex:

-- ::27.777 提示框(警告框)UIAlertView[:] alertView: didDismissWithButtonIndex:
iOS:提示框(警告框)控件UIAlertView的详解的更多相关文章
- 《手把手教你》系列技巧篇(三十八)-java+ selenium自动化测试-日历时间控件-下篇(详解教程)
1.简介 理想很丰满现实很骨感,在应用selenium实现web自动化时,经常会遇到处理日期控件点击问题,手工很简单,可以一个个点击日期控件选择需要的日期,但自动化执行过程中,完全复制手工这样的操作就 ...
- iOS:提示框(警告框)控件UIActionSheet的详解
提示框(警告框)控件2:UIActionSheet 功能:当点击按钮或标签等时,弹出一个提示框,显示必要的提示,然后通过添加的按钮完成需要的功能.它与导航栏类似,它继承自UIView. 风格类型: ...
- iOS:网页视图控件UIWebView的详解
网页视图控件:UIWebView 功能:它是继承于UIView的,是一个内置的浏览器控件,以用来浏览从网络下载下来的网页或者本地上加载下来的文档. 枚举: //网页视图导航类型 typedef NS_ ...
- iOS:选择器控件UIPickerView的详解和演示
选择器控件UIPickerView: 功能:它能够创建一个类似于密码锁式的单列或多列的选择菜单,用户可以通过它设置的代理来选择需要菜单中的任意的数据.例如创建日历.字体表(类型.大小.颜色).图库等. ...
- iOS:下拉刷新控件UIRefreshControl的详解
下拉刷新控件:UIRefreshControl 1.具体类信息: @interface UIRefreshControl : UIControl //继承控制类 - (instancetype)ini ...
- iOS:图像选取器控制器控件UIImagePickerController的详解
图像选择控制器:UIImagePickerController 功能:用于选取相册或相机等里面的照片. @interface UIImagePickerController : UINavigatio ...
- delphi控件属性大全-详解-简介
http://blog.csdn.net/u011096030/article/details/18716713 button 组件: CAPTION 属性 :用于在按钮上显示文本内容 Cancel ...
- 【VB技巧】VB ListView 控件功能使用详解
来源:http://lcx.cc/?i=494 ListView控件 在工具箱上击鼠标右键,选择快捷菜单的Components(部件)项,在控件列表中选择Microsoft Windows Commo ...
- 转 VB ListView控件各种操作详解
Private Sub Form_Load() ListView1.ListItems.Clear '清空列表 ListView1.ColumnHeaders.Clear '清空列表头 ListVie ...
随机推荐
- js实现动态数字时钟
1.效果如下 2.html部分 <!DOCTYPE html> <html> <head> <meta charset="UTF-8"&g ...
- SGU 205. Quantization Problem
205. Quantization Problem time limit per test: 0.25 sec. memory limit per test: 65536 KB input: stan ...
- DotNetOpenAuth实践之Windows签名制作
系列目录: DotNetOpenAuth实践系列(源码在这里) 在上篇中我们搭建了一个简单的认证服务器,里面使用到了Windows签名证书,这一篇则是教大家如何制作Windows签名证书,下面进入正题 ...
- es6的set和get实现数据双向绑定,监听变量变化。
直接上代码吧,这个用法真的是效仿了.net的枚举. vue的数据双向绑定就是用这个实现的. 代码: html: <input type="text" id="inp ...
- php、mysql编译配置
与apache一起使用: Configure Command => './configure' '--prefix=/home/sujunjie/local/php' '--with-apx ...
- maven的认识
>>>>>>>>>> 安装完成后,设置为环境变量 命令行输入,如下图片就表明成功 >>>>>>>& ...
- 常用排序算法的Python实现
冒泡排序 算法思想: 对于一组需要排序的数据,对于相邻的两个数进行比较,使较大(或者较小)的数一直向后推,经过多层排序之后,使整个序列是有序的. 算法实现: def bubble_sort(L): l ...
- 主席树+dfs SPOJ BZOJ2588 Count on a tree
这道题我由于智障错误导致一直错. 在树上建主席树,加上lca思想,很简单. #include<bits/stdc++.h> using namespace std; ; struct no ...
- SpringBoot 整合 WebSocket
SpringBoot 整合 WebSocket(topic广播) 1.什么是WebSocket WebSocket为游览器和服务器提供了双工异步通信的功能,即游览器可以向服务器发送消息,服务器也可以向 ...
- [转]Android开发过程中遇到的问题
例1: ‘Can't bind to local 8700 for debugger’报错和解决 1.CTS测试出现,运行startcts后,‘Can't bind to local 8700 ...