
【Unity3D】平面光罩特效
1 前言
屏幕深度和法线纹理简介中对深度和法线纹理的来源、使用及推导过程进行了讲解,激光雷达特效中讲述了一种重构屏幕像素点世界坐标的方法,本文将沿用激光雷达特效中重构像素点世界坐标的方法,实现平面光罩特效。
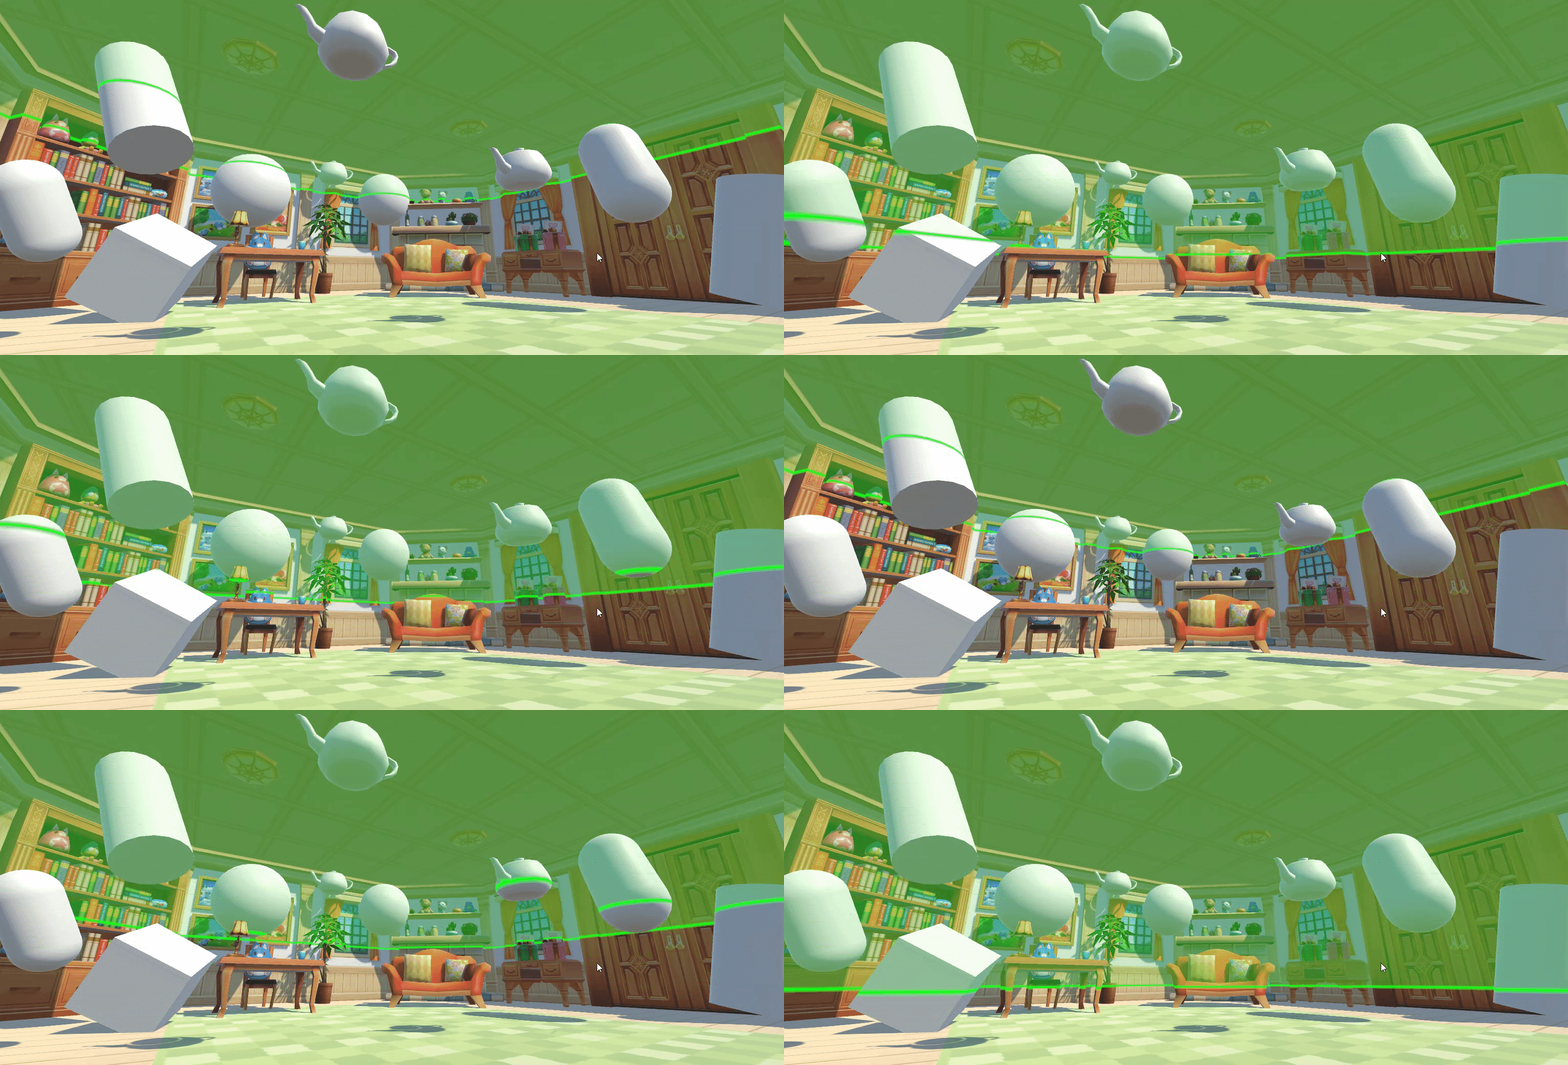
假设平面光罩的高度为 shieldHeight,高亮线的宽度为 lineWidth,待检测像素点对应的世界坐标的高度值为 height,则该点的着色分以下三种情况:
- height < shieldHeight - lineWidth:渲染背景颜色,即 tex2D(_MainTex, i.uv);
- height > shieldHeight + lineWidth:渲染遮罩与背景的混合颜色;
- abs(height - shieldHeight) <= lineWidth:渲染高亮线的颜色。
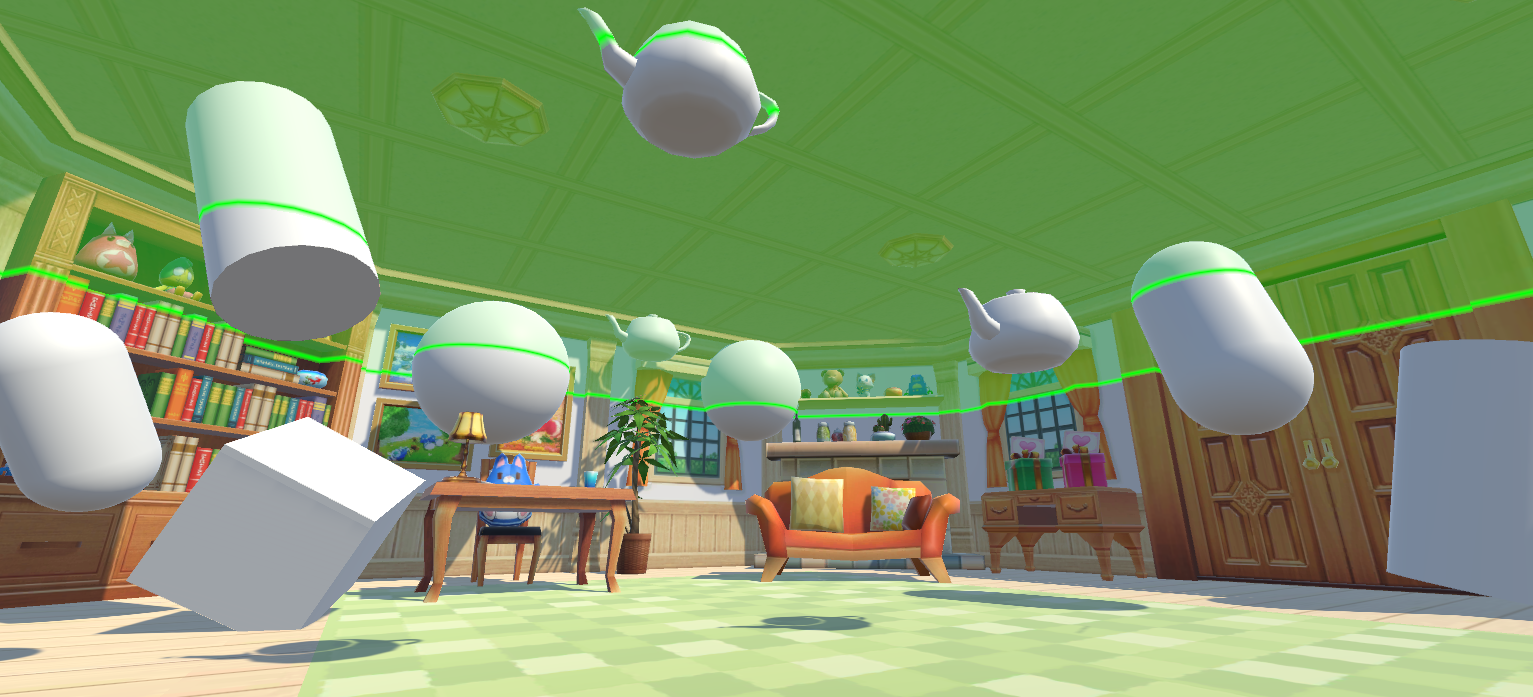
本文完整资源见→Unity3D平面光罩特效。
2 平面光罩实现
PlaneShield.cs
using UnityEngine;

[RequireComponent(typeof(Camera))] // 需要相机组件

public class PlaneShield : MonoBehaviour {

    public Color shieldColor = Color.green; // 平面光罩的颜色

    [Range(0.01f, 0.5f)]

    public float lineWidth = 0.05f; // 线条宽度(交叉线高光)

    [Range(0.01f, 1f)]

    public float minAlpha = 0.2f; // 平面光罩的最小alpha值

    [Range(0.01f, 5f)]

    public float speed = 1f; // 平面光罩的移动速度

    [Range(0, 1)]

    public float minHeight = 0; // 平面光罩的最小高度

    [Range(3, 4)]

    public float maxHeight = 4; // 平面光罩的最大高度

    private Camera cam; // 相机

    private Material material = null; // 材质

    private void Awake() {

        cam = GetComponent<Camera>();

        material = new Material(Shader.Find("MyShader/PlaneShield"));

        material.hideFlags = HideFlags.DontSave;

    }

    private void OnEnable() {

        cam.depthTextureMode |= DepthTextureMode.Depth;

    }

    private void OnRenderImage(RenderTexture src, RenderTexture dest) {

        if (material != null) {

            Matrix4x4 frustumCorners = GetFrustumCornersRay();

            material.SetMatrix("_FrustumCornersRay", frustumCorners);

            material.SetColor("_ShieldColor", shieldColor);

            material.SetFloat("_LineWidth", lineWidth);

            material.SetFloat("_MinAlpha", minAlpha);

            material.SetFloat("_Speed", speed);

            material.SetFloat("_MinHeight", minHeight);

            material.SetFloat("_MaxHeight", maxHeight);

            Graphics.Blit(src, dest, material);

        } else {

            Graphics.Blit(src, dest);

        }

    }

    private Matrix4x4 GetFrustumCornersRay() { // 获取插值射线向量(由相机指向近平面上四个角点的向量除以near后的坐标)

        Matrix4x4 frustumCorners = Matrix4x4.identity;

        float fov = cam.fieldOfView;

        float near = cam.nearClipPlane;

        float aspect = cam.aspect;

        float halfHeight = near * Mathf.Tan(fov * 0.5f * Mathf.Deg2Rad);

        Vector3 toRight = cam.transform.right * halfHeight * aspect; // 指向右方的向量

        Vector3 toTop = cam.transform.up * halfHeight; // 指向上方的向量

        Vector3 toForward = cam.transform.forward * near; // 指向前方的向量

        Vector3 bottomLeft = (toForward - toTop - toRight) / near; // 指向左下角的射线

        Vector3 bottomRight = (toForward + toRight - toTop) / near; // 指向右下角的射线

        Vector3 topRight = (toForward + toRight + toTop) / near; // 指向右上角的射线

        Vector3 topLeft = (toForward + toTop - toRight) / near; // 指向左上角的射线

        frustumCorners.SetRow(0, bottomLeft);

        frustumCorners.SetRow(1, bottomRight);

        frustumCorners.SetRow(2, topRight);

        frustumCorners.SetRow(3, topLeft);

        return frustumCorners;

    }

}
PlaneShield.shader
Shader "MyShader/PlaneShield" { // 平面罩特效

	Properties{

		_MainTex("MainTex", 2D) = "white" {} // 主纹理

		_ShieldColor("ShieldColor", Color) = (0, 1, 0, 1) // 平面光罩的颜色

		_LineWidth("LineWidth", Float) = 0.05 // 线条宽度(交叉线高光)

		_MinAlpha("MinAlpha", Float) = 0.2 // 平面光罩的最小alpha值

		_Speed("Speed", Float) = 1 // 平面罩的移动速度

		_MinHeight("MinHeight", Float) = 0.1 // 平面光罩的最小高度

		_MaxHeight("MaxHeight", Float) = 4 // 平面光罩的最大高度

	}

	SubShader{

		Pass {

			// 深度测试始终通过, 关闭深度写入

			ZTest Always ZWrite Off

			CGPROGRAM

			#include "UnityCG.cginc"

			#pragma vertex vert

			#pragma fragment frag

			sampler2D _MainTex; // 主纹理

			sampler2D _CameraDepthTexture; // 深度纹理

			float4x4 _FrustumCornersRay; // 视锥体四角射线向量(由相机指向近平面上四个角点的向量除以near后的坐标)

			float4 _ShieldColor; // 平面光罩的颜色

			float _LineWidth; // 线条光宽度(交叉线高光)

			float _MinAlpha; //平面光罩的最小alpha值

			float _Speed; // 平面光罩的移动速度

			float _MinHeight; // 平面光罩的最小高度

			float _MaxHeight; // 平面光罩的最大高度

			struct v2f {

				float4 pos : SV_POSITION; // 裁剪空间顶点坐标

				half2 uv : TEXCOORD0; // 纹理uv坐标,

				float4 interpolatedRay : TEXCOORD1; // 插值射线向量(由相机指向近平面上点的向量除以near后的坐标)

			};

			float4 getInterpolatedRay(half2 uv) { // 获取插值射线向量(由相机指向近平面上四个角点的向量除以near后的坐标)

				int index = 0;

				if (uv.x < 0.5 && uv.y < 0.5) {

					index = 0;

				} else if (uv.x > 0.5 && uv.y < 0.5) {

					index = 1;

				} else if (uv.x > 0.5 && uv.y > 0.5) {

					index = 2;

				} else {

					index = 3;

				}

				return _FrustumCornersRay[index];

			}

			v2f vert(appdata_img v) {

				v2f o;

				o.pos = UnityObjectToClipPos(v.vertex); // 计算裁剪坐标系中顶点坐标, 等价于: mul(unity_MatrixMVP, v.vertex)

				o.uv = v.texcoord;

				o.interpolatedRay = getInterpolatedRay(v.texcoord); // 获取插值射线向量(由相机指向近平面上四个角点的向量除以near后的坐标)

				return o;

			}

			fixed4 frag(v2f i) : SV_Target {

				float depth = SAMPLE_DEPTH_TEXTURE(_CameraDepthTexture, i.uv); // 非线性的深度, tex2D(_CameraDepthTexture, i.uv).r

				float linearDepth = LinearEyeDepth(depth); // 线性的深度

				//if (linearDepth > _ProjectionParams.z - 2) {

				//	return tex2D(_MainTex, i.uv); // 天空不参与平面光罩特效

				//}

				float3 worldPos = _WorldSpaceCameraPos + linearDepth * i.interpolatedRay.xyz; // 顶点世界坐标

				float range = _MaxHeight - _MinHeight; // 高度范围

				float shieldHeight = _MinHeight + abs(range - fmod(_Time.y * _Speed, range + range)); // 使平面光罩由上往下、再由下往上周期性运动

				if (worldPos.y < shieldHeight - _LineWidth) {

					return tex2D(_MainTex, i.uv);

				}

				float delta = abs(worldPos.y - shieldHeight);

				float factor = 1 - smoothstep(0, _LineWidth, delta) * (1 - _MinAlpha);

				fixed4 tex = tex2D(_MainTex, i.uv);

				fixed4 color = lerp(tex, _ShieldColor, factor);

				return color;

			}

			ENDCG

		}

	}

	FallBack off

}
3 平面光罩实现
声明:本文转自【Unity3D】平面光罩特效
【Unity3D】平面光罩特效的更多相关文章
- unity3d 摄像机抖动特效
摄像机抖动特效 在须要的地方调用CameraShake.Shake()方法就能够
- Unity3D图像后处理特效——Depth of Field 3.4
Depth of Field 3.4 is a common postprocessing effect that simulates the properties of a camera lens. ...
- Unity3D特效-场景淡入淡出
最近公司开始搞Unity3D..整个游戏..特效需求还是比较多的.关于UI部分的特效淡入淡出.看网上用的方法都是用个黑东东遮挡然后设置alpha这么搞....本大神感觉非常的low.而且很渣.故奋笔疾 ...
- [Unity3D]Unity资料大全免费分享
都是网上找的连七八糟的资料了,整理好分享的,有学习资料,视频,源码,插件……等等 东西比较多,不是所有的都是你需要的,可以按 ctrl+F 来搜索你要的东西,如果有广告,不用理会,关掉就可以了,如 ...
- unity3d 游戏插件 溶解特效插件 - Dissolve Shader
unity3d 游戏插件 溶解特效插件 - Dissolve Shader 链接: https://pan.baidu.com/s/1hr7w39U 密码: 3ed2
- Unity3D之挥动武器产生的剑痕特效
网维教程网 观看很多其它教程 眼下已知3种方法能够做这样的剑痕特效 1.尾随特效 2.程序实现动态面来处理剑痕动画. 3.美术实现剑痕动画,直接坐在模型动画里面 (由于我不会美术所以这个忽略 嘿嘿) ...
- [Unity3D]Unity3D游戏开发之刀光剑影特效的实现
大家好,我是秦元培,欢迎大家关注我的博客,我的博客地址是blog.csdn.net/qinyuanpei. 我实在不明确有的人为什么不喜欢武侠/仙侠类游戏,也许是因为武侠/仙侠类游戏身上被永远烙上的国 ...
- Unity3D学习笔记——组件之Effects(效果/特效)——Particle System(粒子系统)
Effects:效果/特效. Particle System:粒子系统.可用于创建烟雾.气流.火焰.涟漪等效果. 在Unity3D 3.5版本之后退出了新的shuriken粒子系统: 添加组件之后 ...
- 【Unity3D】基于粒子系统实现烟花特效
1 需求实现 粒子系统ParticleSystem 中介绍了粒子初始化.粒子发射.发射器形状.渲染器.碰撞.子发射器.拖尾等粒子系统的基本用法,本节将基于粒子系统实现烟花特效. 实现需求如下( ...
- unity3d笔记:控制特效的播放速度
一般在游戏中,主角或者怪物会受到减速效果,或者攻击速度减慢等类似的状态.本身动作减速的同时,衔接在角色上的特效也需要改变相应的播放速度.一般特效有三个游戏组件: 关键点就是改变Ani ...
随机推荐
- js数组和字符串方法
一.数组方法 1.1.可以改变原数组 var arr = [10, 20, 30, 40, 50, 55]; // 1. **** push() --- 在数组的最后添加一项内容 // var ret ...
- 2020-09-17:arp协议缓存过程是怎样的?
福哥答案2020-09-17:#福大大架构师每日一题# [答案来自此链接](https://www.zhihu.com/question/421513153) ARP(Address Resoluti ...
- 2021-09-02:IP 到 CIDR。给定起始IP和整数n,返回长度最小的CIDR块。力扣751。比如:ip=255.0.0.7,n=10,输出:[“255.0.0.7/32“,“255.0.0.
2021-09-02:IP 到 CIDR.给定起始IP和整数n,返回长度最小的CIDR块.力扣751.比如:ip=255.0.0.7,n=10,输出:["255.0.0.7/32" ...
- POJ - 2251 地下城主
You are trapped in a 3D dungeon and need to find the quickest way out! The dungeon is composed of un ...
- Spring源码:Bean生命周期(终章)
前言 本系列前面讲解了Spring的bean定义.bean实例化.bean初始化等生命周期.这些步骤使我们能够了解bean从创建到准备好使用所经历的过程.但是,除了这些步骤,bean的销毁也是非常重要 ...
- ES5 apply与call详解
虽然es6已经出台了很多简单的方法替代了apply和call,但是还是有很多老大项目使用到了es5的这些方法,所以对于这些方法的掌握是有必要的 先回顾一下官方对apply.call的诠释 apply方 ...
- 客户线上反馈:从信息搜集到疑难 bug 排查全流程经验分享
写在前面:本文是我在前端团队的第三次分享,应该很少会有开发者写客户反馈处理流程以及 bug 排查的心得技巧,全文比较长,写了一个多星期大概1W多字(也是我曾经2年工作的总结),如果你有耐心阅读,我相信 ...
- 离线安装rpm包以及自建yum仓库
离线安装rpm包以及自建yum仓库 离线安装rpm yum支持如下参数 --downloadnoly 只下载不安装 --downloaddir=directory 下载到指定目录下 因此可以在线下载好 ...
- CentOS7 本地光盘镜像rpm包
CentOS7 本地光盘镜像rpm包 一.前言 rpm包的下载方式 通过本地光盘镜像下载rpm,centos7.iso镜像文件,内置了绝大多数软件的rpm包(本文章即演示如何配置本地rpm) 在线下载 ...
- Spark SQL 及其DataFrame的基本操作
1.Spark SQL出现的 原因是什么? Spark SQL是Spark用来处理结构化数据的一个模块,它提供了一个叫作Data Frame的编程抽象结构数据模型(即带有Schema信息的RDD),S ...