【原创】大数据基础之Alluxio(1)简介、安装、使用
Alluxio 1.8.1

官方:http://www.alluxio.org/
一 简介
Open Source Memory Speed Virtual Distributed Storage
Alluxio, formerly Tachyon, enables any application to interact with any data from any storage system at memory speed.
alluxio是一个开源的拥有内存访问速度的虚拟分布式存储;之前叫Tachyon,可以使应用像访问内存数据一样访问任何存储系统中的数据。
1 优势
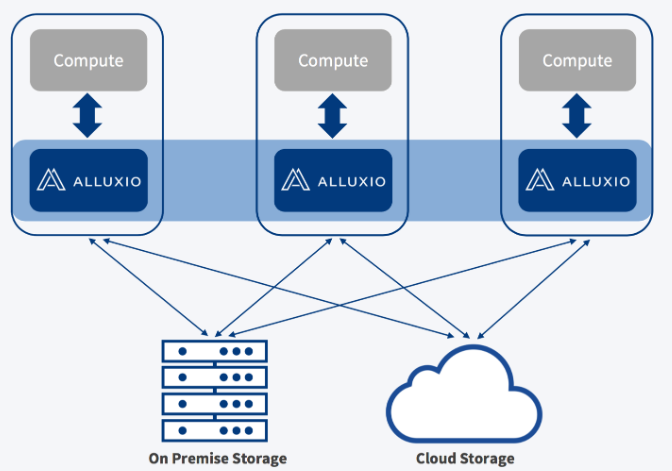
Storage Unification and Abstraction
Alluxio unifies data access to different systems, and seamlessly bridges computation frameworks and underlying storage.

Remote Data Acceleration
Decouple compute and storage without any loss in performance.
将计算和存储分离,并且不会损失性能;
2 部署结构
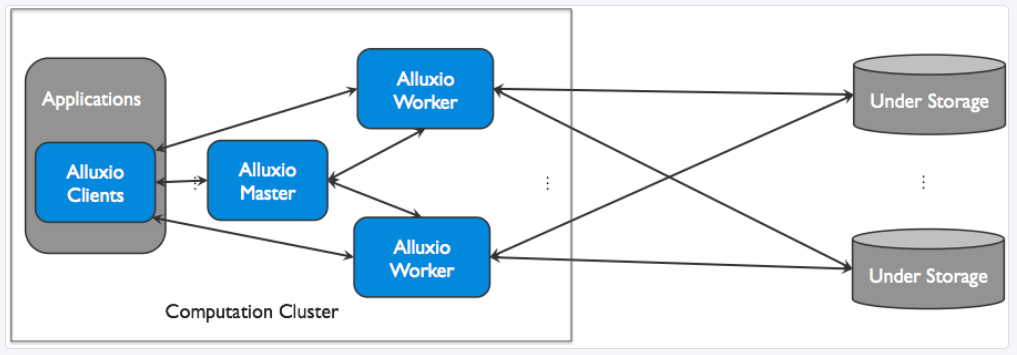
Alluxio can be divided into three components: masters, workers, and clients. A typical setup consists of a single leading master, multiple standby masters, and multiple workers. The master and worker processes constitute the Alluxio servers, which are the components a system administrator would maintain. The clients are used to communicate with the Alluxio servers by applications such as Spark or MapReduce jobs, Alluxio command-line, or the FUSE layer.
alluxio由master、worker组成,其中master如果有多个,只有一个是leading master,其他为standby master;
3 角色
Master
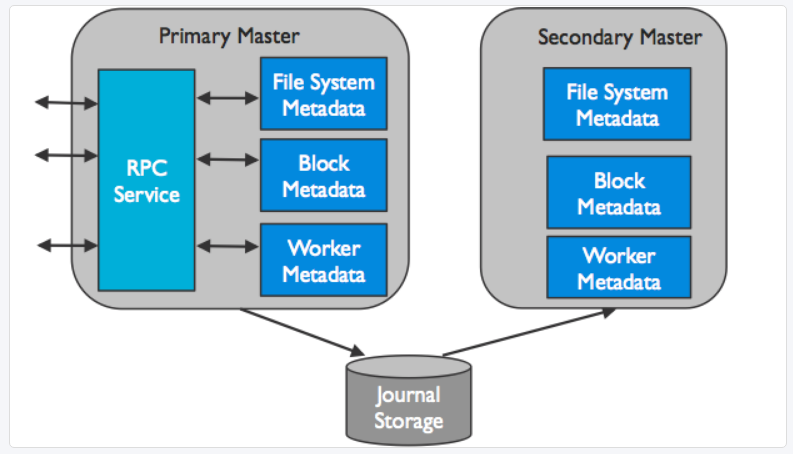
The Alluxio master service can be deployed as one leading master and several standby masters for fault tolerance. When the leading master goes down, a standby master is elected to become the new leading master.
1)Leading Master
Only one master process can be the leading master in an Alluxio cluster. The leading master is responsible for managing the global metadata of the system. This includes file system metadata (e.g. the file system inode tree), block metadata (e.g. block locations), and worker capacity metadata (free and used space). Alluxio clients interact with the leading master to read or modify this metadata. All workers periodically send heartbeat information to the leading master to maintain their participation in the cluster. The leading master does not initiate communication with other components; it only responds to requests via RPC services. The leading master records all file system transactions to a distributed persistent storage to allow for recovery of master state information; the set of records is referred to as the journal.
alluxio中只有一个leading master,leading master负责管理所有的元数据,包括文件系统元数据、block元数据和worker元数据;worker会定期向leading master发送心跳;leading master会记录所有的文件操作到日志中;
2)Standby Masters
Standby masters read journals written by the leading master to keep their own copies of the master state up-to-date. They also write journal checkpoints for faster recovery in the future. They do not process any requests from other Alluxio components.
standby master会及时同步读取leader master的日志;
Worker
Alluxio workers are responsible for managing user-configurable local resources allocated to Alluxio (e.g. memory, SSDs, HDDs). Alluxio workers store data as blocks and serve client requests that read or write data by reading or creating new blocks within their local resources. Workers are only responsible for managing blocks; the actual mapping from files to blocks is only stored by the master.
worker负责管理资源,比如内存、ssd等;worker负责将数据存储为block同时响应client的读写请求;实际的file和block的映射关系保存在master中;

Because RAM usually offers limited capacity, blocks in a worker can be evicted when space is full. Workers employ eviction policies to decide which data to keep in the Alluxio space.
Client
The Alluxio client provides users a gateway to interact with the Alluxio servers. It initiates communication with the leading master to carry out metadata operations and with workers to read and write data that is stored in Alluxio.
client先向leading master请求元数据信息,然后向worker发送读写请求;
二 安装
1 下载
$ wget http://downloads.alluxio.org/downloads/files//1.8.1/alluxio-1.8.1-hadoop-2.6-bin.tar.gz
$ tar xvf alluxio-1.8.1-hadoop-2.6-bin.tar.gz
$ cd alluxio-1.8.1-hadoop-2.6
2 配置本机ssh登录
即可以 ssh localhost
详见:https://www.cnblogs.com/barneywill/p/10271679.html
3 配置
$ cp conf/alluxio-site.properties.template conf/alluxio-site.properties
$ vi conf/alluxio-site.properties
alluxio.master.hostname=localhost
4 初始化
$ ./bin/alluxio validateEnv local
$ ./bin/alluxio format
5 启动
$ ./bin/alluxio-start.sh local SudoMount
如果报错:
Formatting RamFS: /mnt/ramdisk (44849277610)
ERROR: mkdir /mnt/ramdisk failed
需要添加sudo权限
# visudo -f /etc/sudoers
$user ALL=(ALL) NOPASSWD: /bin/mount * /mnt/ramdisk, /bin/umount * /mnt/ramdisk, /bin/mkdir * /mnt/ramdisk, /bin/chmod * /mnt/ramdisk
三 使用
1 命令行
文件系统操作
$ ./bin/alluxio fs
$ ./bin/alluxio fs ls /
$ ./bin/alluxio fs copyFromLocal LICENSE /LICENSE
$ ./bin/alluxio fs cat /LICENSE
看起来和hdfs命令很像
admin操作
$ bin/alluxio fsadmin report
Alluxio cluster summary:
Master Address: localhost/127.0.0.1:19998
Web Port: 19999
Rpc Port: 19998
Started: 01-24-2019 10:28:59:433
Uptime: 0 day(s), 1 hour(s), 24 minute(s), and 42 second(s)
Version: 1.8.1
Safe Mode: false
Zookeeper Enabled: false
Live Workers: 1
Lost Workers: 0
Total Capacity: 10.00GB
Tier: MEM Size: 10.00GB
Used Capacity: 9.36GB
Tier: MEM Size: 9.36GB
Free Capacity: 651.55MB
查看统计信息
$ curl http://$master:19999/metrics/json
2 UFS(Under File Storage)
UFS=LocalFileSystem
1 默认配置
$ cat conf/alluxio-site.properties
alluxio.underfs.address=${alluxio.work.dir}/underFSStorage
2 命令示例
$ ls ./underFSStorage/
$ ./bin/alluxio fs persist /LICENSE
$ ls ./underFSStorage
LICENSE
With the default configuration, Alluxio uses the local file system as its under file storage (UFS). The default path for the UFS is ./underFSStorage.
Alluxio is currently writing data only into Alluxio space, not to the UFS.Configure Alluxio to persist the file from Alluxio space to the UFS by using the persist command.
Alluxio默认用的是本地文件系统作为UFS,只有执行persist命令之后,文件才会持久化到UFS中;
UFS=HDFS
1 配置
$ cat conf/alluxio-site.properties
alluxio.underfs.address=hdfs://<NAMENODE>:<PORT>/alluxio/data
如果你想对hdfs上全部数据进行加速并且路径不变,可以配置为hdfs的根目录
2 配置hadoop
1)链接
$ ln -s $HADOOP_CONF_DIR/core-site.xml conf/core-site.xml
$ ln -s $HADOOP_CONF_DIR/hdfs-site.xml conf/hdfs-site.xml
Copy or make symbolic links from hdfs-site.xml and core-site.xml from your Hadoop installation into ${ALLUXIO_HOME}/conf
2)直接配置路径
alluxio.underfs.hdfs.configuration=/path/to/hdfs/conf/core-site.xml:/path/to/hdfs/conf/hdfs-site.xml
3 命令
$ bin/alluxio fs ls /
可以看到hdfs上所有的目录了
4 文件映射
这时可以通过访问
alluxio://$alluxio_server:19998/test.log
来访问底层存储
hdfs://$namenode_server/alluxio/data/test.log
注意:这里需要指定$alluxio_server和端口,存在单点问题,后续ha方式部署之后可以解决这个问题。
3 Spark访问
1 准备:(二选一)
1)配置
spark.driver.extraClassPath /<PATH_TO_ALLUXIO>/client/alluxio-1.8.1-client.jar
spark.executor.extraClassPath /<PATH_TO_ALLUXIO>/client/alluxio-1.8.1-client.jar
This Alluxio client jar file can be found at /<PATH_TO_ALLUXIO>/client/alluxio-1.8.1-client.jar
2)拷贝jar
$ cp client/alluxio-1.8.1-client.jar $SPARK_HOME/jars/
2 访问
$ spark-shell
scala> val s = sc.textFile("alluxio://localhost:19998/derby.log")
s: org.apache.spark.rdd.RDD[String] = alluxio://localhost:19998/derby.log MapPartitionsRDD[1] at textFile at <console>:24scala> s.foreach(println)
----------------------------------------------------------------
Thu Jan 10 11:05:45 CST 2019:
参考:http://www.alluxio.org/docs/1.8/en/compute/Spark.html
4 hive访问
拷贝jar
$ cp client/alluxio-1.8.1-client.jar $HIVE_HOME/lib/
$ cp client/alluxio-1.8.1-client.jar $HADOOP_HOME/share/hadoop/common/lib/
重启metastore和hiveserver2
5 部署方式
1 集群ha部署
即多worker+多master+zookeeper
1 配置集群服务器间ssh可达
同上
2 配置
$ cat conf/alluxio-site.properties
#alluxio.master.hostname=<MASTER_HOSTNAME>
alluxio.zookeeper.enabled=true
alluxio.zookeeper.address=<ZOOKEEPER_ADDRESS>
alluxio.master.journal.folder=hdfs://$namenode_server/alluxio/journal/
alluxio.worker.memory.size=20GB
将配置同步到集群所有服务器
3 配置masters和workers
$ conf/masters
$master1
$master2$ conf/workers
$worker1
$worker2
$worker3
4 启动
$ ./bin/alluxio-start.sh all SudoMount
5 访问方式
alluxio://zkHost1:2181;zkHost2:2181;zkHost3:2181/path
如果client启动时增加环境变量
-Dalluxio.zookeeper.address=zkHost1:2181,zkHost2:2181,zkHost3:2181 -Dalluxio.zookeeper.enabled=true
则可以直接这样访问
alluxio:///path
6 与hdfs互通
拷贝jar
$ cp client/alluxio-1.8.1-client.jar $HADOOP_HOME/share/hadoop/common/lib/
将以下配置添加到 $HADOOP_CONF_DIR/core-site.xml
alluxio.zookeeper.enabled
alluxio.zookeeper.address
和
<property>
<name>fs.alluxio.impl</name>
<value>alluxio.hadoop.FileSystem</value>
</property>
则可以通过hdfs客户端访问alluxio
$ hadoop fs -ls alluxio:///directory
参考:http://www.alluxio.org/docs/1.8/en/deploy/Running-Alluxio-On-a-Cluster.html
2 Alluxio on Yarn部署
Alluxio还有很多种部署方式,其中一种是Alluxio on Yarn,对于类似Spark on Yarn的用户来说,非常容易使用Alluxio来加速Spark。
详见:
http://www.alluxio.org/docs/1.8/en/deploy/Running-Alluxio-On-Yarn.html
【原创】大数据基础之Alluxio(1)简介、安装、使用的更多相关文章
- 大数据基础环境--jdk1.8环境安装部署
1.环境说明 1.1.机器配置说明 本次集群环境为三台linux系统机器,具体信息如下: 主机名称 IP地址 操作系统 hadoop1 10.0.0.20 CentOS Linux release 7 ...
- 【原创】大数据基础之Zookeeper(2)源代码解析
核心枚举 public enum ServerState { LOOKING, FOLLOWING, LEADING, OBSERVING; } zookeeper服务器状态:刚启动LOOKING,f ...
- CentOS6安装各种大数据软件 第八章:Hive安装和配置
相关文章链接 CentOS6安装各种大数据软件 第一章:各个软件版本介绍 CentOS6安装各种大数据软件 第二章:Linux各个软件启动命令 CentOS6安装各种大数据软件 第三章:Linux基础 ...
- 大数据应用日志采集之Scribe 安装配置指南
大数据应用日志采集之Scribe 安装配置指南 大数据应用日志采集之Scribe 安装配置指南 1.概述 Scribe是Facebook开源的日志收集系统,在Facebook内部已经得到大量的应用.它 ...
- 【原创】大数据基础之Impala(1)简介、安装、使用
impala2.12 官方:http://impala.apache.org/ 一 简介 Apache Impala is the open source, native analytic datab ...
- 【原创】大数据基础之Benchmark(2)TPC-DS
tpc 官方:http://www.tpc.org/ 一 简介 The TPC is a non-profit corporation founded to define transaction pr ...
- 【原创】大数据基础之词频统计Word Count
对文件进行词频统计,是一个大数据领域的hello word级别的应用,来看下实现有多简单: 1 Linux单机处理 egrep -o "\b[[:alpha:]]+\b" test ...
- 大数据基础知识:分布式计算、服务器集群[zz]
大数据中的数据量非常巨大,达到了PB级别.而且这庞大的数据之中,不仅仅包括结构化数据(如数字.符号等数据),还包括非结构化数据(如文本.图像.声音.视频等数据).这使得大数据的存储,管理和处理很难利用 ...
- 大数据基础知识问答----spark篇,大数据生态圈
Spark相关知识点 1.Spark基础知识 1.Spark是什么? UCBerkeley AMPlab所开源的类HadoopMapReduce的通用的并行计算框架 dfsSpark基于mapredu ...
随机推荐
- Luogu P5280 [ZJOI2019]线段树
送我退役的神题,但不得不说是ZJOIDay1最可做的一题了 先说一下考场的ZZ想法以及出来后YY的优化版吧 首先发现每次操作其实就是统计出增加的节点个数(原来的不会消失) 所以我们只要统计出线段树上每 ...
- AI要被祭天了!删Bug,删着删着把全部代码都删了
近日,美国版的“大众点评”,本想训练 AI 来消除 bug,结果它把所有内容删除了... Yelp 在其最新更新的 App 中写道: “我们为本周使用该app遇到问题的用户致歉.我们训练了一个神经网络 ...
- docker(二) windows10下安装docker
官方安装文档: https://docs.docker.com/docker-for-windows/install/ https://docs.docker.com/docker-for-windo ...
- MySQL单向加密函数
select encode('pual','zhangxueliang'); select md5('zhangxueliang'); 加密为null,不显示字段值: select ENCRYPT(& ...
- 2019-04-03 研究EasyWeb有感
今天从往常睡到11点多才起床的状态中一下子转回9点前起床,起床第一件事就是开始研究这框架 1. 根据这框架的说明,首先搭建IDEA开发环境,下载.破解:当从EasyWeb官网下载了两个框架(一个是前端 ...
- php如何解决中文乱码问题?
为什么会出现中文乱码? 很多新手朋友学习PHP的时候,发现程序中的中文在输出的时候会出现乱码的问题,那么为什么会出现这种乱码的情况呢?一般来说,乱码的出现有2种原因,一种是由于编码(charset) ...
- springboot +thymeleaf+myql 记录
thymeleaf官方文档: https://www.thymeleaf.org/doc/tutorials/3.0/usingthymeleaf.pdf demo案例:https://github. ...
- CentOs7 最小安装版安装后配置和java环境的搭建
下面是contos7 最小化安装成功以后进行一些基础的配置和java环境的安装教程: 1 防火墙 : 关闭防火墙: systemctl stop firewalld.service . 关闭开机启 ...
- js 实现的页面图片放大器以及 event中的诸多 x
背景: 淘宝.天猫等电商网站浏览图片时可以查看大图的功能: 思路: 思路很简单,两张图片,一张较小渲染在页面上,一张较大是细节图,随鼠标事件调整它的 left & top; 需要的知识点: o ...
- Linux shell if判断语句
无论什么编程语言都离不开条件判断.SHELL也不例外. 大体的格式如下: if list then do something here elif list then do another thing ...