
如何写一个全局的 Notice 组件?
下面将会实现这样的效果: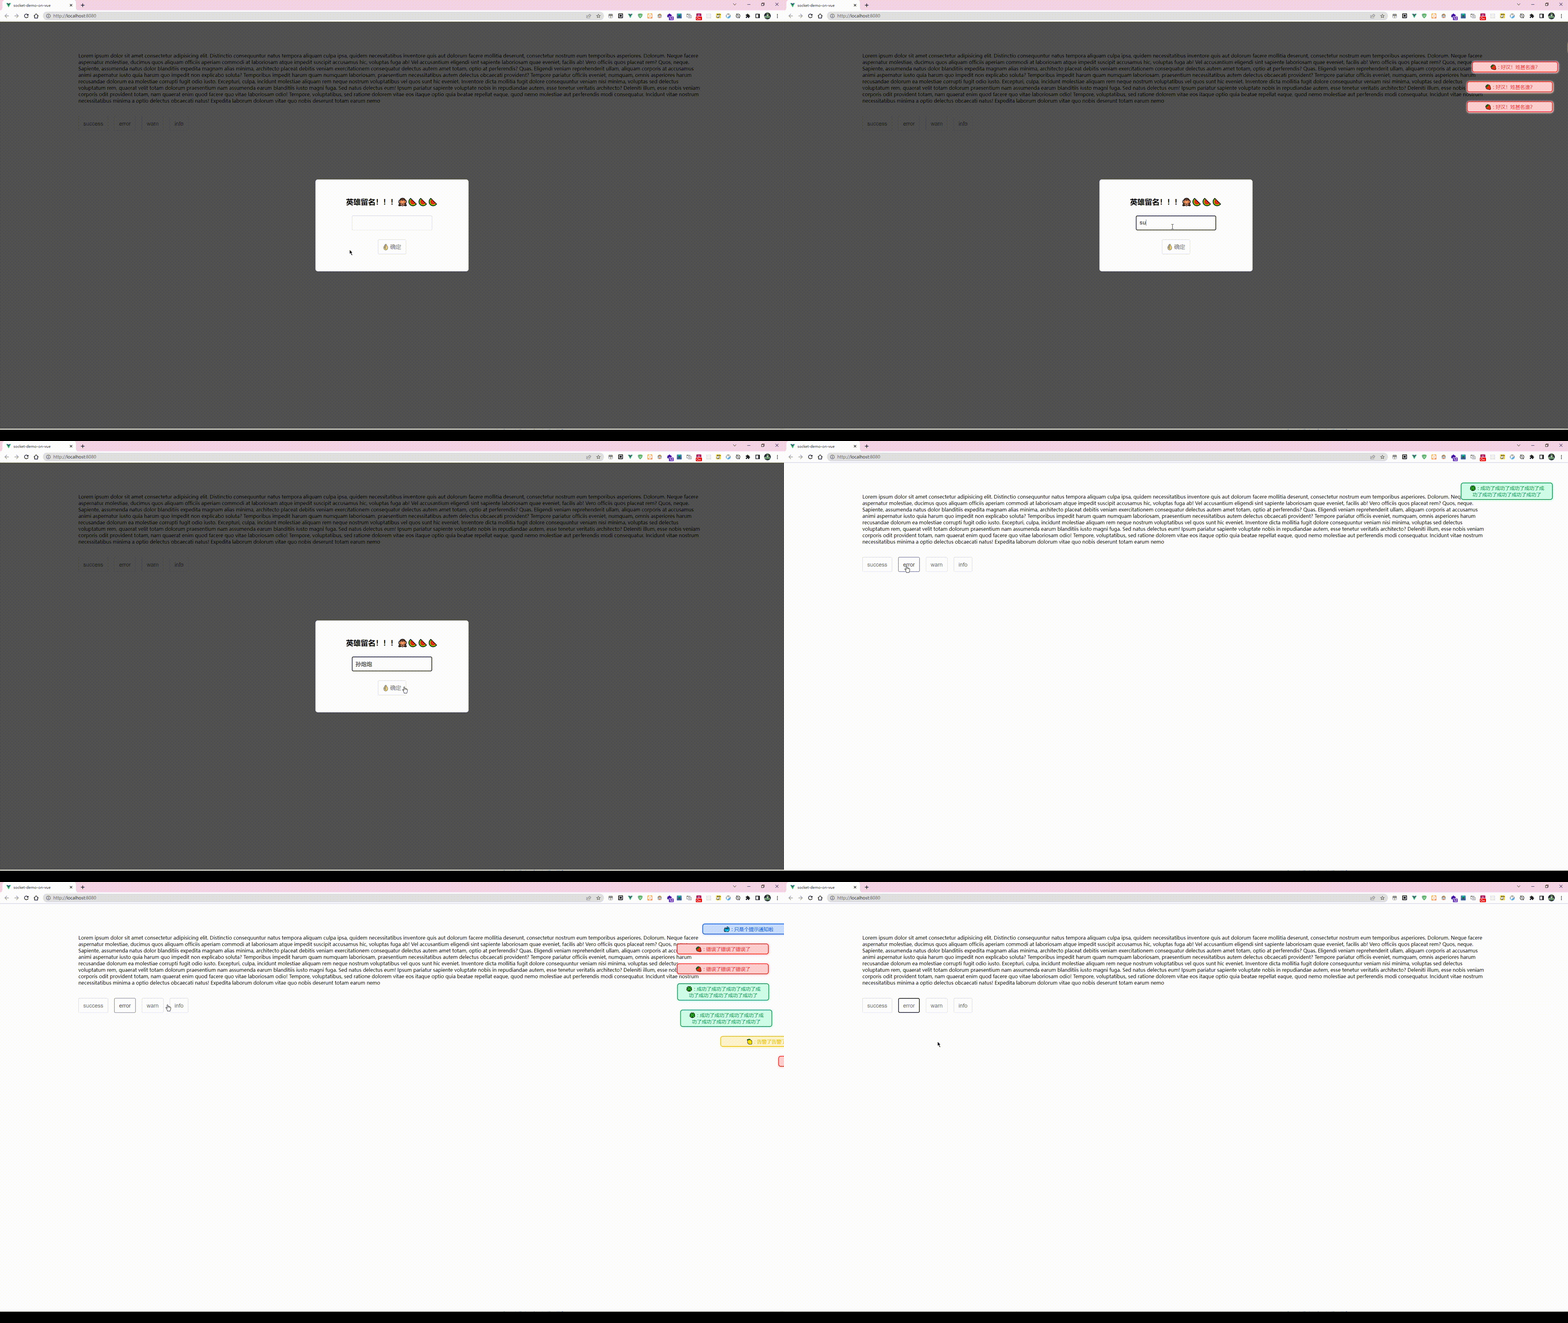
组件动态创建脚本:
import Vue from "vue";

import Notice from "@/components/Noticer/Notice.vue";

function create(Component, props) {

  // 先建立实例

  const vm = new Vue({

    render(h) {

      //h就是createElement,它返回VNode

      return h(Component, { props });

    },

  }).$mount();

  // 手动挂载

  // 判断是否存在container,如果不存在则先创建

  let container;

  container = document.querySelector(".noticer-container");

  if (container == null) {

    container = document.createElement("div");

    container.classList.add("noticer-container");

    container.style.position = "fixed";

    container.style.top = "50px";

    container.style.right = "0px";

    container.style.overflow = "hidden";

    container.style.zIndex = 9999;

    document.body.appendChild(container);

  }

  container.appendChild(vm.$el);

  //销毁方法

  const comp = vm.$children[0];

  comp.remove = function () {

    container.removeChild(comp["$el"]);

    vm.$destroy();

  };

  comp.show();

  return comp;

}

Vue.prototype.$notice = {

  error: function (props) {

    create(Notice, Object.assign(props, { type: "error" }));

  },

  info: function (props) {

    create(Notice, Object.assign(props, { type: "info" }));

  },

  success: function (props) {

    create(Notice, Object.assign(props, { type: "success" }));

  },

  warn: function (props) {

    create(Notice, Object.assign(props, { type: "warn" }));

  },

};
这里有一些值得注意的地方:
- container: 的作用是notice的容器,它可以用于定位notice在页面的哪里展示,注意notice不应该随页面卷动,因此其定位是
fixed, 而之所以设定为overflow:hidden的原因则是,notice 在出现和移除的时候,发生的动画偏移,会让页面出现横向滚动条。为了避免重复创建container, 这里做了一个判断逻辑。然后所有动态生成的notice实例dom都会通过appendChild添加到这个容器。 - 在移除的时候, 移除的是
vm.$children[0]["$el"], 原因是,Notice 模板的实现中,外层套了一个 transition , 而这个transition是并不会渲染dom的。
- container: 的作用是notice的容器,它可以用于定位notice在页面的哪里展示,注意notice不应该随页面卷动,因此其定位是
创建Notice组件模板:
<template>

  <transition

    enter-active-class="animate__animated animate__slideInRight"

    leave-active-class="animate__animated animate__slideOutRight"

    @after-leave="afterLeave"

  >

    <div v-if="isShow" class="notice__root">

      <div :class="`notice-type-${type}`" class="noticer">

        {{

          type === "error"

            ? "🍓"

            : type === "success"

            ? "🍀"

            : type === "warn"

            ? "🍋"

            : "🐳"

        }}

        : {{ message }}

      </div>

    </div>

  </transition>

</template>

<script>

export default {

  props: {

    title: {

      type: String,

      default: "",

    },

    message: {

      type: String,

      default: "",

    },

    time: {

      type: Number,

      default: 1000,

    },

    type: {

      type: String,

    },

  },

  data() {

    return {

      isShow: false,

    };

  },

  methods: {

    show() {

      this.isShow = true;

      setTimeout(this.hide, this.time);

    },

    hide() {

      this.isShow = false;

    },

    afterLeave() {

      this.remove();

    },

  },

};

</script>

<style lang="less" scoped>

@error: rgb(255, 30, 30);

@warn: rgb(240, 192, 0);

@success: rgb(0, 144, 74);

@info: rgb(0, 80, 218);

@errorBg: rgb(255, 208, 208);

@warnBg: rgb(255, 245, 207);

@successBg: rgb(210, 255, 233);

@infoBg: rgb(203, 222, 255);

.notice__root {

  user-select: none;

  padding: 5px 50px 5px 5px;

}

.noticer {

  padding: 5px 20px;

  margin: 10px 0px;

  // margin-right: 50px;

  border-radius: 8px;

  font-size: 16px;

  width: auto;

  min-width: 280px;

  max-width: 300px;

  word-break: break-all;

  text-align: center;

  box-sizing: border-box;

}

.notice-type-error {

  color: @error !important;

  border: 2px solid @error;

  box-shadow: 1px 1px 5px 2px @errorBg;

  background-color: @errorBg;

  // border: 1px solid red;

}

.notice-type-warn {

  color: @warn !important;

  border: 2px solid @warn;

  background-color: @warnBg;

  box-shadow: 1px 1px 5px 2px @warnBg;

}

.notice-type-success {

  color: @success !important;

  border: 2px solid @success;

  background-color: @successBg;

  box-shadow: 1px 1px 5px 2px @successBg;

}

.notice-type-info {

  color: @info !important;

  border: 2px solid @info;

  background-color: @infoBg;

  box-shadow: 1px 1px 5px 2px @infoBg;

}

</style>
在 main.js 中引入执行该脚本即可
import Vue from "vue";

import App from "./App.vue";

import "animate.css";

import "@/components/Noticer/NotificationBanner.js";

new Vue({

  render: (h) => h(App),

}).$mount("#app");
代码中使用实例:
if (!this.nickname) {

    this.$notice.error({

        message: "好汉!姓甚名谁?",

        time: 3000,

    });

} else {

    this.showModal = false;

    this.$notice.info({

        message: this.nickname + "来了!!!",

        time: 3000,

    });

}
动态创建组件的执行逻辑:
当在使用的时候:
this.$notice.error({

    message: "好汉!姓甚名谁?",

    time: 3000,

});
上方代码触发,实际上会触发 NotificationBanner.js 中的 create函数,该函数创建了一个notice 的组件实例,并在实力上添加了一个remove 方法,然后直接触发组件中的 show 方法。
notice 模板实例中:
methods: {

    show() {

        this.isShow = true;

        setTimeout(this.hide, this.time);

    },

    hide() {

        this.isShow = false;

    },

    afterLeave() {

        this.remove();

    },

},
show 方法执行,除了展示 notice,立即设定一个延时函数执行 hide 方法。
hide 方法执行, vue 提供的 transition 钩子 afterleave() 会在移除动画执行完毕后触发。 这时候,去触发 remove 方法,将该notice 组件实例移除。
如何写一个全局的 Notice 组件?的更多相关文章
- 手写一个简单的starter组件
spring-boot中有很多第三方包,都封装成starter组件,在maven中引用后,启动springBoot项目时会自动装配到spring ioc容器中. 思考: 为什么我们springBoot ...
- Tsx写一个通用的button组件
一年又要到年底了,vue3.0都已经出来了,我们也不能一直还停留在过去的js中,是时候学习并且在项目中使用一下Ts了. 如果说jsx是基于js的话,那么tsx就是基于typescript的 废话也不多 ...
- python安装及写一个简单的验证码组件(配合node)
1.安装Python 到官网下载响应系统的版本(这里以windows为例):https://www.python.org/downloads/windows/ 然后就是不断地"下一步&quo ...
- Vue学习—Vue写一个图片轮播组件
1.先看效果: 熟悉的图片轮播,只要是个网站,百分之90以上会有个图片轮播.我认为使用图片轮播. 第一可以给人以一种美观的感受,而不会显得网站那么呆板, 第二可以增加显示内容,同样的区域可以显示更多内 ...
- 用vue2.x注册一个全局的弹窗alert组件
一.在实际的开发当中,弹窗是少不了的,默认系统的弹窗样式太丑,难以满足项目的实际需求,所以需要自己定义弹窗组件,把弹窗组价定义为全局的,这样减少每次使用的时候引入麻烦,节省开发时间.本文将分享如何定义 ...
- 用vue2.x注册一个全局的弹窗alert组件、confirm组件
一.在实际的开发当中,弹窗是少不了的,默认系统的弹窗样式太丑,难以满足项目的实际需求,所以需要自己定义弹窗组件,把弹窗组价定义为全局的,这样减少每次使用的时候引入麻烦,节省开发时间.本文将分享如何定义 ...
- react全局的公共组件-------弹框 (Alert)
最近研究react,发现写一个组件很容易,但是要写一个全局的好像有点麻烦.不能像VUE一样,直接在原型上面扩展,注册全局组件 下面实现一个弹框,只需要引入之后,直接调用方法即可,不需要写入组件 给出我 ...
- 如何优雅的写一个Vue 的弹框
写Vue或者是react 都会遇见弹框的问题.也尝试了多种办法来写弹框,一直都不太满意,今天特地看了一下 Element UI 的源码,模仿着写了一个简易版. 大概有一下几个问题: 1.弹框的层级问题 ...
- 从零开始写一个npm包,一键生成react组件(偷懒==提高效率)
前言 最近写项目开发新模块的时候,每次写新模块的时候需要创建一个组件的时候(包含组件css,index.js,组件js),就只能会拷贝其他组件修改名称 ,但是写了1-2个后发现效率太低了,而且极容易出 ...
随机推荐
- Python入门-变量与命名
在上一篇中,我们定义了很多变量,变量格式是啥?变量名字可以随意么?有啥命名规范么?下面细讲 变量格式 变量名称 = 常量 把常量赋值给变量的过程,就是定义变量. 定义变量 Python中的变量不需要声 ...
- 爬虫---scrapy分布式和增量式
分布式 概念: 需要搭建一个分布式的机群, 然后在每一台电脑中执行同一组程序, 让其对某一网站的数据进行联合分布爬取. 原生的scrapy框架不能实现分布式的原因 调度器不能被共享, 管道也不能被共享 ...
- Spring集成web环境(使用封装好的工具)
接上文spring集成web环境(手动实现) ##########代码接上文############# spring提供了一个监听器ContextLoaderListener对上述功能的封装,该监听器 ...
- 论文解读(GRCCA)《 Graph Representation Learning via Contrasting Cluster Assignments》
论文信息 论文标题:Graph Representation Learning via Contrasting Cluster Assignments论文作者:Chun-Yang Zhang, Hon ...
- Js中的三个错误语句:try、catch、throw
Js中的三个错误语句:try.catch.throw
- asp.net core + jenkins 实现自动化发布
由于部署个人博客系统的服务器只有2G内存,每次利用jenkins编译,发布的时候jenkins老是挂,因此新买了一台轻量应用服务器,专门用于个人博客系统的持续发布任务,下面讲解如何利用jenkins实 ...
- Dependabot 开始支持 pub package 版本检测
今年年初,我们发布了 Flutter 2022 产品路线图,其中「基础设施建设」这部分提到:2022 年 Flutter 团队将增加对供应链的安全的投入,目的是达到符合基础设施 SLSA 4 级别中描 ...
- Go通过cobra快速构建命令行应用
来自jetbrains Go 语言现状调查报告 显示:在go开发者中使用go开发实用小程序的比例为31%仅次于web,go得益于跨平台.无依赖的特性,用来编写命令行或系统管理这类小程序非常不错. 本文 ...
- i2c调试工具分享
i2c-tools简介 在嵌入式开发仲,有时候需要确认硬件是否正常连接,设备是否正常工作,设备的地址是多少等等,这里我们就需要使用一个用于测试I2C总线的工具--i2c-tools. i2c-tool ...
- 如何在代码层面提供CPU分支预测效率
关于分支预测的基本概念和详细算法可以参考我之前写的知乎回答,基本概念不再阐述了~~ https://www.zhihu.com/question/486239354/answer/2410692045 ...