
Python之爬虫(二十一) Scrapy爬取所有知乎用户信息(下)
在上一篇文章中主要写了关于爬虫过程的分析,下面是代码的实现,完整代码在:
https://github.com/pythonsite/spider
items中的代码主要是我们要爬取的字段的定义
class UserItem(scrapy.Item):

    id = Field()

    name = Field()

    account_status = Field()

    allow_message= Field()

    answer_count = Field()

    articles_count = Field()

    avatar_hue = Field()

    avatar_url = Field()

    avatar_url_template = Field()

    badge = Field()

    business = Field()

    employments = Field()

    columns_count = Field()

    commercial_question_count = Field()

    cover_url = Field()

    description = Field()

    educations = Field()

    favorite_count = Field()

    favorited_count = Field()

    follower_count = Field()

    following_columns_count = Field()

    following_favlists_count = Field()

    following_question_count = Field()

    following_topic_count = Field()

    gender = Field()

    headline = Field()

    hosted_live_count = Field()

    is_active = Field()

    is_bind_sina = Field()

    is_blocked = Field()

    is_advertiser = Field()

    is_blocking = Field()

    is_followed = Field()

    is_following = Field()

    is_force_renamed = Field()

    is_privacy_protected = Field()

    locations = Field()

    is_org = Field()

    type = Field()

    url = Field()

    url_token = Field()

    user_type = Field()

    logs_count = Field()

    marked_answers_count = Field()

    marked_answers_text = Field()

    message_thread_token = Field()

    mutual_followees_count = Field()

    participated_live_count = Field()

    pins_count = Field()

    question_count = Field()

    show_sina_weibo = Field()

    thank_from_count = Field()

    thank_to_count = Field()

    thanked_count = Field()

    type = Field()

    vote_from_count = Field()

    vote_to_count = Field()

    voteup_count = Field()
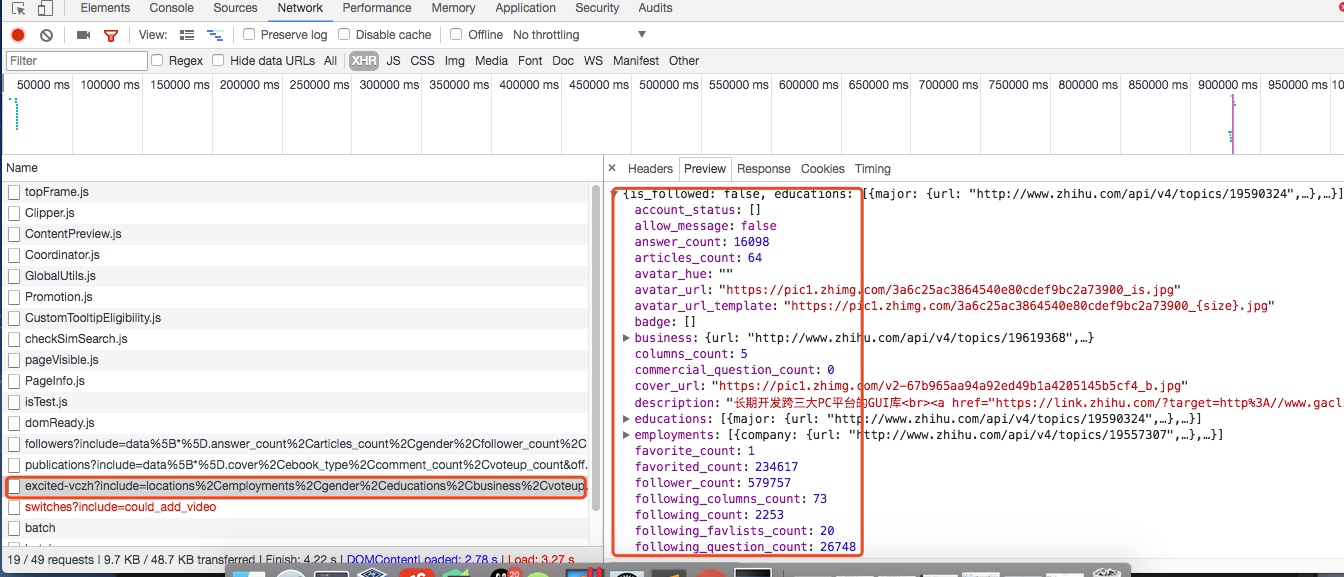
这些字段的是在用户详细信息里找到的,如下图所示,这里一共有58个字段,可以详细研究每个字段代表的意思:
关于spiders中爬虫文件zhihu.py中的主要代码
这段代码是非常重要的,主要的处理逻辑其实都是在这里
class ZhihuSpider(scrapy.Spider):

    name = "zhihu"

    allowed_domains = ["www.zhihu.com"]

    start_urls = ['http://www.zhihu.com/']

    #这里定义一个start_user存储我们找的大V账号

    start_user = "excited-vczh"

    #这里把查询的参数单独存储为user_query,user_url存储的为查询用户信息的url地址

    user_url = "https://www.zhihu.com/api/v4/members/{user}?include={include}"

    user_query = "locations,employments,gender,educations,business,voteup_count,thanked_Count,follower_count,following_count,cover_url,following_topic_count,following_question_count,following_favlists_count,following_columns_count,avatar_hue,answer_count,articles_count,pins_count,question_count,columns_count,commercial_question_count,favorite_count,favorited_count,logs_count,marked_answers_count,marked_answers_text,message_thread_token,account_status,is_active,is_bind_phone,is_force_renamed,is_bind_sina,is_privacy_protected,sina_weibo_url,sina_weibo_name,show_sina_weibo,is_blocking,is_blocked,is_following,is_followed,mutual_followees_count,vote_to_count,vote_from_count,thank_to_count,thank_from_count,thanked_count,description,hosted_live_count,participated_live_count,allow_message,industry_category,org_name,org_homepage,badge[?(type=best_answerer)].topics"

    #follows_url存储的为关注列表的url地址,fllows_query存储的为查询参数。这里涉及到offset和limit是关于翻页的参数,0,20表示第一页

    follows_url = "https://www.zhihu.com/api/v4/members/{user}/followees?include={include}&offset={offset}&limit={limit}"

    follows_query = "data%5B*%5D.answer_count%2Carticles_count%2Cgender%2Cfollower_count%2Cis_followed%2Cis_following%2Cbadge%5B%3F(type%3Dbest_answerer)%5D.topics"

    #followers_url是获取粉丝列表信息的url地址,followers_query存储的为查询参数。

    followers_url = "https://www.zhihu.com/api/v4/members/{user}/followers?include={include}&offset={offset}&limit={limit}"

    followers_query = "data%5B*%5D.answer_count%2Carticles_count%2Cgender%2Cfollower_count%2Cis_followed%2Cis_following%2Cbadge%5B%3F(type%3Dbest_answerer)%5D.topics"

    def start_requests(self):

        '''

        这里重写了start_requests方法,分别请求了用户查询的url和关注列表的查询以及粉丝列表信息查询

        :return:

        '''

        yield Request(self.user_url.format(user=self.start_user,include=self.user_query),callback=self.parse_user)

        yield Request(self.follows_url.format(user=self.start_user,include=self.follows_query,offset=0,limit=20),callback=self.parse_follows)

        yield Request(self.followers_url.format(user=self.start_user,include=self.followers_query,offset=0,limit=20),callback=self.parse_followers)

    def parse_user(self, response):

        '''

        因为返回的是json格式的数据,所以这里直接通过json.loads获取结果

        :param response:

        :return:

        '''

        result = json.loads(response.text)

        item = UserItem()

        #这里循环判断获取的字段是否在自己定义的字段中,然后进行赋值

        for field in item.fields:

            if field in result.keys():

                item[field] = result.get(field)

        #这里在返回item的同时返回Request请求,继续递归拿关注用户信息的用户获取他们的关注列表

        yield item

        yield Request(self.follows_url.format(user = result.get("url_token"),include=self.follows_query,offset=0,limit=20),callback=self.parse_follows)

        yield Request(self.followers_url.format(user = result.get("url_token"),include=self.followers_query,offset=0,limit=20),callback=self.parse_followers)

    def parse_follows(self, response):

        '''

        用户关注列表的解析,这里返回的也是json数据 这里有两个字段data和page,其中page是分页信息

        :param response:

        :return:

        '''

        results = json.loads(response.text)

        if 'data' in results.keys():

            for result in results.get('data'):

                yield Request(self.user_url.format(user = result.get("url_token"),include=self.user_query),callback=self.parse_user)

        #这里判断page是否存在并且判断page里的参数is_end判断是否为False,如果为False表示不是最后一页,否则则是最后一页

        if 'page' in results.keys() and results.get('is_end') == False:

            next_page = results.get('paging').get("next")

            #获取下一页的地址然后通过yield继续返回Request请求,继续请求自己再次获取下页中的信息

            yield Request(next_page,self.parse_follows)

    def parse_followers(self, response):

        '''

        这里其实和关乎列表的处理方法是一样的

        用户粉丝列表的解析,这里返回的也是json数据 这里有两个字段data和page,其中page是分页信息

        :param response:

        :return:

        '''

        results = json.loads(response.text)

        if 'data' in results.keys():

            for result in results.get('data'):

                yield Request(self.user_url.format(user = result.get("url_token"),include=self.user_query),callback=self.parse_user)

        #这里判断page是否存在并且判断page里的参数is_end判断是否为False,如果为False表示不是最后一页,否则则是最后一页

        if 'page' in results.keys() and results.get('is_end') == False:

            next_page = results.get('paging').get("next")

            #获取下一页的地址然后通过yield继续返回Request请求,继续请求自己再次获取下页中的信息

            yield Request(next_page,self.parse_followers)
上述的代码的主要逻辑用下图分析表示:
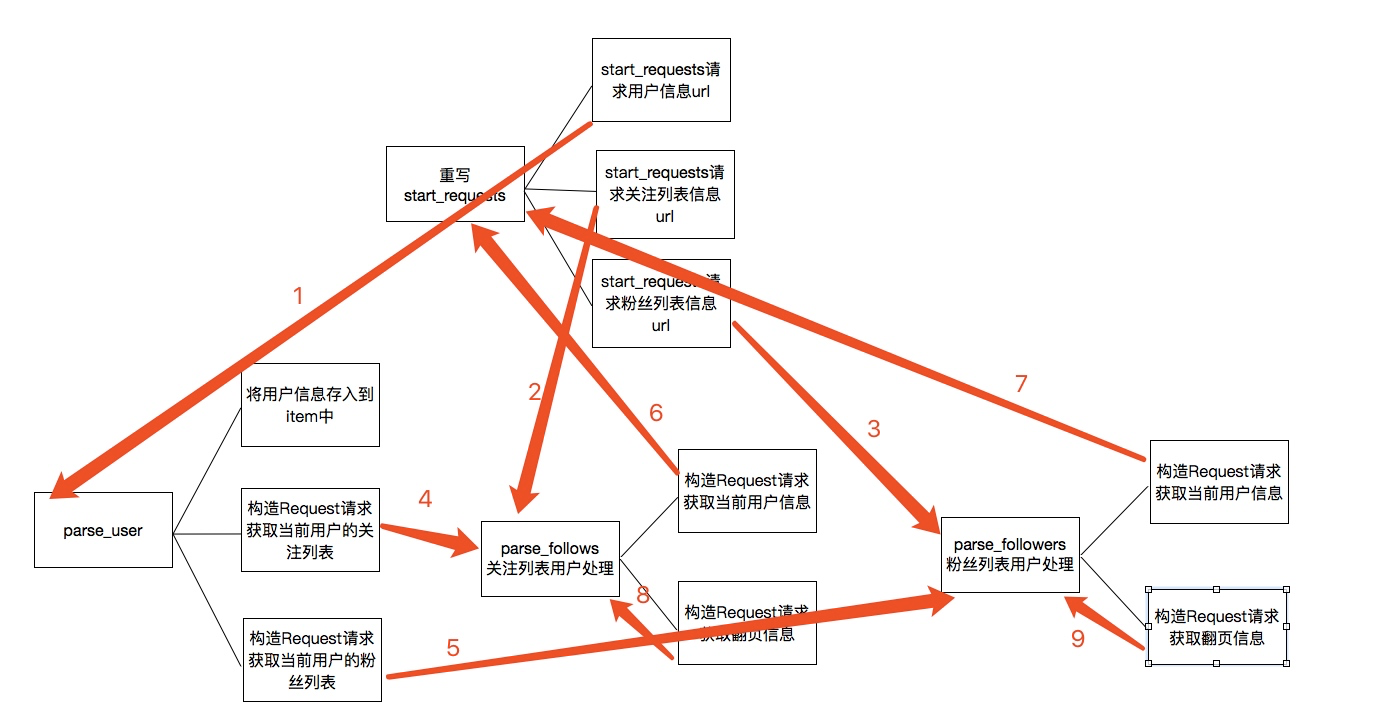
关于上图的一个简单描述:
1. 当重写start_requests,一会有三个yield,分别的回调函数调用了parse_user,parse_follows,parse_followers,这是第一次会分别获取我们所选取的大V的信息以及关注列表信息和粉丝列表信息
2. 而parse分别会再次回调parse_follows和parse_followers信息,分别递归获取每个用户的关注列表信息和分析列表信息
3. parse_follows获取关注列表里的每个用户的信息回调了parse_user,并进行翻页获取回调了自己parse_follows
4. parse_followers获取粉丝列表里的每个用户的信息回调了parse_user,并进行翻页获取回调了自己parse_followers
通过上面的步骤实现所有用户信息的爬取,最后是关于数据的存储
关于数据存储到mongodb
这里主要是item中的数据存储到mongodb数据库中,这里主要的一个用法是就是插入的时候进行了一个去重检测
class MongoPipeline(object):

    def __init__(self, mongo_uri, mongo_db):

        self.mongo_uri = mongo_uri

        self.mongo_db = mongo_db

    @classmethod

    def from_crawler(cls, crawler):

        return cls(

            mongo_uri=crawler.settings.get('MONGO_URI'),

            mongo_db=crawler.settings.get('MONGO_DATABASE', 'items')

        )

    def open_spider(self, spider):

        self.client = pymongo.MongoClient(self.mongo_uri)

        self.db = self.client[self.mongo_db]

    def close_spider(self, spider):

        self.client.close()

    def process_item(self, item, spider):

        #这里通过mongodb进行了一个去重的操作,每次更新插入数据之前都会进行查询,判断要插入的url_token是否已经存在,如果不存在再进行数据插入,否则放弃数据

        self.db['user'].update({'url_token':item["url_token"]},{'$set':item},True)

        return item
Python之爬虫(二十一) Scrapy爬取所有知乎用户信息(下)的更多相关文章
- Python爬虫从入门到放弃(十九)之 Scrapy爬取所有知乎用户信息(下)
在上一篇文章中主要写了关于爬虫过程的分析,下面是代码的实现,完整代码在:https://github.com/pythonsite/spider items中的代码主要是我们要爬取的字段的定义 cla ...
- scrapy爬取全部知乎用户信息
# -*- coding: utf-8 -*- # scrapy爬取全部知乎用户信息 # 1:是否遵守robbots_txt协议改为False # 2: 加入爬取所需的headers: user-ag ...
- Python之爬虫(二十) Scrapy爬取所有知乎用户信息(上)
爬取的思路 首先我们应该找到一个账号,这个账号被关注的人和关注的人都相对比较多的,就是下图中金字塔顶端的人,然后通过爬取这个账号的信息后,再爬取他关注的人和被关注的人的账号信息,然后爬取被关注人的账号 ...
- Python爬虫从入门到放弃(十八)之 Scrapy爬取所有知乎用户信息(上)
爬取的思路 首先我们应该找到一个账号,这个账号被关注的人和关注的人都相对比较多的,就是下图中金字塔顶端的人,然后通过爬取这个账号的信息后,再爬取他关注的人和被关注的人的账号信息,然后爬取被关注人的账号 ...
- 利用Scrapy爬取所有知乎用户详细信息并存至MongoDB
欢迎大家关注腾讯云技术社区-博客园官方主页,我们将持续在博客园为大家推荐技术精品文章哦~ 作者 :崔庆才 本节分享一下爬取知乎用户所有用户信息的 Scrapy 爬虫实战. 本节目标 本节要实现的内容有 ...
- 初识python 之 爬虫:使用正则表达式爬取“糗事百科 - 文字版”网页数据
初识python 之 爬虫:使用正则表达式爬取"古诗文"网页数据 的兄弟篇. 详细代码如下: #!/user/bin env python # author:Simple-Sir ...
- python网络爬虫之使用scrapy爬取图片
在前面的章节中都介绍了scrapy如何爬取网页数据,今天介绍下如何爬取图片. 下载图片需要用到ImagesPipeline这个类,首先介绍下工作流程: 1 首先需要在一个爬虫中,获取到图片的url并存 ...
- Python网络爬虫——Appuim+夜神模拟器爬取得到APP课程数据
一.背景介绍 随着生产力和经济社会的发展,温饱问题基本解决,人们开始追求更高层次的精神文明,开始愿意为知识和内容付费.从2016年开始,内容付费渐渐成为时尚. 罗辑思维创始人罗振宇全力打造" ...
- python爬虫29 | 使用scrapy爬取糗事百科的例子,告诉你它有多厉害!
是时候给你说说 爬虫框架了 使用框架来爬取数据 会节省我们更多时间 很快就能抓取到我们想要抓取的内容 框架集合了许多操作 比如请求,数据解析,存储等等 都可以由框架完成 有些小伙伴就要问了 你他妈的 ...
随机推荐
- 05.Java面向对象
一.面向对象基本概念 面向对象的特征 封装 封装是指利用抽象数据类型将数据(属性)和对数据的操作(方法)包装起来,把对象的属性和动作结合成一个独立的单位,并尽可能隐蔽对象的内部处理细节. 继承 一个类 ...
- @topcoder - 2013TCO3A D1L3@ TrickyInequality
目录 @description@ @accepted code@ @accepted code@ @details@ @description@ 现有不等式组: \[\begin{cases} x_1 ...
- [每日一题2020.06.15]P1226 【模板】快速幂取余运算
我是题目 快速幂就是快速求 \(a^b\)的一种算法 快速幂 思想 : 比如我要求 \(6^9\) 首先将幂转化为二进制形式 : \[6^9 = 6^{1001} \tag{1} \] 可以得到 : ...
- cb21a_c++_string对象的比较
*cb21a_c++_string对象的比较s.compare(s2)--区分大小的s.compare(pos1,n1,s2)s.compare(pos1,n1,s2,pos2,n2)s.compar ...
- ca76a_c++_流文件打开输入输出文件模式p773
/*ca76a_c++_流文件打开输入输出文件模式利用文件流打开文件进行输入与输出时的选项in.out.app(附加模式).ate((end)文件打开后,定于文件结尾).trunc(裁剪).binar ...
- XmlHttpRequest使用及“跨域”问题解决
一. IE7以后对xmlHttpRequest 对象的创建在不同浏览器上是兼容的. 下面的方法是考虑兼容性的,实际项目中一般使用Jquery的ajax请求,可以不考虑兼容性问题. function g ...
- IWAB0398E Error in generating WSDL from Java: java.lang.ClassNotFoundException
今天想用Eclipse创建WebService,报错信息 IWAB0398E Error in generating WSDL from Java: java.lang.ClassNotFoundEx ...
- 韩顺刚-tcp报文头协议详细分析第一包数据:序号是0,发送数据的长度是0,因为没有收到对端的数据,所以确认号是0, Syn的标志位设置成1,这里没有发送的数据,只发送TCP的20个字节的头部
TCP报文段首部格式 大部分TCP报文头部都是20个字节,有的数据包要加上选项. 上面一行代表4个字节,源端口和目的端口都是2个字节. TCP协议是面向字节流的协议 TCP是一段一段分块的发送数据的 ...
- ABP(ASP.NET Boilerplate Project)快速入门
前言 这两天看了一下ABP,做个简单的学习记录.记录主要有以下内容: 从官网创建并下载项目(.net core 3.x + vue) 项目在本地成功运行 新增实体并映射到数据库 完成对新增实体的基本增 ...
- git和github入门指南(5)
5.github上的标签 5.1.标签的作用 给当前版本打一个标签,在github上就会形成一个releases版本 点击进去后,用户就可以下载对应版本的源代码 5.2.在本地git工具上创建标签,同 ...