吴裕雄 python 神经网络——TensorFlow 卷积神经网络水果图片识别
#-*- coding:utf- -*-

import time

import keras

import skimage

import numpy as np

import tensorflow as tf

import matplotlib.image as img

from scipy import ndimage

from skimage import color, data, transform

%matplotlib inline
#设置文件目录

Training = r'F:\\data\\fruits-360\\Training'

Test = r'F:\\data\\fruits-360\\Test'
import os
from natsort import natsorted #获取每类水果中的第五张图像
def load_print_img(root):
print_img = []
print_label = []
#遍历水果种类目录
for i in range(len(os.listdir(root))):
child1 = os.listdir(root)[i]
child2 = os.listdir(os.path.join(root, child1))
#对第二层目录进行自然数排序,os.listder默认为str排序
child2 = natsorted(child2)
#取出每类的第五张图像
path = os.path.join(root, child1, child2[])
if(path.endswith('.jpg')):
print_img.append(skimage.data.imread(path))
print_label.append(child1)
return print_img, print_label print_img, print_label = load_print_img(Test)
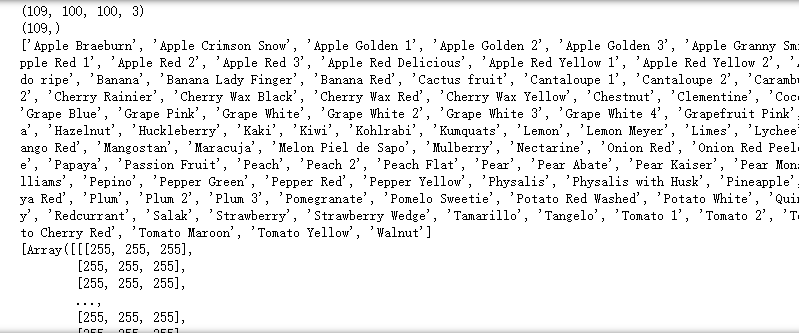
print(np.shape(print_img))
print(np.shape(print_label))
print(print_label)
print(print_img)
import matplotlib.pyplot as plt
from IPython.core.pylabtools import figsize #打印每类水果的第五张图像
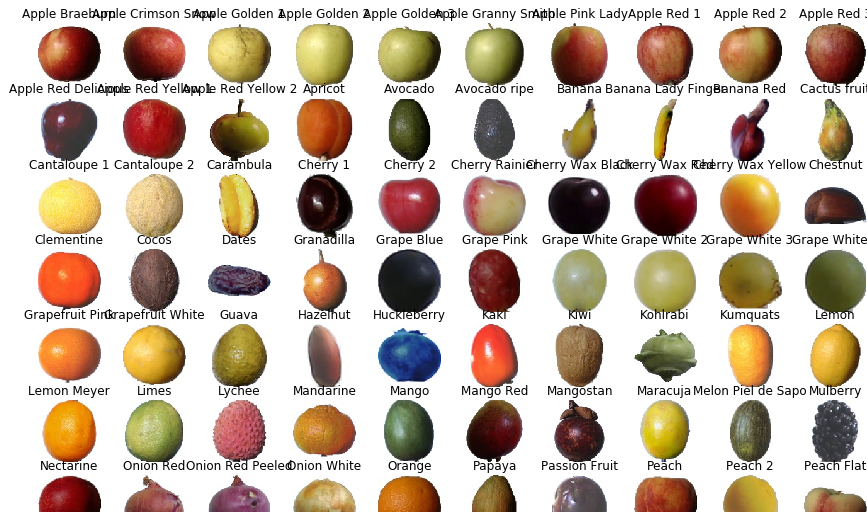
def print_fruit(print_img, print_label, size) :
plt.figure(figsize(size, size))
for i in range(len(print_img)):
#图像输出格式为11行10列
plt.subplot(, ,(i+))
#打印图像
plt.imshow(print_img[i])
#打印水果种类
plt.title(format(print_label[i]))
plt.axis('off')
plt.show() print_img, print_label = load_print_img(Test)
#打印水果
print_fruit(print_img, print_label, )
import random

#随机获取水果种类

def get_random_fruits(root, n_classes):

    #创建一个1到水果种类总数的list

    fruits = []

    for i in range(len(os.listdir(root))):

        fruits.append(i)

    #随机获取n_classes个随机不重复的水果种类

    random_fruits = random.sample(fruits, n_classes)

    return random_fruits
#获取随机抽取的10类水果的图像

def load(root, random_fruits):

    #存放图像

    image_data = []

    #存放标签

    image_label = []

    #存放图像标签码

    num_label = []

    #遍历水果类型

    for i in range(len(random_fruits)):

        #第一层子目录(水果种类)

        child1 = os.listdir(root)[i]

        #第二层子目录(水果图像)

        child2 = os.listdir(os.path.join(root, child1))

        #对第二层目录进行自然数排序,os.listder默认为str排序

        child2 = natsorted(child2)

        #遍历水果图像

        for j in range(len(child2)):

            #结合第一二层子目录

            path = os.path.join(root, child1, child2[j])

            #只读取'.jpg'文件(文件后缀是否为'.jpg')

            if(path.endswith('.jpg')):

                #把文件读取为图像存入image_data

                image_data.append(skimage.data.imread(path))

                #储存第一层子目录文件名(即水果名)

                image_label.append(child1)

                #把第一层子目录文件名的下标作为水果类型的编码

                num_label.append(i)

                #把水果类型编码转换为one_hot编码

    num_label = keras.utils.to_categorical(num_label, len(random_fruits))

    #print("图片数:{0}, 标签数:{1}".format(len(image_data), len(os.listdir(root))) #输出图片和标签数

    return image_data, image_label, num_label
#裁剪图像

def crop(image_data):

    crop_data = []

    for i in image_data:

        #把图像转换成32*32的格式

        I_crop = skimage.transform.resize(i, (, ))

        #把转换后的图像放入Icrop_data

        crop_data.append(I_crop)

    return crop_data
def fruits_type(random_fruits):

    print('fruits_type:')

    for i in random_fruits:

        print(os.listdir(Training)[i])
#定义水果种类数

n_classes =

#batch_size =  #定义块的大小

#batch_num = int(np.array(crop_img).shape[]/batch_size) #计算取块的次数

#申请四维占位符,数据类型为float32

x = tf.placeholder(tf.float32,[None, , , ])

#申请二维占位符,数据累型为float32

y = tf.placeholder(tf.float32,[None, n_classes])

#申请一维占位符,数据类型为float32

keep_prob = tf.placeholder(tf.float32)

#epochs= #训练次数

#每个神经元保留的概率

dropout=0.75

#卷积核大小

k_size =

Weights = {

"conv_w1" : tf.Variable(tf.random_normal([k_size, k_size, , ]), name = 'conv_w1'),

"conv_w2" : tf.Variable(tf.random_normal([k_size, k_size, , ]), name = 'conv_w2'),

#"conv_w3" : tf.Variable(tf.random_normal([k_size, k_size, , ]), name = 'conv_w3'), \

"den_w1" : tf.Variable(tf.random_normal([int(*//*), ]), name = 'dev_w1'),

"den_w2" : tf.Variable(tf.random_normal([, ]), name = 'den_w2'),

"den_w3" : tf.Variable(tf.random_normal([, n_classes]), name = 'den_w3')

}

bias = {

"conv_b1" : tf.Variable(tf.random_normal([]), name = 'conv_b1'),

"conv_b2" : tf.Variable(tf.random_normal([]), name = 'conv_b2'),

#"conv_b3" : tf.Variable(tf.random_normal([]), name = 'conv_b3'), \

"den_b1" : tf.Variable(tf.random_normal([]), name = 'den_b1'),

"den_b2" : tf.Variable(tf.random_normal([]), name = 'den_b2'),

"den_b3" : tf.Variable(tf.random_normal([n_classes]), name = 'den_b3')

}

def conv2d(x,W,b,stride=):

    x=tf.nn.conv2d(x,W,strides=[,stride,stride,],padding="SAME")

    x=tf.nn.bias_add(x,b)

    return tf.nn.relu(x)

def maxpool2d(x,stride=):

    return tf.nn.max_pool(x,ksize=[,stride,stride,],strides=[,stride,stride,],padding="SAME")
def conv_net(inputs, W, b, dropout):

    ## convolution layer

    ## 输入32**3的数据,输出16**64的数据

    conv1 = conv2d(x, W["conv_w1"], b["conv_b1"])

    conv1 = maxpool2d(conv1, )

    tf.summary.histogram('ConvLayer1/Weights', W["conv_w1"])

    tf.summary.histogram('ConvLayer1/bias', b["conv_b1"])

    ## convolution layer2

    ## 输入16**64的数据,输出8**128的数据

    conv2 = conv2d(conv1, W["conv_w2"], b["conv_b2"])

    conv2 = maxpool2d(conv2, )

    tf.summary.histogram('ConvLayer2/Weights', W["conv_w2"])

    tf.summary.histogram('ConvLayer2/bias', b["conv_b2"])

    ## convolution layer3

    #conv3 = conv2d(conv2, W["conv_w3"], b["conv_b3"])

    #conv3 = maxpool2d(conv3, )

    #tf.summary.histogram('ConvLayer3/Weights', W["conv_w3"])

    #tf.summary.histogram('ConvLayer3/bias', b["conv_b3"])

    ## flatten

    ## 把数据拉伸为长度为8**128的一维数据

    flatten = tf.reshape(conv2,[-, W["den_w1"].get_shape().as_list()[]])

    ## dense layer1

    ## 输入8192*1的数据,输出1024*1的数据

    den1 = tf.add(tf.matmul(flatten, W["den_w1"]), b["den_b1"])

    den1 = tf.nn.relu(den1)

    den1 = tf.nn.dropout(den1, dropout)

    tf.summary.histogram('DenLayer1/Weights', W["den_w1"])

    tf.summary.histogram('DenLayer1/bias', b["den_b1"])

    ## dense layer2

    ## *1的数据,输出512*1的数据

    den2 = tf.add(tf.matmul(den1, W["den_w2"]), b["den_b2"])

    den2 = tf.nn.relu(den2)

    den2 = tf.nn.dropout(den2, dropout)

    tf.summary.histogram('DenLayer2/Weights', W["den_w2"])

    tf.summary.histogram('DenLayer2/bias', b["den_b2"])

    ## out

    ## *1的数据,输出n_classes*1的数据

    out = tf.add(tf.matmul(den2, W["den_w3"]), b["den_b3"])

    tf.summary.histogram('DenLayer3/Weights', W["den_w3"])

    tf.summary.histogram('DenLayer3/bias', b["den_b3"])

    return out
pred=conv_net(x,Weights,bias,keep_prob)
cost=tf.reduce_mean(tf.nn.softmax_cross_entropy_with_logits(logits=pred,labels=y))
tf.summary.histogram('loss', cost)
optimizer=tf.train.AdamOptimizer(0.01).minimize(cost)
correct_pred=tf.equal(tf.argmax(pred,),tf.argmax(y,))
accuracy=tf.reduce_mean(tf.cast(correct_pred,tf.float32))
merged=tf.summary.merge_all() def train_and_test(train_x, train_y, test_x, test_y, epochs, batch_size, times = ) :
# 初始化全局变量
init=tf.global_variables_initializer()
start_time = time.time()
with tf.Session() as sess:
sess.run(init)
# 把需要可视化的参数写入可视化文件
writer=tf.summary.FileWriter('F:\\data\\fruits-360\\tensorboard\\Fruit_graph' + str(times), sess.graph)
for i in range(epochs):
batch_num = int(np.array(train_x).shape[]/batch_size)
sum_cost =
sum_acc =
for j in range(batch_num):
batch_x = get_data(train_x, batch_size, j)
batch_y = get_data(train_y, batch_size, j)
sess.run(optimizer, feed_dict={x:batch_x,y:batch_y,keep_prob:0.75})
loss,acc = sess.run([cost,accuracy],feed_dict={x:batch_x,y:batch_y,keep_prob: .})
sum_cost += loss
sum_acc += acc
result=sess.run(merged,feed_dict={x:batch_x, y:batch_y, keep_prob:0.75})
writer.add_summary(result, i)
arg_cost = sum_cost/batch_num
arg_acc = sum_acc/batch_num
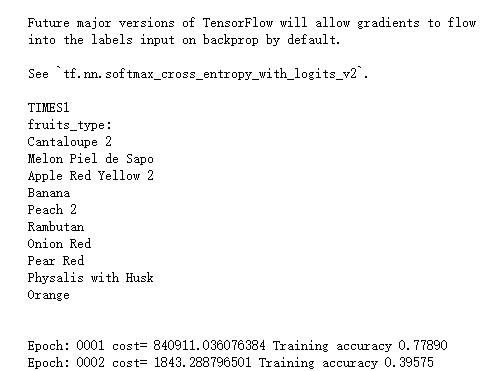
print("Epoch:", '%04d' % (i+),"cost=", "{:.9f}".format(arg_cost),"Training accuracy","{:.5f}".format(arg_acc))
end_time = time.time()
print('Optimization Completed')
print('Testing Accuracy:',sess.run(accuracy,feed_dict={x:test_x, y:test_y,keep_prob: }))
print('Total processing time:',end_time - start_time) for i in range():
random_fruits = get_random_fruits(Training, n_classes)
img_data, img_label, num_label = load(Training, random_fruits)
crop_img = crop(img_data)
test_data, test_label, test_num_label = load(Test, random_fruits)
crop_test = crop(test_data)
print("TIMES"+str(i+))
fruits_type(random_fruits)
print("\n")
train_and_test(crop_img, num_label, crop_test, test_num_label, , , (i+))
print("\n\n\n")
吴裕雄 python 神经网络——TensorFlow 卷积神经网络水果图片识别的更多相关文章
- 吴裕雄--天生自然 Tensorflow卷积神经网络:花朵图片识别
import os import numpy as np import matplotlib.pyplot as plt from PIL import Image, ImageChops from ...
- 吴裕雄 python 神经网络——TensorFlow 卷积神经网络手写数字图片识别
import os import tensorflow as tf from tensorflow.examples.tutorials.mnist import input_data INPUT_N ...
- Tensorflow卷积神经网络
卷积神经网络(Convolutional Neural Network, CNN)是一种前馈神经网络, 在计算机视觉等领域被广泛应用. 本文将简单介绍其原理并分析Tensorflow官方提供的示例. ...
- Tensorflow卷积神经网络[转]
Tensorflow卷积神经网络 卷积神经网络(Convolutional Neural Network, CNN)是一种前馈神经网络, 在计算机视觉等领域被广泛应用. 本文将简单介绍其原理并分析Te ...
- 深度学习原理与框架-Tensorflow卷积神经网络-cifar10图片分类(代码) 1.tf.nn.lrn(局部响应归一化操作) 2.random.sample(在列表中随机选值) 3.tf.one_hot(对标签进行one_hot编码)
1.tf.nn.lrn(pool_h1, 4, bias=1.0, alpha=0.001/9.0, beta=0.75) # 局部响应归一化,使用相同位置的前后的filter进行响应归一化操作 参数 ...
- TensorFlow 卷积神经网络实用指南 | iBooker·ApacheCN
原文:Hands-On Convolutional Neural Networks with TensorFlow 协议:CC BY-NC-SA 4.0 自豪地采用谷歌翻译 不要担心自己的形象,只关心 ...
- 吴裕雄 python 神经网络——TensorFlow 使用卷积神经网络训练和预测MNIST手写数据集
import tensorflow as tf import numpy as np from tensorflow.examples.tutorials.mnist import input_dat ...
- 吴裕雄 python神经网络 水果图片识别(4)
# coding: utf-8 # In[1]:import osimport numpy as npfrom skimage import color, data, transform, io # ...
- 吴裕雄 python神经网络 水果图片识别(2)
import osimport numpy as npimport matplotlib.pyplot as pltfrom skimage import color,data,transform,i ...
随机推荐
- delphi 单例模式
unit Singleton; (* 单例模式适用于辅助类, 一般伴随于单元的生命周期 *) interface uses SysUtils; type TSingleton = class publ ...
- 逃生(地图上的dp)
蒜头君在玩一款逃生的游戏.在一个n×m 的矩形地图上,蒜头位于其中一个点.地图上每个格子有加血的药剂,和掉血的火焰,药剂的药效不同,火焰的大小也不同,每个格子上有一个数字,如果格子上的数字是正数说明是 ...
- awk中传参方式
结合编辑数据文件的shell脚本学习awk传参方式,该脚本功能: a.取VIDEOUSR_11082017_0102_ONLINE_STASTIC.dat文件中第87个字段的低8位: b.将每行数据的 ...
- cmd执行jmeter命令生成报告的问题。
现有几个jmeter脚本,准备以命令行的方式执行jmeter脚本,并生成报告. 一.使用python语言处理 1.目录结构 2.说明 jmx目录下是jmeter脚本 result目录下是生成的报告及文 ...
- 吴裕雄--天生自然Linux操作系统:Linux 简介
Linux 内核最初只是由芬兰人林纳斯·托瓦兹(Linus Torvalds)在赫尔辛基大学上学时出于个人爱好而编写的. Linux 是一套免费使用和自由传播的类 Unix 操作系统,是一个基于 PO ...
- 吴裕雄--天生自然 PHP开发学习:表单和用户输入
<html> <head> <meta charset="utf-8"> <title>菜鸟教程(runoob.com)</t ...
- [PHP防火墙]输入内容存在危险字符,安全起见,已被本站拦截
之前在很多的网站都看到了360webscan的攻击拦截脚本,正好分析并学习一下. 下载地址:http ://webscan.360.cn/protect/down?domain = blog.dybo ...
- Python—选择排序算法
# 选择排序,时间复杂度O(n²) def select_sort(arr): """ 首先在未排序序列中找到最小(大)元素,存放到排序序列的起始位置. 再从剩余未排序元 ...
- php获取客户IP
获取客户真实IP,保存到数据库建议转整 function getIp(){ $ip = ''; if(!empty($_SERVER['HTTP_CLIENT_IP'])){ $ip = $_SERV ...
- mysql only_full_group_by
下载安装的是最新版的mysql5.7.x版本,默认是开启了 only_full_group_by 模式的,但开启这个模式后,原先的 group by 语句就报错,然后又把它移除了. 一旦开启 only ...