吴裕雄 python神经网络 水果图片识别(2)
import os
import numpy as np
import matplotlib.pyplot as plt
from skimage import color,data,transform,io
labelList = os.listdir("F:\\MachineLearn\\ML-xiaoxueqi\\fruits\\Training")
allFruitsImageName = []
for i in range(10):
allFruitsImageName.append(os.listdir("F:\\MachineLearn\\ML-xiaoxueqi\\fruits\\Training\\"+labelList[i]))
allsortImageName = []
for i in range(len(allFruitsImageName)):
oneClass = allFruitsImageName[i]
nr = []
r = []
r2 = []
for i in range(len(oneClass)):
if(oneClass[i].split("_")[0].isdigit()):
nr.append(int(oneClass[i].split("_")[0]))
else:
if(len(oneClass[i].split("_")[0])==1):
r.append(int(oneClass[i].split("_")[1]))
else:
r2.append(int(oneClass[i].split("_")[1]))
sortnr = sorted(nr)
sortnrImageName = []
for i in range(len(sortnr)):
sortnrImageName.append(str(sortnr[i])+"_100.jpg")
sortr = sorted(r)
sortrImageName = []
for i in range(len(sortr)):
sortrImageName.append("r_"+str(sortr[i])+"_100.jpg")
sortr2 = sorted(r2)
sortr2ImageName = []
for i in range(len(sortr2)):
sortr2ImageName.append("r2_"+str(sortr2[i])+"_100.jpg")
sortnrImageName.extend(sortrImageName)
sortnrImageName.extend(sortr2ImageName)
allsortImageName.append(sortnrImageName)
trainData = []
trainLabel = []
for i in range(len(allsortImageName)):
for j in range(len(allsortImageName[i])):
trainLabel.append(i)
rgb=io.imread("F:\\MachineLearn\\ML-xiaoxueqi\\fruits\\Training\\"+labelList[i]+"\\" + allsortImageName[i][j]) #读取图片
# gray=color.rgb2gray(rgb) #将彩色图片转换为灰度图片
dst=transform.resize(rgb,(32,32)) #调整大小,图像分辨率为64*64
trainData.append(dst)
import tensorflow as tf
from random import shuffle
import keras
import time
from keras.utils import np_utils
X = np.vstack(trainData).reshape(-1, 32,32,3)
Y = np.vstack(trainLabel).reshape(-1, 1)
Xrandom = []
Yrandom = []
index = [i for i in range(len(X))]
shuffle(index)
train_x=X[index]
train_y=Y[index]
train_y=keras.utils.to_categorical(Y,10)
## 配置神经网络的参数
n_classes=10
batch_size=64
kernel_h=kernel_w=5
dropout=0.8
depth_in=3
depth_out1=64
depth_out2=128
image_size=train_x.shape[1] ##图片尺寸
n_sample=train_x.shape[0] ##样本个数
x=tf.placeholder(tf.float32,[None,32,32,3]) ##每张图片的像素大小为32*32
y=tf.placeholder(tf.float32,[None,n_classes])
keep_prob=tf.placeholder(tf.float32) ##dropout的placeholder(解决过拟合)
fla=int((image_size*image_size/16)*depth_out2)#扁平化用到
##定义权重变量
Weights={"con1_w":tf.Variable(tf.random_normal([kernel_h,kernel_w,depth_in,depth_out1])),\
"con2_w":tf.Variable(tf.random_normal([kernel_h,kernel_w,depth_out1,depth_out2])),\
"fc_w1":tf.Variable(tf.random_normal([int((image_size*image_size/16)*depth_out2),512])),\
"fc_w2":tf.Variable(tf.random_normal([512,128])),\
"out":tf.Variable(tf.random_normal([128,n_classes]))}
##定义偏置变量
bias={"conv1_b":tf.Variable(tf.random_normal([depth_out1])),\
"conv2_b":tf.Variable(tf.random_normal([depth_out2])),\
"fc_b1":tf.Variable(tf.random_normal([512])),\
"fc_b2":tf.Variable(tf.random_normal([128])),\
"out":tf.Variable(tf.random_normal([n_classes]))}
## 定义卷积层的生成函数
def conv2d(x,W,b,stride=1):
x=tf.nn.conv2d(x,W,strides=[1,stride,stride,1],padding="SAME")
x=tf.nn.bias_add(x,b)
return tf.nn.relu(x)
## 定义池化层的生成函数
def maxpool2d(x,stride=2):
return tf.nn.max_pool(x,ksize=[1,stride,stride,1],strides=[1,stride,stride,1],padding="SAME")
## 定义卷积神经网络生成函数
def conv_net(x,weights,biases,dropout):
## Convolutional layer 1(卷积层1)
with tf.name_scope('convLayer1'):
conv1 = conv2d(x,Weights['con1_w'],bias['conv1_b']) ##32*32*64
tf.summary.histogram('convLayer1/weights1',Weights['con1_w'])
tf.summary.histogram('convLayer1/bias1',bias['conv1_b'])
tf.summary.histogram('convLayer1/conv1',conv1)
pool1 = maxpool2d(conv1,2) ##经过池化层1 shape:16*16*64
## Convolutional layer 2(卷积层2)
with tf.name_scope('convLayer2'):
conv2 = conv2d(pool1,Weights['con2_w'],bias['conv2_b']) ##16*16*128
tf.summary.histogram('convLayer2/weights2',Weights['con2_w'])
tf.summary.histogram('convLayer2/bias2',bias['conv2_b'])
tf.summary.histogram('convLayer2/conv2',conv2)
pool2 = maxpool2d(conv2,2) ##经过池化层2 shape:8*8*128
tf.summary.histogram('ConvLayer2/pool2',pool2)
flatten = tf.reshape(pool2,[-1,fla]) ##Flatten层,扁平化处理
fc1 = tf.add(tf.matmul(flatten,Weights['fc_w1']),bias['fc_b1'])
fc1r = tf.nn.relu(fc1) ##经过relu激活函数
## Fully connected layer 2(全连接层2)
fc2 = tf.add(tf.matmul(fc1r,Weights['fc_w2']),bias['fc_b2']) ##计算公式:输出参数=输入参数*权值+偏置
fc2 = tf.nn.relu(fc2) ##经过relu激活函数
## Dropout(Dropout层防止预测数据过拟合)
fc2 = tf.nn.dropout(fc2,dropout)
## Output class prediction
prediction = tf.add(tf.matmul(fc2,Weights['out']),bias['out']) ##输出预测参数
return prediction
## 优化预测准确率 0.005
prediction=conv_net(x,Weights,bias,keep_prob) ##生成卷积神经网络
cross_entropy=tf.reduce_mean(tf.nn.softmax_cross_entropy_with_logits_v2(logits=prediction,labels=y)) ##交叉熵损失函数
optimizer=tf.train.AdamOptimizer(1e-4).minimize(cross_entropy) ##选择优化器以及学习率
merged=tf.summary.merge_all()
## 评估模型
correct_pred=tf.equal(tf.argmax(prediction,1),tf.argmax(y,1))
accuracy=tf.reduce_mean(tf.cast(correct_pred,tf.float32))
## 初始会话并开始训练过程
with tf.Session() as sess:
tf.global_variables_initializer().run()
# writer=tf.summary.FileWriter("./Fruits(0.001)",sess.graph)
for i in range(5):
for j in range(int(n_sample/batch_size)+1):
start = (j*batch_size)
end = start+batch_size
x_=train_x[start:end]
y_=train_y[start:end]
##准备验证数据
if i % 1 == 0:
validate_feed={x:x_,y:y_,keep_prob:0.8}
sess.run(optimizer, feed_dict=validate_feed)
# result=sess.run(merged,feed_dict=validate_feed)
# writer.add_summary(result,i)
loss,acc = sess.run([cross_entropy,accuracy],feed_dict=validate_feed)
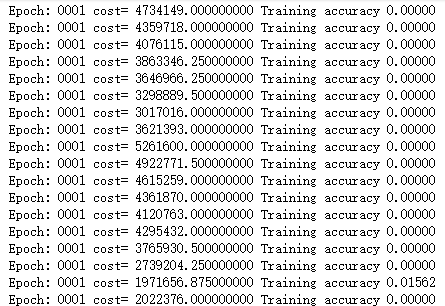
print("Epoch:", '%04d' % (i+1),"cost=", "{:.9f}".format(loss),"Training accuracy","{:.5f}".format(acc))
print('Optimization Completed')
####required libraries
import numpy as np
import tensorflow as tf
import matplotlib.pyplot as plt
import time
from tensorflow.examples.tutorials.mnist import input_data
###########extract data from packages
mnist=input_data.read_data_sets("./MNIST_data",one_hot=True)
train_X,train_Y,test_X,test_Y=mnist.train.images, mnist.train.labels, mnist.test.images, mnist.test.labels
######input data
n_classes=10
x=tf.placeholder(tf.float32,[None,28*28])
y=tf.placeholder(tf.float32,[None,n_classes])
keep_prob = tf.placeholder(tf.float32)
epochs=20
learning_rate=0.01
batch_size=200
batch_num=int(mnist.train.num_examples/batch_size)
dropout=0.75
filter_width=5
filter_height=5
depth_in=1
depth_out1=64
depth_out2=128
f_height=28
######ops:Weights and bias
Weights={"wc1":tf.Variable(tf.random_normal([filter_height,filter_width,depth_in,depth_out1])),\
"wc2":tf.Variable(tf.random_normal([filter_height,filter_width,depth_out1,depth_out2])),\
"wd1":tf.Variable(tf.random_normal([int((f_height*f_height/16)*depth_out2),1024])),\
"out":tf.Variable(tf.random_normal([1024,n_classes]))}
bias={"bc1":tf.Variable(tf.random_normal([depth_out1])),\
"bc2":tf.Variable(tf.random_normal([depth_out2])),\
"bd1":tf.Variable(tf.random_normal([1024])),\
"out":tf.Variable(tf.random_normal([n_classes]))}
##############convolution layer and pooling layer
def conv2d(x,W,b,stride=1):
x=tf.nn.conv2d(x,W,strides=[1,stride,stride,1],padding="SAME")
x=tf.nn.bias_add(x,b)
return tf.nn.relu(x)
def maxpool2d(x,stride=2):
return tf.nn.max_pool(x,ksize=[1,stride,stride,1],strides=[1,stride,stride,1],padding="SAME")
####create the feed forward model
def conv_net(x_,W,b,dropout):
x=tf.reshape(x_,[-1,28,28,1])
####convolution layer 1######
conv1=conv2d(x,W["wc1"],b["bc1"])
conv1=maxpool2d(conv1,2)
####convolution layer 2######
conv2=conv2d(conv1,W["wc2"],b["bc2"])
conv2=maxpool2d(conv2,2)
####fully connected layer#####
fc1=tf.reshape(conv2,[-1,W["wd1"].get_shape().as_list()[0]])
fc1=tf.matmul(fc1,W["wd1"])
fc1=tf.add(fc1,b["bd1"])
fc1=tf.nn.relu(fc1)
######Apply dropout####
fc1=tf.nn.dropout(fc1,dropout)
######output layer####
out=tf.matmul(fc1,W["out"])
out=tf.add(out,b["out"])
return out
'''C O N V O L U T I O N L A Y E R'''
def conv2d(x,W,b,strides=1):
x = tf.nn.conv2d(x,W,strides=[1,strides,strides,1],padding='SAME')
x = tf.nn.bias_add(x,b)
return tf.nn.relu(x)
''' P O O L I N G L A Y E R'''
def maxpool2d(x,stride=2):
return tf.nn.max_pool(x,ksize=[1,stride,stride,1],strides=[1,stride,stride,1],padding='SAME')
def conv_net(x,weights,biases,dropout):
x = tf.reshape(x,shape=[-1,28,28,1])
##################################################
## Convolutional layer 1
conv1 = conv2d(x,weights['wc1'],biases['bc1'])
conv1 = maxpool2d(conv1,2)
## Convolutional layer 2
conv2 = conv2d(conv1,weights['wc2'],biases['bc2'])
conv2 = maxpool2d(conv2,2)
## Now comes the fully connected layer
fc1 = tf.reshape(conv2,[-1,weights['wd1'].get_shape().as_list()[0]])
fc1 = tf.add(tf.matmul(fc1,weights['wd1']),biases['bd1'])
fc1 = tf.nn.relu(fc1)
## Apply Dropout
fc1 = tf.nn.dropout(fc1,dropout)
## Output class prediction
out = tf.add(tf.matmul(fc1,weights['out']),biases['out'])
return out
########Define tensorflow ops for different activities#####
pred=conv_net(x,Weights,bias,keep_prob)
cost=tf.reduce_mean(tf.nn.softmax_cross_entropy_with_logits(logits=pred,labels=y))
optimizer=tf.train.AdamOptimizer(0.01).minimize(cost)
####Evaluate model
correct_pred=tf.equal(tf.argmax(pred,1),tf.argmax(y,1))
accuracy=tf.reduce_mean(tf.cast(correct_pred,tf.float32))
init=tf.global_variables_initializer()
####################################################
## Launch the execution Graph
####################################################
start_time = time.time()
with tf.Session() as sess:
sess.run(init)
for i in range(epochs):
for j in range(batch_num):
batch_x,batch_y = mnist.train.next_batch(batch_size)
sess.run(optimizer, feed_dict={x:batch_x,y:batch_y,keep_prob:0.75})
loss,acc = sess.run([cost,accuracy],feed_dict={x:batch_x,y:batch_y,keep_prob: 1.})
if epochs % 1 == 0:
print("Epoch:", '%04d' % (i+1),"cost=", "{:.9f}".format(loss),"Training accuracy","{:.5f}".format(acc))
print('Optimization Completed')
y1 = sess.run(pred,feed_dict={x:mnist.test.images[:256],keep_prob: 1})
test_classes = np.argmax(y1,1)
print('Testing Accuracy:',sess.run(accuracy,feed_dict={x:mnist.test.images[:256],y:mnist.test.labels[:256],keep_prob: 1}))
print('Total processing time:',end_time - start_time)
####required libraries
import numpy as np
import tensorflow as tf
import matplotlib.pyplot as plt
import time
from tensorflow.examples.tutorials.mnist import input_data
###########extract data from packages
mnist=input_data.read_data_sets("./MNIST_data",one_hot=True)
# train_X,train_Y,test_X,test_Y=mnist.train.images,mnist.train.labels,mnist.test.images,mnist.test.labels
吴裕雄 python神经网络 水果图片识别(2)的更多相关文章
- 吴裕雄 python神经网络 水果图片识别(5)
#-*- coding:utf-8 -*-### required libaraiedimport osimport matplotlib.image as imgimport matplotlib. ...
- 吴裕雄 python神经网络 水果图片识别(4)
# coding: utf-8 # In[1]:import osimport numpy as npfrom skimage import color, data, transform, io # ...
- 吴裕雄 python神经网络 水果图片识别(3)
import osimport kerasimport timeimport numpy as npimport tensorflow as tffrom random import shufflef ...
- 吴裕雄 python神经网络 水果图片识别(1)
import osimport numpy as npimport matplotlib.pyplot as pltfrom skimage import color,data,transform,i ...
- 吴裕雄 python神经网络 花朵图片识别(10)
import osimport numpy as npimport matplotlib.pyplot as pltfrom PIL import Image, ImageChopsfrom skim ...
- 吴裕雄 python神经网络 花朵图片识别(9)
import osimport numpy as npimport matplotlib.pyplot as pltfrom PIL import Image, ImageChopsfrom skim ...
- 吴裕雄 python 神经网络——TensorFlow图片预处理调整图片
import numpy as np import tensorflow as tf import matplotlib.pyplot as plt def distort_color(image, ...
- 吴裕雄 python 神经网络——TensorFlow 花瓣识别2
import glob import os.path import numpy as np import tensorflow as tf from tensorflow.python.platfor ...
- 吴裕雄 python 神经网络——TensorFlow图片预处理
import numpy as np import tensorflow as tf import matplotlib.pyplot as plt # 使用'r'会出错,无法解码,只能以2进制形式读 ...
随机推荐
- go http client, http server
Go语言中的HTTP client, server非常简单.具体如下. HTTP Server package main import ( "fmt" "html&quo ...
- jquery tmpl学习资料 --{{each}} each使用
<!DOCTYPE html><html><head> <script src="Scripts/jquery-1.6.2.min.js&qu ...
- Django 博客项目01 数据库设计与验证码校验+Ajax登录
数据库设计 from django.db import models from django.contrib.auth.models import AbstractUser class UserInf ...
- java GUI(忽略)
觉得学起来很鸡肋.就不学这玩意了
- 无需公众号PHP微信登录微信授权微信第三方登录微信开发php开发
无论是个人还是公司,无需申请公众号,无需申请微信开放平台,即可实现手机网站和PC网站的微 信登录!!! 正常的微信登录是这样的: 1.手机版网站做微信登录,需要申请一个认证公众号,认证不仅需要公司营 ...
- 【Spring学习笔记-MVC-16】Spring MVC之重定向-解决中文乱码
概述 spring MVC框架controller间跳转,需重定向,主要有如下三种: 不带参数跳转:形如:http://localhost:8080/SpringMVCTest/test/myRedi ...
- Tengine 反向代理状态检测
Tengine 反向代理状态检测 安装Tengine: 编译安装./configure --prefix=/usr/loca/nginx make && make install 配置 ...
- 阿里云服务器挖矿wipefs处理
查看指定日志修改过的文件: [root@iZbp12v0moqn078lm0t0l5Z 2018-04-26]# find /data/www/manage -ctime 0 -exec ls -l ...
- HP-UX oracle RAC 双机实践 (转载)
一.软硬件配置检查 1.检查内存#/usr/contrib/bin/machinfoCPU info: 4 Intel(R) Itanium 2 9100 series processors (1. ...
- ioncube 加密软件 linux 使用方法
https://www.ioncube.com/sa_encoder.php?page=pricing 购买成功后 解压文件包 装了一个linux 版的加密软件 目录:/webdata/soft/io ...