linux中mysql,mongodb,redis,hbase数据库操作
.实验内容与完成情况:(实验具体步骤和实验截图说明)
(一) MySQL 数据库操作
学生表 Student
Name English Math Computer zhangsan
lisi 根据上面给出的 Student 表,在 MySQL 数据库中完成如下操作:
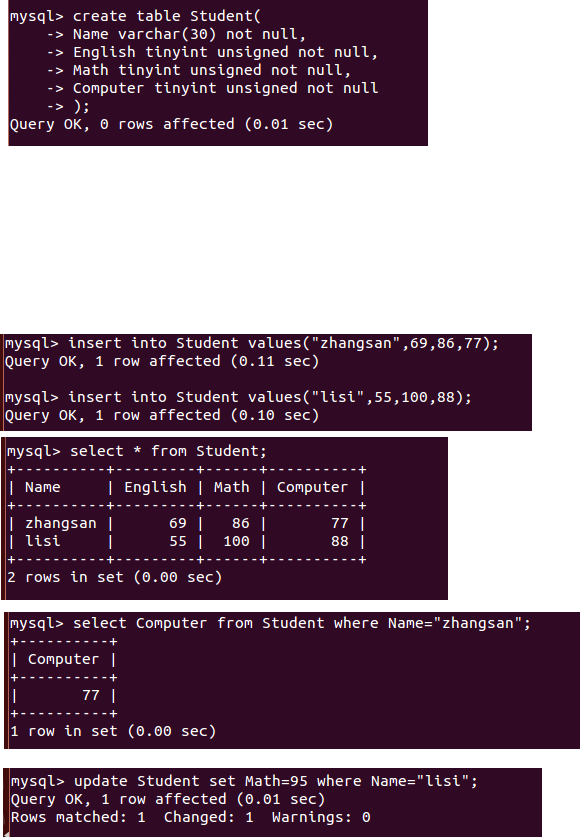
()在 MySQL 中创建 Student 表,并录入数据;
()用 SQL 语句输出 Student 表中的所有记录;
()查询 zhangsan 的 Computer 成绩;
()修改 lisi 的 Math 成绩, 改为 。
根据上面已经设计出的 Student 表,使用 MySQL 的 JAVA 客户端编程实现以下操作:

(1)向 Student 表中添加如下所示的一条记录:

scofield

源代码:

package com.mysql;

import java.sql.*;

public class MysqlTest {

   static final String driver="com.mysql.jdbc.Driver";

   static final String DB="jdbc:mysql://localhost/test1";

   static final String user="root";

   static final String password="wangli";

   public static void main(String[] args) {

       Connection conn=null;

       Statement stmt=null;

       try {

           Class.forName(driver);

           conn=DriverManager.getConnection(DB,user,password);

           stmt=conn.createStatement();

           String sql="insert into Student values('scofied',45,89,100)";

           stmt.executeUpdate(sql);

           System.out.println("插入成功!");

       } catch (SQLException | ClassNotFoundException e) {

        // TODO Auto-generated catch block

        e.printStackTrace();

    }finally {

        if(stmt!=null) {

                try {

                    stmt.close();

                } catch (SQLException e) {

                    // TODO Auto-generated catch block

                    e.printStackTrace();

                }

        }

        if(conn!=null) {

            try {

                conn.close();

            } catch (SQLException e) {

                e.printStackTrace();

            }

        }

    }

   }

}

(2) 获取 scofield 的 English 成绩信息

源代码:

package com.mysql;

import java.sql.*;

public class MysqlTest {

   static final String driver="com.mysql.jdbc.Driver";

   static final String DB="jdbc:mysql://localhost/test1";

   static final String user="root";

   static final String password="wangli";

   public static void main(String[] args) {

       Connection conn=null;

       Statement stmt=null;

       ResultSet rs=null;

       try {

           Class.forName(driver);

           conn=DriverManager.getConnection(DB,user,password);

           stmt=conn.createStatement();

           String sql="select Name,English from Student where Name='scofied' ";

           rs=stmt.executeQuery(sql);

           System.out.println("name"+"\t\t"+"English");

           while(rs.next()) {

               System.out.print(rs.getString()+"\t\t");

               System.out.println(rs.getString());

           }

           System.out.println("输出完成!");

       } catch (SQLException | ClassNotFoundException e) {

        // TODO Auto-generated catch block

        e.printStackTrace();

    }finally {

        if(stmt!=null) {

                try {

                    stmt.close();

                } catch (SQLException e) {

                    // TODO Auto-generated catch block

                    e.printStackTrace();

                }

        }

        if(conn!=null) {

            try {

                conn.close();

            } catch (SQLException e) {

                e.printStackTrace();

            }

        }

    }

   }

}

(二) HBase 数据库操作

学生表 Student

name     score

English     Math     Computer

zhangsan

lisi

根据上面给出的学生表 Student 的信息, 执行如下操作:

() 用 Hbase Shell 命令创建学生表 Student;

()用 scan 命令浏览 Student 表的相关信息;

()查询 zhangsan 的 Computer 成绩;

()修改 lisi 的 Math 成绩, 改为 。

.根据上面已经设计出的 Student 表, 用 HBase API 编程实现以下操作:

()添加数据: English: Math: Computer:

scofield

源代码:

package hbase_test;

import java.io.IOException;

import org.apache.hadoop.conf.Configuration;

import org.apache.hadoop.hbase.HBaseConfiguration;

import org.apache.hadoop.hbase.TableName;

import org.apache.hadoop.hbase.client.Admin;

import org.apache.hadoop.hbase.client.Connection;

import org.apache.hadoop.hbase.client.ConnectionFactory;

import org.apache.hadoop.hbase.client.Put;

import org.apache.hadoop.hbase.client.Table;

public class HBaseTest {

    public static Configuration configuration;

    public static Connection connection;

    public static Admin admin;

    public static void main(String[] args) {

        configuration=HBaseConfiguration.create();

        configuration.set("hbase.rootdir", "hdfs://localhost:9000/hbase");

        try {

            connection=ConnectionFactory.createConnection(configuration);

            admin=connection.getAdmin();

            insertRow("Student","scofield","score","English","");

            insertRow("Student","scofield","score","Math","");

            insertRow("Student","scofield","score","Computer","");

            System.out.println("插入成功!");

        } catch (IOException e) {

            // TODO Auto-generated catch block

            e.printStackTrace();

        }

        close();

    }

    public static void insertRow(String tableName, String rowKey, String colFamily, String col, String val) {

        try {

            Table table = connection.getTable(TableName.valueOf(tableName));

            Put put = new Put(rowKey.getBytes());

            put.addColumn(colFamily.getBytes(), col.getBytes(), val.getBytes());

            table.put(put);

            table.close();

        } catch (IOException e) {

            // TODO Auto-generated catch block

            e.printStackTrace();

        }

    }

    public static void close() {

        try {

            if (admin != null) {

                admin.close();

            }

            if(null!=connection) {

                connection.close();

            }

        } catch (IOException e) {

            // TODO Auto-generated catch block

            e.printStackTrace();

        }

    }

}

(2)获取 scofield 的 English 成绩信息。

源代码:

package hbase_test;

import java.io.IOException;

import org.apache.hadoop.conf.Configuration;

import org.apache.hadoop.hbase.Cell;

import org.apache.hadoop.hbase.CellUtil;

import org.apache.hadoop.hbase.HBaseConfiguration;

import org.apache.hadoop.hbase.TableName;

import org.apache.hadoop.hbase.client.Admin;

import org.apache.hadoop.hbase.client.Connection;

import org.apache.hadoop.hbase.client.ConnectionFactory;

import org.apache.hadoop.hbase.client.Get;

import org.apache.hadoop.hbase.client.Put;

import org.apache.hadoop.hbase.client.Result;

import org.apache.hadoop.hbase.client.Table;

public class HBaseTest2 {

    public static Configuration configuration;

    public static Connection connection;

    public static Admin admin;

    public static void main(String[] args) {

        configuration=HBaseConfiguration.create();

        configuration.set("hbase.rootdir", "hdfs://localhost:9000/hbase");

        try {

            connection=ConnectionFactory.createConnection(configuration);

            admin=connection.getAdmin();

            getData("Student","scofield","score","English");

            System.out.println("输出完成!");

        } catch (IOException e) {

            // TODO Auto-generated catch block

            e.printStackTrace();

        }

        close();

    }

    public static void getData(String tableName, String rowKey, String colFamily, String col) {

        try {

            Table table = connection.getTable(TableName.valueOf(tableName));

            Get get=new Get(rowKey.getBytes());

            get.addColumn(colFamily.getBytes(), col.getBytes());

            Result result=table.get(get);

            showCell(result);

            table.close();

        } catch (IOException e) {

            // TODO Auto-generated catch block

            e.printStackTrace();

        }

    }

    private static void showCell(Result result) {

        Cell[] cells=result.rawCells();

        for(Cell cell:cells) {

            System.out.println("RowName:"+new String(CellUtil.cloneRow(cell))+"     ");

            System.out.println("Timetamp:"+cell.getTimestamp()+"     ");

            System.out.println("column Family"+new String(CellUtil.cloneFamily(cell))+"     ");

            System.out.println("row Name:"+new String(CellUtil.cloneValue(cell))+"     ");

            System.out.println("value"+new String(CellUtil.cloneValue(cell))+"     ");

        }

    }

    public static void close() {

        try {

            if (admin != null) {

                admin.close();

            }

            if(null!=connection) {

                connection.close();

            }

        } catch (IOException e) {

            // TODO Auto-generated catch block

            e.printStackTrace();

        }

    }

}

(三) Redis 数据库操作

Student 键值对如下:

zhangsan:{

English:

Math:

Computer:

}

lisi:{

English:

Math:

Computer:

}

. 根据上面给出的键值对, 完成如下操作:

()用 Redis 的哈希结构设计出学生表 Student (键值可以用 student.zhangsan 和 student.lisi来表示两个键值属于同一个表);

() 用 hgetall 命令分别输出 zhangsan 和 lisi 的成绩信息;

() 用 hget 命令查询 zhangsan 的 Computer 成绩;

()修改 lisi 的 Math 成绩, 改为 。

.根据上面已经设计出的学生表 Student, 用 Redis 的 JAVA 客户端编程(jedis),实现如下
操作:
()添加数据: English: Math: Computer:
该数据对应的键值对形式如下:
scofield:{
English:
Math:
Computer: }
(四) MongoDB 数据库操作
Student 文档如下:
{
“name”: “zhangsan”,
“score”: {
“English”: ,
“Math”: ,
“Computer”:
} } {
“name”: “lisi”,
“score”: {
“English”: ,
“Math”: ,
“Computer”:
} } .根据上面给出的文档,完成如下操作:
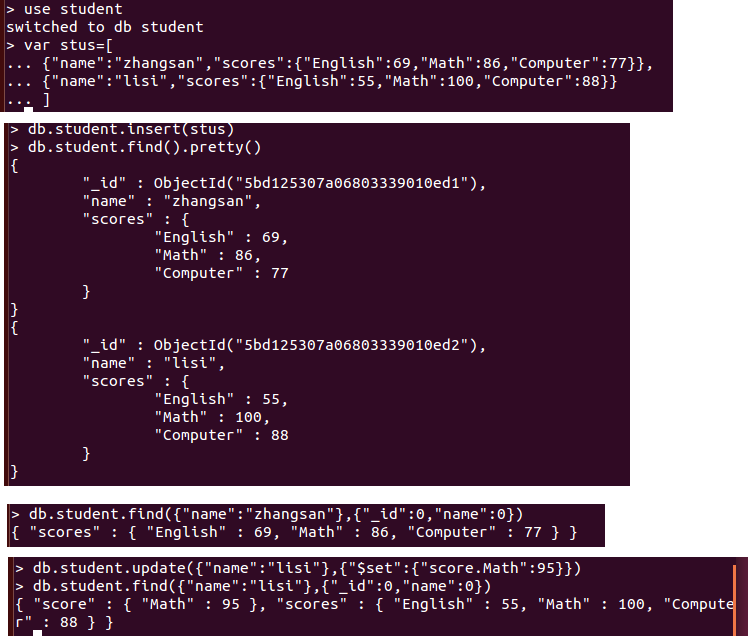
() 用 MongoDB Shell 设计出 student 集合;
()用 find()方法输出两个学生的信息;
()用 find()方法查询 zhangsan 的所有成绩(只显示 score 列);
()修改 lisi 的 Math 成绩, 改为 。
.根据上面已经设计出的 Student 集合,用 MongoDB 的 Java 客户端编程,实现如下操作:

() 添加数据: English: Math: Computer:

与上述数据对应的文档形式如下:

{

“name”: “scofield”,

“score”: {

“English”: ,

“Math”: ,

“Computer”:

} }

源代码:

package com.mongo;

import java.util.ArrayList;

import java.util.List;

import org.bson.Document;

import com.mongodb.MongoClient;

import com.mongodb.client.MongoCollection;

import com.mongodb.client.MongoDatabase;

public class MongoTest {

    public static void main(String[] args) {

        MongoClient mongoClient=new MongoClient("localhost",);

        MongoDatabase mongoDatabase=mongoClient.getDatabase("student");

        MongoCollection<Document> collection=mongoDatabase.getCollection("student");

        Document document=new Document("name","scofield").append("score",

                new Document("English",).append("Math", ).append("Computer",

                        ));

        List<Document> documents=new ArrayList<Document>();

        documents.add(document);

        collection.insertMany(documents);

        System.out.println("文档插入成功!");

    }

}

实验截图:

(2)获取 scofield 的所有成绩成绩信息(只显示 score 列)

源代码:

package com.mongo;

import org.bson.Document;

import com.mongodb.MongoClient;

import com.mongodb.client.MongoCollection;

import com.mongodb.client.MongoCursor;

import com.mongodb.client.MongoDatabase;

public class MongoTest2 {

    public static void main(String[] args) {

        MongoClient mongoClient=new MongoClient("localhost",);

        MongoDatabase mongoDatabase=mongoClient.getDatabase("student");

        MongoCollection<Document> collection=mongoDatabase.getCollection("student");

        MongoCursor<Document> cursor=collection.find(new Document("name","scofield")).

                projection(new Document("score",).append("_id", )).iterator();

        while(cursor.hasNext())

            System.out.println(cursor.next().toJson());

    }

}
linux中mysql,mongodb,redis,hbase数据库操作的更多相关文章
- Scrapy连接到各类数据库(SQLite,Mysql,Mongodb,Redis)
如何使用scrapy连接到(SQLite,Mysql,Mongodb,Redis)数据库,并把爬取的数据存储到相应的数据库中. 一.SQLite 1.修改pipelines.py文件加入如下代码 # ...
- 数据库们~MySQL~MongoDB~Redis
mysql基础 mysql进阶 python操作mysql MongoDB Redis
- Linux中python3,django,redis以及mariab的安装
1. Linux中python3,django,redis以及mariab的安装 2. CentOS下编译安装python3 编译安装python3.6的步骤 1.下载python3源码包 wget ...
- linux中MySQL主从配置(Django实现主从读写分离)
一 linux中MySQL主从配置原理(主从分离,主从同步) mysql主从配置的流程大体如图: 1)master会将变动记录到二进制日志里面: 2)master有一个I/O线程将二进制日志发送到sl ...
- 转载-清除Linux中MySQL的使用痕迹~/.mysql_history
原文地址:清除Linux中MySQL的使用痕迹~/.mysql_history 作者:RogerZhuo 原贴:http://bbs.chinaunix.net/thread-3676498-1-1. ...
- 回顾:Linux环境 Mysql新建用户和数据库并授权
回顾:Linux环境 Mysql新建用户和数据库并授权 一.新建用户 //登录Mysql @>mysql -u root -p @>密码 //创建用户 mysql> insert i ...
- hbase数据库操作
.实验内容与完成情况:(实验具体步骤和实验截图说明) (一)编程实现以下指定功能,并用 Hadoop 提供的 HBase Shell 命令完成相同任务: () 列出 HBase 所有的表的相关信息,例 ...
- Python交互数据库(Mysql | Mongodb | Redis)
数据库 Mysql Mysql MySQL是一个关系型数据库管理系统,由瑞典MySQL AB公司开发,后来被Sun公司收购,Sun公司后来又被Oracle公司收购,目前属于Oracle旗下产品 MyS ...
- Linux中mysql的操作
一.mysql服务操作 二.数据库操作 三.数据表操作 四.修改表结构 五.数据备份和恢复 六.卸载数据库
随机推荐
- unity3d MonoDevelop引用外部自定义dll文件报错:are you missing an assembly reference?
在unity3d 编辑器 MonoDevelop 中引用外部自定义dll文件报错:are you missing an assembly reference? 因为unity还停留在.NET Fram ...
- R语言输出pdf时,中文乱码处理
本文转载自:https://blog.csdn.net/hongweigg/article/details/47907555 1.使用基础包,使用函数pdf()输出 在使用pdf()函数时,要输出中文 ...
- Django框架 之 Cookie和Session初识
Django框架 之 Cookie和Session初识 浏览目录 Cookie介绍 Django中的Cookie Session 一.Cookie介绍 1.Cookie产生的意义 众所周知,HTTP协 ...
- Entity Relationships
Entity Relationships: Here, you will learn how entity framework manages the relationships between en ...
- java全栈day13----Eclipse项目的jar包导出与使用jar包
01eclipse快捷键 Ctrl+T:查看所选中类的继承树 例如,在下面代码中,选中Teacher类名,然后按Ctrl+T,就会显示出Teacher类的继承关系 * B: 查看所选中方法的源代码 ...
- android listview addHeaderView和addFooterView的注意事项
1. item内如果有button等控件时,在监听listview的onitemclick事件时,焦点会被item内的button. imagebutton等控件抢走,从而导致在listview设置了 ...
- redis系列:集群
1 简介 Redis 集群是Redis 的一个分布式实现,它是一个网状结构,每个节点都通过 TCP 连接跟其他每个节点连接.现在来看看Redis集群实现了哪些目标? 在1000个节点的时候仍能表现得很 ...
- python web框架(bottle,flask,tornado)
Python的WEB框架 Bottle Bottle是一个快速.简洁.轻量级的基于WSIG的微型Web框架,此框架只由一个 .py 文件,除了Python的标准库外,其不依赖任何其他模块. pip i ...
- C#多线程 线程嵌套调用问题
线程嵌套指的是:线程A的执行代码启动了线程B,线程B的执行代码又启动了线程C. 我原本以为线程A被Abort后,线程B会自动被Abort,但是我大错特错了. 在这种场景下,线程的管理就非常重要了. 线 ...
- ubuntu安装软件-笔记
手动安装过程 下载 - 配置文件 常用命令: sudo dpkg -i ******.deb 问题&解决思路 问题1:依赖项 - 缺少某一个依赖包 解决尝试: 1 . sudo apt-ge ...