
tensorflow在文本处理中的使用——TF-IDF算法
代码来源于:tensorflow机器学习实战指南(曾益强 译,2017年9月)——第七章:自然语言处理
代码地址:https://github.com/nfmcclure/tensorflow-cookbook
解决问题:使用“tfidf”来进行垃圾短信的预测(使用逻辑回归算法)
缺点:未考虑单词顺序
TF-IDF:TF词频(Term Frequency),IDF逆向文件频率(Inverse Document Frequency)。
TF表示词条在文档d中出现的频率。
IDF的主要思想是:如果包含词条t的文档越少,也就是分母越小,IDF越大,则说明词条t具有很好的类别区分能力。
i词在j文档中的tfidf值计算
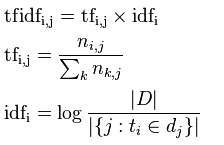
|D|是全部文档数目
分母为有i词的文档数目,有时分母会为0,采用拉普拉斯平滑,作+1处理
步骤如下:
step1:导入需要的包
step2:准备数据集
step3:分词且构建文本向量
step4:分割数据集
step5:构建图
step6:训练效果变化
step1:导入需要的包
import tensorflow as tf

import matplotlib.pyplot as plt

import csv

import numpy as np

import os

import string

import requests

import io

import nltk

from zipfile import ZipFile

from sklearn.feature_extraction.text import TfidfVectorizer

from tensorflow.python.framework import ops

ops.reset_default_graph()

# Start a graph session

sess = tf.Session()

#定义批处理大小和特征向量长度

batch_size = 200

max_features = 1000
step2:准备数据集
step3:分词且构建文本向量
# Define tokenizer

def tokenizer(text):

    words = nltk.word_tokenize(text)

    return words

# Create TF-IDF of texts

tfidf = TfidfVectorizer(tokenizer=tokenizer, stop_words='english', max_features=max_features)

sparse_tfidf_texts = tfidf.fit_transform(texts)
此时sparse_tfidf_texts已经将每个文本转成一个1000维的向量,多个文本构成矩阵(注意该矩阵为稀疏矩阵,查看值使用sparse_tfidf_texts.todense())
step4:分割数据集
# Split up data set into train/test

train_indices = np.random.choice(sparse_tfidf_texts.shape[0], round(0.8*sparse_tfidf_texts.shape[0]), replace=False)

test_indices = np.array(list(set(range(sparse_tfidf_texts.shape[0])) - set(train_indices)))

texts_train = sparse_tfidf_texts[train_indices]

texts_test = sparse_tfidf_texts[test_indices]

target_train = np.array([x for ix, x in enumerate(target) if ix in train_indices])

target_test = np.array([x for ix, x in enumerate(target) if ix in test_indices])
step5:构建图
# Create variables for logistic regression设置权重和偏置项

A = tf.Variable(tf.random_normal(shape=[max_features,1]))

b = tf.Variable(tf.random_normal(shape=[1,1]))

# Initialize placeholders设置数据的占位符

x_data = tf.placeholder(shape=[None, max_features], dtype=tf.float32)

y_target = tf.placeholder(shape=[None, 1], dtype=tf.float32)

# Declare logistic model (sigmoid in loss function)

model_output = tf.add(tf.matmul(x_data, A), b)

# Declare loss function (Cross Entropy loss)损失函数计算

loss = tf.reduce_mean(tf.nn.sigmoid_cross_entropy_with_logits(model_output, y_target))

# Actual Prediction 预测结果

prediction = tf.round(tf.sigmoid(model_output))

predictions_correct = tf.cast(tf.equal(prediction, y_target), tf.float32)

accuracy = tf.reduce_mean(predictions_correct)

# Declare optimizer 用GD优化算法更新权重,最小化损失

my_opt = tf.train.GradientDescentOptimizer(0.0025)

train_step = my_opt.minimize(loss)
step6:训练效果变化
# Intitialize Variables

init = tf.initialize_all_variables()

sess.run(init)

# Start Logistic Regression

train_loss = []

test_loss = []

train_acc = []

test_acc = []

i_data = []

for i in range(10000):

    rand_index = np.random.choice(texts_train.shape[0], size=batch_size)

    rand_x = texts_train[rand_index].todense()

    rand_y = np.transpose([target_train[rand_index]])

    sess.run(train_step, feed_dict={x_data: rand_x, y_target: rand_y})

    # Only record loss and accuracy every 100 generations,100回记录,500回输出状态

    if (i+1)%100==0:

        i_data.append(i+1)

        train_loss_temp = sess.run(loss, feed_dict={x_data: rand_x, y_target: rand_y})

        train_loss.append(train_loss_temp)

        test_loss_temp = sess.run(loss, feed_dict={x_data: texts_test.todense(), y_target: np.transpose([target_test])})

        test_loss.append(test_loss_temp)

        train_acc_temp = sess.run(accuracy, feed_dict={x_data: rand_x, y_target: rand_y})

        train_acc.append(train_acc_temp)

        test_acc_temp = sess.run(accuracy, feed_dict={x_data: texts_test.todense(), y_target: np.transpose([target_test])})

        test_acc.append(test_acc_temp)

    if (i+1)%500==0:

        acc_and_loss = [i+1, train_loss_temp, test_loss_temp, train_acc_temp, test_acc_temp]

        acc_and_loss = [np.round(x,2) for x in acc_and_loss]

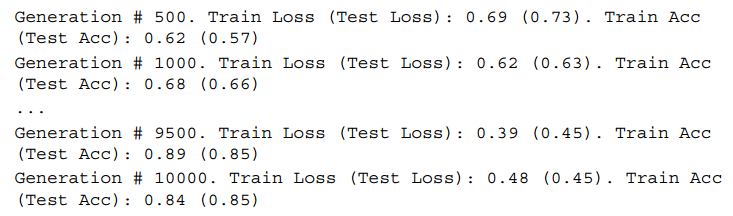
        print('Generation # {}. Train Loss (Test Loss): {:.2f} ({:.2f}). Train Acc (Test Acc): {:.2f} ({:.2f})'.format(*acc_and_loss))
结果如下:
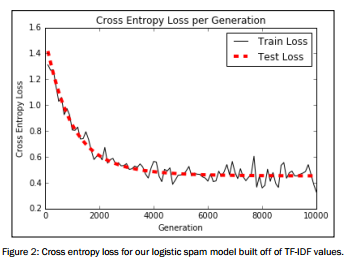
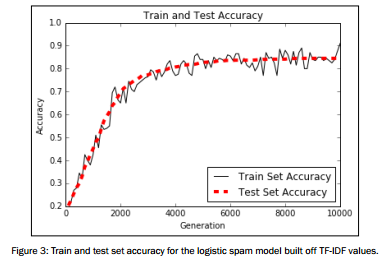
图像展示
# Plot loss over time

plt.plot(i_data, train_loss, 'k-', label='Train Loss')

plt.plot(i_data, test_loss, 'r--', label='Test Loss', linewidth=4)

plt.title('Cross Entropy Loss per Generation')

plt.xlabel('Generation')

plt.ylabel('Cross Entropy Loss')

plt.legend(loc='upper right')

plt.show()

# Plot train and test accuracy

plt.plot(i_data, train_acc, 'k-', label='Train Set Accuracy')

plt.plot(i_data, test_acc, 'r--', label='Test Set Accuracy', linewidth=4)

plt.title('Train and Test Accuracy')

plt.xlabel('Generation')

plt.ylabel('Accuracy')

plt.legend(loc='lower right')

plt.show()
tensorflow在文本处理中的使用——TF-IDF算法的更多相关文章
- tensorflow在文本处理中的使用——Doc2Vec情感分析
代码来源于:tensorflow机器学习实战指南(曾益强 译,2017年9月)——第七章:自然语言处理 代码地址:https://github.com/nfmcclure/tensorflow-coo ...
- tensorflow在文本处理中的使用——Word2Vec预测
代码来源于:tensorflow机器学习实战指南(曾益强 译,2017年9月)——第七章:自然语言处理 代码地址:https://github.com/nfmcclure/tensorflow-coo ...
- tensorflow在文本处理中的使用——CBOW词嵌入模型
代码来源于:tensorflow机器学习实战指南(曾益强 译,2017年9月)——第七章:自然语言处理 代码地址:https://github.com/nfmcclure/tensorflow-coo ...
- tensorflow在文本处理中的使用——skip-gram模型
代码来源于:tensorflow机器学习实战指南(曾益强 译,2017年9月)——第七章:自然语言处理 代码地址:https://github.com/nfmcclure/tensorflow-coo ...
- 55.TF/IDF算法
主要知识点: TF/IDF算法介绍 查看es计算_source的过程及各词条的分数 查看一个document是如何被匹配到的 一.算法介绍 relevance score算法,简单来说 ...
- Elasticsearch由浅入深(十)搜索引擎:相关度评分 TF&IDF算法、doc value正排索引、解密query、fetch phrase原理、Bouncing Results问题、基于scoll技术滚动搜索大量数据
相关度评分 TF&IDF算法 Elasticsearch的相关度评分(relevance score)算法采用的是term frequency/inverse document frequen ...
- tf–idf算法解释及其python代码实现(上)
tf–idf算法解释 tf–idf, 是term frequency–inverse document frequency的缩写,它通常用来衡量一个词对在一个语料库中对它所在的文档有多重要,常用在信息 ...
- tf–idf算法解释及其python代码实现(下)
tf–idf算法python代码实现 这是我写的一个tf-idf的简单实现的代码,我们知道tfidf=tf*idf,所以可以分别计算tf和idf值在相乘,首先我们创建一个简单的语料库,作为例子,只有四 ...
- tf–idf算法解释及其python代码
tf–idf算法python代码实现 这是我写的一个tf-idf的简单实现的代码,我们知道tfidf=tf*idf,所以可以分别计算tf和idf值在相乘,首先我们创建一个简单的语料库,作为例子,只有四 ...
随机推荐
- let 和const命令
ES6新增了let命令,用来声明变量.它的用法类似于var,但是所声明的变量,只在let命令所在的代码块内有效.换句话说,let声明了块级作用域. 输出 看下面代码: 输出: 变量i是var声明的,在 ...
- 关于iOS7的一切相关的资料
http://www.cocoachina.com/special/ios7/ PreviousNext 作为的用户,您可能需要了解 WWDC大会以及iOS 7的新界面 CocoaChina WWDC ...
- Codeforces 414A
题目链接 首先考虑无解的情况: n / 2 > k 或者 n==1 且 k != 0 (因为两个数的最大公约数最小为1) 然后因为有 n / 2 组(把 a[i] 和 a[i+1] 看成一组), ...
- git安装方法
点击 http://git-scm.com/download 选择你使用的操作系统,如果是linux就可以看到命令行,windows则是下载客户端
- Directx11教程(57) 环境映射
原文:Directx11教程(57) 环境映射 建好skydome后,如果我们想让其中的某个物体,比如那个球体来映射出周围环境的蓝天白云(不包括自己附近的物体),该怎么做呢?此时可以把这个 ...
- objectarx之判断三点是否在一条直线上
bool CCommonFuntion::IsOnLine(AcGePoint2d& pt1, AcGePoint2d& pt2, AcGePoint2d& pt3){ AcG ...
- PHPCMS快速建站系列
模板标签 {pc:content action="position" posid="2" order="id DESC" num=&qu ...
- Git同步Python代码
之前我们都是将代码保存到本地目录, 然后再上传到Git中,但如果针对在pycharm中的代码,就要换另一种方式了,下面简单介绍一下. 1.打开pycharm主界面,选择菜单栏VCS---checkou ...
- mysql 语句的查询过程解析
select * from tb where ID = 1 下面解析的查询过程都是基于上面的简单查询,该系列的所有素材都来自于丁奇的mysql的45讲 1.建立连接 a.客户端发出请求,请求首先到达连 ...
- H5+ 重写在线升级版本比较代码
重写h5+在线升级版本比较代码 hello h5+版本在线升级提供了如下的版本比较方法,逻辑比较繁琐,相关判断多余,非常不宜读. 先判断新旧版本有无, 接着分割为数组比较数组项大小,而且还只取了前四项 ...