Unity3D行为树插件Behave学习笔记
Behave1.4行为树插件
下载地址:http://pan.baidu.com/s/1i4uuX0L
安装插件和使用
我们先来看看插件的安装和基本使用方法,新建一个Unity3D项目,这里我使用的是5.0以上的版本:
导入插件
第一步当然是导入下载好的插件包了,操作略过...
创建资源
首先我们创建一个名为BT的文件夹,点击Project面板的create来创建相应的资源:
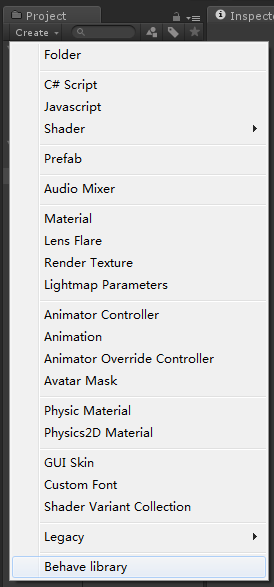
我们会在Asset目录下生成一个NewBehaveLibrary0.asset的文件,我们重命名为MyBehaveLibrary后将其拖入新建的BT文件夹中即可。
编辑资源
我们选中创建的资源,在Inspector中可以看到如下的界面:

我们点击Edit library后会弹出两个窗口,需要注意的是有一个窗口被另一个完全覆盖了,拖拽一下就可以看到了。点击behave browse面板的create创建一个collection,再点击一次create创建一个tree我们就有了一个行为树了。
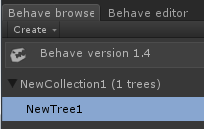
接下来我们选中新创建的NewTree1在behave editor面板就可以编辑这个行为树了。
我们将面板下方的Action拖拽到面板中并在Inspector修改该节点的名称为MyAction:
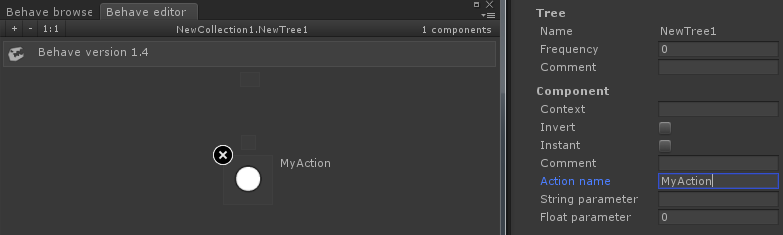
接下来我们在顶部中间的方块拉出一条线,连线到我们的MyAction顶上,这样就把这个节点添加到该行为树上了。
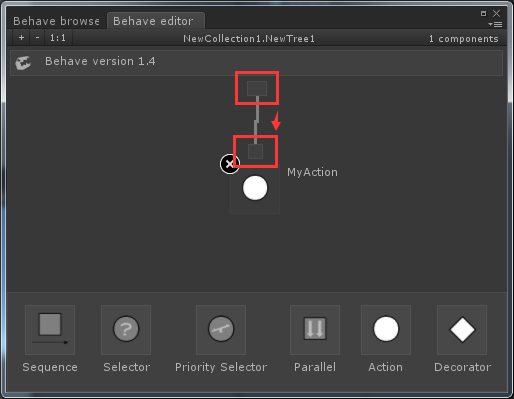
好了到目前为止,我们的编辑就算是完成了。
编译资源
到目前为止,我们的资源还不能在项目中直接使用,我们需要先对其进行编译,选中我们的library,在Inspector中会出现选项:
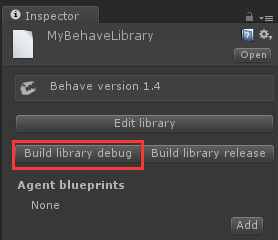
我们点击一下Build library debug就可以编译出在项目中可以使用的资源了,如下:
编辑代码
编辑完成后,接下来我们该怎么使用行为树呢?看官们请接着看。
首先我们创建一个类Demo1Agent:
 using Behave.Runtime;

 using UnityEngine;

 using System.Collections;

 using Tree = Behave.Runtime.Tree;

 public class Demo1Agent : IAgent {

     public void Reset (Tree sender) {

     }

     public int SelectTopPriority (Tree sender, params int[] IDs) {

         return ;

     }

     public BehaveResult Tick (Tree sender, bool init) {

         Debug.Log("调用系统的Tick方法");

         return BehaveResult.Success;

     }

     public BehaveResult TickMyActionAction(Tree sender) {

         Debug.Log("我的action");

         return BehaveResult.Success;

     }

 }
我们创建了一个实现了IAgent的类,这个类会和一个行为树进行绑定,这里需要注意的是Tick和TickMyActionAction方法,在一个行为树中,同一时刻只有一个节点会执行,而我们的“MyAction”执行时,会寻找TickMyActionAction方法进行调用,这里的方法命名有一个规则:“Tick”+节点名称+“Action”,如果行为树找到了对应当前节点名称的方法就会进行调用,否则会调用Tick方法。
接下来我们创建一个类Demo1:
 using UnityEngine;

 using System.Collections;

 using Behave.Runtime;

 using Tree = Behave.Runtime.Tree;

 public class Demo1 : MonoBehaviour {

     Tree m_Tree;

     Demo1Agent agent;

     void Start () {

         agent = new Demo1Agent ();

         m_Tree = BLMyBehaveLibrary.InstantiateTree(BLMyBehaveLibrary.TreeType.NewCollection1_NewTree1, agent);

     }

     void Update () {

         m_Tree.Tick();

     }

 }
这个类就比较简单了,我们通过BLMyBehaveLibrary创建一个和Demo1Agent的实例绑定的行为树,其中BLMyBehaveLibrary和NewCollection1_NewTree1都是我们之前编辑好编译生成的行为树代码,每帧调用行为树的Tick方法即可。
调试行为树
我们在场景中添加一个GameObject并绑定Demo1即可,运行就可以看到“我的Action”的输出了。
节点详解
目前behave提供了下面6个节点,我们来具体的看看:

Action
动作节点,执行核心逻辑的节点,该节点我们之前已经使用过了,主要用来实现我们需要的逻辑功能。
这里主要说一下Tick方法的3个返回值:
 namespace Behave.Runtime

 {

     public enum BehaveResult

     {

         Running,

         Success,

         Failure

     }

 }
- Running表示当前节点需要继续运行,下一次Tick时仍然会执行该节点。
- Success表示节点执行完毕,而且执行成功。
- Failure表示节点执行完毕,而且执行失败。
Decorator
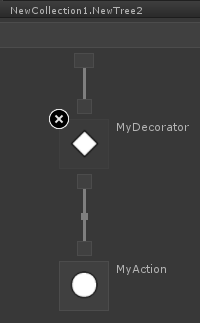
装饰节点只会有一个子节点,作用为通过判断来控制是否执行其子节点,我们来看看装饰节点的使用方法:
首先我们创建一个新的行为树,并添加一个装饰节点和一个动作节点:
我们新建一个Demo2Agent:
 using Behave.Runtime;

 using UnityEngine;

 using System.Collections;

 using Tree = Behave.Runtime.Tree;

 public class Demo2Agent : IAgent {

     private bool _shoulDo;

     public void Reset (Tree sender) {

     }

     public int SelectTopPriority (Tree sender, params int[] IDs) {

         return ;

     }

     public BehaveResult Tick (Tree sender, bool init) {

         Debug.Log("调用系统的Tick方法");

         return BehaveResult.Success;

     }

     public BehaveResult TickMyDecoratorDecorator(Tree sender) {

         _shoulDo = !_shoulDo;

         if (_shoulDo) {

             Debug.Log("执行子节点");

             return BehaveResult.Success;

         } else {

             Debug.Log("不执行子节点");

             return BehaveResult.Failure;

         }

     }

     public BehaveResult TickMyActionAction(Tree sender) {

         Debug.Log("我的action");

         return BehaveResult.Success;

     }

 }
这里要注意的是,装饰节点的命名为:“Tick”+节点名称+“Decorator”,不是Action了。
接下来编译我们的行为树,添加一个类Demo2:
 using UnityEngine;

 using System.Collections;

 using Behave.Runtime;

 using Tree = Behave.Runtime.Tree;

 public class Demo2 : MonoBehaviour {

     Tree m_Tree;

     Demo2Agent agent;

     void Start () {

         agent = new Demo2Agent ();

         m_Tree = BLMyBehaveLibrary.InstantiateTree(BLMyBehaveLibrary.TreeType.NewCollection1_NewTree2, agent);

     }

     void Update () {

         m_Tree.Tick();

     }

 }
添加到场景就可以查看效果了。
Sequence
顺序节点会让连接它的子节点从左到右依次执行, 每个节点从底部的线决定了顺序,摆放的位置无关紧要,如果第一个子节点返回失败,则整个节点返回失败。如果该子节点返回成功,则会自动往右边一个子节点执行,如果该节点返回runing,则会重新开始运行。
我们创建一个新的行为树,如下:
我们新建一个Demo3Agent:
 using Behave.Runtime;

 using UnityEngine;

 using System.Collections;

 using Tree = Behave.Runtime.Tree;

 public class Demo3Agent : IAgent {

     public GameObject cube;

     public float time;

     float nowTime = ;

     public void Reset (Tree sender) {

     }

     public int SelectTopPriority (Tree sender, params int[] IDs) {

         return ;

     }

     public BehaveResult Tick (Tree sender, bool init) {

         Debug.Log("调用系统的Tick方法");

         return BehaveResult.Success;

     }

     public BehaveResult TickMyAction1Action(Tree sender) {

         Debug.Log("我的action1");

         if (cube.transform.position.x >= 3.0f) {

             cube.transform.position = new Vector3(3.0f, , );

             return BehaveResult.Success;

         }

         cube.transform.Translate(new Vector3(2.0f * time, , ));

         return BehaveResult.Running;

     }

     public BehaveResult TickMyAction2Action(Tree sender) {

         Debug.Log("我的action2");

         if (nowTime >= 1.0f) {

             nowTime = ;

             cube.transform.localEulerAngles = new Vector3(, , );

             return BehaveResult.Success;

         }

         cube.transform.Rotate(new Vector3(360.0f * time, , ));

         nowTime += time;

         return BehaveResult.Running;

     }

     public BehaveResult TickMyAction3Action(Tree sender) {

         Debug.Log("我的action3");

         if (cube.transform.position.x <= ) {

             cube.transform.position = new Vector3(, , );

             return BehaveResult.Success;

         }

         cube.transform.Translate(new Vector3(-2.0f * time, , ));

         return BehaveResult.Running;

     }

 }
我们再创建一个Demo3:
 using UnityEngine;

 using System.Collections;

 using Behave.Runtime;

 using Tree = Behave.Runtime.Tree;

 public class Demo3 : MonoBehaviour {

     public GameObject cube;

     Tree m_Tree;

     Demo3Agent agent;

     void Start () {

         agent = new Demo3Agent ();

         agent.cube = cube;

         m_Tree = BLMyBehaveLibrary.InstantiateTree(BLMyBehaveLibrary.TreeType.NewCollection1_NewTree3, agent);

     }

     void Update () {

         agent.time = Time.deltaTime;

         m_Tree.Tick();

     }

 }
我们在场景里添加一个Cube,把Demo3拖入并绑定Cube就可以查看效果了;
这里的效果是Cube先向前移动,然后旋转一下再向后移动,如此反复。
Selector
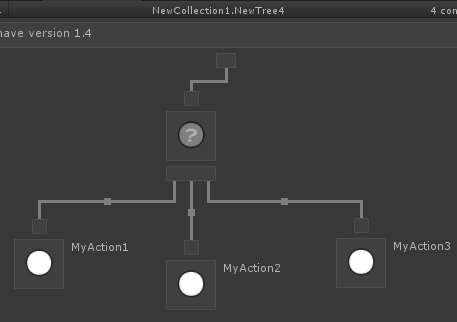
选择节点子节点会从左到右依次执行,和顺序节点不同的是,选择节点的子节点返回成功,则整个节点返回成功,如果子节点返回失败,则运行右边的一个子节点,并继续运行,一直到运行到子节点的末尾一个,则返回失败,下一次选择节点再被触发的时候,又从最左边 第一个节点开始运行。
我们创建一个新的行为树,如下:
我们新建一个Demo4Agent:
 using Behave.Runtime;

 using UnityEngine;

 using System.Collections;

 using Tree = Behave.Runtime.Tree;

 public class Demo4Agent : IAgent {

     public GameObject cube;

     public float time;

     float nowTime = ;

     public void Reset (Tree sender) {

     }

     public int SelectTopPriority (Tree sender, params int[] IDs) {

         return ;

     }

     public BehaveResult Tick (Tree sender, bool init) {

         Debug.Log("调用系统的Tick方法");

         return BehaveResult.Success;

     }

     public BehaveResult TickMyAction1Action(Tree sender) {

         Debug.Log("我的action1");

         if (nowTime >= 1.0f) {

             nowTime = ;

             cube.transform.position = new Vector3(, , );

             //失败则执行下一个节点

             if (Random.value > 0.5f) {

                 return BehaveResult.Failure;

             }

             return BehaveResult.Success;

         }

         cube.transform.Translate(new Vector3(2.0f * time, , ));

         nowTime += time;

         return BehaveResult.Running;

     }

     public BehaveResult TickMyAction2Action(Tree sender) {

         Debug.Log("我的action2");

         if (nowTime >= 1.0f) {

             nowTime = ;

             cube.transform.localEulerAngles = new Vector3(, , );

             //失败则执行下一个节点

             if (Random.value > 0.5f) {

                 return BehaveResult.Failure;

             }

             return BehaveResult.Success;

         }

         cube.transform.Rotate(new Vector3(360.0f * time, , ));

         nowTime += time;

         return BehaveResult.Running;

     }

     public BehaveResult TickMyAction3Action(Tree sender) {

         Debug.Log("我的action3");

         if (nowTime >= 1.0f) {

             nowTime = ;

             cube.transform.localScale = new Vector3(, , );

             //失败则执行下一个节点

             if (Random.value > 0.5f) {

                 return BehaveResult.Failure;

             }

             return BehaveResult.Success;

         }

         cube.transform.localScale = new Vector3(nowTime, nowTime, nowTime);

         nowTime += time;

         return BehaveResult.Running;

     }

 }
我们再创建一个Demo4:
 using UnityEngine;

 using System.Collections;

 using Behave.Runtime;

 using Tree = Behave.Runtime.Tree;

 public class Demo4 : MonoBehaviour {

     public GameObject cube;

     Tree m_Tree;

     Demo4Agent agent;

     void Start () {

         agent = new Demo4Agent ();

         agent.cube = cube;

         m_Tree = BLMyBehaveLibrary.InstantiateTree(BLMyBehaveLibrary.TreeType.NewCollection1_NewTree4, agent);

     }

     void Update () {

         agent.time = Time.deltaTime;

         m_Tree.Tick();

     }

 }
我们的小正方形会先运行Action1,然后有50%的机会进入Action2,进入Action2后又有50%的机会进入Action3。
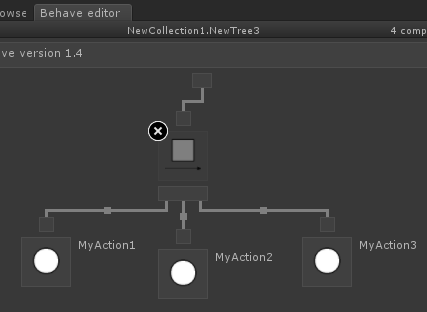
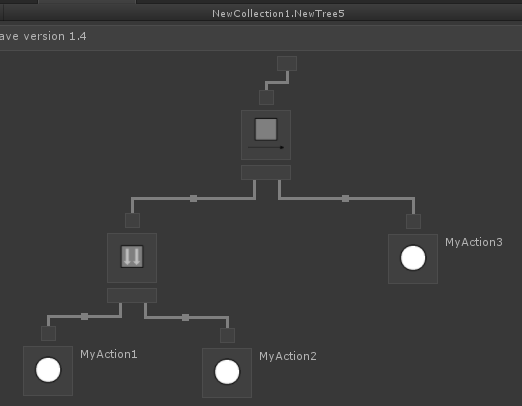
Parallel
并行节点会从左到右触发它所有的子节点工作,对于并行节点有两个重要的设置,一个是子节点完成,一个是组件完成,子节点完成参数决定了子节点的返回值该如何处理:
- 如果并行节点设置为成功或者失败,那么无论它返回的是成功还是失败,子节点的输出都标记为完成。
- 如果并行节点设置为成功,那么子节点的输出只在返回成功时候才标记为完成。在触发所有的子节点工作后,一个子节点返回失败就会让整个并行组件返回失败。
- 并行节点设置为失败的话也会同理,子节点只有在返回完成时,它才会返回失败。
我们创建一个新的行为树,如下:
选择并行节点可以看到属性:
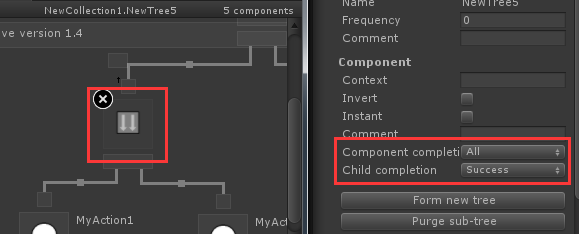
这里的意思是:所有的子节点都返回成功则退出该节点。
我们新建一个Demo5Agent:
 using Behave.Runtime;

 using UnityEngine;

 using System.Collections;

 using Tree = Behave.Runtime.Tree;

 public class Demo5Agent : IAgent {

     public GameObject cube;

     public float time;

     float nowTime = ;

     public void Reset (Tree sender) {

     }

     public int SelectTopPriority (Tree sender, params int[] IDs) {

         return ;

     }

     public BehaveResult Tick (Tree sender, bool init) {

         Debug.Log("调用系统的Tick方法");

         return BehaveResult.Success;

     }

     public BehaveResult TickMyAction1Action(Tree sender) {

         Debug.Log("我的action1");

         if (cube.transform.position.x >= 3.0f) {

             cube.transform.position = new Vector3(3.0f, , );

             return BehaveResult.Success;

         }

         cube.transform.Translate(new Vector3(2.0f * time, , ));

         return BehaveResult.Running;

     }

     public BehaveResult TickMyAction2Action(Tree sender) {

         Debug.Log("我的action2");

         if (nowTime >= 1.0f) {

             nowTime = ;

             cube.transform.localEulerAngles = new Vector3(, , );

             return BehaveResult.Success;

         }

         cube.transform.Rotate(new Vector3(360.0f * time, , ));

         nowTime += time;

         return BehaveResult.Running;

     }

     public BehaveResult TickMyAction3Action(Tree sender) {

         Debug.Log("我的action3");

         if (cube.transform.position.x <= ) {

             cube.transform.position = new Vector3(, , );

             return BehaveResult.Success;

         }

         cube.transform.Translate(new Vector3(-2.0f * time, , ));

         return BehaveResult.Running;

     }

 }
我们再创建一个Demo5:
 using UnityEngine;

 using System.Collections;

 using Behave.Runtime;

 using Tree = Behave.Runtime.Tree;

 public class Demo5 : MonoBehaviour {

     public GameObject cube;

     Tree m_Tree;

     Demo5Agent agent;

     void Start () {

         agent = new Demo5Agent ();

         agent.cube = cube;

         m_Tree = BLMyBehaveLibrary.InstantiateTree(BLMyBehaveLibrary.TreeType.NewCollection1_NewTree5, agent);

     }

     void Update () {

         agent.time = Time.deltaTime;

         m_Tree.Tick();

     }

 }
运行游戏:会看见小正方形会旋转着前进,因为并行是所有子节点每帧都会被调用到,当两个子节点都返回成功时退出该节点。小正方形恢复到原点。
工程下载
http://pan.baidu.com/s/1sjZNg9B
Unity3D行为树插件Behave学习笔记的更多相关文章
- 珂朵莉树(Chtholly Tree)学习笔记
珂朵莉树(Chtholly Tree)学习笔记 珂朵莉树原理 其原理在于运用一颗树(set,treap,splay......)其中要求所有元素有序,并且支持基本的操作(删除,添加,查找......) ...
- Unity3D之Mecanim动画系统学习笔记(九):Blend Tree(混合树)
认识Blend Tree 我们在Animator Controller中除了可以创建一个State外还可以创建一个Blend Tree,如下: 那么我们看下新创建的Blend Tree和State有什 ...
- Unity3d Mecanim动画系统Animator学习笔记
1. unity3d Mecanim学习 Unity3d新版动画系统网上的介绍很多,但多是流水笔记,外人很难看明白,后来我 终于找到介绍的比较明白的两个作者,特别感谢.一个是58开发网的乐天老师,课 ...
- Unity3D之Legacy动画系统学习笔记
Unity3D的Mecanim动画系统是非常强大的,而且作为Unity推荐的动画系统,其未来会完全代替老的一套动画系统,即Legacy动画系统.目前的情况是Mecanim与Legacy两套动画系统同时 ...
- Unity3D之Mecanim动画系统学习笔记(七):IK(反向动力学)动画
什么是IK? IK(Inverse Kinematics)即反向动力学,即可以使用场景中的各种物体来控制和影响角色身体部位的运动,一般来说骨骼动画都是传统的从父节点到子节点的带动方式(即正向动力学), ...
- Unity3D之Mecanim动画系统学习笔记(一):认识Mecanim动画系统
Mecanim简介 Mecanim动画系统是Unity3D4.0开始引入的一套全新的动画系统,主要提供了下面4个方面的功能: 针对人形角色提供一套特殊的工作流. 动画重定向的能力,可以非常方便的把动画 ...
- kubernetes CSI 插件机制学习笔记
前言 最近在极客时间订阅了kubernetes的专栏,这篇文章是想记录一下自己学习 CSI 插件机制 (container-storage-interface) 的过程,加深一下记忆. 准备工作 老师 ...
- Unity3D之Mecanim动画系统学习笔记(十一):高级功能应用
动作游戏 还记得读书的时候熬夜打<波斯王子>的时光,我们的王子通过跳跃穿过墙壁的小洞.在高层建筑上进行攀爬和跳跃,还有在操作失误掉下高楼和触发必死机关后使用时之沙的时光倒流功能回归死亡之前 ...
- Unity3D之Mecanim动画系统学习笔记(十):Mecanim动画的资源加载相关
资源加载是必备的知识点,这里就说说Mecanim动画的资源如何打包及加载. 注意,Unity4.x和Unity5.x的AssetBundle打包策略不一样,本笔记是基于Unity4.x的AssetBu ...
随机推荐
- HDU 4864 (2014 Multi-University Training Contest 1 )
考试时,想到了一个很类似的方法,但是总是差那么点,就是这么点,需要不断的努力啊!!! 题解: 基本思想是贪心. 对于价值c=500*xi+2*yi,yi最大影响100*2<500,所以就是求xi ...
- 函数buf_read_page_low
/********************************************************************//** Low-level function which r ...
- bzoj1053: [HAOI2007]反素数ant
51nod有一道类似的题...我至今仍然不会写暴搜!!! #include<cstdio> #include<cstring> #include<iostream> ...
- NALU(NAL单元)
一 NALU类型 标识NAL单元中的RBSP数据类型,其中,nal_unit_type为1, 2, 3, 4, 5及12的NAL单元称为VCL的NAL单元,其他类型的NAL单元为非VCL的NAL ...
- MySQL基础之第10章 查询数据
10.1.基本查询语句 SELECT 属性列表 FROM 表名和视图列表[WHERE条件表达式1][GROUPBY 属性名1 [HAVING条件表达式2]][ORDERBY 属性名2[ASC|DESC ...
- shell小技巧
# awk '{a[$1]++;a[$2]++}END{for (i in a)print i "\t" a[i]}' list | grep -w 2 | awk '{print ...
- UVA 10054 The Necklace
完全就是哭瞎的节奏···QAQ 又是图论··· 题意:有一种项链,每个珠子上有两种颜色,相同颜色的两颗珠子的两头相连,如果能连成环输出珠子的顺序,不能连成环输出"some beads may ...
- java web 学习六(servlet开发2)
一.ServletConfig讲解 1.1.配置Servlet初始化参数 在Servlet的配置文件web.xml中,可以使用一个或多个<init-param>标签为servlet配置一些 ...
- Hadoop序列化
遗留问题: Hadoop序列化可以复用对象,是在哪里复用的? 介绍Hadoop序列化机制 Hadoop序列化机制详解 Hadoop序列化的核心 Hadoop序列化的比较接口 ObjectWrita ...
- Easy Climb
题意: 有n块石头,给定他们的高度,现保持第一和最后一块高度不变,其他可增加和减少高度,求通过变换使所有相邻石头的高度差的绝对值不大于d,所变化高度总和的最小值. 分析: 状态还可以想出来,dp[i] ...