
Introduction to Go Modules
转:https://roberto.selbach.ca/intro-to-go-modules/
git init
git add *
git commit -am "First commit"
git push -u origin master
$HOME/.gitconfig is your global config for git.
There are three levels of config files.
cat $(git rev-parse --show-toplevel)/.git/config
(mentioned by bereal) is your local config, local to the repo you have cloned.
you can also type from within your repo:
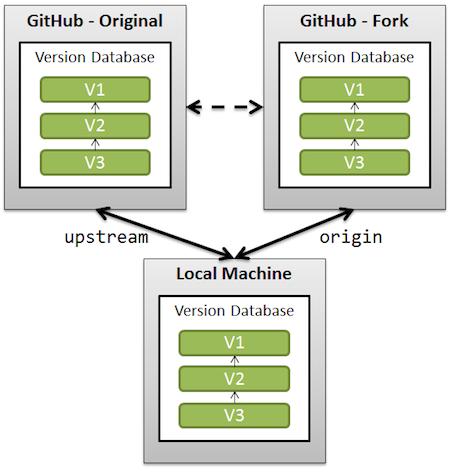
git remote -v
And see if there is any remote named 'origin' listed in it.
If not, if that remote (which is created by default when cloning a repo) is missing, you can add it again:
git remote add origin url/to/your/fork
The OP mentions:
Doing
git remote -vgives:
upstream git://git.moodle.org/moodle.git (fetch)

upstream git://git.moodle.org/moodle.git (push)
So 'origin' is missing: the reference to your fork.
See "What is the difference between origin and upstream in github"
----------------------------------------------------------------------
Introduction to Go Modules
Creating a Module
So first things first. Let’s create our package. We’ll call it “testmod”. An important detail here: this directory should be outside your $GOPATH because by default, the modules support is disabled inside it. Go modules is a first step in potentially eliminating $GOPATH entirely at some point.
$ mkdir testmod

$ cd testmod
Our package is very simple:
package testmod

import "fmt"

// Hi returns a friendly greeting

func Hi(name string) string {

   return fmt.Sprintf("Hi, %s", name)

}
The package is done but it is still not a module. Let’s change that.
$ go mod init github.com/robteix/testmod

go: creating new go.mod: module github.com/robteix/testmod
This creates a new file named go.mod in the package directory with the following contents:
module github.com/robteix/testmodNot a lot here, but this effectively turns our package into a module.We can now push this code to a repository:
$ git init

$ git add *

$ git commit -am "First commit"

$ git push -u origin master
Until now, anyone willing to use this package would go get it:
$ go get github.com/robteix/testmodAnd this would fetch the latest code in master. This still works, but we should probably stop doing that now that we have a Better Way™. Fetching master is inherently dangerous as we can never know for sure that the package authors didn’t make change that will break our usage. That’s what modules aims at fixing.
Quick Intro to Module Versioning
Go modules are versioned, and there are some particularities with regards to certain versions. You will need to familiarize yourself with the concepts behind semantic versioning.More importantly, Go will use repository tags when looking for versions, and some versions are different of others: e.g. versions 2 and greater should have a different import path than versions 0 and 1 (we’ll get to that.)As well, by default Go will fetch the latest tagged version available in a repository. This is an important gotcha as you may be used to working with the master branch.What you need to keep in mind for now is that to make a release of our package, we need to tag our repository with the version. So let’s do that.
Making our first release
Now that our package is ready, we can release it to the world. We do this by using version tags. Let’s release our version 1.0.0:
$ git tag v1.0.0

$ git push --tags
This creates a tag on my Github repository marking the current commit as being the release 1.0.0.Go doesn’t enforce that in any way, but a good idea is to also create a new branch (“v1”) so that we can push bug fixes to.
$ git checkout -b v1

$ git push -u origin v1
Now we can work on master without having to worry about breaking our release.
Using our module
Now we’re ready to use the module. We’ll create a simple program that will use our new package:
package main

import (

    "fmt"

    "github.com/robteix/testmod"

)

func main() {

    fmt.Println(testmod.Hi("roberto"))

}
Until now, you would do a go get github.com/robteix/testmod to download the package, but with modules, this gets more interesting. First we need to enable modules in our new program.
$ go mod init modAs you’d expect from what we’ve seen above, this will have created a new go.mod file with the module name in it:
module modThings get much more interesting when we try to build our new program:
$ go build

go: finding github.com/robteix/testmod v1.0.0

go: downloading github.com/robteix/testmod v1.0.0
As we can see, the go command automatically goes and fetches the packages imported by the program. If we check our go.mod file, we see that things have changed:
module mod

require github.com/robteix/testmod v1.0.0
And we now have a new file too, named go.sum, which contains hashes of the packages, to ensure that we have the correct version and files.
github.com/robteix/testmod v1.0.0 h1:9EdH0EArQ/rkpss9Tj8gUnwx3w5p0jkzJrd5tRAhxnA=

github.com/robteix/testmod v1.0.0/go.mod h1:UVhi5McON9ZLc5kl5iN2bTXlL6ylcxE9VInV71RrlO8=
Making a bugfix release
Now let’s say we realized a problem with our package: the greeting is missing ponctuation! People are mad because our friendly greeting is not friendly enough. So we’ll fix it and release a new version:
// Hi returns a friendly greeting

func Hi(name string) string {

-       return fmt.Sprintf("Hi, %s", name)

+       return fmt.Sprintf("Hi, %s!", name)

}
We made this change in the v1 branch because it’s not relevant for what we’ll do for v2 later, but in real life, maybe you’d do it in master and then back-port it. Either way, we need to have the fix in our v1 branch and mark it as a new release.
$ git commit -m "Emphasize our friendliness" testmod.go

$ git tag v1.0.1

$ git push --tags origin v1
Updating modules
By default, Go will not update modules without being asked. This is a Good Thing™ as we want predictability in our builds. If Go modules were automatically updated every time a new version came out, we’d be back in the uncivilized age pre-Go1.11. No, we need to tell Go to update a modules for us.We do this by using our good old friend go get:
- run
go get -uto use the latest minor or patch releases (i.e. it would update from 1.0.0 to, say, 1.0.1 or, if available, 1.1.0) - run
go get -u=patchto use the latest patch releases (i.e., would update to 1.0.1 but not to 1.1.0) - run
go get package@versionto update to a specific version (say,github.com/robteix/testmod@v1.0.1)
In the list above, there doesn’t seem to be a way to update to the latest major version. There’s a good reason for that, as we’ll see in a bit.Since our program was using version 1.0.0 of our package and we just created version 1.0.1, any of the following commands will update us to 1.0.1:
$ go get -u

$ go get -u=patch

$ go get github.com/robteix/testmod@v1.0.1
After running, say, go get -u our go.mod is changed to:
module mod

require github.com/robteix/testmod v1.0.1
Major versions
According to semantic version semantics, a major version is different than minors. Major versions can break backwards compatibility. From the point of view of Go modules, a major version is a different package completely. This may sound bizarre at first, but it makes sense: two versions of a library that are not compatible with each other are two different libraries.Let’s make a major change in our package, shall we? Over time, we realized our API was too simple, too limited for the use cases of our users, so we need to change the Hi() function to take a new parameter for the greeting language:
package testmod

import (

    "errors"

    "fmt"

)

// Hi returns a friendly greeting in language lang

func Hi(name, lang string) (string, error) {

    switch lang {

    case "en":

        return fmt.Sprintf("Hi, %s!", name), nil

    case "pt":

        return fmt.Sprintf("Oi, %s!", name), nil

    case "es":

        return fmt.Sprintf("¡Hola, %s!", name), nil

    case "fr":

        return fmt.Sprintf("Bonjour, %s!", name), nil

    default:

        return "", errors.New("unknown language")

    }

}
Existing software using our API will break because they (a) don’t pass a language parameter and (b) don’t expect an error return. Our new API is no longer compatible with version 1.x so it’s time to bump the version to 2.0.0.I mentioned before that some versions have some peculiarities, and this is the case now. Versions 2 and overshould change the import path. They are different libraries now.We do this by appending a new version path to the end of our module name.
module github.com/robteix/testmod/v2The rest is the same as before, we push it, tag it as v2.0.0 (and optionally create a v2 branch.)
$ git commit testmod.go -m "Change Hi to allow multilang"

$ git checkout -b v2 # optional but recommended

$ echo "module github.com/robteix/testmod/v2" > go.mod

$ git commit go.mod -m "Bump version to v2"

$ git tag v2.0.0

$ git push --tags origin v2 # or master if we don't have a branch
Updating to a major version
Even though we have released a new incompatible version of our library, existing software will not break, because it will continue to use the existing version 1.0.1. go get -u will not get version 2.0.0.At some point, however, I, as the library user, may want to upgrade to version 2.0.0 because maybe I was one of those users who needed multi-language support.I do it but modifying my program accordingly:
package main

import (

    "fmt"

    "github.com/robteix/testmod/v2"

)

func main() {

    g, err := testmod.Hi("Roberto", "pt")

    if err != nil {

        panic(err)

    }

    fmt.Println(g)

}
And then when I run go build, it will go and fetch version 2.0.0 for me. Notice how even though the import path ends with “v2”, Go will still refer to the module by its proper name (“testmod”).As I mentioned before, the major version is for all intents and purposes a completely different package. Go modules does not link the two at all. That means we can use two incompatible versions in the same binary:
package main

import (

    "fmt"

    "github.com/robteix/testmod"

    testmodML "github.com/robteix/testmod/v2"

)

func main() {

    fmt.Println(testmod.Hi("Roberto"))

    g, err := testmodML.Hi("Roberto", "pt")

    if err != nil {

        panic(err)

    }

    fmt.Println(g)

}
This eliminates a common problem with dependency management: when dependencies depend on different versions of the same library.
Tidying it up
Going back to the previous version that uses only testmod 2.0.0, if we check the contents of go.mod now, we’ll notice something:
module mod

require github.com/robteix/testmod v1.0.1

require github.com/robteix/testmod/v2 v2.0.0
By default, Go does not remove a dependency from go.mod unless you ask it to. If you have dependencies that you no longer use and want to clean up, you can use the new tidy command:
$ go mod tidyNow we’re left with only the dependencies that are really being used.
Vendoring
Go modules ignores the vendor/ directory by default. The idea is to eventually do away with vendoring1. But if we still want to add vendored dependencies to our version control, we can still do it:
$ go mod vendorThis will create a vendor/ directory under the root of your project containing the source code for all of your dependencies.Still, go build will ignore the contents of this directory by default. If you want to build dependencies from the vendor/ directory, you’ll need to ask for it.
$ go build -mod vendorI expect many developers willing to use vendoring will run go build normally on their development machines and use -mod vendor in their CI.Again, Go modules is moving away from the idea of vendoring and towards using a Go module proxy for those who don’t want to depend on the upstream version control services directly.There are ways to guarantee that go will not reach the network at all (e.g. GOPROXY=off) but these are the subject for a future blog post.
Conclusion
This post may seem a bit daunting, but I tried to explain a lot of things together. The reality is that now Go modules is basically transparent. We import package like always in our code and the go command will take care of the rest.When we build something, the dependencies will be fetched automatically. It also eliminates the need to use $GOPATH which was a roadblock for new Go developers who had trouble understanding why things had to go into a specific directory.Vendoring is (unofficially) being deprecated in favour of using proxies.1 I may do a separate post about the Go module proxy. (Update: it’s live.)
- I think this came out a bit too strong and people left with the impression that vendoring is being removed right now. It isn’t. Vendoring still works, albeit slightly different than before. There seems to be a desire to replace vendoring with something better, which may or may not be a proxy. But for now this is just it: a desire for a better solution. Vendoring is not going away until a good replacement is found (if ever.) ↩ ↩
Posted inGo|ProgrammingTagged modules | vgo
Introduction to Go Modules的更多相关文章
- Cheatsheet: 2013 06.23 ~ 06.30, Farewell GoogleReader(2008.07.20~2013.06.30)
Mobile Resources for Mac and iOS Developers- Introduction to Objective-C Modules Other 10 Principles ...
- Go依赖模块版本之Module避坑使用详解
前提 对于Go的版本管理主要用过 glide,下面介绍 Go 1.11 之后官方支持的版本管理工具 mod. 关于 mod 官方给出了三个命令 go help mod.go help modules. ...
- Go 1.11 Module 介绍
title: "Go 1.11 Module" date: 2018-10-26T23:50:56+08:00 draft: false --- Go 1.11 Module 介绍 ...
- The Secret Mixed-Signal Life of PWM Peripherals
The Secret Mixed-Signal Life of PWM Peripherals Pulse-width modulation (PWM) peripherals have enjoye ...
- 学习LSM(Linux security module)之二:编写并运行一个简单的demo
各种折腾,经过了一个蛋疼的周末,终于在Ubuntu14.04上运行了一个基于LSM的简单demo程序. 一:程序编写 先简单的看一下这个demo: //demo_lsm.c#include <l ...
- 用简单的方法学习ES6
ES6 简要概览 这里是ES6 简要概览.本文大量参考了ES6特性代码仓库,请允许我感谢其作者@Luke Hoban的卓越贡献,也感谢@Axel Rauschmayer所作的[优秀书籍]//explo ...
- Linux Modules Introduction
Modules are small kernel extensions ,that may be loaded and unloaded at will● Can implement drivers, ...
- Python Modules and Packages – An Introduction
This article explores Python modules and Python packages, two mechanisms that facilitate modular pro ...
- Introduction to graph theory 图论/脑网络基础
Source: Connected Brain Figure above: Bullmore E, Sporns O. Complex brain networks: graph theoretica ...
随机推荐
- bootstrap基础学习【网格系统】(三)
<!DOCTYPE html> <html> <head> <meta charset="UTF-8"> <title> ...
- 算法详解之Tarjan
"tarjan陪伴强联通分量 生成树完成后思路才闪光 欧拉跑过的七桥古塘 让你 心驰神往"----<膜你抄> 一.tarjan求强连通分量 什么是强连通分量? 引用来自 ...
- 正确理解使用Vue里的nextTick方法
最近,在项目中要使用Swiper做一个移动端轮播插件.需要先异步动态加载数据后,然后使用v-for渲染节点,再执行插件的滑动轮播行为.解决这个问题,我们通过在组件中使用vm.$nextTick来解决这 ...
- [转]mac升级Nodejs和Npm到最新版
第一步,先查看本机node.js版本: node -v 第二步,清除node.js的cache: sudo npm cache clean -f 第三步,安装 n 工具,这个工具是专门用来管理node ...
- oracle 创建新用户,授权dba
1.用有dba权限的用户登录:sys用户 2.创建一个新用户:create user abc identified by 123456; 3.授予DBA权限: grant connect,resour ...
- 【LOJ】#2239. 「CQOI2014」危桥
LOJ#2239. 「CQOI2014」危桥 就是先把每条边正着连一条容量为2的边,反着连一条容量为2的边 显然如果只有一个人走的话,答案就是一个源点往起点连一条容量为次数×2的边,终点往汇点连一个次 ...
- 在windows系统下打包linux平台运行的go程序
在windows系统下打包linux平台运行的go程序 1.先在main.go下打包成.exe可执行程序测试代码是否正确 //cd到main.go目录 go build //打包命令 如果打包成功则表 ...
- nginx 实践配置
nginx.conf文件 user root; worker_processes 1; error_log logs/error.log crit; #error_log logs/error.log ...
- 牛客 72C 小H和游戏 (动态点分治)
大意: 给定树, 每个点初始权值0, 每次询问给出$x$, $x$权值+1, 求距离$x$不超过2的权值和. 这题数据范围过大, 动态点分治卡不过去, 考虑其他做法 考虑每次只加范围$1$, c[0] ...
- hdu 2610 2611 dfs的判重技巧
对于全排列枚举的数列的判重技巧 1:如果查找的是第一个元素 那么 从0开始到当前的位置看有没有出现过这个元素 出现过就pass 2: 如果查找的不是第一个元素 那么 从查找的子序列当前位置的前一个元素 ...