Tensorflow物体检测(Object Detection)API的使用
Tensorflow在更新1.2版本之后多了很多新功能,其中放出了很多用tf框架写的深度网络结构(看这里),大大降低了吾等调包侠的开发难度,无论是fine-tuning还是该网络结构都方便了不少。这里讲的的是物体检测(object detection)API,这个库的说明文档很详细,可以的话直接看原文即可。
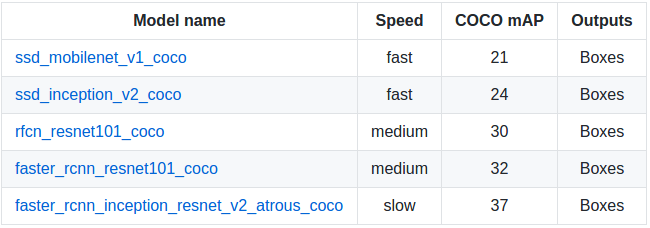
这个物体检测API提供了5种网络结构的预训练的weights,全部是用COCO数据集进行训练,可以在这里下载:分别是SSD+mobilenet, SSD+inception_v2, R-FCN+resnet101, faster RCNN+resnet101, faster RCNN+inception+resnet101。各个模型的精度和计算所需时间如下,具体测评细节可以看这篇文章:
依赖包
Protobuf 2.6

Pillow 1.0

lxml

tf Slim

Jupyter notebook

Matplotlib  # 用这个画图会比较慢,内存占用高,可以用cv2来代替

Tensorflow
API安装
$ pip install tensorflow-gpu

$ sudo apt-get install protobuf-compiler python-pil python-lxml

$ sudo pip install jupyter

$ sudo pip install matplotlib
因为使用protobuf来配置模型和训练参数,所以API正常使用必须先编译protobuf库:
$ cd tensorflow/models

$ protoc object_detection/protos/*.proto --python_out=.
然后将models和slim(tf高级框架)加入python环境变量:
export PYTHONPATH=$PYTHONPATH:/your/path/to/tensorflow/models:/your/path/to/tensorflow/models/slim
最后测试安装:
python object_detection/builders/model_builder_test.py
fine-tuning
python object_detection/create_pascal_tf_record.py \

    --label_map_path=object_detection/data/pascal_label_map.pbtxt \   # 训练物品的品类和id

    --data_dir=VOCdevkit --year=VOC2012 --set=train \

    --output_path=pascal_train.record

python object_detection/create_pascal_tf_record.py \

    --label_map_path=object_detection/data/pascal_label_map.pbtxt \

    --data_dir=VOCdevkit --year=VOC2012 --set=val \

    --output_path=pascal_val.record
其中--data_dir为训练集的目录。结构同Pascal VOC,如下:
    + VOCdevkit  # +为文件夹

        + JPEGImages

            - 001.jpg  # - 为文件

        + Annotations

            - 001.xml
- 训练
train和eval输入输出数据储存结构为:
    + input

        - label_map.pbtxt file  # 可以在object_detection/data/*.pbtxt找到样例

        - train TFRecord file

        - eval TFRecord file

    + models

        + modelA

            - pipeline config file # 可以在object_detection/samples/configs/*.config下找到样例,定义训练参数和输入数据

            + train  # 保存训练产生的checkpoint文件

            + eval
准备好上述文件后就可以直接调用train文件进行训练
python object_detection/train.py \

    --logtostderr \

    --pipeline_config_path=/your/path/to/models/modelA/pipeline config file \

    --train_dir=/your/path/to/models/modelA/train
- 评估
在训练开始以后,就可以运行eval来评估模型的效果。不过实际情况是eval模型也需要加载ckpt文件,因此也需要占用不小的显存,而一般训练的时候都会调整batch尽量利用显卡性能,所以想要实时运行train和eval的话需要调整好两者所需的内存。
python object_detection/eval.py \

    --logtostderr \

    --pipeline_config_path=/your/path/to/models/modelA/pipeline config file \

    --checkpoint_dir=/your/path/to/models/modelA/train \

    --eval_dir=/your/path/to/models/modelA/eval
- 监控
通过tensorboard命令可以在浏览器很轻松的监控训练进程,在浏览器输入localhost:6006(默认)即可
tensorboard --logdir=/your/path/to/models/modelA # 需要包含eval和train目录(.ckpt, .index, .meta, checkpoint, graph.pbtxt文件)
freeze model
在训练完成后需要将训练产生的最后一组.meta, .index, .ckpt, checkpoint文件。其中meta保存了graph和metadata,ckpt保存了网络的weights。而在生产环境中进行预测的时候是只需要模型和权重,不需要metadata,所以需要将其提出进行freeze操作,将所需的部分放到一个文件,方便之后的调用,也减少模型加载所需的内存。(在下载的预训练模型解压后可以找到4个文件,其中名为frozen_inference_graph.pb的文件就是freeze后产生的模型文件,比weights文件大,但是比weights和meta文件加起来要小不少。)
本来,tensorflow/python/tools/freeze_graph.py提供了freeze model的api,但是需要提供输出的final node names(一般是softmax之类的最后一层的激活函数命名),而object detection api提供提供了预训练好的网络,final node name并不好找,所以object_detection目录下还提供了export_inference_graph.py。
python export_inference_graph.py \

        --input_type image_tensor \

        --pipeline_config_path /your/path/to/models/modelA/pipeline config file \

        --checkpoint_path  /your/path/to/models/modelA/train/model.ckpt-* \

        --inference_graph_path /your/path/to/models/modelA/train/frozen_inference_graph.pb  # 输出的文件名
模型调用
目录下提供了一个样例。这里只是稍作调整用cv2来显示图像。
import numpy as np

import os, sys

import tensorflow as tf

import cv2

MODEL_ROOT = "/home/arkenstone/tensorflow/workspace/models"

sys.path.append(MODEL_ROOT)  # 应用和训练的目录在不同的地方

from object_detection.utils import label_map_util

from object_detection.utils import visualization_utils as vis_util

MODEL_PATH = "/home/arkenstone/tensorflow/workspace/models/objectdetection/models/faster_rcnn_inception_resnet_v2_atrous_coco_11_06_2017"

PATH_TO_CKPT = MODEL_PATH + '/frozen_inference_graph.pb'  # frozen model path

PATH_TO_LABELS = os.path.join(MODEL_ROOT, 'object_detection/data', 'mscoco_label_map.pbtxt')

NUM_CLASSES = 90

label_map = label_map_util.load_labelmap(PATH_TO_LABELS)

categories = label_map_util.convert_label_map_to_categories(label_map, max_num_classes=NUM_CLASSES, use_display_name=True)

category_index = label_map_util.create_category_index(categories)  # 格式为{1:{'id': 1, 'name': 'person'}, 2: {'id': 2, 'name': 'bicycle'}, ...}

# 模型加载:test.py

detection_graph = tf.Graph()

with detection_graph.as_default():

  od_graph_def = tf.GraphDef()

  with tf.gfile.GFile(PATH_TO_CKPT, 'rb') as fid:

    serialized_graph = fid.read()

    od_graph_def.ParseFromString(serialized_graph)

    tf.import_graph_def(od_graph_def, name='')

# 防止内存不足,限制sess内存使用比例

gpu_memory_fraction = 0.4

gpu_options = tf.GPUOptions(per_process_gpu_memory_fraction=gpu_memory_fraction)

config = tf.ConfigProto(gpu_options=gpu_options, log_device_placement=False, allow_soft_placement=True)

config.gpu_options.allow_growth = False

def detect(image_path):

    with detection_graph.as_default():  # 需要手动close sess

      with tf.Session(graph=detection_graph, config=config) as sess:

          image = cv2.imread(image_path)

          image_np = cv2.cvtColor(image, cv2.COLOR_BGR2RGB)

          image_np_expanded = np.expand_dims(image_np, axis=0)

          image_tensor = detection_graph.get_tensor_by_name('image_tensor:0')

          boxes = detection_graph.get_tensor_by_name('detection_boxes:0')

          scores = detection_graph.get_tensor_by_name('detection_scores:0')

          classes = detection_graph.get_tensor_by_name('detection_classes:0')

          num_detections = detection_graph.get_tensor_by_name('num_detections:0')

          (boxes, scores, classes, num_detections) = sess.run(

              [boxes, scores, classes, num_detections],

              feed_dict={image_tensor: image_np_expanded})

          vis_util.visualize_boxes_and_labels_on_image_array(

              image_np,

              np.squeeze(boxes),

              np.squeeze(classes).astype(np.int32),

              np.squeeze(scores),

              category_index,

              use_normalized_coordinates=True,

              line_thickness=4)

          new_img = cv2.cvtColor(image_np, cv2.COLOR_RGB2BGR)

          cv2.imshow("test", new_img)

          cv2.waitKey(0)

if __name__ == '__main__':

    detect(/your/test/image)
参考
https://github.com/tensorflow/models/tree/master/object_detection
https://blog.metaflow.fr/tensorflow-how-to-freeze-a-model-and-serve-it-with-a-python-api-d4f3596b3adc
https://www.tensorflow.org/extend/tool_developers/
Tensorflow物体检测(Object Detection)API的使用的更多相关文章
- 【TensorFlow】获取object detection API训练模型的输出坐标
如下图,谷歌开源的object detection API提供了五种网络结构的fine-tuning训练权重,方便我们针对目标检测的需求进行模型训练,本文详细介绍下导出训练模型后,如何获得目标检测框的 ...
- 【TensorFlow】使用Object Detection API 训练自己的数据集报错
错误1: 训练正常开始后,能正常看到日志输出,但中途报错 ResourceExhaustedError (see above for traceback): OOM when allocating ...
- 第三十四节,目标检测之谷歌Object Detection API源码解析
我们在第三十二节,使用谷歌Object Detection API进行目标检测.训练新的模型(使用VOC 2012数据集)那一节我们介绍了如何使用谷歌Object Detection API进行目标检 ...
- 基于ssd的手势识别模型(object detection api方式)
[Tensorflow]Object Detection API-训练自己的手势识别模型 1. 安装tensorflow以及下载object detection api 1.安装tensorflow: ...
- 谷歌开源的TensorFlow Object Detection API视频物体识别系统实现教程
视频中的物体识别 摘要 物体识别(Object Recognition)在计算机视觉领域里指的是在一张图像或一组视频序列中找到给定的物体.本文主要是利用谷歌开源TensorFlow Object De ...
- Tensorflow object detection API 搭建物体识别模型(四)
四.模型测试 1)下载文件 在已经阅读并且实践过前3篇文章的情况下,读者会有一些文件夹.因为每个读者的实际操作不同,则文件夹中的内容不同.为了保持本篇文章的独立性,制作了可以独立运行的文件夹目标检测. ...
- Tensorflow object detection API 搭建物体识别模型(三)
三.模型训练 1)错误一: 在桌面的目标检测文件夹中打开cmd,即在路径中输入cmd后按Enter键运行.在cmd中运行命令: python /your_path/models-master/rese ...
- Tensorflow object detection API 搭建物体识别模型(一)
一.开发环境 1)python3.5 2)tensorflow1.12.0 3)Tensorflow object detection API :https://github.com/tensorfl ...
- Tensorflow object detection API 搭建物体识别模型(二)
二.数据准备 1)下载图片 图片来源于ImageNet中的鲤鱼分类,下载地址:https://pan.baidu.com/s/1Ry0ywIXVInGxeHi3uu608g 提取码: wib3 在桌面 ...
随机推荐
- [openssl]openssl特定版本安装
卸载旧版本 OpenSSL1. apt-get purge openssl2. rm -rf /etc/ssl #删除配置文件编译与安装 OpenSSLprefix 是安装目录,openssldir ...
- [数据结构]最大流之Ford-Fulkerson算法
本文主要讲解最大流问题的Ford-Fulkerson解法.可以说这是一种方法,而不是算法,因为它包含具有不同运行时间的几种实现.该方法依赖于三种重要思想:残留网络,增广路径和割. 在介绍着三种概念之前 ...
- EF5.x Code First 一对多关联条件查询,Contains,Any,All
背景 通过多个部门id获取所有用户,部门和用户是多对多. 已知部门id,获取该部门包括该部门下的所有子部门的所有用户. 关系如下: public class Entity:IEntity { publ ...
- XML(五)dom4j增删改查
book2.xml <? xml version="1.0" encoding="UTF-8"?> <书架> <书> < ...
- spring 加载jar包中的配置文件
package com.xxx.ssptsppt.dataexchange.utils; import com.xxx.maybee.engine.utils.FileUtil; import com ...
- iOS 实时音频采集与播放Audio Unit使用
前言 在iOS中有很多方法可以进行音视频采集.如 AVCaptureDevice, AudioQueue以及Audio Unit.其中 Audio Unit是最底层的接口,它的优点是功能强大,延迟低; ...
- atmega328 熔丝
http://www.geek-workshop.com/thread-5772-1-1.html AVR_fighter http://wenku.baidu.com/view/0c0a8ccc61 ...
- webpack5--css 打包
1.在 src 文件夹下面新建 css 文件夹,创建 common.css body{ background-color: #f2f2f2; } a{ color: #188eee; text-dec ...
- JavaScript实现继承的混合方式
实现JavaScript继承的最简单的方式是call方法(或者apply方法)及原型链方法,但这两种方法都有缺陷,而其混合体就是很好的继承实现方式.下面举例说明: function Animal(ag ...
- 关于Unity中的光照(七)
全局光照 GI 这里所说的反射就是,一个红色的物体,当太阳照射它的时候,它周围的物体也会变得有点红. 1:Realtime每帧都会计算光照,实时光照是不会反射的,所以它的光影显得单调;2:Baked ...