iOS:选择器控件UIPickerView的详解和演示
选择器控件UIPickerView:
@protocol UIPickerViewDataSource, UIPickerViewDelegate;
@interface UIPickerView : UIView <NSCoding>
@property(nonatomic,assign) id<UIPickerViewDataSource> dataSource; // default is nil,设置代理
@property(nonatomic,assign) id<UIPickerViewDelegate> delegate; // default is nil,设置代理
@property(nonatomic) BOOL showsSelectionIndicator; // default is NO
@property(nonatomic,readonly) NSInteger numberOfComponents; //列数
二、协议UIPickerViewDataSource
@protocol UIPickerViewDataSource<NSObject>
@required //必须要实现的方法
// 返回的列显示的数量。
- (NSInteger)numberOfComponentsInPickerView:(UIPickerView *)pickerView;
//返回行数在每个组件(每一列)
- (NSInteger)pickerView:(UIPickerView *)pickerView numberOfRowsInComponent:(NSInteger)component;
@end
三、协议UIPickerViewDelegate
@protocol UIPickerViewDelegate<NSObject>
@optional //可以选择执行的方法
//每一列组件的列宽度
- (CGFloat)pickerView:(UIPickerView *)pickerView widthForComponent:(NSInteger)component;
//每一列组件的行高度
- (CGFloat)pickerView:(UIPickerView *)pickerView rowHeightForComponent:(NSInteger)component;
// 返回每一列组件的每一行的标题内容
- (NSString *)pickerView:(UIPickerView *)pickerView titleForRow:(NSInteger)row forComponent:(NSInteger)component;
// 返回每一列组件的每一行的标题内容的属性
- (NSAttributedString *)pickerView:(UIPickerView *)pickerView attributedTitleForRow:(NSInteger)row forComponent:(NSInteger)component;
// 返回每一列组件的每一行的视图显示
- (UIView *)pickerView:(UIPickerView *)pickerView viewForRow:(NSInteger)row forComponent:(NSInteger)component reusingView:(UIView *)view;
//执行选择某列某行的操作
- (void)pickerView:(UIPickerView *)pickerView didSelectRow:(NSInteger)row inComponent:(NSInteger)component;
@end
 #import <UIKit/UIKit.h>

 @interface ViewController : UIViewController<UIPickerViewDataSource,UIPickerViewDelegate>

 @property(nonatomic,strong)NSArray *years;

 @property(nonatomic,strong)NSArray *months;

 @property(nonatomic,strong)NSArray *days;

 @end
#import "ViewController.h"

   @interface ViewController ()

   @property (weak, nonatomic) IBOutlet UIPickerView *pickerView;

   @end

   @implementation ViewController

  - (void)viewDidLoad

  {

      [super viewDidLoad];

      //初始化数据

      NSMutableArray *multYears = [NSMutableArray array];//年

      for(int i=; i<; i++)

      {

          NSString *year = [NSString stringWithFormat:@"20%02d年",i+];

          [multYears addObject:year];

      }

      self.years = multYears;

      NSMutableArray *multMonths = [NSMutableArray arrayWithCapacity:];//月

      for(int i=; i<=; i++)

      {

          NSString *month = [NSString stringWithFormat:@"%d月",i];

          [multMonths addObject:month];

      }

      self.months = multMonths;

      NSMutableArray *multDays = [NSMutableArray arrayWithCapacity:];//日

      for(int i=; i<=; i++)

      {

          NSString *day = [NSString stringWithFormat:@"%d日",i];

          [multDays addObject:day];

      }

      self.days = multDays;

      //设置pickerView的数据源和代理

      self.pickerView.dataSource = self;

      self.pickerView.delegate = self;

      //显示当前日期

      NSDate *now = [NSDate date];

      //分解日期

      NSCalendar  *calendar = [[NSCalendar alloc]initWithCalendarIdentifier:NSCalendarIdentifierGregorian];

      NSCalendarUnit unitFlags = NSCalendarUnitYear|NSCalendarUnitMonth|NSCalendarUnitDay;

      NSDateComponents *components = [calendar components:unitFlags fromDate:now];

      //设置pickerView显示当前日期

      NSInteger year = [components year];

      [self.pickerView selectRow:year-- inComponent: animated:year];

      NSInteger month = [components month];

      [self.pickerView selectRow:month- inComponent: animated:month];

      NSInteger day = [components day];

      [self.pickerView selectRow:day- inComponent: animated:day];

  }

  #pragma mark - pickerView的代理方法

  -(NSInteger)numberOfComponentsInPickerView:(UIPickerView *)pickerView

  {

      return ;

  }

  -(NSInteger)pickerView:(UIPickerView *)pickerView numberOfRowsInComponent:(NSInteger)component

  {

      NSInteger row = ;

      switch (component)

      {

          case :

              row = self.years.count;

              break;

          case :

              row = self.months.count;

              break;

          case :

              row = self.days.count;

              break;

      }

      return  row;

  }

  -(NSString*)pickerView:(UIPickerView *)pickerView titleForRow:(NSInteger)row forComponent:(NSInteger)component

  {

      NSString *title;

      switch (component)

      {

          case :

              title = self.years[row];

              break;

          case :

              title = self.months[row];

              break;

          case :

              title = self.days[row];

              break;

     }

     return  title;

 }

 -(void)pickerView:(UIPickerView *)pickerView didSelectRow:(NSInteger)row inComponent:(NSInteger)component

 {

     NSString *strDate = [NSString stringWithFormat:@"%@-%@-%@",

                          self.years[[pickerView selectedRowInComponent:]],

                          self.months[[pickerView selectedRowInComponent:]],

                          self.days[[pickerView selectedRowInComponent:]]];

     NSLog(@"%@",strDate);

 }

 @end
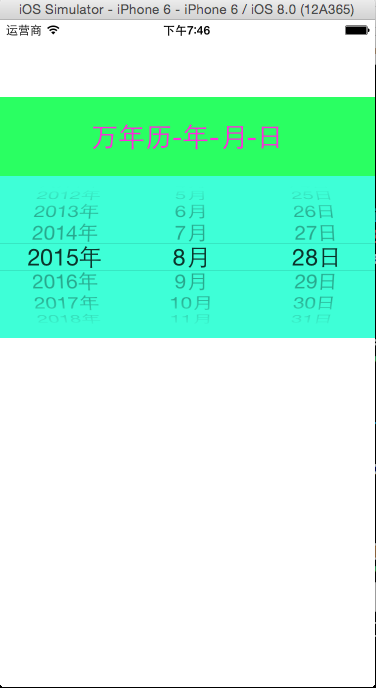
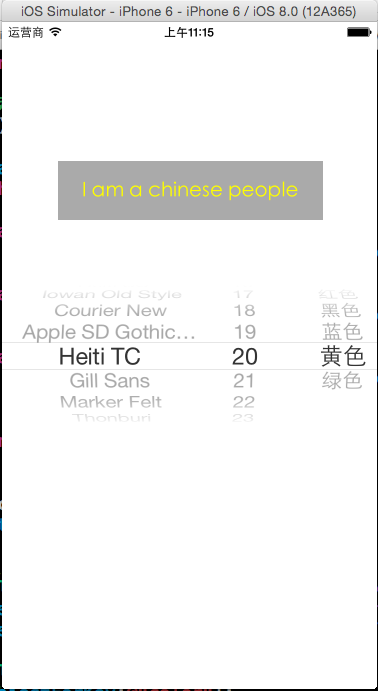
演示二:制作简单的字体表,包括字体类型、大小、颜色
源码如下:
 #import <UIKit/UIKit.h>

 @interface ViewController : UIViewController<UIPickerViewDataSource,UIPickerViewDelegate>

 @property(nonatomic,strong) NSArray *fontNames;

 @property(nonatomic,strong) NSArray *fontSizes;

 @property(nonatomic,strong) NSArray *fontColors;

 @end
 #import "ViewController.h"

   @interface ViewController ()

   @property (weak, nonatomic) IBOutlet UILabel *label;

   @property (weak, nonatomic) IBOutlet UIPickerView *pickerView;

   @end

  @implementation ViewController

  - (void)viewDidLoad {

      [super viewDidLoad];

      //初始化数据

      self.fontNames = [UIFont familyNames];//字体名字

      NSMutableArray *mutsize = [NSMutableArray arrayWithCapacity:];//字体大小

      for(int i=; i<=; i++)

      {

          [mutsize addObject:[NSString stringWithFormat:@"%d",+i]];

      }

      self.fontSizes = mutsize;

      self.fontColors = @[

                          @{@"name":@"红色",@"color":[UIColor redColor]},

                          @{@"name":@"黑色",@"color":[UIColor blackColor]},

                          @{@"name":@"蓝色",@"color":[UIColor blueColor]},

                          @{@"name":@"黄色",@"color":[UIColor yellowColor]},

                          @{@"name":@"绿色",@"color":[UIColor greenColor]}

                         ];

      //设置pickerView的代理和数据源

      self.pickerView.dataSource = self;

      self.pickerView.delegate = self;

      //设置label的font

      self.label.font = [UIFont fontWithName:self.fontNames[] size:[self.fontSizes[] integerValue]];

      self.label.textColor = [self.fontColors[] objectForKey:@"color"];

  }

  #pragma mark - pickerView的代理方法

  -(NSInteger)numberOfComponentsInPickerView:(UIPickerView *)pickerView

  {

      return  ;

  }

  -(NSInteger)pickerView:(UIPickerView *)pickerView numberOfRowsInComponent:(NSInteger)component

  {

      NSInteger row = ;

      switch (component)

      {

          case :

              row = self.fontNames.count;

              break;

          case :

              row = self.fontSizes.count;

              break;

          case :

              row = self.fontColors.count;

              break;

      }

      return row;

  }

  -(NSString*)pickerView:(UIPickerView *)pickerView titleForRow:(NSInteger)row forComponent:(NSInteger)component

  {

      NSString *title;

      switch (component)

      {

          case :

              title = self.fontNames[row];

              break;

          case :

              title = self.fontSizes[row];

              break;

          case :

              title = [self.fontColors[row] objectForKey:@"name"];

              break;

      }

      return  title;

  }

  //设置每一列的宽度

  -(CGFloat)pickerView:(UIPickerView *)pickerView widthForComponent:(NSInteger)component

  {

      CGFloat width = 0.0f;

      switch (component)

      {

          case :

              width = pickerView.frame.size.width/;

              break;

          case :

              width = pickerView.frame.size.width/;

              break;

          case :

              width = pickerView.frame.size.width/;

              break;

      }

      return width;

  }

  -(void)pickerView:(UIPickerView *)pickerView didSelectRow:(NSInteger)row inComponent:(NSInteger)component

 {

     //设置label的font

     self.label.font = [UIFont fontWithName:self.fontNames[[pickerView selectedRowInComponent:]] size:[self.fontSizes[[pickerView selectedRowInComponent:]] integerValue]];

     self.label.textColor = [self.fontColors[[pickerView selectedRowInComponent:]] objectForKey:@"color"];

 }

 @end
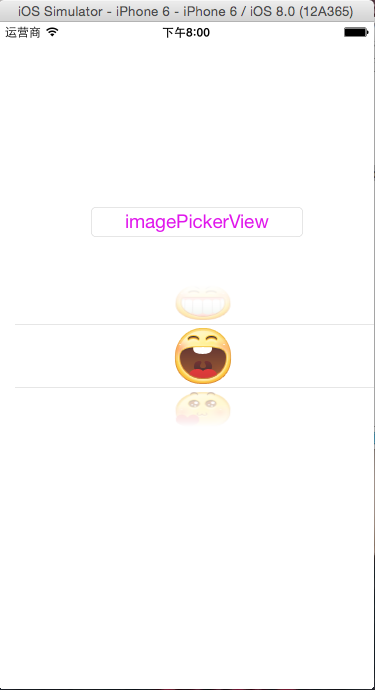
演示三:制作简单的图库浏览器
源码如下:
#import <UIKit/UIKit.h>

@interface ViewController : UIViewController<UIPickerViewDelegate,UIPickerViewDataSource>

@end
#import "ViewController.h"

  @interface ViewController ()

  @property (weak, nonatomic) IBOutlet UIPickerView *pickerView;

  @property (strong,nonatomic)NSArray *imageNames;

  @end

  @implementation ViewController

 - (void)viewDidLoad {

     [super viewDidLoad];

     //初始化数据

     NSMutableArray *mutImageNames = [NSMutableArray arrayWithCapacity:];

     for(int i=; i<; i++)

     {

         [mutImageNames addObject:[NSString stringWithFormat:@"%d.png",i]];

     }

     self.imageNames = mutImageNames;

     //设置pickerView的数据源和代理

     self.pickerView.dataSource = self;

     self.pickerView.delegate = self;

 }

 #pragma mark - pickerview代理方法

 -(NSInteger)numberOfComponentsInPickerView:(UIPickerView *)pickerView

 {

     return ;

 }

 -(NSInteger)pickerView:(UIPickerView *)pickerView numberOfRowsInComponent:(NSInteger)component

 {

     return self.imageNames.count;

 }

 //设置行高

 -(CGFloat)pickerView:(UIPickerView *)pickerView rowHeightForComponent:(NSInteger)component

 {

     UIImage *image = [UIImage imageNamed:self.imageNames[]];

     return image.size.height;

 }

 //设置每行显示的视图

 -(UIView *)pickerView:(UIPickerView *)pickerView viewForRow:(NSInteger)row forComponent:(NSInteger)component reusingView:(UIView *)view

 {

     UIImage *image = [UIImage imageNamed:self.imageNames[row]];

     //UIImageView *imageView = [[UIImageView alloc]initWithImage:image];

     //imageView.frame = CGRectMake(0, 0, image.size.width, image.size.height);

     //return imageView;

     UIButton *button = [[UIButton alloc]initWithFrame:CGRectMake(, ,image.size.width, image.size.height)];

     [button setBackgroundImage:image forState:UIControlStateNormal];

     [button addTarget:self action:@selector(buttonClicked:) forControlEvents:UIControlEventTouchUpInside];

     return button;

 }

 -(void)buttonClicked:(UIButton *)sender

 {

     NSLog(@"button clicked");

 }

 @end
iOS:选择器控件UIPickerView的详解和演示的更多相关文章
- 《手把手教你》系列技巧篇(三十八)-java+ selenium自动化测试-日历时间控件-下篇(详解教程)
1.简介 理想很丰满现实很骨感,在应用selenium实现web自动化时,经常会遇到处理日期控件点击问题,手工很简单,可以一个个点击日期控件选择需要的日期,但自动化执行过程中,完全复制手工这样的操作就 ...
- iOS:提示框(警告框)控件UIActionSheet的详解
提示框(警告框)控件2:UIActionSheet 功能:当点击按钮或标签等时,弹出一个提示框,显示必要的提示,然后通过添加的按钮完成需要的功能.它与导航栏类似,它继承自UIView. 风格类型: ...
- iOS:提示框(警告框)控件UIAlertView的详解
提示框(警告框)控件:UIAlertView 功能:当点击按钮或标签等时,弹出一个提示框,显示必要的提示,然后通过添加的按钮完成需要的功能. 类型:typedef NS_ENUM(NSInte ...
- iOS:下拉刷新控件UIRefreshControl的详解
下拉刷新控件:UIRefreshControl 1.具体类信息: @interface UIRefreshControl : UIControl //继承控制类 - (instancetype)ini ...
- iOS:网页视图控件UIWebView的详解
网页视图控件:UIWebView 功能:它是继承于UIView的,是一个内置的浏览器控件,以用来浏览从网络下载下来的网页或者本地上加载下来的文档. 枚举: //网页视图导航类型 typedef NS_ ...
- iOS:图像选取器控制器控件UIImagePickerController的详解
图像选择控制器:UIImagePickerController 功能:用于选取相册或相机等里面的照片. @interface UIImagePickerController : UINavigatio ...
- 《手把手教你》系列技巧篇(三十七)-java+ selenium自动化测试-日历时间控件-上篇(详解教程)
1.简介 我们在实际工作中,有可能遇到有些web产品,网页上有一些时间选择,然后支持按照不同时间段范围去筛选数据.网页上日历控件一般,是一个文本输入框,鼠标点击,就会弹出日历界面,可以选择具体日期.这 ...
- delphi控件属性大全-详解-简介
http://blog.csdn.net/u011096030/article/details/18716713 button 组件: CAPTION 属性 :用于在按钮上显示文本内容 Cancel ...
- 【VB技巧】VB ListView 控件功能使用详解
来源:http://lcx.cc/?i=494 ListView控件 在工具箱上击鼠标右键,选择快捷菜单的Components(部件)项,在控件列表中选择Microsoft Windows Commo ...
随机推荐
- 查找html中的某个事件
打开浏览器的调试功能,以chrome为例,按F12打开调试窗口,切换到Sources选项卡,最右边的Event Listener Breakpoints里勾选Mouse下的mouseover即可,当你 ...
- NetApp 监控
http://support.ipmonitor.com/mibs/network-appliance-mib/tree.aspx http://www.360doc.com/content/10/1 ...
- 复利计算--结对项目<04-11-2016> 1.0.0 lastest 阶段性完工~
结对项目:Web复利计算 搭档博客地址:25江志彬 http://www.cnblogs.com/qazwsxedcrfv/ 个人摘要: (2016-04-09-12:00)补充:之前传送门没做好, ...
- Hdu5093 Battle ships 二分图
Time Limit: 2000/1000 MS (Java/Others) Memory Limit: 65536/65536 K (Java/Others)Total Submission( ...
- 198个经典C#WinForm实例源码(超赞) 里面的例子 .sln 目录
\-窗体技巧\QQ窗体\QQFrm.sln; \-窗体技巧\仿XP系统的任务栏菜单\仿XP系统的任务栏菜单.sln; \-窗体技巧\向窗体中拖放图片并显示\向窗体中拖放图片并显示.sln; \-窗体技 ...
- 从Bayesian角度浅析Batch Normalization
前置阅读:http://blog.csdn.net/happynear/article/details/44238541——Batch Norm阅读笔记与实现 前置阅读:http://www.zhih ...
- 近半年MVC使用后的一些习惯
半年前接新项目, 来了一个前端, 由于只有我前后台都会, 就做业务层+辅助前端显示, 于是我决定使用MVC 上面那句无关紧要的话让我改了好多遍, 转载请注明出处: http://www.cnblogs ...
- phpunit测试学习 2 分类总结断言涉及哪些方面
11:27 2015/12/9phpunit测试学习 2, 分类总结断言涉及哪些方面先推荐windows快速打开某处路径下的cmd,进入测试状态:可以在文件夹中,按住Shift+鼠标右键,这时候你就 ...
- 【资源】NOIP2013测试数据senior/junior 普及/提高 数据
https://yunpan.cn/cRSepfcG4XX3V 访问密码 48e1 NOIP2013测试数据senior/junior 普及/提高 数据都在了
- 【BZOJ2157】旅游 LCT
模板T,SB的DMoon..其实样例也是中国好样例...一开始不会复制,yangyang:找到“sample input”按住shift,按page down.... #include <ios ...