Mybatis基于注解开启使用二级缓存
关于Mybatis的一级缓存和二级缓存的概念以及理解可以参照前面文章的介绍。前文连接:https://www.cnblogs.com/hopeofthevillage/p/11427438.html,上文中二级缓存使用的是xml方式的实现,本文主要是补充一下Mybatis中基于注解的二级缓存的开启使用方法。
1.在Mybatis的配置文件中开启二级缓存
<?xml version="1.0" encoding="UTF-8" ?>
<!DOCTYPE configuration
PUBLIC "-//mybatis.org//DTD Config 3.0//EN"
"http://mybatis.org/dtd/mybatis-3-config.dtd">
<configuration>
<settings>
<!--开启全局的懒加载-->
<setting name="lazyLoadingEnabled" value="true"/>
<!--<!–关闭立即加载,其实不用配置,默认为false–>-->
<!--<setting name="aggressiveLazyLoading" value="false"/>-->
<!--开启Mybatis的sql执行相关信息打印-->
<setting name="logImpl" value="STDOUT_LOGGING" />
<!--默认是开启的,为了加强记忆,还是手动加上这个配置-->
<setting name="cacheEnabled" value="true"/>
</settings>
<typeAliases>
<typeAlias type="com.example.domain.User" alias="user"/>
<package name="com.example.domain"/>
</typeAliases>
<environments default="test">
<environment id="test">
<!--配置事务-->
<transactionManager type="jdbc"></transactionManager>
<!--配置连接池-->
<dataSource type="POOLED">
<property name="driver" value="com.mysql.jdbc.Driver"/>
<property name="url" value="jdbc:mysql://localhost:3306/test1"/>
<property name="username" value="root"/>
<property name="password" value="123456"/>
</dataSource>
</environment>
</environments>
<mappers>
<package name="com.example.dao"/>
</mappers>
</configuration>
开启缓存 <setting name="cacheEnabled" value="true"/>,为了查看Mybatis中查询的日志,添加 <setting name="logImpl" value="STDOUT_LOGGING" />开启日志的配置。
2.领域类以及Dao
public class User implements Serializable{

    private Integer userId;

    private String userName;

    private Date userBirthday;

    private String userSex;

    private String userAddress;

    private List<Account> accounts;

   省略get和set方法......

}

import com.example.domain.User;

import org.apache.ibatis.annotations.*;

import org.apache.ibatis.mapping.FetchType;

import java.util.List;

@CacheNamespace(blocking = true)

public interface UserDao {

    /**

     * 查找所有用户

     * @return

     */

    @Select("select * from User")

    @Results(id = "userMap",value = {@Result(id = true,column = "id",property = "userId"),

            @Result(column = "username",property = "userName"),

            @Result(column = "birthday",property = "userBirthday"),

            @Result(column = "sex",property = "userSex"),

            @Result(column = "address",property = "userAddress"),

            @Result(column = "id",property = "accounts",many = @Many(select = "com.example.dao.AccountDao.findAccountByUid",fetchType = FetchType.LAZY))

    })

    List<User> findAll();

    /**

     * 保存用户

     * @param user

     */

    @Insert("insert into user(username,birthday,sex,address) values(#{username},#{birthday},#{sex},#{address})")

    void saveUser(User user);

    /**

     * 更新用户

     * @param user

     */

    @Update("update user set username=#{username},birthday=#{birthday},sex=#{sex},address=#{address} where id=#{id}")

    void updateUser(User user);

    /**

     * 删除用户

     * @param id

     */

    @Delete("delete from user where id=#{id}")

    void  deleteUser(Integer id);

    /**

     * 查询用户根据ID

     * @param id

     * @return

     */

    @Select("select * from user where id=#{id}")

    @ResultMap(value = {"userMap"})

    User findById(Integer id);

    /**

     * 根据用户名称查询用户

     * @param name

     * @return

     */

//    @Select("select * from user where username like #{name}")

    @Select("select * from user where username like '%${value}%'")

    List<User> findByUserName(String name);

    /**

     * 查询用户数量

     * @return

     */

    @Select("select count(*) from user")

    int findTotalUser();

}
3.在对应的Dao类上面增加注释以开启二级缓存
@CacheNamespace(blocking = true)
4.测试
public class UserCacheTest {

    private InputStream in;

    private SqlSessionFactory sqlSessionFactory;

    @Before

    public void init()throws Exception{

        in = Resources.getResourceAsStream("SqlMapConfig.xml");

        sqlSessionFactory = new SqlSessionFactoryBuilder().build(in);

    }

    @After

    public void destory()throws Exception{

        in.close();

    }

    @Test

    public void testFindById(){

        //第一查询

        SqlSession sqlSession1 = sqlSessionFactory.openSession();

        UserDao userDao1 = sqlSession1.getMapper(UserDao.class);

        User user1 = userDao1.findById(41);

        System.out.println(user1);

        //关闭一级缓存

        sqlSession1.close();

        //第二次查询

        SqlSession sqlSession2 = sqlSessionFactory.openSession();

        UserDao userDao2 = sqlSession2.getMapper(UserDao.class);

        User user2 = userDao2.findById(41);

        System.out.println(user2);

        sqlSession1.close();

        System.out.println(user1 == user2);

    }

}
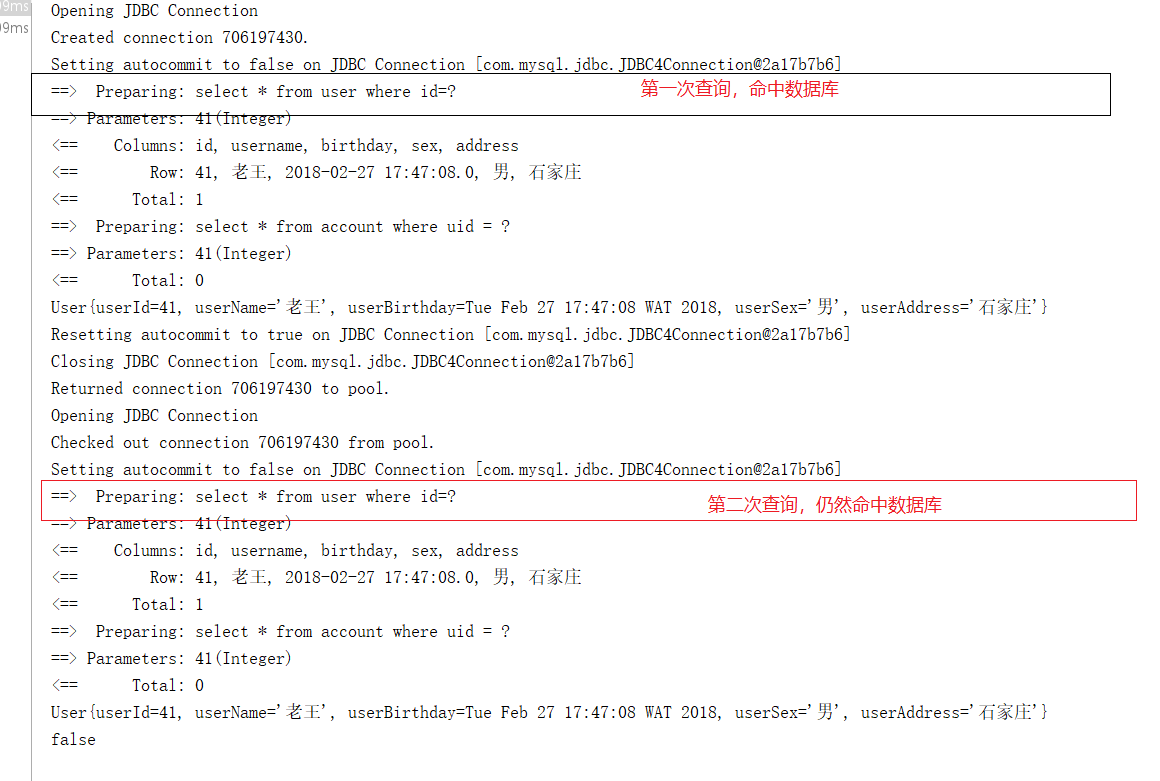
(1)未开启二级缓存时
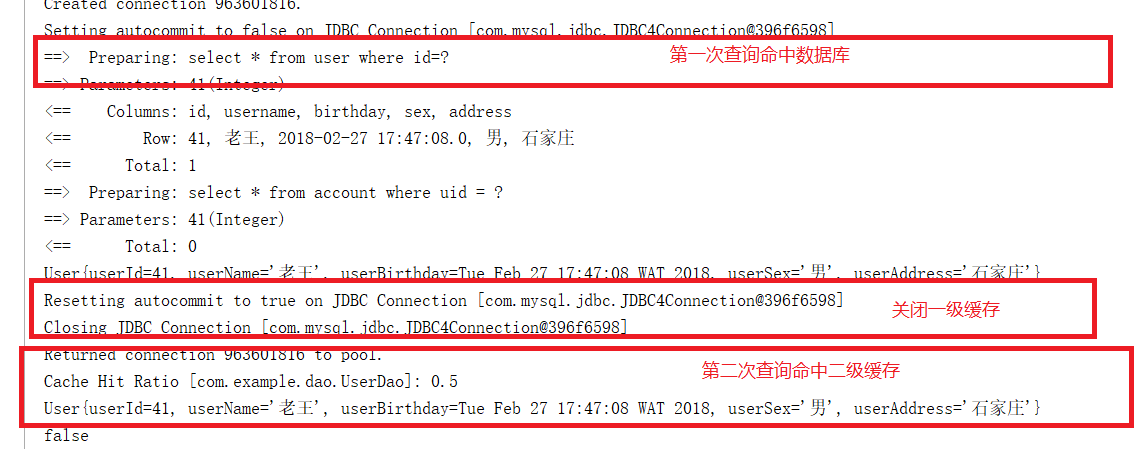
(2)开启二级缓存时
Mybatis基于注解开启使用二级缓存的更多相关文章
- 基于Spring Cache实现二级缓存(Caffeine+Redis)
一.聊聊什么是硬编码使用缓存? 在学习Spring Cache之前,笔者经常会硬编码的方式使用缓存. 我们来举个实际中的例子,为了提升用户信息的查询效率,我们对用户信息使用了缓存,示例代码如下: @A ...
- SpringMVC + ehcache( ehcache-spring-annotations)基于注解的服务器端数据缓存
背景 声明,如果你不关心java缓存解决方案的全貌,只是急着解决问题,请略过背景部分. 在互联网应用中,由于并发量比传统的企业级应用会高出很多,所以处理大并发的问题就显得尤为重要.在硬件资源一定的情况 ...
- 阶段3 1.Mybatis_12.Mybatis注解开发_8 mybatis注解开发使用二级缓存
执行两次都查询userId为57的数据.测试一级缓存 返回true 新建测试类 ,测试二级缓存 二级缓存的配置 首先是全局配置,不配置其实也是可以的.默认就是开启的.这里为了演示配置上 dao类里面进 ...
- MyBatis功能点一:二级缓存cache
对于Mybatis缓存分作用域等维度区别一.二级缓存特点如下图: 分析缓存源码首先得找到缓存操作的入口:前面已经分析,sqlsesion.close()仅对一级缓存有影响,而update等对一/二级缓 ...
- mybatis plus使用redis作为二级缓存
建议缓存放到 service 层,你可以自定义自己的 BaseServiceImpl 重写注解父类方法,继承自己的实现.为了方便,这里我们将缓存放到mapper层.mybatis-plus整合redi ...
- Spring+Mybatis基于注解整合Redis
基于这段时间折腾redis遇到了各种问题,想着整理一下.本文主要介绍基于Spring+Mybatis以注解的形式整合Redis.废话少说,进入正题. 首先准备Redis,我下的是Windows版,下载 ...
- SpringMvc+Spring+MyBatis 基于注解整合
最近在给学生们讲Spring+Mybatis整合,根据有的学生反映还是基于注解实现整合便于理解,毕竟在先前的工作中团队里还没有人完全舍弃配置文件进行项目开发,由于这两个原因,我索性参考spring官方 ...
- Mybatis 源码分析之一二级缓存
一级缓存 其实关于 Mybatis 的一级缓存是比较抽象的,并没有什么特别的配置,都是在代码中体现出来的. 当调用 Configuration 的 newExecutor 方法来创建 executor ...
- java基于注解的redis自动缓存实现
目的: 对于查询接口所得到的数据,只需要配置注解,就自动存入redis!此后一定时间内,都从redis中获取数据,从而减轻数据库压力. 示例: package com.itliucheng.biz; ...
随机推荐
- android dialog,popupwindow,toast窗口的添加机制
Dialog 窗口添加机制 代码示例 首先举两个例子: 例子1 在Activity中 @OnClick(R.id.but) void onClick() { Log.d("LiaBin&qu ...
- Mac基本配置
相关操作 配置文件 java 下载jdk-12.0.1_osx-x64_bin.dmg 配置环境变量 #配置java JAVA_HOME=/Library/Java/JavaVirtualMachin ...
- Spring Boot系列(三) Spring Boot 之 JDBC
数据源 类型 javax.sql.DataSource javax.sql.XADataSource org.springframework.jdbc.datasource.embedded,Enbe ...
- Mac入门--安装PHP扩展redis,swoole
1 php7以下可以通过pecl安装PHP扩展 安装redis扩展 pecl install redis 安装swoole扩展 pecl install swoole 2 PHP7以上通过源码编译安装 ...
- React.memo
介绍React.memo之前,先了解一下React.Component和React.PureComponent. React.Component React.Component是基于ES6 class ...
- 2019牛客暑期多校训练营(第五场) - C - generator 2 - BSGS
https://ac.nowcoder.com/acm/contest/885/C 这个跟平时那种求离散对数的bsgs不一样,虽然可以转化成离散对数来做不过会T掉.展开递推式然后合并具有a的项,发现其 ...
- Thymeleaf简介
Thymeleaf Thymeleaf简介 Thymeleaf是一个流行的模板引擎,该模板引擎采用Java语言开发,模板引擎是一个技术名词,是跨领域跨平台的概念,在Java语言体系下有模板引擎,在C# ...
- JavaWeb基础工具类——BaseDao
package dao; import java.sql.Connection; import java.sql.DriverManager; import java.sql.PreparedStat ...
- Centos7 配置rsyslog客户端接收远程日志
rsyslog 因为路由器我设定每天重启,但是日志一重启就会清除,并且路由器最多只能保存1024条记录,所以我想把路由器的日志记录到一台服务器上,发现路由器包含远程日志功能 于是我就在我的centos ...
- weblogic+idea
1.首先是weblogic的安装,去官网下载,下载完成后,安装,然后还需要创建域,参考链接: https://www.cnblogs.com/xdp-gacl/p/4140683.html,创建域的h ...