pytorch中的剪枝操作
深度学习技术依赖于过参数化模型,这是不利于部署的,相反,生物神经网络是使用高效的稀疏连接的。
通过减少模型中的参数数量来压缩模型的技术非常重要,为减少内存、电池和硬件的消耗,而牺牲准确性,实现在设备上部署轻量级模型。
在Pytorch中,主要通过torch.nn.utils.prune来进行剪枝,以及自定义剪枝
预备工作
导入需要的库
import torch

from torch import nn

import torch.nn.utils.prune as prune

import torch.nn.functional as F

import matplotlib.pyplot as plt

import seaborn as sns

import numpy as np
创建模型
device = torch.device("cuda" if torch.cuda.is_available() else "cpu")

class LeNet(nn.Module):

    def __init__(self):

        super(LeNet, self).__init__()

        # 1 input image channel, 6 output channels, 3x3 square conv kernel

        self.conv1 = nn.Conv2d(1, 6, 3)

        self.conv2 = nn.Conv2d(6, 16, 3)

        self.fc1 = nn.Linear(16 * 5 * 5, 120)  # 5x5 image dimension

        self.fc2 = nn.Linear(120, 84)

        self.fc3 = nn.Linear(84, 10)

    def forward(self, x):

        x = F.max_pool2d(F.relu(self.conv1(x)), (2, 2))

        x = F.max_pool2d(F.relu(self.conv2(x)), 2)

        x = x.view(-1, int(x.nelement() / x.shape[0]))

        x = F.relu(self.fc1(x))

        x = F.relu(self.fc2(x))

        x = self.fc3(x)

        return x

model = LeNet().to(device=device)
使用的模型为:LeNet网络
模型的权重参数
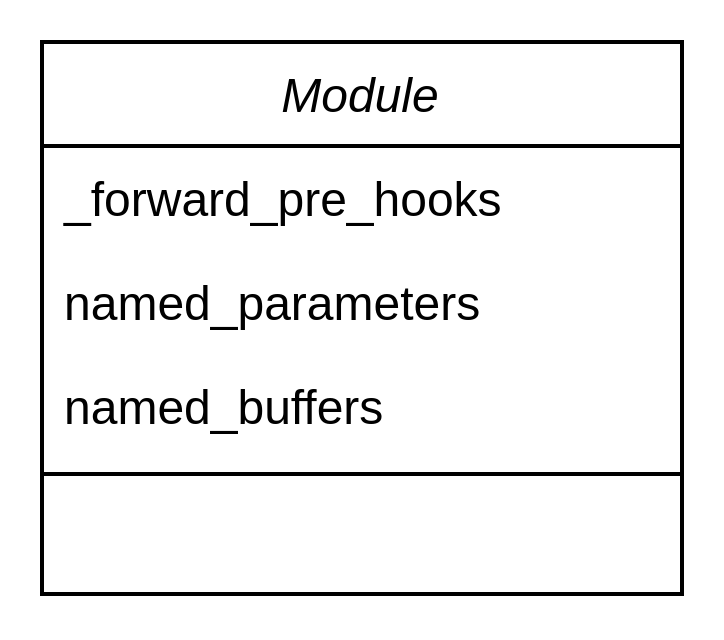
在torch.nn.Module中的提供了获取学习参数的方法,将会返回list,其中包含有"weights"和"bias"
其中,
named_parameters函数: 返回 self._parameters 中的 name 和 parameter 元组,如果 recurse=True 还会返回子模块中的模型参数,
named_buffers: 返回 self._buffers 中的 name 和 buffer 元组,如果 recurse=True 还会返回子模块中的模型 buffer。可以理解为剪枝之后的参数,处于buffer中还未被应用
- 缓冲buffer必须要登记注册才会有效,如果仅仅将张量赋值给Module模块的属性,不会被自动转为缓冲buffer.因而也无法被state_dict()、buffers()、named_buffers()访问到.此外state_dict()可以遍历缓冲buffer和参数Parameter.
- 缓冲buffer和参数Parameter的区别是前者不需要训练优化,而后者需要训练优化. 在创建方法上也有区别,前者必须要将一个张量使用方法register_buffer()来登记注册,后者比较灵活,可以直接赋值给模块的属性,也可以使用方法register_parameter()来登记注册.
_forward_pre_hooks: 剪枝完之后,需要使用_forward_pre_hooks在每次向前传递之前应用剪枝。具体来说,当修剪module时,它将为与之关联的每个参数获取forward_pre_hook进行修剪
未剪枝的conv1参数
未剪枝的 conv1 包含 两个参数weight 和 bias
module = model.conv1

print(list(module.named_parameters()))
Output exceeds the size limit. Open the full output data in a text editor

[('weight', Parameter containing:

tensor([[[[ 0.0269, -0.1127,  0.2630],

          [-0.2205,  0.1524, -0.2633],

          [ 0.0150,  0.3068, -0.1860]]],

        [[[-0.2370, -0.2555,  0.1270],

          [-0.2306, -0.0749,  0.2301],

          [ 0.1271,  0.2838, -0.1007]]],

        [[[ 0.1891,  0.2757, -0.0634],

          [-0.0449, -0.1481,  0.2999],

          [ 0.0977, -0.0103,  0.2895]]],

        [[[ 0.1956,  0.2537, -0.2782],

          [ 0.1659, -0.2173,  0.3263],

          [-0.2252, -0.0120, -0.0382]]],

        [[[-0.1830, -0.3317,  0.3158],

          [-0.0410, -0.2604, -0.2450],

          [-0.0853,  0.1218, -0.0550]]],

...

          [-0.2336,  0.2198, -0.2146],

          [-0.0740, -0.0744,  0.3016]]]], device='cuda:0', requires_grad=True)), ('bias', Parameter containing:

tensor([ 0.0475, -0.2210,  0.0267, -0.2039, -0.1939, -0.2303], device='cuda:0',

       requires_grad=True))]
查看named_buffers函数的返回:
print(list(module.named_buffers()))
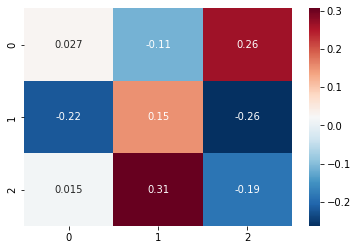
# conv1 weight [6,1,3,3] visualization
sns.heatmap(data=np.array(module.weight[0,0,:,:].cpu().detach().numpy()),annot=True,cmap="RdBu_r")
print(module.weight[0,0,:,:].cpu().detach().numpy())
运行结果:
[]

[[ 0.02690872 -0.1127493   0.26298428]

 [-0.22050266  0.15237224 -0.26334763]

 [ 0.01498783  0.3068373  -0.18603854]]
剪枝
如果要裁剪一个Module,首先需要选取一个pruning方案,目前torch.nn.utils.prune已经支持:
- RandomUnstructured
- L1Unstructured
- RandomStructured
- LnStructured
- CustomFromMask
也可以通过继承BasePruningMethod来自定义自己的pruning方法
然后,指定裁剪的参数,最后设置适当参数来完成剪枝
非结构化剪枝
本例子中,随机裁剪conv1 层中weight的30%的连接,传入module,,传入 name指示剪哪个参数,传入 amount指示裁剪掉的连接比率(0到1)或者裁剪掉的连接个数(非负整数)
prune.random_unstructured(module, name="weight", amount=0.3)
Conv2d(1, 6, kernel_size=(3, 3), stride=(1, 1))
剪枝操作会将weight从参数中替换成weight_orig(在元参数名上增加"_orig"后缀)
weight_orig存储未剪枝的参数
bias参数不变
print(list(module.named_parameters()))
输出结果:
Output exceeds the size limit. Open the full output data in a text editor

[('bias', Parameter containing:

tensor([ 0.0475, -0.2210,  0.0267, -0.2039, -0.1939, -0.2303], device='cuda:0',

       requires_grad=True)), ('weight_orig', Parameter containing:

tensor([[[[ 0.0269, -0.1127,  0.2630],

          [-0.2205,  0.1524, -0.2633],

          [ 0.0150,  0.3068, -0.1860]]],

        [[[-0.2370, -0.2555,  0.1270],

          [-0.2306, -0.0749,  0.2301],

          [ 0.1271,  0.2838, -0.1007]]],

        [[[ 0.1891,  0.2757, -0.0634],

          [-0.0449, -0.1481,  0.2999],

          [ 0.0977, -0.0103,  0.2895]]],

        [[[ 0.1956,  0.2537, -0.2782],

          [ 0.1659, -0.2173,  0.3263],

          [-0.2252, -0.0120, -0.0382]]],

        [[[-0.1830, -0.3317,  0.3158],

          [-0.0410, -0.2604, -0.2450],

...

        [[[ 0.1799,  0.1700, -0.2640],

          [-0.2336,  0.2198, -0.2146],

          [-0.0740, -0.0744,  0.3016]]]], device='cuda:0', requires_grad=True))]
上文选择的剪枝方法获得mask存在buffer参数weight_mask(在原参数名后+"_mask"后缀)
print(list(module.named_buffers()))

print(list(module.named_buffers())[0][1].cpu().numpy()[0,0,:,:])
Output exceeds the size limit. Open the full output data in a text editor

[('weight_mask', tensor([[[[0., 1., 0.],

          [1., 1., 1.],

          [0., 0., 1.]]],

        [[[1., 1., 1.],

          [1., 1., 1.],

          [0., 1., 1.]]],

        [[[1., 0., 1.],

          [0., 0., 1.],

          [1., 1., 1.]]],

        [[[1., 1., 0.],

          [1., 1., 1.],

          [1., 0., 0.]]],

        [[[1., 1., 1.],

          [0., 0., 1.],

          [0., 1., 0.]]],

...

          [1., 1., 1.]]]], device='cuda:0'))]

[[0. 1. 0.]

 [1. 1. 1.]

 [0. 0. 1.]]
会产生一个weight_mask的掩码,本身是不会作用于模型的,会产生一个weight的属性,这个时候原moudle是不存在weight的parameter,仅仅是一个attribute.
网络forward如果要不修改的话, 这一层需要一个
weight状态.torch.nn.utils.prune得到剪枝后的weight (将mask和原weight合并)并存在weight状态里. 注意不再是module的参数了,而是改层的一个状态
print(module.weight)
输出结果:
Output exceeds the size limit. Open the full output data in a text editor

tensor([[[[ 0.0000, -0.1127,  0.0000],

          [-0.2205,  0.1524, -0.2633],

          [ 0.0000,  0.0000, -0.1860]]],

        [[[-0.2370, -0.2555,  0.1270],

          [-0.2306, -0.0749,  0.2301],

          [ 0.0000,  0.2838, -0.1007]]],

        [[[ 0.1891,  0.0000, -0.0634],

          [-0.0000, -0.0000,  0.2999],

          [ 0.0977, -0.0103,  0.2895]]],

        [[[ 0.1956,  0.2537, -0.0000],

          [ 0.1659, -0.2173,  0.3263],

          [-0.2252, -0.0000, -0.0000]]],

        [[[-0.1830, -0.3317,  0.3158],

          [-0.0000, -0.0000, -0.2450],

          [-0.0000,  0.1218, -0.0000]]],

...

        [[[ 0.1799,  0.1700, -0.2640],

          [-0.2336,  0.0000, -0.2146],

          [-0.0740, -0.0744,  0.3016]]]], device='cuda:0',

       grad_fn=<MulBackward0>)
最后,使用pytorch的 _forward_pre_hooks 会在每次forward之前应用这个pruning操作,需要指出的是当module被裁剪之后,它的每一个paramter都需要一个forward_pre_hooks来标识将被裁剪。当前我们只进行了conv1模块的weight裁剪,所以以下命令将只能看到一个hook。
print(module._forward_pre_hooks)
输出结果:
OrderedDict([(0, <torch.nn.utils.prune.RandomUnstructured object at 0x7f67df15a430>)])
上述可以看到module的parameters、buffers、hooks,以及attributes如何变化,现在采用另外一种剪枝策略,使用L1 norm来裁剪bias里最小的三个,实现如l1_unstructured函数
prune.l1_unstructured(module, name="bias", amount=3)
运行结果:
Conv2d(1, 6, kernel_size=(3, 3), stride=(1, 1))
处理之后,named_parameters将包含weight_orig和bias_orig,buffers将包含weight_mask和bias_mask,裁剪后最终的只存放在module的attributes,对应两个forward_pre_hooks
print(list(module.named_parameters()))
输出结果:
Output exceeds the size limit. Open the full output data in a text editor

[('weight_orig', Parameter containing:

tensor([[[[ 0.0269, -0.1127,  0.2630],

          [-0.2205,  0.1524, -0.2633],

          [ 0.0150,  0.3068, -0.1860]]],

        [[[-0.2370, -0.2555,  0.1270],

          [-0.2306, -0.0749,  0.2301],

          [ 0.1271,  0.2838, -0.1007]]],

        [[[ 0.1891,  0.2757, -0.0634],

          [-0.0449, -0.1481,  0.2999],

          [ 0.0977, -0.0103,  0.2895]]],

        [[[ 0.1956,  0.2537, -0.2782],

          [ 0.1659, -0.2173,  0.3263],

          [-0.2252, -0.0120, -0.0382]]],

        [[[-0.1830, -0.3317,  0.3158],

          [-0.0410, -0.2604, -0.2450],

          [-0.0853,  0.1218, -0.0550]]],

...

          [-0.2336,  0.2198, -0.2146],

          [-0.0740, -0.0744,  0.3016]]]], device='cuda:0', requires_grad=True)), ('bias_orig', Parameter containing:

tensor([ 0.0475, -0.2210,  0.0267, -0.2039, -0.1939, -0.2303], device='cuda:0',

       requires_grad=True))]
输出buffers:
print(list(module.named_buffers()))
输出结果:
[('weight_mask', tensor([[[[0., 1., 0.],

          [1., 1., 1.],

          [0., 0., 1.]]],

        [[[1., 1., 1.],

          [1., 1., 1.],

          [0., 1., 1.]]],

        [[[1., 0., 1.],

          [0., 0., 1.],

          [1., 1., 1.]]],

        [[[1., 1., 0.],

          [1., 1., 1.],

          [1., 0., 0.]]],

        [[[1., 1., 1.],

          [0., 0., 1.],

          [0., 1., 0.]]],

        [[[1., 1., 1.],

          [1., 0., 1.],

          [1., 1., 1.]]]], device='cuda:0')), ('bias_mask', tensor([0., 1., 0., 1., 0., 1.], device='cuda:0'))]
print(module.bias)
输出结果:
tensor([ 0.0000, -0.2210,  0.0000, -0.2039, -0.0000, -0.2303], device='cuda:0',

       grad_fn=<MulBackward0>)
输出hooks:
print(module._forward_pre_hooks)
输出结果:
OrderedDict([(0, <torch.nn.utils.prune.RandomUnstructured object at 0x7f67df15a430>), (1, <torch.nn.utils.prune.L1Unstructured object at 0x7f682901ba30>)])
可看到hooks中有两个
结构化剪枝
module里同一个参数是可以剪枝多次的,相当于mask多次
多次mask的累加通过
PruningContainer的compute_mask比如想进一步结构化剪枝module.weight,对卷积的输出通道进行基于l2-nom剪枝,即第0维,对于conv1是个数为6,通过设置ln_structrued函数的参数n=2和dim = 0
prune.ln_structured(module, name="weight", amount=0.5, n=2, dim=0)

# 将会对一半通道对应连接置0,之前的mask也会保留下来

print(module.weight)
输出结果:
Output exceeds the size limit. Open the full output data in a text editor

tensor([[[[ 0.0000, -0.0000,  0.0000],

          [-0.0000,  0.0000, -0.0000],

          [ 0.0000,  0.0000, -0.0000]]],

        [[[-0.2370, -0.2555,  0.1270],

          [-0.2306, -0.0749,  0.2301],

          [ 0.0000,  0.2838, -0.1007]]],

        [[[ 0.0000,  0.0000, -0.0000],

          [-0.0000, -0.0000,  0.0000],

          [ 0.0000, -0.0000,  0.0000]]],

        [[[ 0.1956,  0.2537, -0.0000],

          [ 0.1659, -0.2173,  0.3263],

          [-0.2252, -0.0000, -0.0000]]],

        [[[-0.0000, -0.0000,  0.0000],

          [-0.0000, -0.0000, -0.0000],

          [-0.0000,  0.0000, -0.0000]]],

...

        [[[ 0.1799,  0.1700, -0.2640],

          [-0.2336,  0.0000, -0.2146],

          [-0.0740, -0.0744,  0.3016]]]], device='cuda:0',

       grad_fn=<MulBackward0>)
对应hook是torch.nn.utils.prune.PruningContainer类型,记录所有对应于 weight 参数的剪枝操作
for hook in module._forward_pre_hooks.values():

    if hook._tensor_name == "weight":  # select out the correct hook

        break

print(list(hook))  # pruning history in the container
输出结果:
[<torch.nn.utils.prune.RandomUnstructured object at 0x7f67df15a430>, <torch.nn.utils.prune.LnStructured object at 0x7f68cdd5e6a0>]
序列化保存
所有裁剪前、后的tensor(包括mask和orig参数)都是存储在state_dict中
print(model.state_dict().keys())
输出结果:
odict_keys(['conv1.weight_orig', 'conv1.bias_orig', 'conv1.weight_mask', 'conv1.bias_mask', 'conv2.weight', 'conv2.bias', 'fc1.weight', 'fc1.bias', 'fc2.weight', 'fc2.bias', 'fc3.weight', 'fc3.bias'])
接下来就要考虑,如何将pruning永久的作用于模型,而不保存类似weight_orig以及weight_mask这样的Tensor,同时移除forward_pre_hook
prune中提供了remove操作, 需要注意的是,remove并不能undo裁剪的操作,使得什么都没发生过一样,仅仅是永久化,重新将weight赋值给module的源tensor.
prune.remove(module, 'weight')

print(list(module.named_parameters()))
输出结果:
Output exceeds the size limit. Open the full output data in a text editor

[('bias_orig', Parameter containing:

tensor([ 0.0475, -0.2210,  0.0267, -0.2039, -0.1939, -0.2303], device='cuda:0',

       requires_grad=True)), ('weight', Parameter containing:

tensor([[[[ 0.0000, -0.0000,  0.0000],

          [-0.0000,  0.0000, -0.0000],

          [ 0.0000,  0.0000, -0.0000]]],

        [[[-0.2370, -0.2555,  0.1270],

          [-0.2306, -0.0749,  0.2301],

          [ 0.0000,  0.2838, -0.1007]]],

        [[[ 0.0000,  0.0000, -0.0000],

          [-0.0000, -0.0000,  0.0000],

          [ 0.0000, -0.0000,  0.0000]]],

        [[[ 0.1956,  0.2537, -0.0000],

          [ 0.1659, -0.2173,  0.3263],

          [-0.2252, -0.0000, -0.0000]]],

        [[[-0.0000, -0.0000,  0.0000],

          [-0.0000, -0.0000, -0.0000],

...

        [[[ 0.1799,  0.1700, -0.2640],

          [-0.2336,  0.0000, -0.2146],

          [-0.0740, -0.0744,  0.3016]]]], device='cuda:0', requires_grad=True))]
可以发现,直接weight就是裁剪后的值,而weight_orig已经不见了
如果希望裁剪模型中的多个参数,可以遍历module然后重复上述操作即可。
剪枝模型中的多层参数
指定剪枝策略和对应的参数.
new_model = LeNet()

for name, module in new_model.named_modules():

    # prune 20% of connections in all 2D-conv layers

    if isinstance(module, torch.nn.Conv2d):

        prune.l1_unstructured(module, name='weight', amount=0.2)

    # prune 40% of connections in all linear layers

    elif isinstance(module, torch.nn.Linear):

        prune.l1_unstructured(module, name='weight', amount=0.4)

print(dict(new_model.named_buffers()).keys())  # to verify that all masks exist

print(dict(new_model.named_parameters()).keys())
输出结果:
dict_keys(['conv1.weight_mask', 'conv2.weight_mask', 'fc1.weight_mask', 'fc2.weight_mask', 'fc3.weight_mask'])

dict_keys(['conv1.bias', 'conv1.weight_orig', 'conv2.bias', 'conv2.weight_orig', 'fc1.bias', 'fc1.weight_orig', 'fc2.bias', 'fc2.weight_orig', 'fc3.bias', 'fc3.weight_orig'])
全局剪枝
以上为局部剪枝,只考虑当前层的统计信息(权重,激活,梯度),最有用的还是一次性剪枝整个网络,使用 torch.nn.utils.prune中的global_unstructured.
model = LeNet()

parameters_to_prune = (

    (model.conv1, 'weight'),

    (model.conv2, 'weight'),

    (model.fc1, 'weight'),

    (model.fc2, 'weight'),

    (model.fc3, 'weight'),

)

prune.global_unstructured(

    parameters_to_prune,

    pruning_method=prune.L1Unstructured,

    amount=0.2,

)

print(dict(new_model.named_buffers()).keys())  # to verify that all masks exist

print(dict(new_model.named_parameters()).keys())
输出结果:
dict_keys(['conv1.weight_mask', 'conv2.weight_mask', 'fc1.weight_mask', 'fc2.weight_mask', 'fc3.weight_mask'])

dict_keys(['conv1.bias', 'conv1.weight_orig', 'conv2.bias', 'conv2.weight_orig', 'fc1.bias', 'fc1.weight_orig', 'fc2.bias', 'fc2.weight_orig', 'fc3.bias', 'fc3.weight_orig'])
查看每个剪枝参数的稀疏度,不是每层都是20%,但是全局稀疏度大概是20%
print(

    "Sparsity in conv1.weight: {:.2f}%".format(

        100. * float(torch.sum(model.conv1.weight == 0))

        / float(model.conv1.weight.nelement())

    )

)

print(

    "Sparsity in conv2.weight: {:.2f}%".format(

        100. * float(torch.sum(model.conv2.weight == 0))

        / float(model.conv2.weight.nelement())

    )

)

print(

    "Sparsity in fc1.weight: {:.2f}%".format(

        100. * float(torch.sum(model.fc1.weight == 0))

        / float(model.fc1.weight.nelement())

    )

)

print(

    "Sparsity in fc2.weight: {:.2f}%".format(

        100. * float(torch.sum(model.fc2.weight == 0))

        / float(model.fc2.weight.nelement())

    )

)

print(

    "Sparsity in fc3.weight: {:.2f}%".format(

        100. * float(torch.sum(model.fc3.weight == 0))

        / float(model.fc3.weight.nelement())

    )

)

print(

    "Global sparsity: {:.2f}%".format(

        100. * float(

            torch.sum(model.conv1.weight == 0)

            + torch.sum(model.conv2.weight == 0)

            + torch.sum(model.fc1.weight == 0)

            + torch.sum(model.fc2.weight == 0)

            + torch.sum(model.fc3.weight == 0)

        )

        / float(

            model.conv1.weight.nelement()

            + model.conv2.weight.nelement()

            + model.fc1.weight.nelement()

            + model.fc2.weight.nelement()

            + model.fc3.weight.nelement()

        )

    )

)
输出结果:
Sparsity in conv1.weight: 0.00%

Sparsity in conv2.weight: 9.14%

Sparsity in fc1.weight: 21.98%

Sparsity in fc2.weight: 12.51%

Sparsity in fc3.weight: 9.05%

Global sparsity: 20.00%
这时的压缩率是全局考虑,有些module裁剪的比例高,有些更低。
自定义剪枝
自定义剪枝是通过继承BasePruningMethod基类 ,基类中实现了__call__, apply_mask,apply, prune, 和 remove等方法,不必重新实现,其子类中必须要 实现__init__ 和 compute_mask (mask和参数所执行的逻辑操作),执行哪种剪枝类型 ( global,structured, 或者 unstructured),决定了这些mask如何迭代作用。
class FooBarPruningMethod(prune.BasePruningMethod):

    """间隔的剪枝

    """

    PRUNING_TYPE = 'unstructured'

    def compute_mask(self, t, default_mask):

        mask = default_mask.clone()

        mask.view(-1)[::2] = 0

        return mask
在一个nn.Module上要使用这种剪枝, 还需要定义一个函数来调用类实例方法来执行
def foobar_unstructured(module, name):

    """Prunes tensor corresponding to parameter called `name` in `module`

    by removing every other entry in the tensors.

    Modifies module in place (and also return the modified module)

    by:

    1) adding a named buffer called `name+'_mask'` corresponding to the

    binary mask applied to the parameter `name` by the pruning method.

    The parameter `name` is replaced by its pruned version, while the

    original (unpruned) parameter is stored in a new parameter named

    `name+'_orig'`.

    Args:

        module (nn.Module): module containing the tensor to prune

        name (string): parameter name within `module` on which pruning

                will act.

    Returns:

        module (nn.Module): modified (i.e. pruned) version of the input

            module

    Examples:

        >>> m = nn.Linear(3, 4)

        >>> foobar_unstructured(m, name='bias')

    """

    FooBarPruningMethod.apply(module, name)

    return module
调用自定义剪枝函数
model = LeNet()

foobar_unstructured(model.fc3, name='bias')

print(model.fc3.bias_mask)
运行结果:
tensor([0., 1., 0., 1., 0., 1., 0., 1., 0., 1.])
接下来要
1、剪枝在pytorch中是如何实现的?
2、Torch-Pruning的使用
3、训练个剪枝网络
pytorch中的剪枝操作的更多相关文章
- PyTorch中的CUDA操作
CUDA(Compute Unified Device Architecture)是NVIDIA推出的异构计算平台,PyTorch中有专门的模块torch.cuda来设置和运行CUDA相关操作.本 ...
- pytorch中Math operation操作:torch.ger()
torch.ger(vec1, vec2, out=None) → Tensor Outer product of vec1 and vec2. If vec1 is a vector of size ...
- 实践Pytorch中的模型剪枝方法
摘要:所谓模型剪枝,其实是一种从神经网络中移除"不必要"权重或偏差的模型压缩技术. 本文分享自华为云社区<模型压缩-pytorch 中的模型剪枝方法实践>,作者:嵌入式 ...
- 基于pytorch实现模型剪枝
一,剪枝分类 1.1,非结构化剪枝 1.2,结构化剪枝 1.3,本地与全局修剪 二,PyTorch 的剪枝 2.1,pytorch 剪枝工作原理 2.2,局部剪枝 2.2.1,局部非结构化剪枝 2.2 ...
- PyTorch中ReLU的inplace
0 - inplace 在pytorch中,nn.ReLU(inplace=True)和nn.LeakyReLU(inplace=True)中存在inplace字段.该参数的inplace=True的 ...
- pytorch中如何使用DataLoader对数据集进行批处理
最近搞了搞minist手写数据集的神经网络搭建,一个数据集里面很多个数据,不能一次喂入,所以需要分成一小块一小块喂入搭建好的网络. pytorch中有很方便的dataloader函数来方便我们进行批处 ...
- (原)CNN中的卷积、1x1卷积及在pytorch中的验证
转载请注明处处: http://www.cnblogs.com/darkknightzh/p/9017854.html 参考网址: https://pytorch.org/docs/stable/nn ...
- [Pytorch]Pytorch中tensor常用语法
原文地址:https://zhuanlan.zhihu.com/p/31494491 上次我总结了在PyTorch中建立随机数Tensor的多种方法的区别. 这次我把常用的Tensor的数学运算总结到 ...
- 转pytorch中训练深度神经网络模型的关键知识点
版权声明:本文为博主原创文章,遵循CC 4.0 BY-SA版权协议,转载请附上原文出处链接和本声明. 本文链接:https://blog.csdn.net/weixin_42279044/articl ...
- (转载)Pytorch中的仿射变换(affine_grid)
转载于:Pytorch中的仿射变换(affine_grid) 参考:详细解读Spatial Transformer Networks (STN) 假设我们有这么一张图片: 下面我们将通过分别通过手 ...
随机推荐
- VMware虚拟机上安装Kali Linux详细教程
1.Kali Linux简介 Kali Linux是一个基于Debian的开源Linux发行版,集成了精心挑选的渗透测试和安全审计的工具,供渗透测试和安全设计人员使用,面向各种信息安全任务:如渗透测试 ...
- RestClient C# 举例 是用jsonbody ,并列出httpclient 等价的方式
以下是使用 RestSharp 发送 POST 请求并附带 JSON 请求体的示例,以及相应的使用 HttpClient 的等价方式: 首先,使用 RestSharp: using System; u ...
- FastAPI Cookie 和 Header 参数完全指南:从基础到高级实战 🚀
title: FastAPI Cookie 和 Header 参数完全指南:从基础到高级实战 date: 2025/3/9 updated: 2025/3/9 author: cmdragon exc ...
- DBeaver 连接 mysql 报错:Public Key Retrieval is not allowed
前言 DBeaver 连接 mysql 报错:Public Key Retrieval is not allowed 遇到 "Public Key Retrieval is not allo ...
- 云服务器下如何部署Flask项目详细操作步骤
参考网上各种方案,再结合之前学过的Django部署方案,最后确定Flask总体部署是基于:centos7+nginx+uwsgi+python3+Flask之上做的. 本地windows开发测试好了我 ...
- HTTP 和 RPC
TCP 是传输层的协议,而基于 TCP 造出来的 HTTP 和各类 RPC 协议,它们都只是定义了不同消息格式的应用层协议而已. RPC(Remote Procedure Call),又叫做远程过程调 ...
- CSAPP学习笔记——Chapter10,11 系统级I/O与网络编程
CSAPP学习笔记--Chapter10,11 系统级I/O与网络编程 Chapter10 系统级I/O 系统级I/O这一章的内容,主要可以通过这张图概括: Unix I/O模型是在操作系统内核中实现 ...
- 【Linux】3.5 实用指令
实用指令 1. 指定运行级别(7个级别) 0.关机[一旦开机它就会执行关机] 1.单用户[找回丢失密码] 2.多用户状态没有网络服务 3.多用户状态有网络服务 4.系统未使用保留给用户 5.图形界面 ...
- Java 与 LLM 大模型融合的技术革命:JBoltAI 如何重构企业级 AI 开发范式
Java 与 LLM 大模型融合的技术革命:JBoltAI 如何重构企业级 AI 开发范式 一.Java 技术栈的智能化转型挑战 随着 LLM(大语言模型)技术的突破,全球超过 900 万家 Java ...
- expected at least 1 bean which qualifies as autowire candidate
org.springframework.beans.factory.UnsatisfiedDependencyException: Error creating bean with name 'log ...