[转]iOS学习之UINavigationController详解与使用(一)添加UIBarButtonItem
转载地址:http://blog.csdn.net/totogo2010/article/details/7681879
1、UINavigationController导航控制器如何使用
UINavigationController可以翻译为导航控制器,在iOS里经常用到。
我们看看它的如何使用:
下面的图显示了导航控制器的流程。最左侧是根视图,当用户点击其中的General项时 ,General视图会滑入屏幕;当用户继续点击Auto-Lock项时,Auto-Lock视图将滑入屏幕。相应地,在对象管理上,导航控制器使用了导航堆栈。根视图控制器在堆栈最底层,接下来入栈的是General视图控制器和Auto-Lock视图控制器。可以调用pushViewControllerAnimated:方法将视图控制器推入栈顶,也可以调用popViewControllerAnimated:方法将视图控制器弹出堆栈。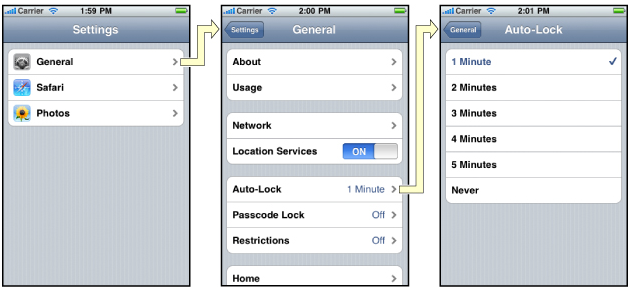
上图来自苹果官网。
2、UINavigationController的结构组成
看下图,UINavigationController有Navigation bar ,Navigation View ,Navigation toobar等组成。

现在我们建立一个例子,看看如何使用UINavigationController
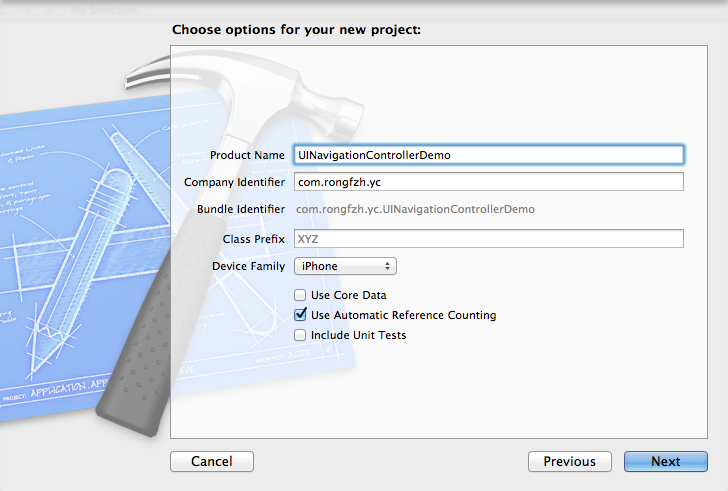
3、新建一个项目
命名为UINavigationControllerDemo,为了更好理解UINavigationController,我们选择Empty Application模板
4、创建一个View Controller,命名为RootViewController:依次选择File——New——New File,默认勾上With XIB for user interface.
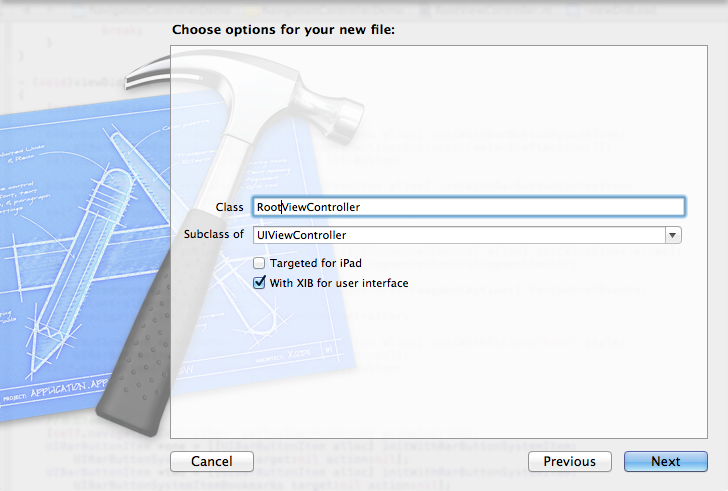
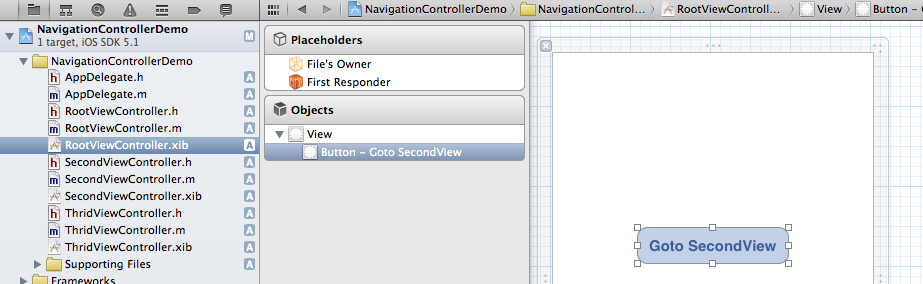
选择正确位置创建完成,这时项目里多了三个文件,分别是RootViewController.h RootViewController.m RootViewController.xib文件。
打开RootViewController.xib,添加一个按钮控件,按钮Button改成 :Goto SecondView,为跳转做准备
5、打开AppDelegate.h,向其中添加属性:
- @property (strong, nonatomic) UINavigationController *navController;
添加后AppDelegate.h文件代码如下:
- #import <UIKit/UIKit.h>
- @class ViewController;
- @interface AppDelegate : UIResponder <UIApplicationDelegate>
- @property (strong, nonatomic) UIWindow *window;
- @property (strong, nonatomic) ViewController *viewController;
- @property (strong, nonatomic) UINavigationController *navController;
- @end
6、在AppDelegate.m 文件的didFinishLaunchingWithOptions方法中创建添加navController,RootViewController视图。
- - (BOOL)application:(UIApplication *)application didFinishLaunchingWithOptions:(NSDictionary *)launchOptions
- {
- self.window = [[UIWindow alloc] initWithFrame:[[UIScreen mainScreen] bounds]];
- RootViewController *rootView = [[RootViewController alloc] init];
- rootView.title = @"Root View";
- self.navController = [[UINavigationController alloc] init];
- [self.navController pushViewController:rootView animated:YES];
- [self.window addSubview:self.navController.view];
- [self.window makeKeyAndVisible];
- return YES;
- }
给rootView的titie命名为 Root View,好识别View直接的切换关系。用pushViewController把rootView加入到navController的视图栈中。
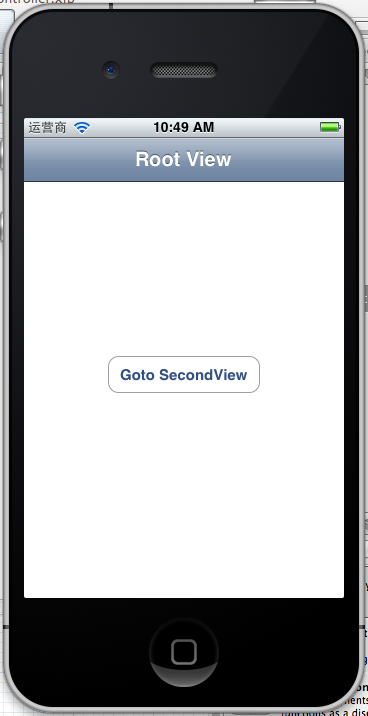
7、现在Root视图添加完成
看看效果:
 '
'
现在还没有Navigation bar 。只有title。
8、添加UIBarButtonItem
bar ButtonItem分左右UIBarButtonItem。我们把左右的都添加上去。
在RootViewController.m中添加代码如下:
- - (void)viewDidLoad
- {
- [super viewDidLoad];
- UIBarButtonItem *leftButton = [[UIBarButtonItem alloc] initWithBarButtonSystemItem:UIBarButtonSystemItemAction target:self action:@selector(selectLeftAction:)];
- self.navigationItem.leftBarButtonItem = leftButton;
- UIBarButtonItem *rightButton = [[UIBarButtonItem alloc] initWithBarButtonSystemItem:UIBarButtonSystemItemAdd target:self action:@selector(selectRightAction:)];
- self.navigationItem.rightBarButtonItem = rightButton;<p class="p1">}</p>
这样添加了UIBarButtonItem了,效果如下:

这里重点介绍下
UIBarButtonItem *leftButton = [[UIBarButtonItemalloc]initWithBarButtonSystemItem:UIBarButtonSystemItemActiontarget:selfaction:@selector(selectLeftAction:)];
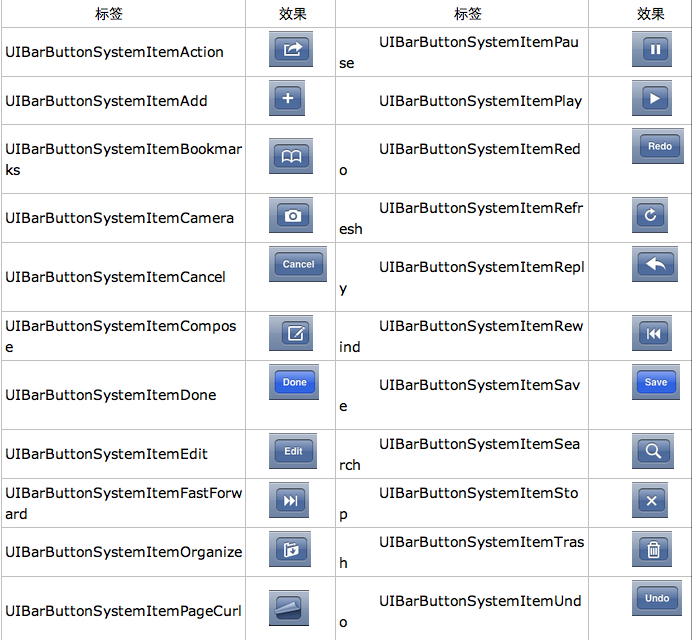
UIBarButtonSystemItemAction的风格,这是系统自带的按钮风格,看下图,你不用一个个试验,你也知道想用那个item,如下图:
9、响应UIBarButtonItem的事件的实现
我们在 action:@selector(selectLeftAction:);
action添加了selectLeftAction和selectRightAction
在RootViewController.m文件中添加代码实现:
- -(void)selectLeftAction:(id)sender
- {
- UIAlertView *alter = [[UIAlertView alloc] initWithTitle:@"提示" message:@"你点击了导航栏左按钮" delegate:self cancelButtonTitle:@"确定" otherButtonTitles:nil, nil];
- [alter show];
- }
- -(void)selectRightAction:(id)sender
- {
- UIAlertView *alter = [[UIAlertView alloc] initWithTitle:@"提示" message:@"你点击了导航栏右按钮" delegate:self cancelButtonTitle:@"确定" otherButtonTitles:nil, nil];
- [alter show];
- }
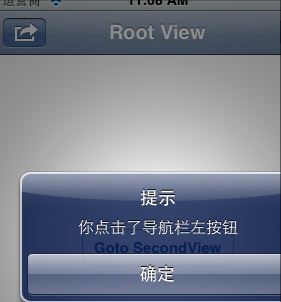
这样在点击左右的UIBarButtonItem时,弹出提示:
这篇先讲添加UIBarButtonItem,下篇讲解页面跳转和添加UISegmentedControl
[转]iOS学习之UINavigationController详解与使用(一)添加UIBarButtonItem的更多相关文章
- iOS学习之UINavigationController详解与使用(一)添加UIBarButtonItem
http://blog.csdn.net/totogo2010/article/details/7681879 1.UINavigationController导航控制器如何使用 UINavigati ...
- [转]iOS学习之UINavigationController详解与使用(二)页面切换和segmentedController
转载地址:http://blog.csdn.net/totogo2010/article/details/7682433 iOS学习之UINavigationController详解与使用(一)添加U ...
- iOS学习之UINavigationController详解与使用(三)ToolBar
1.显示Toolbar 在RootViewController.m的- (void)viewDidLoad方法中添加代码,这样Toobar就显示出来了. [cpp] view plaincopy [ ...
- iOS学习之UINavigationController详解与使用(二)页面切换和segmentedController
iOS学习之UINavigationController详解与使用(一)添加UIBarButtonItem是上篇,我们接着讲UINavigationController的重要作用,页面的管理和切换. ...
- [转]iOS学习之UINavigationController详解与使用(三)ToolBar
转载地址:http://blog.csdn.net/totogo2010/article/details/7682641 iOS学习之UINavigationController详解与使用(二)页面切 ...
- UINavigationController详解一(转)UIBarButtonItem
本文出自:http://www.cnblogs.com/smileEvday/archive/2012/05/14/2495153.html 特别感谢. 1.UINavigationControlle ...
- IOS开发之UINavigationController详解
UINavigationController是IOS编程中比较常用的一种容器view controller,很多系统的控件(如UIImagePickerViewController)以及很多有名的AP ...
- IOS 友盟使用详解
IOS 友盟使用详解 这篇博客将会详细介绍友盟的使用,希望对博友们有所帮助. 首先我们在浏览器上搜索友盟. 在这里我们选择官网这个,进去友盟官网后我们按照下图进行选择. 接下来选择如下图 Next 这 ...
- iOS中—触摸事件详解及使用
iOS中--触摸事件详解及使用 (一)初识 要想学好触摸事件,这第一部分的基础理论是必须要学会的,希望大家可以耐心看完. 1.基本概念: 触摸事件 是iOS事件中的一种事件类型,在iOS中按照事件划分 ...
随机推荐
- iOS使用代码截图
/** * 截图代码 * * @param view 需要截图的view * @param rect 需要截取的区域 * * @return 返回截取的对象 */ + (UIImage *)viewS ...
- ORACLE 11G内存管理方式
SGA包含的组件: 组件名 说明 参数 buffer cache 存放从数据文件中读取的数据拷贝,所有用户之间是可以共享的 db_cache_size db_keep_cache_size db_re ...
- css 去除标签默认样式
p,ul,ol,li,dl,dt,dd { list-style-type: none; margin: 0; padding: 0;}
- PostgreSQL Configuration – managing scary settings
When it comes to highly available database servers and configuration, a very important aspect is whe ...
- PostgreSQL Replication之第十二章 与Postgres-XC一起工作(5)
12.5 创建表和发送查询 介绍了Postgres-XC以及其底层的思想之后,是时候创建我们的第一个表,看看集群将如何表现.下面的例子演示了一个简单的表.将使用id列的哈希键来分布它: test=# ...
- Leetcode: Guess Number Higher or Lower II
e are playing the Guess Game. The game is as follows: I pick a number from 1 to n. You have to guess ...
- sdutoj 2152 Balloons
http://acm.sdut.edu.cn/sdutoj/problem.php?action=showproblem&problemid=2152 Balloons Time Limit: ...
- Apache与Nginx虚拟主机设置(多域名和多端口的区别)
为了方便管理虚拟主机,应该尽量少修改主配置文件http.conf或者nginx.conf,大部分修改变更都在虚拟主机片配置文件httpd- vhost.conf或者vhost.conf中完成,这样有利 ...
- Codeforces Round #288 (Div. 2)
A. Pasha and Pixels 题意就是给一个n*m的矩阵,k次操作,一开始矩阵全白,一次操作可以染黑一个格子,问第几次操作可以使得矩阵中存在一个2*2的黑色矩阵.直接模拟即可 代码: ...
- PHP中9大缓存技术总结(转载 http://www.php100.com/html/php/lei/2015/0919/8969.html)
PHP中9大缓存技术总结 来源: 时间:2015-09-19 02:40:33 阅读数:57767 分享到: 12 [导读] 1.全页面静态化缓存也就是将页面全部生成html静态页面,用户访问 ...