微信小程序文件上传至七牛云(laravel7)
1 wxml:
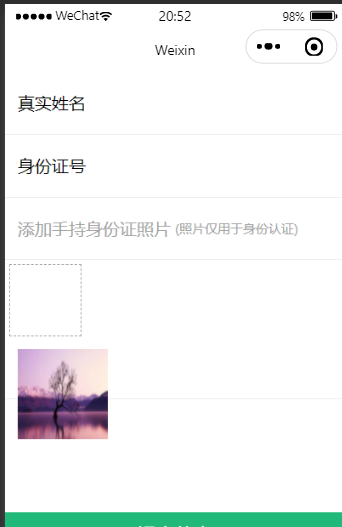
<view>

  <form bindsubmit="dopost">

    <view>

      <label>真实姓名</label>

      <input name="truename" value="{{ userinfo.truename }}" />

    </view>

    <view>

      <label>身份证号</label>

      <input name="card" type="idcard" value="{{ userinfo.card }}" />

    </view>

    <view class="tip-msg">

      添加手持身份证照片

      <text>(照片仅用于身份认证)</text>

    </view>

    <view class="uppic" bind:tap="upfile">

      <text class="iconfont icon-jiahao"></text>

    </view>

    <view class="imglist">

      <block wx:for="{{upfile}}" wx:key="upfile">

        <image src="{{item}}" />

      </block>

    </view>

    <view class="sendbtn">

      提交信息

      <button type="primary" form-type="submit">提交信息</button>

    </view>

  </form>

</view>
2 wx.js:
    // pages/page/page.js

    Page({

        /**

         * 页面的初始数据

         */

        data: {

            upfile:[]

        },

    //图片上传

    upfile:function(res){

        let that = this

        let file = []

        // 本地图片

        wx.chooseImage({

        count: 3,

        sizeType: ['original', 'compressed'],

        sourceType: ['album', 'camera'],

        success (res) {

            // tempFilePath可以作为img标签的src属性显示图片

            let tempFilePaths = res.tempFilePaths;

            tempFilePaths.map(filepath=>{

            wx.uploadFile({

                //   发送的网址

                url: 'http://www.yan.com/api/xcx/xcxImg',

                filePath: filepath,

                // 发送的文件

                name: 'file',

                success (ret){

                let json = JSON.parse(ret.data)

                //   console.log(json)

                // 将返回的文件追加至file空数组

                file.push(json.data)

                //   设置data数据中的file

                that.setData({

                    upfile:file

                })

                },fail(res){

                wx.showToast({

                    title: '请求失败',

                    icon:"error"

                })

                }

            })

            })

        }

        })

    },

    })
wxss
/* pages/page/page.wxss */

page {

    background-color: #fff;

  }

  .imglist image{

    width: 200rpx;

    height: 200rpx;

  }

  .tip {

    background-color: #fff3cd;

    height: 60rpx;

    line-height: 60rpx;

    font-size: 14px;

    color: #fb6951;

    padding-left: 10rpx;

  }

  .tip text:nth-of-type(1) {

    margin-right: 10rpx;

  }

  form view {

    padding: 30rpx;

    display: flex;

    height: 80rpx;

    line-height: 80rpx;

    border-bottom: 1px solid #eeeeee;

  }

  form view:nth-last-of-type(1){

    border: none;

  }

  form view label {

    margin-right: 30rpx;

  }

  form view input {

    height: 80rpx;

    line-height: 80rpx;

  }

  .tip-msg{

    color: #a4a4a4;

  }

  .tip-msg text{

    margin-left: 10rpx;

    font-size: 12px;

  }

  .uppic{

    margin-left: 10rpx;

    margin-top: 10rpx;

    width: 100rpx;

    height: 100rpx;

    border: 1px dashed #a4a4a4;

    display: flex;

    justify-content: center;

    align-items: center;

  }

  .sendbtn{

    position: fixed;

    bottom: 0px;

    width: 750rpx;

    height: 100rpx;

    background: #21b97a;

    padding: 0;

    margin: 0;

    text-align: center;

    color: #fff;

    display: flex;

    justify-content: center;

    align-items: center;

    font-size: 18px;

  }

  .sendbtn button {

    width: 100%;

    height: 100rpx;

    opacity: 0;

    position: absolute;

    top: 0;

  }
3 laravel7 api.php书写路由
Route::group(['namespace'=>'xcx'],function (){

//图片

    Route::post('xcx/xcxImg','LoginController@xcxImg');

});
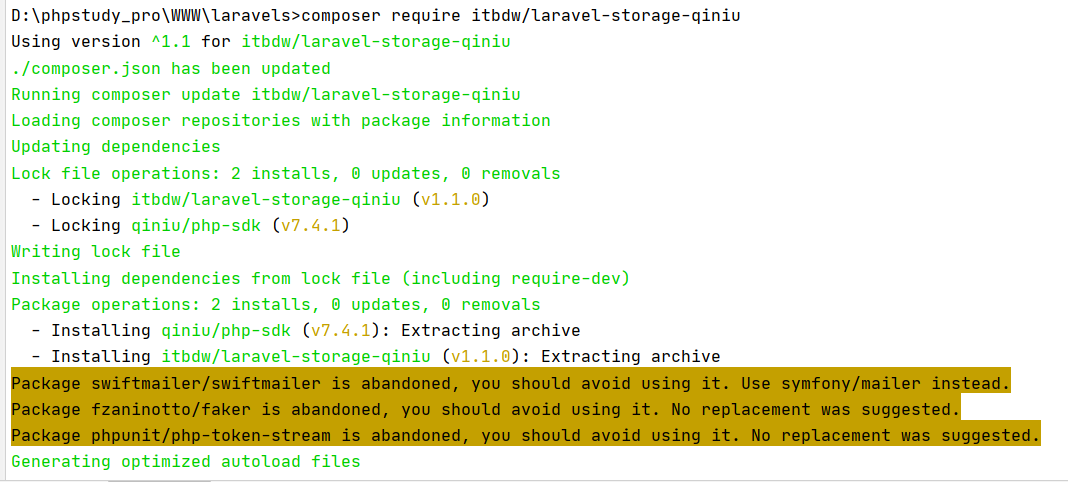
4 然后composer下载七牛云
composer require itbdw/laravel-storage-qiniu
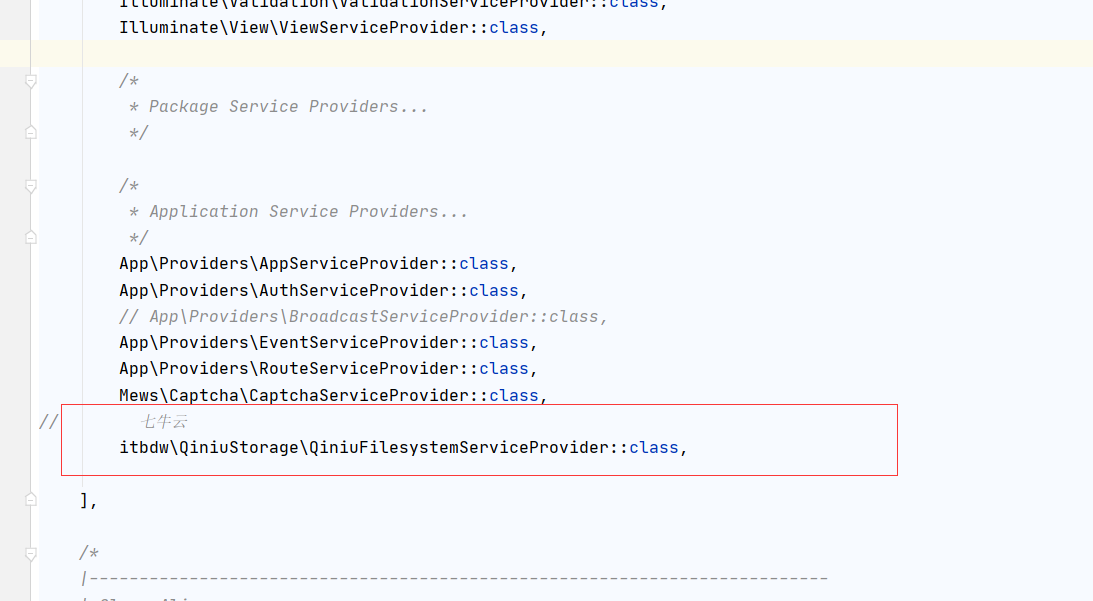
5 .打开 config 文件夹下的 app.php 文件,在 providers 中加入一下代码
itbdw\QiniuStorage\QiniuFilesystemServiceProvider::class,
6 .打开 config 文件夹下的 filesystems.php 文件,在 disks中加入一下代码,注意位置
'qiniu' => [

            'driver'    => 'qiniu',

            'domain'    => '',  //你的七牛域名

            'access_key'=> '',    //AccessKey

            'secret_key'=> '',   //SecretKey

            'bucket'    => '',    //Bucket名字,即七牛云存储空间名称

        ],


'qiniu' => [
'driver' => 'qiniu',
'domain' => 'r3y7oifgb.hn-bkt.clouddn.com', //你的七牛域名
'access_key'=> '7Gu_5HzqSHJB3nLBz51pQN8oJBfqeGwd3kQ-vCNX', //AccessKey
'secret_key'=> 'frzqcOjOhL55eIMXQSLIfO_apMHrs0fr8jjklKDt', //SecretKey
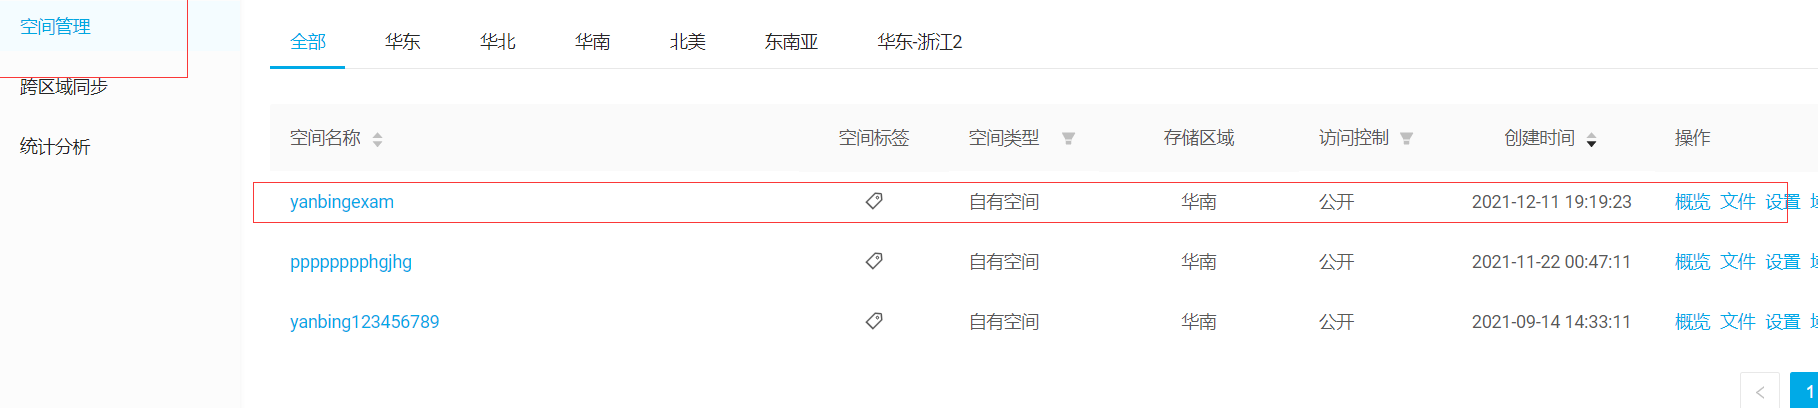
'bucket' => 'yanbingexam', //Bucket名字,即七牛云存储空间名称
],
7 :控制器进行调用
  public function xcxImg(){

        $disk = \Storage::disk('qiniu'); //使用七牛云上传

        $time = date('Y-m-d');//文件上传时间

        $filename = $disk->put($time, request()->file('file'));//上传 这里的image是前端的name值,自己来定

        if(!$filename) {

            return ['code' => 500, 'meg' => 'error', 'data' => []];

        }

        $img_url = $disk->getDriver()->downloadUrl($filename); //获取下载链接

        return ['code' => 200, 'meg' => '上传成功', 'data' => $img_url];

    }
8:七牛云进行查看,切记桶空间必须是公开的,要不上传不上去

参考:
(1)如果上传至本地图片参考以下代码:
 public function xcxImg(Request $request)

   {

        if ($request->hasFile('file')){

            // 上传

         $ret = $request->file('file')->store('', 'img');

           $pic = '/uploads/img/' . $ret;

           $disk =\Storage::disk('qiniu'); //使用七牛云上传

            $time = date('Y-m-d');

            $filename = $disk->put($time, request()->file('file'));//上传 这里的image是前端的name值,自己来定

            if(!$filename) {

                return ['code' => 500, 'meg' => 'error', 'data' => []];

            }

            $img_url = $disk->getDriver()->downloadUrl($filename); //获取下载链接

          return ['code' => 200, 'meg' => '上传成功', 'data' => $img_url];

       }

   }
(2) 如需将图片保存至本地参考以下博客
https://www.cnblogs.com/xiaoyantongxue/p/15679469.html
   public function store(Request $request)

    {

        //

        $data = $request->post();

//        将文件上传至本地

        $img = $request->file('img');

        if (!empty($img)){

            $img = "/".$request->file('img')->store(date('y/m/d')."/".'img');

            $data['img'] = $img;

        }

//        文件上传至七牛云

        $disk = \Storage::disk('qiniu'); //使用七牛云上传

        $time = date('Y-m-d');//文件上传时间

        $filename = $disk->put($time, request()->file('img'));//上传 这里的image是前端的name值,自己来定

//        验证

        $this->validate($request, ['name' => 'required', 'zhicheng' => 'required', 'img' => 'required'],

            ['name.required' => '医生姓名不可以为空', 'zhicheng.required' => '医生职称不可以为空', 'img.required' => '图片不可以为空']);

//添加入库

       $res = Doctor::create($data);

        if ($res) {

            return redirect(route('doctor.index'))->with(['success' => '添加成功']);

        }

        return redirect(route('doctor.create'))->withErrors(['error' => '添加失败']);

    }
微信小程序文件上传至七牛云(laravel7)的更多相关文章
- 微信小程序文件上传结合lin ul
html <l-form name="goods" l-form-btn-class="l-form-btn-class" bind:linsubmit= ...
- .Net Core实现将文件上传到七牛云存储
功能:将图片上传到七牛云存储 准备工作 注册七牛账号,提交实名认证(基本上1天内内审核通过) 登录七牛后台->对象存储->新建空间 (基本概念:https://developer.qini ...
- laravel7文件上传至七牛云并保存在本地图片
HTML代码: <form class="layui-form" action="{{route('doctor.store')}}" method=&q ...
- 5行代码实现微信小程序图片上传与腾讯免费5G存储空间的使用
本文介绍了如何在微信小程序开发中使用腾讯官方提供的云开发功能快速实现图片的上传与存储,以及介绍云开发的 5G 存储空间的基本使用方法,这将大大提高微信小程序的开发效率,同时也是微信小程序系列教程的视频 ...
- 快速高效实现微信小程序图片上传与腾讯免费5G存储空间的使用
本文介绍了如何在微信小程序开发中使用腾讯官方提供的云开发功能快速实现图片的上传与存储,以及介绍云开发的 5G 存储空间的基本使用方法,这将大大提高微信小程序的开发效率 对于一般的图片上传功能开发,我们 ...
- 微信小程序图片上传并展示
1.首先编写微信小程序的页面和样式: index.js var total = []; Page({ data: { perImgSrc: [] }, onLoad: function (option ...
- 小程序文件上传uploadFile
前台代码: bindPhoto(e) { var that = this; wx.chooseImage({ count: 1, sizeType: ['original','compressed'] ...
- 微信小程序---图片上传+服务端接受
原文地址:http://blog.csdn.net/sk719887916/article/details/54312573 微信小程序,图片上传,应用地方-修改用户信息的头像. 详细代码: 小程序的 ...
- 微信小程序图片上传和裁剪
本篇博客用于解决微信小程序图片裁剪问题 图片裁剪常用于头像选择和图片合成等. 图片裁剪解决方案: 目前网络上知名的微信小程序图片裁剪插件是we-cropper(文末有链接) 操作步骤:下载好we-cr ...
随机推荐
- Java 给Word每一页设置不同图片水印效果
Word中设置水印时,可加载图片设置为水印效果,但通常添加水印效果时,会对所有页面都设置成统一效果,如果需要对每一页或者某个页面设置不同的水印效果,则可以参考本文中的方法.下面,将以Java代码为例, ...
- HTTPS的基本使用
1.https简单说明 HTTPS(全称:Hyper Text Transfer Protocol over Secure Socket Layer),是以安全为目标的HTTP通道,简单讲是HTTP的 ...
- Android编译implement、api 和compile区别【转】
感谢大佬:https://blog.csdn.net/fengyeNom1/article/details/81903186 前言 2017 年google 后,Android studio 版本更新 ...
- 使用ajax上传文件
1. XMLHttpRequest(原生ajax) [](javascript:void(0) <input class="file" type="file&quo ...
- 有关MVC设计模式 #DF
模型(Model).视图(View).控制器(Controller) -- MVC是 Cocoa 中的一种行为模块,并且也是所有 Cocoa 设计模式中使用最多的.在程序中按照它们的角色来分类这些对象 ...
- 关于单调性优化DP算法的理解
Part1-二分栈优化DP 引入 二分栈主要用来优化满足决策单调性的DP转移式. 即我们设\(P[i]\)为\(i\)的决策点位置,那么\(P[i]\)满足单调递增的性质的DP. 由于在这种DP中,满 ...
- mysql对属性的增删改
修改表 alter table 创建表db 查看表 desc与describe desc table 查看建表语句show create table t1; 修改表名 alter table t1 r ...
- 图解python | 面向对象编程
作者:韩信子@ShowMeAI 教程地址:http://www.showmeai.tech/tutorials/56 本文地址:http://www.showmeai.tech/article-det ...
- libc++abi.dylib: terminating with uncaught exception of type NSException
这是微信sdk注册时候报的错误 解决方法 选择Build Setting,在"Other Linker Flags"中加入"-Objc -all_load"
- Windows系统散列值获取分析与防范
LM Hash && NTLM Hash Windows操作系统通常使用两种方法对用户的明文进行加密处理,在域环境中,用户信息存储在ntds.dit中,加密后为散列值.Windows操 ...