
nginx: [emerg] https protocol requires SSL support in /usr/local/nginx/conf/nginx.conf:50
最近在nginx中配置一个443端口
一、安装nginx
首先得先安装个nginx
1、安装依赖包
	# 一键安装上面四个依赖

	[root@dex ~]#  yum -y install gcc zlib zlib-devel pcre-devel openssl openssl-devel
2、下载并解压nginx安装包
	# 创建一个文件夹

	[root@dex ~]#  cd /usr/local

	[root@dex local]#  mkdir nginx

	[root@dex local]#  cd nginx

	# 下载tar包

	[root@dex nginx]#  wget http://nginx.org/download/nginx-1.13.7.tar.gz

	# 解压 nginx 包

	[root@dex nginx]# tar -xvf nginx-1.13.7.tar.gz
手动下载nginx http://nginx.org/en/download.html
3、执行安装nginx
	#进入nginx目录

	[root@dex nginx]# cd nginx-1.13.7

	#执行编译命令

	[root@dex nginx-1.13.7]# ./configure

	#执行make命令

	[root@dex nginx-1.13.7]#  make

	#执行make install命令

	[root@dex nginx-1.13.7]# make install
4、配置nginx
	# 打开配置文件

	[root@dex ~]# vi /usr/local/nginx/conf/nginx.conf
5、启动nginx
[root@dex ~]#/usr/local/nginx/sbin/nginx
6、查看nginx进程
	[root@dex nginx-1.13.7]# ps -ef|grep nginx

	root     22988     1  0 Dec20 ?        00:00:00 nginx: master process /usr/local/nginx/sbin/nginx

	nobody   22989 22988  0 Dec20 ?        00:00:00 nginx: worker process

	root     23638 23598  0 09:06 pts/0    00:00:00 grep --color=auto nginx

	[root@dex nginx-1.13.7]#
二、下载ssl证书
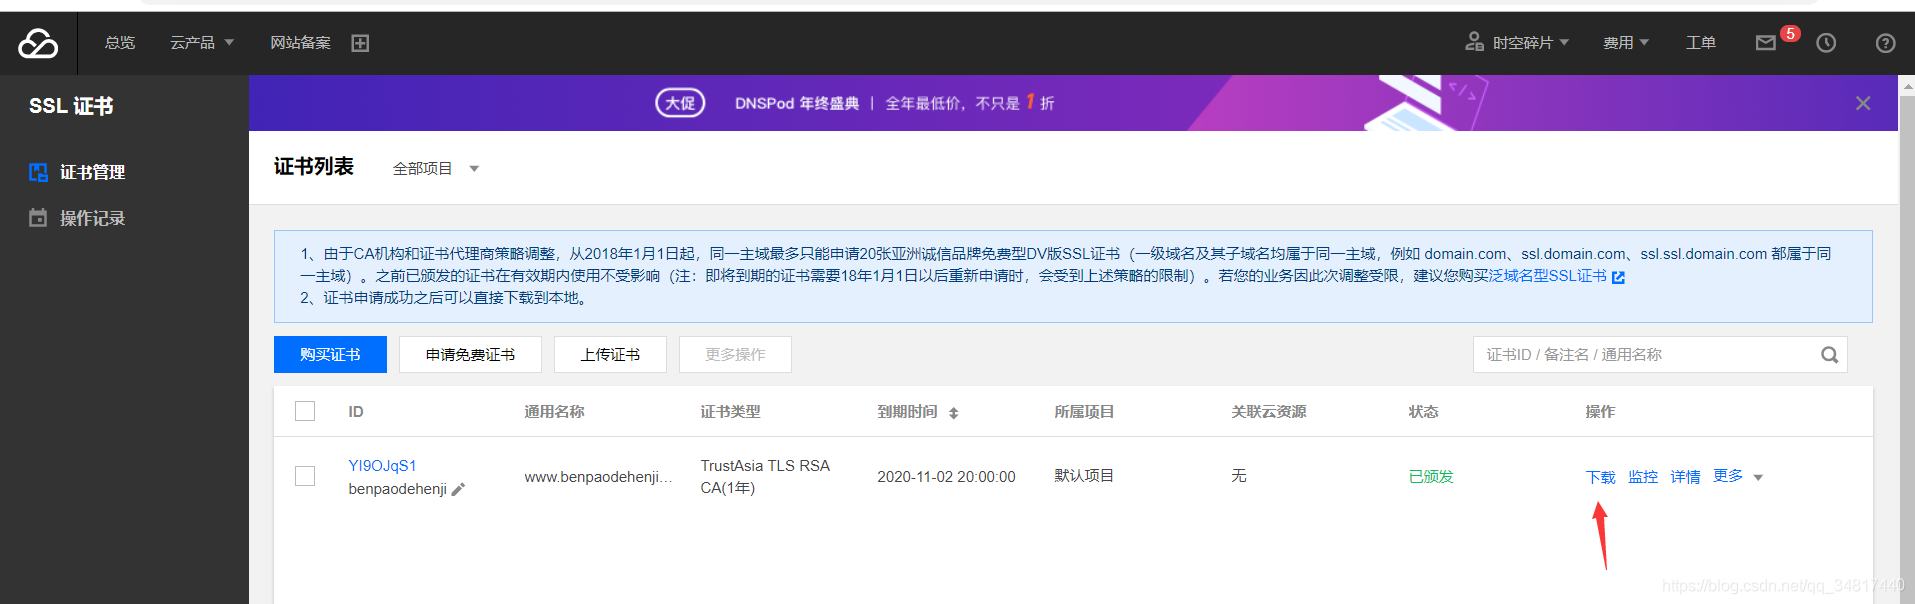
然后解压下载的 证书zip

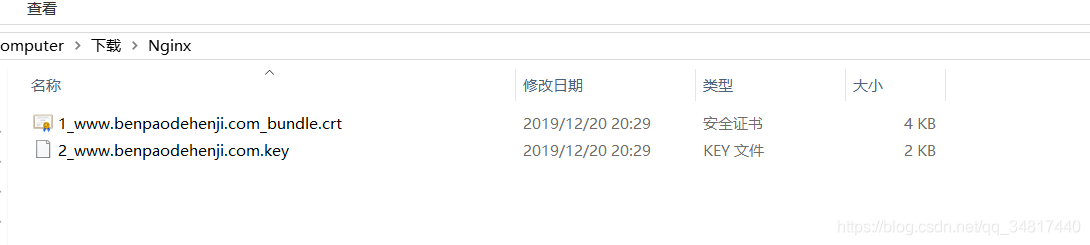
会得到三个文件,我们打开nginx 的文件夹
三、配置ssl
然后将这个两个文件上传到linux(我是上传到 /opt/sslCertificate/)目录下
	[root@dex ~]# ll /opt/sslCertificate/

	total 8

	-rw-r--r-- 1 root root 3733 Dec 20 21:25 1_www.benpaodehenji.com_bundle.crt

	-rw-r--r-- 1 root root 1704 Dec 20 21:25 2_www.benpaodehenji.com.key
ssl配置如下
    server {

        listen       443 ssl;

        server_name  www.benpaodehenji.com;

        ssl_certificate     /opt/sslCertificate/1_www.benpaodehenji.com_bundle.crt;

        ssl_certificate_key  /opt/sslCertificate/2_www.benpaodehenji.com.key;

        ssl_session_cache    shared:SSL:1m;

        ssl_session_timeout  5m;

        #ssl_ciphers  HIGH:!aNULL:!MD5;

        #ssl_prefer_server_ciphers  on;

        location / {

            root  /opt/html;

            index  index.html index.htm;

      }

        location /vueapp/ {

	    proxy_pass http://127.0.0.1:8191/;

       }

   }
然后监听80强制反向代理到https
    server {

        listen       80;

        server_name www.benpaodehenji.com ;

        #charset koi8-r;

        #access_log  logs/host.access.log  main;

	    rewrite ^(.*)$ https://${server_name}$1 permanent;

		location  / {

			proxy_pass https://benpaodehenji.com;

		}

}
配置完成后运行/usr/local/nginx/sbin/nginx -t 时提示 如下错误
	[root@dex sbin]# ./nginx -t

	nginx: [emerg] https protocol requires SSL support in /usr/local/nginx/conf/nginx.conf:50

	nginx: configuration file /usr/local/nginx/conf/nginx.conf test failed
这个是nginx 不支持 https,接下来得进入如下配置,让其支持ssl
四、配置nginx 支持ssl
1、首先cd /usr/local/nginx/nginx-1.13.7 然后执行如下命令
	[root@dex nginx-1.13.7]# ./configure --prefix=/usr/local/nginx --with-http_ssl_module

	checking for OS

	 + Linux 3.10.0-957.21.3.el7.x86_64 x86_64

	checking for C compiler ... found

	 + using GNU C compiler

	 + gcc version: 4.8.5 20150623 (Red Hat 4.8.5-39) (GCC)

	.....省略

	  nginx http uwsgi temporary files: "uwsgi_temp"

	  nginx http scgi temporary files: "scgi_temp"
这里并可没有完,需要先停掉nginx 然后在执行make 进行重新编译
注意不要使用make install那样就是重新安装一次 nginx 了
	[root@dex nginx-1.13.7]# make

	make -f objs/Makefile

	make[1]: Entering directory `/usr/local/nginx/nginx-1.13.7'

	cc -c -pipe  -O -W -Wall -Wpointer-arith -Wno-unused-parameter -Werror -g  -I src/core -I src/event -I src/event/modules -I src/os/unix -I objs \

		-o objs/src/core/nginx.o \

	... 省略

	-ldl -lpthread -lcrypt -lpcre -lssl -lcrypto -ldl -lz \

	-Wl,-E

	sed -e "s|%%PREFIX%%|/usr/local/nginx|" \

		-e "s|%%PID_PATH%%|/usr/local/nginx/logs/nginx.pid|" \

		-e "s|%%CONF_PATH%%|/usr/local/nginx/conf/nginx.conf|" \

		-e "s|%%ERROR_LOG_PATH%%|/usr/local/nginx/logs/error.log|" \

		< man/nginx.8 > objs/nginx.8

	make[1]: Leaving directory `/usr/local/nginx/nginx-1.13.7'
2、执行完成后,我们备份一下原来的nginx (这个以防万一,如果你的nginx中没有其他部署那倒是无所谓)
[root@dex nginx-1.13.7]# cp /usr/local/nginx/sbin/nginx /usr/local/nginx/sbin/nginx_bak
3、 再把刚才编译的nginx 拷贝覆盖原来的nginx
[root@dex nginx-1.13.7]# cp ./objs/nginx /usr/local/nginx/sbin/
4、nginx 安装情况
	[root@dex nginx-1.13.7]# /usr/local/nginx/sbin/nginx -v

	nginx version: nginx/1.13.7
5、 在执行一下nginx -t 检测一下
	[root@dex nginx-1.13.7]# /usr/local/nginx/sbin/nginx -t

	nginx: the configuration file /usr/local/nginx/conf/nginx.conf syntax is ok

	nginx: configuration file /usr/local/nginx/conf/nginx.conf test is successful
6、启动nginx
	[root@dex nginx-1.13.7]# /usr/local/nginx/sbin/nginx

	# 看看哈进程

	[root@dex nginx-1.13.7]# ps -ef|grep nginx

	root     22988     1  0 22:45 ?        00:00:00 nginx: master process /usr/local/nginx/sbin/nginx

	nobody   22989 22988  0 22:45 ?        00:00:00 nginx: worker process

	root     23014 20315  0 22:51 pts/0    00:00:00 grep --color=auto nginx

	[root@dex nginx-1.13.7]#
记录下其他nginx相关命令
	./nginx 启动nginx

	./nginx -s quit:此方式停止步骤是待nginx进程处理任务完毕进行停止。

	./nginx -s stop:此方式相当于先查出nginx进程id再使用kill命令强制杀掉进程。

	./nginx -s reload 重新加载配置
linux 进程查询、 关闭
	[root@dex sbin]# ps -ef|grep nginx

	nobody    6715 14665  0 Dec12 ?        00:00:00 nginx: worker process

	root     14665     1  0 Nov03 ?        00:00:00 nginx: master process /usr/local/nginx/sbin/nginx -c /usr/local/nginx/conf/nginx.conf

	root     22551 20315  0 22:06 pts/0    00:00:00 grep --color=auto nginx

	[root@dex sbin]# kill -9 14665

	[root@dex sbin]# kill -9 22551

	-bash: kill: (22551) - No such process
nginx: [emerg] https protocol requires SSL support in /usr/local/nginx/conf/nginx.conf:50的更多相关文章
- nginx: [emerg] directive "location" has no opening "{" in /usr/local/nginx//conf/nginx.conf:75
1.报错:[emerg]directive "location" has no opening "{" in ..... 解决方法: 由于对应行或者附近行的“{ ...
- 已安装nginx支持https配置 the "ssl" parameter requires ngx_http_ssl_module
原文链接:https://blog.seosiwei.com/detail/28 nginx已安装,ssl模块未安装的解决方法: 如果需要在linux中编译自己的nginx服务器,请参照:https: ...
- nginx: [emerg] unknown directive "聽" in D:\software03\GitSpace\cms\nginx-1.14.0/conf/nginx.conf:36
nginx: [emerg] unknown directive "聽" in D:\software03\GitSpace\cms\nginx-1.14.0/conf/nginx ...
- nginx: [error] open() "/usr/local/var/run/nginx.pid" failed (2: No such file or directory)
nginx: [error] open() "/usr/local/var/run/nginx.pid" failed (2: No such file or directory) ...
- nginx: [error] invalid PID number “” in “/usr/local/var/run/nginx/nginx.pid”
在Mac上用brew安装Nginx,然后修改Nginx配置文件,再重启时报出如下错误: nginx: [error] invalid PID number "" in " ...
- 【防坑指南】nginx重启后出现[error] open() “/usr/local/var/run/nginx/nginx.pid” failed
重新启动nginx后,出现报错,原因就是下没有nginx文件夹或没有nginx.pid文件,为什么会没有呢? 原因就是每次重新启动,系统都会自动删除文件,所以解决方式就是更改pid文件存储的位置, 打 ...
- nginx启动或者重启失败,报错nginx: [error] open() "/usr/local/var/run/nginx.pid" failed (2: No such file or directory)
第一种方案: 1. 执行命令 :open /usr/local/etc/nginx 打开nginx安装目录 nginx安装目录默认位置有:(找到适合你的) /etc/nginx/nginx.conf, ...
- nginx停止后再启动出现: [error] open() "/usr/local/nginx/logs/nginx.pid" failed错误的解决方法
为了备份数据 手动停止了服务器的nginx 结果启动时报错 nginx: [error] open() "/usr/local/nginx/logs/nginx.pid" fail ...
- 【转】Linux下nginx配置https协议访问的方法
一.配置nginx支持https协议访问,需要在编译安装nginx的时候添加相应的模块--with-http_ssl_module 查看nginx编译参数:/usr/local/nginx/sbin/ ...
- Linux下nginx配置https协议访问
一.配置nginx支持https协议访问,需要在编译安装nginx的时候添加相应的模块--with-http_ssl_module 查看nginx编译参数:/usr/local/nginx/sbin/ ...
随机推荐
- 服务器资源监测脚本(网卡、MEM、CPU)
#-*- coding: utf-8 -*- #!/usr/bin/python ''' 用法: sar [ 选项 ] [ <时间间隔> [ <次数> ] ] 主选项和报告: ...
- WPF监听快捷键的几种方式
调用Win32 API(优先级最高,全局监听, 支持最小化失焦等情况) 那么,假如我要在一个WPF程序监听CTRL+5按键,首先在主窗口程序添加以下代码: /// <summary> // ...
- Debiased Contrastive Learning of Unsupervised Sentence Representations 论文精读
1. 介绍(Introduction) 问题: 由PLM编码得到的句子表示在方向上分布不均匀, 在向量空间中占据一个狭窄的锥形区域, 这在很大程度上限制了它们的表达能力. 已有的解决办法: 对比学习. ...
- JVM 重点知识归纳
JVM(Java Virtual Machine:译为 Java虚拟机)内核: 通常指通过软件模拟的具有完整硬件系统功能的运行在一个完全隔离环境汇总的完整计算机系统.如下: ■ Mware/Vis ...
- 2PC(两阶段提交)【XA 与 Seata方案】
更多内容,前往 IT-BLOG 一.概述 2PC(two phase commit protocol,2PC)即两阶段提交协议,是将整个事务流程分为两个阶段,准备阶段(Prepare phase).提 ...
- 在线调试工具 Arthas
Arthas(阿尔萨斯) 是 Alibaba开源的一款 Java在线诊断工具,能够分析,诊断,定位Java应用问题,例如:JVM信息,线程信息,搜索类中的方法,跟踪代码执行,观测方法的入参和返回参数等 ...
- 本地推理,单机运行,MacM1芯片系统基于大语言模型C++版本LLaMA部署“本地版”的ChatGPT
OpenAI公司基于GPT模型的ChatGPT风光无两,眼看它起朱楼,眼看它宴宾客,FaceBook终于坐不住了,发布了同样基于LLM的人工智能大语言模型LLaMA,号称包含70亿.130亿.330亿 ...
- VS2013连接SQLSERVER数据库时显示无法添加数据连接
VS2013连接sqlserver2008时出现如下错误: VS2013添加Microsoft SQL Server数据源时,会遇到无法添加数据连接. Could not load file or a ...
- Auto Photoshop StableDiffusion - 这是一款可以在 Photoshop 中使用 AI 智能 Automatic1111 进行插画、海报等设计的插件
简介 Auto Photoshop StableDiffusion - 这是一款可以在 Photoshop 中使用 AI 智能 Automatic1111 进行插画.海报等设计的插件,此插件可以是你在 ...
- ChatGPT 开源了第一款插件,都来学习一下源码吧!
3 月 23 日,OpenAI 又投出了一枚重磅炸弹:为 ChatGPT 推出插件系统! 此举意味着 ChatGPT 将迎来"APP Store"时刻,也就是围绕它的能力,形成一个 ...