使用caffe训练mnist数据集 - caffe教程实战(一)
个人认为学习一个陌生的框架,最好从例子开始,所以我们也从一个例子开始。
学习本教程之前,你需要首先对卷积神经网络算法原理有些了解,而且安装好了caffe
卷积神经网络原理参考:http://cs231n.stanford.edu/syllabus.html
Ubuntu安装caffe教程参考:http://caffe.berkeleyvision.org/install_apt.html
先讲解一下caffe设计的架构吧:

训练mnist数据集使用 build/tools/caffe
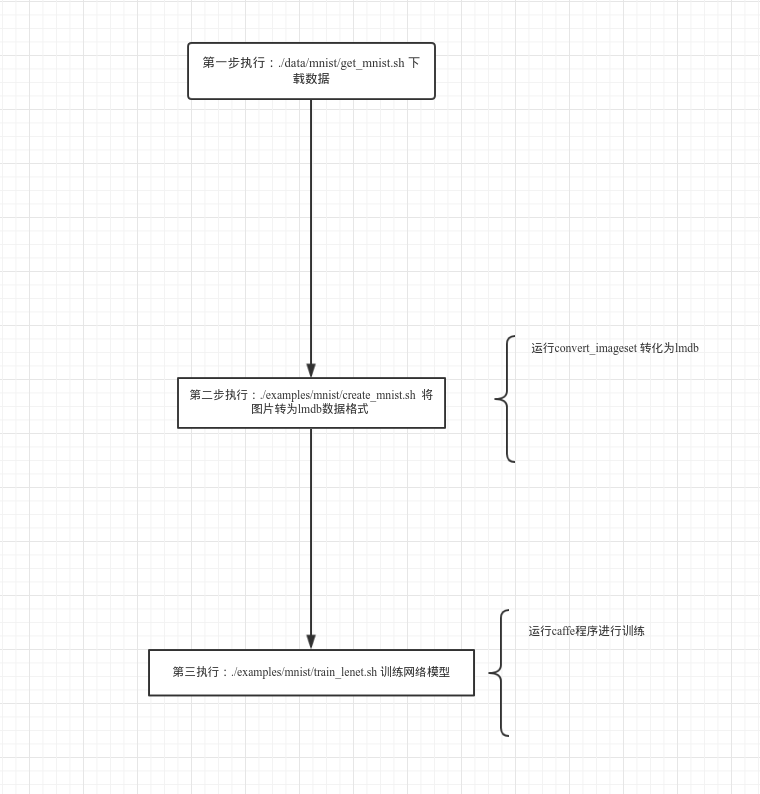
训练步骤:
准备数据:
cd $CAFFE_ROOT //安装caffe的根目录./data/mnist/get_mnist.sh //下载mnist数据集
./examples/mnist/create_mnist.sh //将图片转为lmdb数据格式
定义网络模型:
首先定义数据层:
  layer {

    name: "mnist"  //名字可以随便写 字符串类型

    type: "Data"  //类型 必须是 Data 字符串类型

    transform_param {

      scale: 0.00390625

    }

    data_param {

      source: "mnist_train_lmdb"

      backend: LMDB

      batch_size: 64

    }

    top: "data"

    top: "label"

  }

  定义卷基层:
  layer {

    name: "conv1"

    type: "Convolution"

    param { lr_mult: 1 } #定义w参数的学习率

    param { lr_mult: 2 } #定义b参数的学习率

    convolution_param {

      num_output: 20    #定义输出map数量

      kernel_size: 5

      stride: 1

      weight_filler {

        type: "xavier"

      }

      bias_filler {

        type: "constant"

      }

    }

    bottom: "data"

    top: "conv1"

  }
定义pool层:
  layer {

    name: "pool1"

    type: "Pooling"

    pooling_param {

      kernel_size: 2

      stride: 2

      pool: MAX

    }

    bottom: "conv1"

    top: "pool1"

  }
 定义全连接层:
  layer {

    name: "ip1"

    type: "InnerProduct"

    param { lr_mult: 1 }

    param { lr_mult: 2 }

    inner_product_param {

      num_output: 500

      weight_filler {

        type: "xavier"

      }

      bias_filler {

        type: "constant"

      }

    }

    bottom: "pool2"

    top: "ip1"

  }
  定义relu层:
layer {
name: "relu1"
type: "ReLU"
bottom: "ip1"
top: "ip1"
}
再定义一个全连接层: 注意这里的输出为 分类的个数layer {
    name: "ip2"

    type: "InnerProduct"

    param { lr_mult: 1 }

    param { lr_mult: 2 }

    inner_product_param {

      num_output: 10    #表示有10个类别 从0-9个数字

      weight_filler {

        type: "xavier"

      }

      bias_filler {

        type: "constant"

      }

    }

    bottom: "ip1"

    top: "ip2"

  }

  最后定义 损失函数
  layer {

    name: "loss"

    type: "SoftmaxWithLoss"

    bottom: "ip2"

    bottom: "label"

  }
定义好网络模型后,需要定义 模型训练的策略, solver
# The train/test net protocol buffer definition
net: "examples/mnist/lenet_train_test.prototxt"
# test_iter specifies how many forward passes the test should carry out.
# In the case of MNIST, we have test batch size 100 and 100 test iterations,
# covering the full 10,000 testing images.
test_iter: 100
# Carry out testing every 500 training iterations.
test_interval: 500
# The base learning rate, momentum and the weight decay of the network.
base_lr: 0.01
momentum: 0.9
weight_decay: 0.0005
# The learning rate policy
lr_policy: "inv"
gamma: 0.0001
power: 0.75
# Display every 100 iterations
display: 100
# The maximum number of iterations
max_iter: 10000
# snapshot intermediate results
snapshot: 5000
snapshot_prefix: "examples/mnist/lenet"
# solver mode: CPU or GPU
solver_mode: GPU #使用gpu进行训练
开始训练网络:
cd $CAFFE_ROOT

./examples/mnist/train_lenet.sh
你会看到类似下面的输出:
I1203 net.cpp:66] Creating Layer conv1

I1203 net.cpp:76] conv1 <- data

I1203 net.cpp:101] conv1 -> conv1

I1203 net.cpp:116] Top shape: 20 24 24

I1203 net.cpp:127] conv1 needs backward computation.
。。。。。
I1203 net.cpp:142] Network initialization done.

I1203 solver.cpp:36] Solver scaffolding done.

I1203 solver.cpp:44] Solving LeNet
。。。。。
I1203 solver.cpp:84] Testing net
I1203 solver.cpp:111] Test score #0: 0.9897
I1203 solver.cpp:111] Test score #1: 0.0324599
I1203 solver.cpp:126] Snapshotting to lenet_iter_10000
I1203 solver.cpp:133] Snapshotting solver state to lenet_iter_10000.solverstate
I1203 solver.cpp:78] Optimization Done.
结束
运行结构图:
接下来的教程会结合源码详细展开 这三部做了什么 看懂caffe源码
欢迎加入深度学习交流群,群号码:317703095
使用caffe训练mnist数据集 - caffe教程实战(一)的更多相关文章
- 实践详细篇-Windows下使用VS2015编译的Caffe训练mnist数据集
上一篇记录的是学习caffe前的环境准备以及如何创建好自己需要的caffe版本.这一篇记录的是如何使用编译好的caffe做训练mnist数据集,步骤编号延用上一篇 <实践详细篇-Windows下 ...
- ubuntu16.04+caffe训练mnist数据集
1. caffe-master文件夹权限修改 下载的caffe源码编译的caffe-master文件夹貌似没有写入权限,输入以下命令修改: sudo chmod -R 777 ~/caffe-ma ...
- Caffe系列4——基于Caffe的MNIST数据集训练与测试(手把手教你使用Lenet识别手写字体)
基于Caffe的MNIST数据集训练与测试 原创:转载请注明https://www.cnblogs.com/xiaoboge/p/10688926.html 摘要 在前面的博文中,我详细介绍了Caf ...
- windows下使用caffe测试mnist数据集
在win10机子上装了caffe,感谢大神们的帖子,要入坑caffe-windows的朋友们看这里,还有这里,安装下来基本没什么问题. 好了,本博文写一下使用caffe测试mnist数据集的步骤. 1 ...
- 【Mxnet】----1、使用mxnet训练mnist数据集
使用自己准备的mnist数据集,将0-9的bmp图像分别放到0-9文件夹下,然后用mxnet训练. 1.制作rec数据集 (1).制作list
- TensorFlow 训练MNIST数据集(2)—— 多层神经网络
在我的上一篇随笔中,采用了单层神经网络来对MNIST进行训练,在测试集中只有约90%的正确率.这次换一种神经网络(多层神经网络)来进行训练和测试. 1.获取MNIST数据 MNIST数据集只要一行代码 ...
- TensorFlow训练MNIST数据集(1) —— softmax 单层神经网络
1.MNIST数据集简介 首先通过下面两行代码获取到TensorFlow内置的MNIST数据集: from tensorflow.examples.tutorials.mnist import inp ...
- 搭建简单模型训练MNIST数据集
# -*- coding = utf-8 -*- # @Time : 2021/3/16 # @Author : pistachio # @File : test1.py # @Software : ...
- MXNet学习-第一个例子:训练MNIST数据集
一个门外汉写的MXNET跑MNIST的例子,三层全连接层最后验证率是97%左右,毕竟是第一个例子,主要就是用来理解MXNet怎么使用. #导入需要的模块 import numpy as np #num ...
随机推荐
- [BZOJ2049] [SDOI2008] Cave 洞穴勘测 (LCT)
Description 辉辉热衷于洞穴勘测.某天,他按照地图来到了一片被标记为JSZX的洞穴群地区.经过初步勘测,辉辉发现这片区域由n个洞穴(分别编号为1到n)以及若干通道组成,并且每条通道连接了恰好 ...
- 标注-CRF条件随机场
1 概率无向图模型1.1 模型定义1.2 因子分解2 条件随机场的定义2.2 条件随机场的参数化形式2.3 条件随机场的简化形式2.4 条件随机场的矩阵形式 3 条件随机场的概率计算问题 3.1 前向 ...
- MyBatis相关配置
在MyBatis中,不免会有一些配置要设置,我们先来看一下MyBatis配置XML文件的层次结构,这些层次是不能够颠倒顺序的,下面是层次结构: <?xml version = "1.0 ...
- Django高级部分
Django高级部分 1.上传图片: 当Django在处理文件上传的时候,文件数据被保存在request.FILES,FILES中的每个键为<input type="file" ...
- opencv 学习入门篇
unbuntu 安装:http://blog.csdn.net/cocoaqin/article/details/78163171 windows 安装:https://jingyan.baidu.c ...
- Starting a Gradle Daemon, 5 busy and 1 incompatible and 1 stopped Daemons could not be reused, use --status for details FAILURE: Build failed with an exception. * What went wrong: Could not dispatch
执行gradle build出的问题,查看hs_err_pid11064.log日志文件发现,是电脑的RAM不足导致
- 11 个简单的 Java 性能调优技巧
大多数开发人员理所当然地以为性能优化很复杂,需要大量的经验和知识.好吧,不能说这是完全错误的.优化应用程序以获得最佳性能不是一件容易的事情.但是,这并不意味着如果你不具备这些知识,就不能做任何事情.这 ...
- VMware静态地址上网
虚拟机通过dhcp获取ip,当系统重启时可能导致ip变更,出现不必要的麻烦,以下是通过nat模式设置虚拟机静态ip同时能够上网的方式. 编辑VMware,依次点击“编辑”--“虚拟网络编辑器” 注:为 ...
- nodejs轻量级时间格式化组件Moment.js的使用例子
在项目中,经常使用时间进行格式化的输出,以及转换,同时做时间的统计,原本js原生的时间函数比较复杂繁琐,不适合快速开发使用. 轻量级的moment.js很好的解决了这些问题. 下面以简单的例子进行mo ...
- 笔记:Maven 聚合和继承
聚合模块 我们希望一次构建两个或更多项目,而不是到每个模块的目录下分别执行mvn命令,Maven 聚合这一特性就是为该需求服务的, 为了使用聚合,我们必须创建一个聚合模块,通过该模块与其他项目聚合,并 ...