WCF学习之旅—WCF4.0中的简化配置功能(十五)
六 WCF4.0中的简化配置功能
WCF4.0为了简化服务配置,提供了默认的终结点、绑定和服务行为。也就是说,在开发WCF服务程序的时候,即使我们不提供显示的 服务终结点,WCF框架也能为我们的服务提供一些默认配置功能的服务终结点。当然也包含默认的绑定和默认的服务行为。这一切都是为了简化配置过程,避免一 些不必要的错误。
下面我们就来通过代码示例来体验一下WCF4.0提供简化配置的功能。
(1)默认终结点
默认终结点(Default Endpoints)指的是,如果开发人员没有为服务显示配置服务终结点(Endpoints)。WCF4.0会根据已有的基地址,产生针对每个基地址一个默认的终结点。
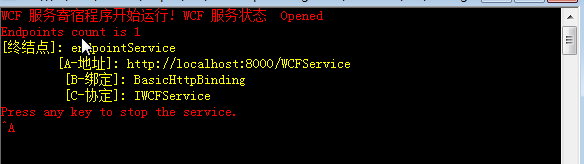
我们在前面的示例之中,都是以标准的WCF服务配置进行配置文件的书写,明确提供了Address、Binding和Contract,也就是ABC,完整代码见之前的示例。终结点配置代码如下:
<service    name="WCFService.WCFService">

                <endpoint    name="endpointService"

                    address="http://localhost:8000/WCFService"

                    binding="wsHttpBinding"

                    contract="WCFService.IWCFService">

                </endpoint>

</service>
启动之后生成的地址如下图。
现在我们在配置文件中的<host>节点中的<baseAddress>节点添加基地址,那么在<service>节点中的<address>可以使用相对地址。不过这个配置写法只能在WCF4.0之后的版本中使用,只要你提供了一个服务的基地址,即使没有服务终结点配置,WCF框架会自动根据基地址创建一个默认的终结点,也就是Default Endpoint。请看下面的服务配置信息:
<service    name="WCFService.WCFService">

        <host>

           <baseAddresses>

            <add baseAddress="http://localhost:8000/"/>

             <add baseAddress="http://localhost:8080/"/>

          </baseAddresses>

        </host>

</service>
不过这样配置,程序运行时会报错,错误信息如下:
其他信息: 此集合已经采用方案 http 的地址。此集合中每个方案中最多只能包含一个地址。如果服务承载于 IIS 中,则可以通过将“system.serviceModel/serviceHostingEnvironment/multipleSiteBindingsEnabled”设置为 true,或指定“system.serviceModel/serviceHostingEnvironment/baseAddressPrefixFilters”来解决此问题。

正确的配置方式如下:
<service    name="WCFService.WCFService">

        <host>

             <baseAddresses>

            <add baseAddress="http://localhost:8000/"/>

             <add baseAddress="net.tcp://localhost:8080/"/>

          </baseAddresses>

        </host>

</service>
一般WCF4.0里我们只指定一个baseAddress,做为示例,我在这里指定了2个服务的baseAddress。那么按照理论,WCF框架会为我们产生2个默认的终结点。运行代码结果如下图:
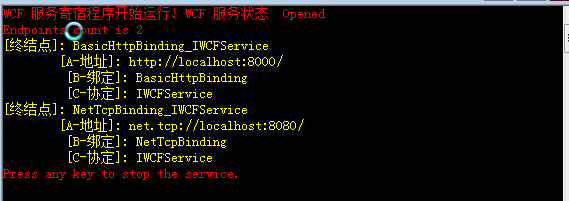
这里我们能看到根据已有的两个baseAddress,WCF框架产生了2个默认服务终结点。如果我们把2个基地址也去除,运行WCF Host程序,就会出现没有终结点的错误。这里针对每个不同的基地址,WCF4.0提供了不同的默认绑定。如上图中的,第一个终结点是使用Http协议,WCF 4.0框架提供的是 basicHttpBinding。第二个终点使用的是net.tcp协议,WCF 4.0框架提供的是netTcpBinding。
(2)指定终结点
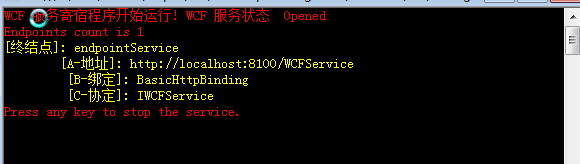
如果我们显示指定服务的终结点,那么WCF就不会基于baseAddress产生新的默认的终结点。修改配置代码如下:
  <services>

      <service  name="WCFService.WCFService" >

        <endpoint  name="endpointService"

           address="http://localhost:8100/WCFService"

           binding="basicHttpBinding"

           contract="WCFService.IWCFService">

        </endpoint>

       <!--<endpoint address="mex" binding="mexHttpBinding" contract="IMetadataExchange" />-->

        <host>

           <baseAddresses>

            <add baseAddress="http://localhost:8000/"/>

             <add baseAddress="net.tcp://localhost:8080/"/>

          </baseAddresses>

        </host>

      </service>

</services>
这时在运行WCF Host程序,就不会产生新的默认的终结点。运行结果如下图:
(3)强制为每个基地址添加默认终结点
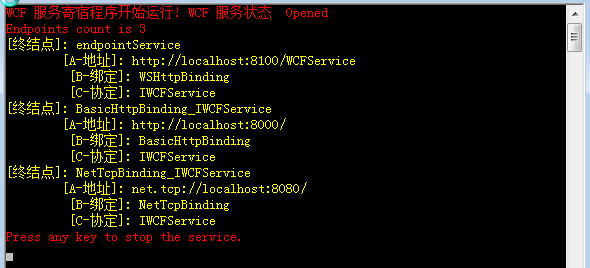
如果我们想为每个基地址baseAddress, 保留产生的默认的服务终结点,还想添加自己的服务终结点怎么办呢?因为之前WCF服务提供了显示的终结点以后,默认服务终结点就消失了。这个时候我们可以 通过调用Host的AddDefaultEndpoints()方法实现这一目的。此方法的目的会为服务里每个基地址产生一个终结点。绑定也是使用默认的 配置。代码就是:host.AddDefaultEndpoints();新的运行结果如下,这里理论上,我们会得到3个服务终结点:2个默认+1个显示 配置。运行程序结果如下图:

(4) 绑定协议映射:
默认协议映射(Default Protocol Mapping)。WCF提供针对绑定协议的映射机制,用来简化配置。我们可以在服务配置里指定某个地址结构映射到特定的绑定上,WCF会自动在服务里更新匹配该地址结构的默认终结点的绑定为映射的绑定。
这里把这个概念放到此处,根据上面的例子来解释,很简单。要使用绑定映射功能。我需要在服务里指定使用的映射。配置文件里的 <protocolMapping>节点,我们可以在其内部指定此解决方案里使用的服务的绑定映射。配置代码如下:
<system.serviceModel>

    <protocolMapping>

      <add scheme="http" binding="basicHttpBinding"/>

      <add scheme="net.tcp" binding="netTcpBinding"/>

      <add scheme="net.pipe" binding="netNamedPipeBinding"/>

      <add scheme="net.msmq" binding="netMsmqBinding"/>

    </protocolMapping>
修改后的配置代码如下:
<system.serviceModel>

        <protocolMapping>

            <add scheme="http" binding="webHttpBinding"/>

            <add scheme="net.tcp" binding="netTcpBinding"/>

            <add scheme="net.pipe" binding="netNamedPipeBinding"/>

            <add scheme="net.msmq" binding="netMsmqBinding"/>

        </protocolMapping>

    </system.serviceModel>
注意上图运行结果,基于http基地址产生的默认终结点,使用的绑定是basicHttpBinding。我们这里为了测试,把http的映射修改为webHttpBinding,然后启动Host程序,再来观察一下结果。运行结果如下图:
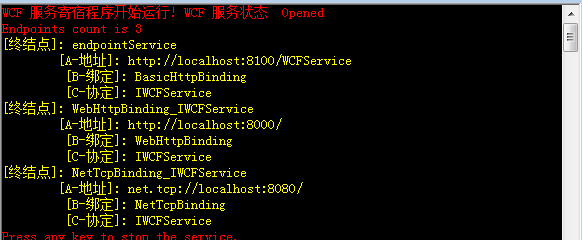
观察上图中的第二个终结点,绑定已经变为webHttpBinding。
配置文件:
<?xml version="1.0"?>

<configuration>

  <system.web>

    <compilation debug="true"/>

  </system.web>

  <!-- When deploying the service library project, the content of the config file must be added to the host's

  app.config file. System.Configuration does not support config files for libraries. -->

  <system.serviceModel>

    <protocolMapping>

      <add scheme="http" binding="basicHttpBinding"/>

      <add scheme="net.tcp" binding="netTcpBinding"/>

      <add scheme="net.pipe" binding="netNamedPipeBinding"/>

      <add scheme="net.msmq" binding="netMsmqBinding"/>

    </protocolMapping>

    <services>

      <service  name="WCFService.WCFService" >

        <endpoint  name="endpointService"

           address="http://localhost:8100/WCFService"

           binding="basicHttpBinding"

           contract="WCFService.IWCFService">

        </endpoint>

       <!--<endpoint address="mex" binding="mexHttpBinding" contract="IMetadataExchange" />-->

        <host>

           <baseAddresses>

            <add baseAddress="http://localhost:8000/"/>

             <add baseAddress="net.tcp://localhost:8080/"/>

          </baseAddresses>

        </host>

      </service>

    </services>

    <behaviors>

      <serviceBehaviors >

        <behavior >

          <serviceMetadata httpGetEnabled="true"  />

          <serviceDebug includeExceptionDetailInFaults="false"/>

        </behavior>

      </serviceBehaviors>

    </behaviors>

    <bindings>

      <basicHttpBinding></basicHttpBinding>

      <basicHttpContextBinding></basicHttpContextBinding>

      <netMsmqBinding></netMsmqBinding>

      <netNamedPipeBinding></netNamedPipeBinding>

      <webHttpBinding></webHttpBinding>

      <wsHttpBinding>

        <binding >

          <security mode="Message">

            <transport clientCredentialType="None">

            </transport>

            <message clientCredentialType="Certificate"/>

          </security>

        </binding>

      </wsHttpBinding>

      <wsDualHttpBinding></wsDualHttpBinding>

    </bindings>

  </system.serviceModel>

  <startup>

    <supportedRuntime version="v4.0" sku=".NETFramework,Version=v4.0"/>

  </startup>

</configuration>
代码:
using System;

using System.Collections.Generic;

using System.Linq;

using System.Text;

using System.ServiceModel;

using System.ServiceModel.Description;

using System.Runtime.Serialization;

namespace WCFHost

{

    //采用自托管方式,也可以是IIS、WAS,Windows服务等用户自定义程序托管服务

    //Simple Configration

   public class WCFHost

    {

        static void Main(string[] args)

        {

            //反射方式创建服务实例,

            ServiceHost host = new ServiceHost(typeof(WCFService.WCFService));//,

            //为WCF服务中的每个基地址生成一个终结点

            host.AddDefaultEndpoints();

            //判断是否以及打开连接,如果尚未打开,就打开侦听端口

            if (host.State !=CommunicationState.Opening)

                host.Open();

                //显示运行状态

                Console.ForegroundColor = ConsoleColor.Red;

                Console.WriteLine("WCF 服务寄宿程序开始运行! WCF 服务状态  {0}",host.State);

                  //print endpoint information

                Console.WriteLine("Endpoints count is {0}", host.Description.Endpoints.Count);

                Console.ForegroundColor = ConsoleColor.Yellow;

                foreach (ServiceEndpoint se in host.Description.Endpoints)

                {

                    Console.WriteLine("[终结点]: {0}\r\n\t[A-地址]: {1} \r\n\t [B-绑定]: {2} \r\n\t [C-协定]: {3}",

                 se.Name,se.Address, se.Binding.Name, se.Contract.Name);

                }

                //等待输入即停止服务

                Console.ForegroundColor = ConsoleColor.Red;

                Console.WriteLine("Press any key to stop the service.");

                Console.ReadLine();

                host.Close();

        }

    }

}
(5) 默认绑定配置:
在WCF3.0或3.5中,您需要为您的每一个绑定取一个名字,然后您的每个终结点需要指定某个定义好的绑定来进行应用。WCF4.0 引入了默认绑定配置(Default Binding Configurations)。我们可以提供某种类型的绑定的配置,但是如果不把这个绑定配置应用到特定的服务终结点上。WCF会默认把所有匹配该绑定的终结点,全部应用对应的绑定配置。
例如,我们为wsHttpBinding启用了消息安全模式,并且客户端认证方式为证书,一般的做法是我们定义个绑定配置。代码如下:
<wsHttpBinding>

                <binding name="wsHttpBindingSecurity">

                    <security mode="Message">

                        <transport clientCredentialType="None">

                        </transport>

                        <message clientCredentialType="Certificate"/>

                    </security>

                </binding>

            </wsHttpBinding>
然后在把这个绑定配置应用到特定的服务终结点上,例如:
  <endpoint  name="endpointService"

           address="http://localhost:8100/WCFService"

           binding="wsHttpBinding"

           contract="WCFService.IWCFService">

        </endpoint>
这样才能对此终结点启用绑定配置的安全要求。但是现在在新的WCF机制下。我们不需要把配置应用到默认的终结点上。简单的配置如下:
<wsHttpBinding>

     <binding >

                    <security mode="Message">

                        <transport clientCredentialType="None">

                        </transport>

                        <message clientCredentialType="Certificate"/>

                    </security>

                </binding>

            </wsHttpBinding>
这些配置会作用到匹配wsHttpBinding的默认的服务终结点上。
由于没有证书,所以会出现以下错误信息:
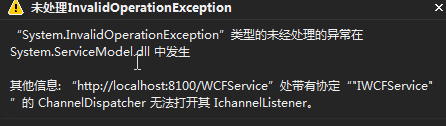
其他信息: “http://localhost:8100/WCFService”处带有协定“"IWCFService"”的 ChannelDispatcher 无法打开其 IchannelListener。
这个错误的解决方式,需要如果将mode改为message方式,这种方式是对消息加密或签名,因此必须要注定证书
<behaviors>

      <serviceBehaviors >

        <behavior >

          <serviceMetadata httpGetEnabled="true"  />

          <serviceDebug includeExceptionDetailInFaults="false"/>

          <serviceCredentials>

          <serviceCertificate

            findValue="e6 00 c8 f6 93 ce 5c 8f a6 08 a5 c8 0e 09 de 5e 8b 9d 3a 99"

            x509FindType="FindByThumbprint"

            storeLocation="CurrentUser"

            storeName="My" />

        </serviceCredentials>

        </behavior>

      </serviceBehaviors>

    </behaviors>
然后启动Host程序,再来观察一下结果。运行结果如下图:
(6)默认行为配置:
在WCF3.0或3.5中,您需要为您的每一个行为取一个名字,然后您的每个终结点需要指定某个定义好的行为来进行应用。可以想象,当您有几十个甚至几百个服务同时应用相同的绑定或行为的时候,指定这些名字将成为单纯的体力劳动。为了避免这样的情况,WCF4.0 引入了默认行为配置(Default Behavior Configurations)。WCF允许你定义一个服务行为,该服务行为会默认匹配到该运行在此机器上的全部该解决方案的全部服务(或者终结点)。
现在在WCF里,以服务行为为例,我们这里的定义不包含名称。配置代码如下:
<serviceBehaviors>

                <behavior >

                    <serviceMetadata httpGetEnabled="true"/>

                    <serviceDebug includeExceptionDetailInFaults="false"/>

                </behavior>

            </serviceBehaviors>
服务的配置非常简单,我们这里只使用一个baseAddress。配置信息如下:
<services>

            <service    name="WCFService.WCFService" >

                <host>

                    <baseAddresses>

                        <add baseAddress="http://localhost:8000/"/>

                    </baseAddresses>

                </host>

            </service>

        </services>
这里我们也就启用了服务元数据交换,为了检查这个默认服务behavior设置,会不会作用到我们的服务上,现在我们来运行Host,然后在浏览器里查询服务元数据。在WCF3.5里不显示配置,应该是不可以查看的元数据的。这里我们打开浏览器,输入元数据地址,查看信息如下:
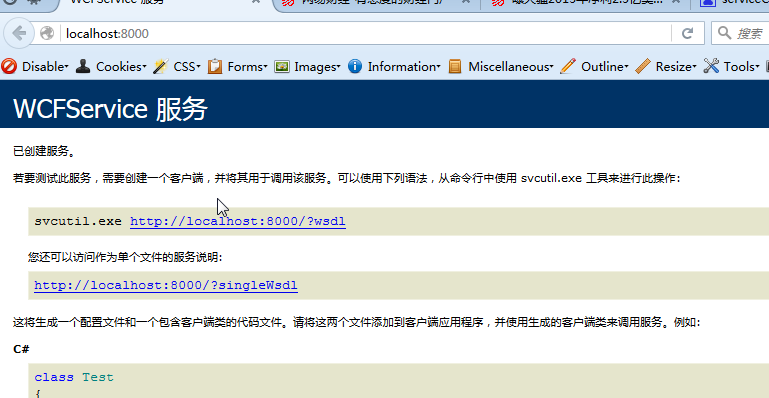
默认情况下,这个配置会对所有的服务或终结点起作用。如果我们把配置信息放置在machine.config,则会作用于机器上所有托管的服务或者终结点。如果是app.config,则只影响本托管程序里的服务行为。
最后的配置文件如下:
<?xml version="1.0"?>

<configuration>

  <system.web>

    <compilation debug="true"/>

  </system.web>

  <!-- When deploying the service library project, the content of the config file must be added to the host's

  app.config file. System.Configuration does not support config files for libraries. -->

  <system.serviceModel>

    <protocolMapping>

      <add scheme="http" binding="basicHttpBinding"/>

      <add scheme="net.tcp" binding="netTcpBinding"/>

      <add scheme="net.pipe" binding="netNamedPipeBinding"/>

      <add scheme="net.msmq" binding="netMsmqBinding"/>

    </protocolMapping>

    <services>

      <service  name="WCFService.WCFService" >

        <endpoint  name="endpointService"

           address="http://localhost:8100/WCFService"

           binding="wsHttpBinding"

           contract="WCFService.IWCFService">

        </endpoint>

       <!--<endpoint address="mex" binding="mexHttpBinding" contract="IMetadataExchange" />-->

        <host>

           <baseAddresses>

            <add baseAddress="http://localhost:8000/"/>

             <add baseAddress="net.tcp://localhost:8080/"/>

          </baseAddresses>

        </host>

      </service>

    </services>

    <behaviors>

      <serviceBehaviors >

        <behavior >

          <serviceMetadata httpGetEnabled="true"  />

          <serviceDebug includeExceptionDetailInFaults="false"/>

          <serviceCredentials>

          <serviceCertificate

            findValue="e6 00 c8 f6 93 ce 5c 8f a6 08 a5 c8 0e 09 de 5e 8b 9d 3a 99"

            x509FindType="FindByThumbprint"

            storeLocation="CurrentUser"

            storeName="My" />

        </serviceCredentials>

        </behavior>

      </serviceBehaviors>

    </behaviors>

    <bindings>

      <basicHttpBinding></basicHttpBinding>

      <basicHttpContextBinding></basicHttpContextBinding>

      <netMsmqBinding></netMsmqBinding>

      <netNamedPipeBinding></netNamedPipeBinding>

      <webHttpBinding></webHttpBinding>

      <wsHttpBinding>

        <binding >

          <security mode="Message">

            <transport clientCredentialType="None">

            </transport>

            <message clientCredentialType="Certificate"/>

          </security>

        </binding>

      </wsHttpBinding>

      <wsDualHttpBinding></wsDualHttpBinding>

    </bindings>

  </system.serviceModel>

  <startup>

    <supportedRuntime version="v4.0" sku=".NETFramework,Version=v4.0"/>

  </startup>

</configuration>
WCF学习之旅—WCF4.0中的简化配置功能(十五)的更多相关文章
- WCF学习之旅—第三个示例之四(三十)
上接WCF学习之旅—第三个示例之一(二十七) WCF学习之旅—第三个示例之二(二十八) WCF学习之旅—第三个示例之三(二十九) ...
- WCF学习之旅—实现支持REST客户端应用(二十四)
WCF学习之旅—实现REST服务(二十二) WCF学习之旅—实现支持REST服务端应用(二十三) 在上二篇文章中简单介绍了一下RestFul与WCF支持RestFul所提供的方法,及创建一个支持RES ...
- WCF学习之旅—第三个示例之三(二十九)
上接WCF学习之旅—第三个示例之一(二十七) WCF学习之旅—第三个示例之二(二十八) 在上一篇文章中我们创建了实体对象与接口协定,在这一篇文章中我们来学习如何创建WCF的服务端代码.具体步骤见下面. ...
- WCF学习之旅—第三个示例之五(三十一)
上接WCF学习之旅—第三个示例之一(二十七) WCF学习之旅—第三个示例之二(二十八) WCF学习之旅—第三个示例之三(二十九) WCF学习 ...
- WCF学习之旅—WCF服务的批量寄宿(十三)
上接 WCF学习之旅—WCF服务部署到IIS7.5(九) WCF学习之旅—WCF服务部署到应用程序(十) WCF学习之旅—WCF服务的Windows 服务程序寄宿(十一) WCF学习之旅—WCF ...
- WCF学习之旅—WCF服务部署到IIS7.5(九)
上接 WCF学习之旅—WCF寄宿前的准备(八) 四.WCF服务部署到IIS7.5 我们把WCF寄宿在IIS之上,在IIS中宿主一个服务的主要优点是在发生客户端请求时宿主进程会被自动启动,并且你可以 ...
- WCF学习之旅—WCF服务部署到应用程序(十)
上接 WCF学习之旅—WCF寄宿前的准备(八) WCF学习之旅—WCF服务部署到IIS7.5(九) 五.控制台应用程序宿主 (1) 在解决方案下新建控制台输出项目 ConsoleHosting.如下 ...
- WCF学习之旅—WCF服务的Windows 服务程序寄宿(十一)
上接 WCF学习之旅—WCF服务部署到IIS7.5(九) WCF学习之旅—WCF服务部署到应用程序(十) 七 WCF服务的Windows 服务程序寄宿 这种方式的服务寄宿,和IIS一样有一个一样 ...
- WCF学习之旅—WCF服务的WAS寄宿(十二)
上接 WCF学习之旅—WCF服务部署到IIS7.5(九) WCF学习之旅—WCF服务部署到应用程序(十) WCF学习之旅—WCF服务的Windows 服务程序寄宿(十一) 八.WAS宿主 IIS ...
随机推荐
- NPM (node package manager) 入门 - 基础使用
什么是npm ? npm 是 nodejs 的包管理和分发工具.它可以让 javascript 开发者能够更加轻松的共享代码和共用代码片段,并且通过 npm 管理你分享的代码也很方便快捷和简单. 截至 ...
- opencv源码:cascadedetect
级联分类器检测类CascadeClassifier,提供了两个重要的方法: CascadeClassifier cascade_classifier; cascade_classifier.load( ...
- CSS HTML元素布局及Display属性
本篇文章主要介绍HTML的内联元素.块级元素的分类与布局,以及dispaly属性对布局的影响. 目录 1. HTML 元素分类:介绍内联元素.块级元素的分类. 2. HTML 元素布局:介绍内联元素. ...
- 协议森林17 我和你的悄悄话 (SSL/TLS协议)
作者:Vamei 出处:http://www.cnblogs.com/vamei 转载请先与我联系. TLS名为传输层安全协议(Transport Layer Protocol),这个协议是一套加密的 ...
- 用FSM一键制作逐帧动画雪碧图 Vue2 + webpack
因为工作需要要将五六十张逐帧图拼成雪碧图,网上想找到一件制作工具半天没有找到,就自己用canvas写了一个. 写成之后就再没有什么机会使用了,因此希望有人使用的时候如果遇到bug了能及时反馈给我. 最 ...
- 《LoadRunner12七天速成宝典》签售会2016-12-17北京
报名地址: http://www.after615.com/actives/s?id=3141&time=1480042829608&sign=9ac8e25e9ab3cf57f613 ...
- mount报错: you must specify the filesystem type
在linux mount /dev/vdb 到 /home 分区时报错: # mount /dev/vdb /homemount: you must specify the filesystem ty ...
- MSYS2环境下编译X265
HEVC(High Efficiency Video Coding),是一种新的视频压缩标准.可以替代H.264/ AVC编码,使得保持相同质量的情况下,体积减少40%左右.目前有多种实现版本,x26 ...
- JavaScript对象和数组
1.JavaScript中有两个非常重要的数据类型是对象和数组. 通过"."或者"[]"来访问对象属性 举例:var book = { topic:" ...
- iOS之应用版本号的设置规则
版本号的格式:v<主版本号>.<副版本号>.<发布号> 版本号的初始值:v1.0.0 管理规则: 主版本号(Major version) 1. 产品的主体构件进 ...