
WCF学习之旅—WCF服务部署到应用程序(十)
上接 WCF学习之旅—WCF寄宿前的准备(八)
WCF学习之旅—WCF服务部署到IIS7.5(九)
五、控制台应用程序宿主
(1) 在解决方案下新建控制台输出项目 ConsoleHosting。如下图。
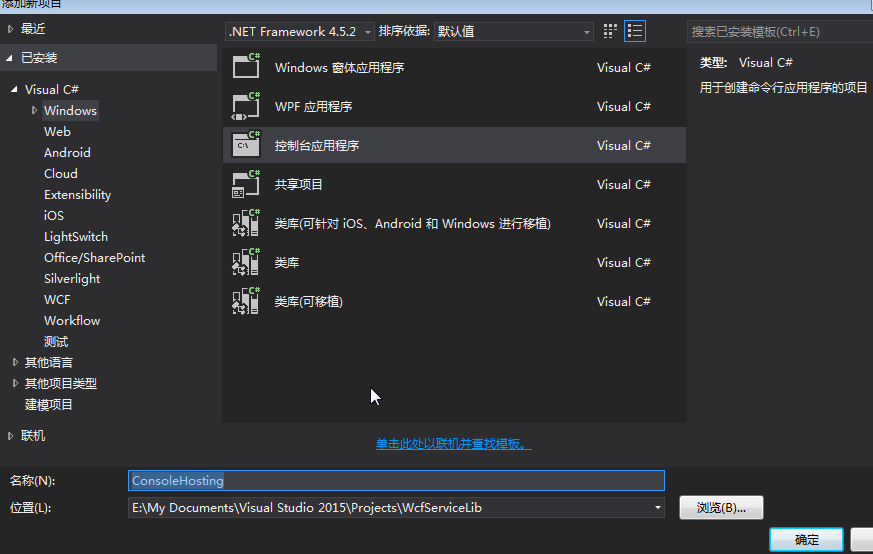
(2)添加 System.ServiceModel.dll 的引用。
(3)添加 WCF 服务类库(WcfServiceLib)的项目引用。
(4)创建宿主程序,代码如下:
using System;

using System.Collections.Generic;

using System.Linq;

using System.ServiceModel;

using System.ServiceModel.Description;

using System.Text;

using System.Threading.Tasks;

using WcfServiceLib;

namespace ConsoleHosting

{

    class Program

    {

        static void Main(string[] args)

        {

            //创建宿主的基地址

            Uri baseAddress = new Uri("http://localhost:8080/BookService");

            //创建宿主

            using (ServiceHost host = new ServiceHost(typeof(BookService), baseAddress))

            {

                //向宿主中添加终结点

                host.AddServiceEndpoint(typeof(IBookService), new WSHttpBinding(), baseAddress);

                if (host.Description.Behaviors.Find<ServiceMetadataBehavior>() == null)

                {

                    //将HttpGetEnabled属性设置为true

                    ServiceMetadataBehavior behavior = new ServiceMetadataBehavior();

                    behavior.HttpGetEnabled = true;

                    behavior.HttpGetUrl = baseAddress;

                    //将行为添加到Behaviors中

                    host.Description.Behaviors.Add(behavior);

                    //打开宿主

                    host.Opened += delegate

      {

          Console.WriteLine("BookService控制台程序寄宿已经启动,HTTP监听已启动....,按任意键终止服务!");

      };

                    host.Open();

                    Console.Read();

          }

            }

        }

    }

}
(5)运行宿主程序,在运行客户端进行调用之前,需要先运行宿主程序。如下图所示,则说明宿主建立成功。

建立客户端
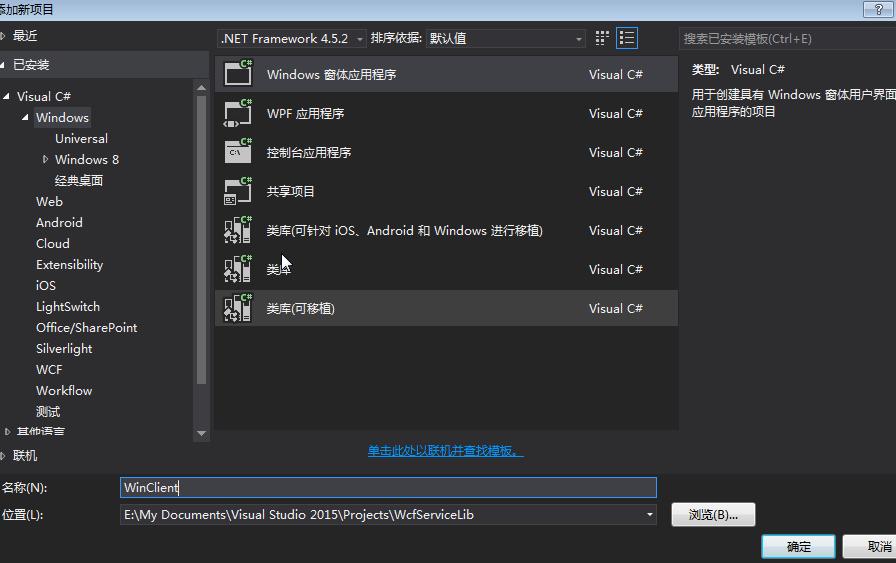
(1) 重新建立解决方案-->Windows窗体应用程序项目。如下图。
(2)添加对服务的引用(在引用上右键-->输入我们定义的服务宿主的基地址(此处为:http://localhost:8080/BookService)-->转到-->确定),具体请看第一节。如下图1,图2。
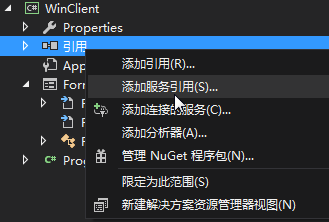
图1
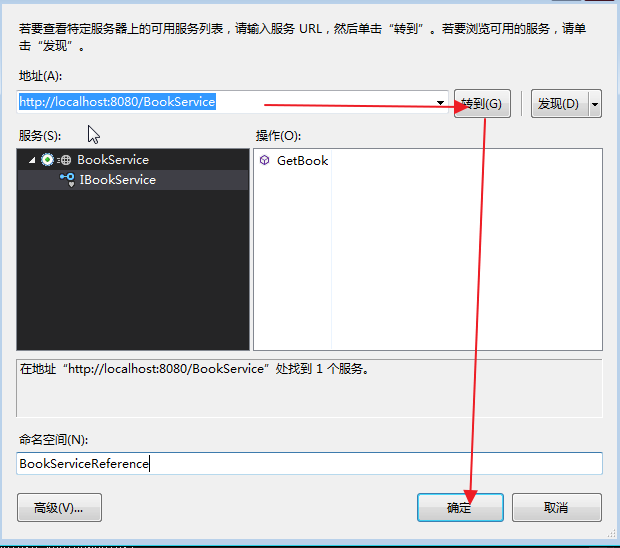
图2
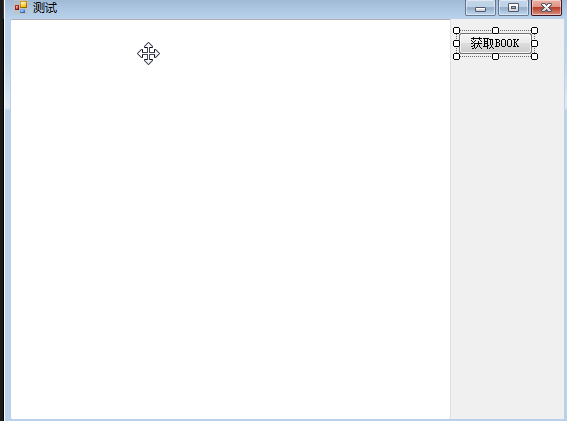
(2) 在From1中添加一个文本框与一个按钮。如下图。
(3) 在From1.cs中写如下代码。
using System;

using System.Collections.Generic;

using System.ComponentModel;

using System.Data;

using System.Drawing;

using System.Linq;

using System.Text;

using System.Threading.Tasks;

using System.Windows.Forms;

namespace WinClient

{

    public partial class Form1 : Form

    {

        public Form1()

        {

            InitializeComponent();

        }

        private void btnGetBook_Click(object sender, EventArgs e)

        {

            BookServiceReference.BookServiceClient client = new BookServiceReference.BookServiceClient();

            string book = client.GetBook("");

            textBox1.Text = book;

        }

    }

}
(4) 测试程序如下图所示说明成功(注意:一定要先运行我们的宿主程序才行,如果宿主没有打开的话会报错:由于目标计算机积极拒绝,无法连接。)。如下图。

在这个示例中我们把Endpoint中的ABC,基地址,Behaviors等都直接写在了代码里,但实际应用过程中都是去依赖配置文件,为了对比说明我们下面的例子中会使用配置文件。
六、Windows应用程序宿主
(1) 在解决方案下新建Windows窗体应用程序项目 WinHosting。如下图。

(2)添加 System.ServiceModel.dll 的引用。
(3)添加 WCF 服务类库(WcfServiceLib)的项目引用。
(4)添加应用程序配置文件App.config,这次我们使用配置的方式进行WCF服务的公布,WCF服务配置代码如下。
<?xml version="1.0" encoding="utf-8" ?>

<configuration>

    <startup>

        <supportedRuntime version="v4.0" sku=".NETFramework,Version=v4.5.2" />

    </startup>

  <system.serviceModel>

    <behaviors>

      <serviceBehaviors>

        <behavior name="metadataBehavior">

          <serviceMetadata httpGetEnabled="true" httpGetUrl="http://127.0.0.1:8080/BookService/metadata" />

          <serviceDebug includeExceptionDetailInFaults="True" />

        </behavior>

      </serviceBehaviors>

    </behaviors>

    <services>

      <service behaviorConfiguration="metadataBehavior" name="WcfServiceLib.BookService">

        <endpoint address="http://127.0.0.1:8080/BookService" binding="wsHttpBinding"

        contract="WcfServiceLib.IBookService" />

      </service>

    </services>

  </system.serviceModel>

</configuration>
(5)创建宿主程序Form1窗体,并修改App.config,代码如下:
using System;

using System.Collections.Generic;

using System.ComponentModel;

using System.Data;

using System.Drawing;

using System.Linq;

using System.ServiceModel;

using System.Text;

using System.Threading.Tasks;

using System.Windows.Forms;

using WcfServiceLib;

namespace WinHosting

{

    public partial class Form1 : Form

    {

        public Form1()

        {

            InitializeComponent();

        }

        ServiceHost host = null;

        private void Form1_Load(object sender, EventArgs e)

        {

            try

            {

                host = new ServiceHost(typeof(BookService));

                    host.Opened += delegate

                    {

                        label1.Text="窗体宿主程序,BookService,使用配置文件!";

                    };

                    host.Open();

            }

            catch (Exception ex)

            {

                label1.Text=ex.Message;

            }

        }

        private void Form1_FormClosed(object sender, FormClosedEventArgs e)

        {

            host.Close();

        }

    }

}
(6) 运行程序如下图所示。

建立客户端
使用我们在Console寄宿程序编写的客户端,去访问Windows窗体宿主程序的WCF服务。
WCF学习之旅—WCF服务部署到应用程序(十)的更多相关文章
- WCF学习之旅—WCF服务部署到IIS7.5(九)
上接 WCF学习之旅—WCF寄宿前的准备(八) 四.WCF服务部署到IIS7.5 我们把WCF寄宿在IIS之上,在IIS中宿主一个服务的主要优点是在发生客户端请求时宿主进程会被自动启动,并且你可以 ...
- WCF学习之旅—WCF服务的Windows 服务程序寄宿(十一)
上接 WCF学习之旅—WCF服务部署到IIS7.5(九) WCF学习之旅—WCF服务部署到应用程序(十) 七 WCF服务的Windows 服务程序寄宿 这种方式的服务寄宿,和IIS一样有一个一样 ...
- WCF学习之旅—WCF服务的WAS寄宿(十二)
上接 WCF学习之旅—WCF服务部署到IIS7.5(九) WCF学习之旅—WCF服务部署到应用程序(十) WCF学习之旅—WCF服务的Windows 服务程序寄宿(十一) 八.WAS宿主 IIS ...
- WCF学习之旅—WCF服务的批量寄宿(十三)
上接 WCF学习之旅—WCF服务部署到IIS7.5(九) WCF学习之旅—WCF服务部署到应用程序(十) WCF学习之旅—WCF服务的Windows 服务程序寄宿(十一) WCF学习之旅—WCF ...
- WCF学习之旅—基于Fault Contract 的异常处理(十八)
WCF学习之旅—WCF中传统的异常处理(十六) WCF学习之旅—基于ServiceDebug的异常处理(十七) 三.基于Fault Contract 的异常处理 第二个示例是通过定制Servic ...
- WCF学习之旅—WCF第二个示例(五)
二.WCF服务端应用程序 第一步,创建WCF服务应用程序项目 打开Visual Studio 2015,在菜单上点击文件—>新建—>项目—>WCF服务应用程序.在弹出界面的“名称”对 ...
- WCF学习之旅—WCF第二个示例(七)
三.创建客户端应用程序 若要创建客户端应用程序,你将另外添加一个项目,添加对该项目的服务引用,配置数据源,并创建一个用户界面以显示服务中的数据. 在第一个步骤中,你将 Windows 窗体项目添加到解 ...
- WCF学习之旅—WCF第二个示例(六)
第五步,创建数据服务 在“解决方案资源管理器”中,使用鼠标左键选中“SCF.WcfService”项目,然后在菜单栏上,依次选择“项目”.“添加新项”. 在“添加新项”对话框中,选择“Web”节点,然 ...
- WCF学习之旅—WCF寄宿前的准备(八)
一.WCF服务应用程序与WCF服务库 我们在平时开发的过程中常用的项目类型有“WCF 服务应用程序”和“WCF服务库”. WCF服务应用程序,是一个可以执行的程序,它有独立的进程,WCF服务类协定的定 ...
随机推荐
- SQLSERVER走起微信公众帐号已经开通搜狗微信搜索
SQLSERVER走起微信公众帐号已经开通搜狗微信搜索 请打开下面链接 http://weixin.sogou.com/gzh?openid=oIWsFt-hiIb_oYqQHaBMoNwRB2wM ...
- 关于开启.NET在线提升教育培训的通知! - 可在此页面观看在线直播!
年前在线公开课程通知: 近期在开启VIP课程,隔天讲一次,年前其它时间插空讲公开课,主题:设计模式系列 1:培训 - 大概不会讲的内容: 1:不讲系列. 2:不讲入门. 3:不讲我不懂的! 2:培训 ...
- js中参数不对应问题
因为js是一种弱类型的编程语言,对数据类型的要求没有其他编程语言的要求严格,所以在定义函数的时候不需要像java和C#一样对其传入参数的类型进行定义.那么传入参数的个数有没有影响呢?今天小猪就做了个实 ...
- iOS---iOS10适配iOS当前所有系统的远程推送
一.iOS推送通知简介 众所周知苹果的推送通知从iOS3开始出现, 每一年都会更新一些新的用法. 譬如iOS7出现的Silent remote notifications(远程静默推送), iOS8出 ...
- 02.SQLServer性能优化之---牛逼的OSQL----大数据导入
汇总篇:http://www.cnblogs.com/dunitian/p/4822808.html#tsql 上一篇:01.SQLServer性能优化之----强大的文件组----分盘存储 http ...
- 移动端1px边框
问题:移动端1px边框,看起来总是2倍的边框大小,为了解决这个问题试用过很多方法,用图片,用js判断dpr等,都不太满意, 最后找到一个还算好用的方法:伪类 + transform 原理是把原先元素的 ...
- 阿里云服务器上配置并使用: PHP + Redis + Mysql 从配置到使用
(原创出处为本博客,http://www.cnblogs.com/linguanh/) 目录: 一,下载 二,解压 三,配置与启动 四,测试 Redis 五,配置 phpRedis 扩展 六,综合测试 ...
- ASP.NET Core 中文文档 第五章 测试(5.2)集成测试
原文: Integration Testing 作者: Steve Smith 翻译: 王健 校对: 孟帅洋(书缘) 集成测试确保应用程序的组件组装在一起时正常工作. ASP.NET Core支持使用 ...
- React Native Android gradle下载慢问题解决
很多人会遇到 初次运行 react-native run android的时候 gradle下载极慢,甚至会失败的问题 如下图 实际上这个问题好解决的 首先 把对应版本的gradle下载到本地任意一个 ...
- Java 进阶 hello world! - 中级程序员之路
Java 进阶 hello world! - 中级程序员之路 Java是一种跨平台的语言,号称:"一次编写,到处运行",在世界编程语言排行榜中稳居第二名(TIOBE index). ...