iOS UI-集合视图(UICollectionView)
BowenCollectionViewCell.xib
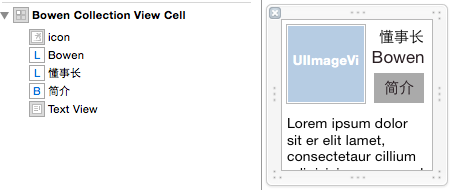

 #import <UIKit/UIKit.h>

 @interface BowenCollectionViewCell : UICollectionViewCell

 @property (weak, nonatomic) IBOutlet UIImageView *iconImageView;

 @property (weak, nonatomic) IBOutlet UILabel *lalName;

 @property (weak, nonatomic) IBOutlet UILabel *lblPosition;

 @property (weak, nonatomic) IBOutlet UIButton *btnManInfo;

 @property (weak, nonatomic) IBOutlet UITextView *textViewStory;

 @end

 #import "BowenCollectionViewCell.h"

 @implementation BowenCollectionViewCell

 - (void)awakeFromNib {

     // Initialization code

 }

 @end

 #import "ViewController.h"

 #import "BowenCollectionViewCell.h"

 /*

  集合视图:UICollertionView

  三个协议、两个代理、四或五个方法

  UICollectionViewDataSource          加载数据

  UICollectionViewDelegate            执行代理

  UICollectionViewDelegateFlowLayout  布局

  使用步骤

  0.创建单元格ID

  1.创建布局(横向布局、纵向布局)

  2.创建集合视图,设置代理

  3.注册单元格

  4.加载视图

  */

 @interface ViewController ()<UICollectionViewDataSource,UICollectionViewDelegate,UICollectionViewDelegateFlowLayout>

 @property (nonatomic, strong) UICollectionView *collectionView;

 @property (nonatomic, strong) NSIndexPath *indexPath;

 @end

 @implementation ViewController

 static NSString *cellIdentyfier = @"cellIndentyfier";

 - (void)viewDidLoad {

     [super viewDidLoad];

 //    1.创建布局(横向布局、纵向布局)

     UICollectionViewFlowLayout *layout = [[UICollectionViewFlowLayout alloc] init];

     [layout setScrollDirection:UICollectionViewScrollDirectionHorizontal];

 //    2.创建集合视图,设置代理

     self.collectionView = [[UICollectionView alloc] initWithFrame:self.view.bounds collectionViewLayout:layout];

     self.collectionView.dataSource =self;

     self.collectionView.delegate = self;

 //    3.注册单元格(item)

     [self.collectionView registerClass:[UICollectionViewCell class] forCellWithReuseIdentifier:cellIdentyfier];

 //    4.加载视图

     [self.view addSubview:self.collectionView];

 //      加载nib文件

     [self.collectionView registerNib:[UINib nibWithNibName:@"BowenCollectionViewCell" bundle:[NSBundle mainBundle]] forCellWithReuseIdentifier:cellIdentyfier];

 }

 #pragma mark - 数据源

 // 加载组数

 - (NSInteger)numberOfSectionsInCollectionView:(UICollectionView *)collectionView

 {

     return ;

 }

 // item的个数

 - (NSInteger)collectionView:(UICollectionView *)collectionView numberOfItemsInSection:(NSInteger)section

 {

     return ;

 }

 // item中的单元格加载数据的方法

 - (UICollectionViewCell *)collectionView:(UICollectionView *)collectionView cellForItemAtIndexPath:(NSIndexPath *)indexPath

 {

     //集合视图的单元格本身就是一个View,什么自带控件都没有

     //如果想使用集合视图的item

     //1.直接往上面添加控件(不推荐) 官方规定:这个加载方法只能加载数据

     //2.自定义item使用

     BowenCollectionViewCell *cell = [collectionView dequeueReusableCellWithReuseIdentifier:cellIdentyfier forIndexPath:indexPath];

     cell.contentView.backgroundColor = [UIColor whiteColor];

     //每个button都是不一样的

     cell.btnManInfo.tag = indexPath.section* + indexPath.row;

     [cell.btnManInfo addTarget:self action:@selector(btnManInfoClick:) forControlEvents:UIControlEventTouchUpInside];

     return cell;

 }

 // 按钮关联方法

 - (void)btnManInfoClick:(id)sender

 {

     UIButton *tempBtn = (UIButton*)sender;

     NSInteger section = tempBtn.tag/;

     NSInteger row = tempBtn.tag%;

     switch (section) {

         case :

             if (row ==) {

                 NSLog(@"第0分组第0元素");

             }

             else{

                 NSLog(@"第0分组第1元素");

             }

             break;

         case :

             if (row ==) {

                 NSLog(@"第1分组第0元素");

             }

             else{

                 NSLog(@"第1分组第1元素");

             }

             break;

         default:

             break;

     }

 }

 #pragma mark - 代理方法

 // 监听行被选中执行的代理方法

 - (void)collectionView:(UICollectionView *)collectionView didSelectItemAtIndexPath:(NSIndexPath *)indexPath

 {

     NSLog(@"%@",indexPath);

 }

 #pragma mark - 布局

 // item的尺寸

 - (CGSize)collectionView:(UICollectionView *)collectionView layout:(UICollectionViewLayout*)collectionViewLayout sizeForItemAtIndexPath:(NSIndexPath *)indexPath

 {

     return CGSizeMake(, );

 }

 // 每组的Header尺寸

 - (CGSize)collectionView:(UICollectionView *)collectionView layout:(UICollectionViewLayout*)collectionViewLayout referenceSizeForHeaderInSection:(NSInteger)section

 {

     return CGSizeMake(, );

 }

 #pragma mark - 状态栏

 // 隐藏状态栏

 - (BOOL)prefersStatusBarHidden

 {

     return YES;

 }

 - (void)didReceiveMemoryWarning {

     [super didReceiveMemoryWarning];

     // Dispose of any resources that can be recreated.

 }

 @end
一、UICollectionViewController的使用
[self.collectionView registerClass:[UICollectionViewCell class] forCellWithReuseIdentifier:@"product"];
- (UICollectionViewCell *)collectionView:(UICollectionView *)collectionView cellForItemAtIndexPath:(NSIndexPath *)indexPath
{
UICollectionViewCell *cell = [collectionView dequeueReusableCellWithReuseIdentifier:@"product" forIndexPath:indexPath];
return cell;
}
- (id)init
{
// 1.流水布局
UICollectionViewFlowLayout *layout = [[UICollectionViewFlowLayout alloc] init];
// 2.每个cell的尺寸
layout.itemSize = CGSizeMake(100, 100);
return [super initWithCollectionViewLayout:layout];
}
二、UICollectionViewFlowLayout
@property (nonatomic) CGSize itemSize;
@property (nonatomic) CGFloat minimumInteritemSpacing;
@property (nonatomic) CGFloat minimumLineSpacing;
@property (nonatomic) UIEdgeInsets sectionInset;
三、UICollectionView常用数据源方法
- (NSInteger)numberOfSectionsInCollectionView:(UICollectionView *)collectionView;
- (NSInteger)collectionView:(UICollectionView *)collectionView numberOfItemsInSection:(NSInteger)section;
- (UICollectionViewCell *)collectionView:(UICollectionView *) collectionView cellForItemAtIndexPath:(NSIndexPath *)indexPath;
UICollectionView的数据源必须实现第二个方法和第三个方法,第一个方法不实现默认就是1组
@property (nonatomic, strong) UICollectionViewLayout *collectionViewLayout;
@property (nonatomic, strong) UIView *backgroundView;
@property (nonatomic) BOOL allowsSelection;
@property (nonatomic) BOOL allowsMultipleSelection;
五、UICollectionViewFlowLayout常用属性
七、注册cell的三种方式:
1> 用nib(xib)来注册cell,表示cell如何去创建, 在注册同时必须给cell设置重用标识
2> 用类(纯代码)来注册cell,表示cell用代码来创建,在注册同时必须cell设置重用标识
3> 在storyboard中给cell,设置重用标识时会同时注册cell
1纯代码实现
常见错误
错误1> ICollectionView must be initialized with a non-nil layout parameter
实例化(创建)UICollectionView的同时必须指定一个非空的layout
用UICollectionViewLayout这个类直接创建出来的布局对应就是一个空的布局,里面什么也没有
一般情况用UICollectionViewFlowLayout(流水布局,它创建出来有默认的itemSize,和行间距等等)
错误警告
negative or zero item sizes are not supported in the flow layout
UICollectionViewFlowLayout 不支持负得或为0尺寸cell
当itemSize等于 CGSizeZero 数据源方法返回每一个cell的方法不会执行,说明只有cell有尺寸时才能返回cell
layout.itemSize = CGSizeZero;
用class来注册 cell(告诉collectionView中的cell如何创建),并给cell添加重用标识
[collectionView registerClass:[CZAppCell class] forCellWithReuseIdentifier:ID];
2.用xib实现
// 加载xib
UINib *nib = [UINib nibWithNibName:@"CZAppCell" bundle:nil];
// 通过xib来注册,告诉collectionView如何去创建cell,并指定重用标识
[self.collectionView registerNib:nib forCellWithReuseIdentifier:ID];
// 实例化xib
CZAppCell *cell = [[nib instantiateWithOwner:nil options:nil] lastObject];
// 根据xib中的cell的尺寸来设置布局属性中cell的尺寸
self.flowLayout.itemSize = cell.bounds.size;
3.用storyboard实现
给storyboard的cell会只需添加重用标识即可自动注册
iOS UI-集合视图(UICollectionView)的更多相关文章
- iOS:集合视图UICollectionView、集合视图控制器UICollectionViewController、集合视图单元格UICollectionViewCell(创建表格的另一种控件)
两种创建表格方式的比较:表格视图.集合视图(二者十分类似) <1>相同点: 表格视图:UITableView(位于storyboard中,通过UIViewController控制器实现 ...
- IOS中集合视图UICollectionView中DecorationView的简易使用方法
转载自: http://www.it165.net/pro/html/201312/8575.html Decoration View是UICollectionView的装饰视图.苹果官方给的案例 ...
- 集合视图UICollectionView 介绍及其示例程序
UICollectionView是一种新的数据展示方式,简单来说可以把它理解成多列的UITableView.如果你用过iBooks的话,可 能你还对书架布局有一定印象,一个虚拟书架上放着你下载和购买的 ...
- swift:创建集合视图UICollectionView
swift中创建集合视图和OC中差不多,主要是实现UICollectionViewDataSource数据源协议和UICollectionViewDelegateFlowLayout自定义布局协议,其 ...
- 集合视图 UICollectionView
什么是UICollectionView UICollectionView是一种新的数据展示方式,简单来说可以把他理解成多列的UITableView(请一定注意这是UICollectionView的最最 ...
- IOS UI 滚动视图 UIScrollView
UIScrollView 常用属性 scrollView.maximumZoomScale= 2.0; // 缩放最大比例 scrollView.minimumZoomScale = 0.2;// ...
- UICollectionView集合视图的概念
如何创建UICollectionView 集合视图的布局UICollectionViewFlowLayout 自定义cell 布局协议UICollectionViewDelegateFlowLayou ...
- 集合视图控制器(CollectionViewController) 、 标签控制器(TabBarController) 、 高级控件介绍
1 创建集合视图,设置相关属性以满足要求 1.1 问题 集合视图控制器UIConllectionViewController是一个展示大量数据的控制器,系统默认管理着一个集合视图UICollectio ...
- UICollectionView(集合视图)以及自定义集合视图
一.UICollectionView集合视图 其继承自UIScrollView. UICollectionView类是iOS6新引进的API,用于展示集合视图,布局 ...
- 【推荐】iOS集合视图的可重新排序的layout
在实际项目中你或许会遇到在一个集合视图中移动一项到另外一个位置,那么此时我们需要对视图中的元素进行重新排序,今天推荐一个很好用的第三方类LXReorderableCollectionViewFlowL ...
随机推荐
- UVA10298 Power Strings
UVA10298 Power Strings hash+乘法逆元+一点点数学知识 我们用取余法算出主串的hash,然后从小到大枚举子串的长度 显然,如果若干个子串的复制的hash值之和等于主串的has ...
- 01: socket模块
网络编程其他篇 目录: 1.1 socket理论部分 1.2 socket处理单个连接 和 同时接受多个连接 1.3 socket实现远程执行命令,下载文件 1.4 通过socket实现简单的ssh ...
- 02: 安装epel 解决centos7无法使用yum安装nginx
参考网址: http://www.mamicode.com/info-detail-1671603.html 1.yum命令安装 yum install epel-release -y 2.更新数据 ...
- SYSBIOS学习笔记---线程(Threads)
在SYS/BIOS中,广义上指被处理器执行的任何独立的指令流.线程是一个能够调用一个函数或者中断服务程序的单点控制.在sysbios系统中一共有硬件中断(HWI).软件中断(SWI).任务(Task) ...
- c#进阶之Delegate
委托是什么?答:委托是一种类型 等同与 一个class类,继承System.MulticastDelegate,但mult....gate是一个特殊类,不能够派生 委托的调用,如何去使用 1/委托 ...
- [bzoj 1616][Usaco2008 Mar]Cow Travelling游荡的奶牛
题目描述 奶牛们在被划分成N行M列(2 <= N <= 100; 2 <= M <= 100)的草地上游走,试图找到整块草地中最美味的牧草.Farmer John在某个时刻看见 ...
- 网络压缩论文集(network compression)
Convolutional Neural Networks ImageNet Models Architecture Design Activation Functions Visualization ...
- 事务(Transaction)
1.演示转账的功能:(1)创建一张表示学生表表 CREATE TABLE student( id INT PRIMARY KEY AUTO_INCREMENT,name VARCHAR(50), ac ...
- session的理解和使用
Session的使用与Session的生命周期 1.HttpSession的方法 Object getAttribute(String); Enumeration<String> getA ...
- MVC ---- 无法将类型"System.Data.EntityState"隐式转换为"System.Data.Entity.EntityState"
1.EF 5.0解决方法 先卸载EF:Uninstall-Package EntityFramework -Force 在安装EF5.0:Install-Package EntityFramework ...