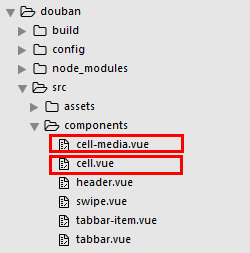
vue2.0 之 douban (五)创建cell,media-cell组件
1.组件cell
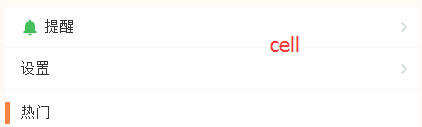
这里的cell分为三种样式,左侧带图标,不带图标,以及左侧带竖线的cell。
每一个组件都有一个底部边框:
这里我们采用了移动端1px像素问题的解决方法:父级元素设置相对定位,构建1个伪元素,设置绝对定位, 将它的长宽放大到2倍, 边框宽度设置为1px, 再以transform缩放到50%.
&:before {

  	content: '';

  	position: absolute;

  	left: 0;

  	bottom: 0;

  	right: 0;

  	height: 1px;

  	background: #eee;

  	transform: scaleY(0.5);

}
不同的样式,我们采用slot内容分发的方式来实现
Index.vue
<m-cell title="提醒" icon>

	<img src="../../assets/images/ic_mine_notification.png" slot="icon">

	<a href="javascript:;" slot="cell-right"><img src="../../assets/images/ic_arrow_gray_small.png" alt=""></a>

</m-cell>

<m-cell title="设置">

	<a href="javascript:;" slot="cell-right"><img src="../../assets/images/ic_arrow_gray_small.png" alt=""></a>

</m-cell>
cell.vue
<template>

  <div class="m-cell normal" :class="label">

    <div class="m-cell-title">

      <slot name="icon"></slot> {{title}}

    </div>

    <div class="m-cell-right">

      <slot name="cell-right"></slot>

    </div>

  </div>

</template>

<script>

  export default {

    props: {

      title: {

        type: String,

        default: ''

      },

      hot: {

        type: Boolean,

        default: false

      },

      recommend: {

        type: Boolean,

        default: false

      },

      icon: {

        type: Boolean,

        default: false

      },

      label: {

        type: String,

        default: 'normal'

      }

    }

  }

</script>

<style lang="less">

  .m-cell {

    position: relative;

    padding: 10px 5px 10px 15px;

    display: flex;

    justify-content: space-between;

    align-items: center;

    &:before {

      content: '';

      position: absolute;

      left: 0;

      bottom: 0;

      right: 0;

      height: 1px;

      background: #eee;

      transform: scaleY(0.5);

    }

    .m-cell-title {

      font-size: 15px;

      img {

        width: 20px;

        height: 20px;

      }

    }

    .m-cell-right {

      font-size: 12px;

      a {

        color: #666;

      }

      img {

        width: 20px;

        height: 20px;

      }

    }

    &.normal {}

    &.hot {

      padding: 0px 5px 0px 15px;

      height: 22px;

      &:after {

        content: '';

        position: absolute;

        width: 5px;

        left: 0;

        top: 0px;

        bottom: 0px;

        background: #ff8447;

      }

      &:before {

        height: 0

      }

    }

    &.recommend {

      padding: 0px 5px 0px 15px;

      height: 22px;

      &:after {

        content: '';

        position: absolute;

        width: 5px;

        left: 0;

        top: 0px;

        bottom: 0px;

        background: #42bd56;

      }

      &:before {

        height: 0

      }

    }

  }

</style>
2.组件media-cell
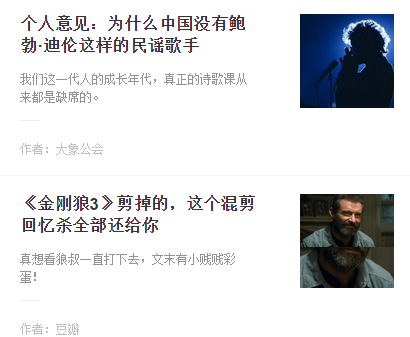
这里的作者,栏目,图片通过props传递,标题描述通过slot内容分发,图片采用背景居中的方式来显示,background-position: center center;background-size: cover;
<m-cell-media author="作者:大象公会" column="来自栏目:广播精选" img="https://qnmob2.doubanio.com/img/files/file-1489047494.jpg">

  <span slot="title">个人意见:为什么中国没有鲍勃·迪伦这样的民谣歌手</span>

  <span slot="describe">我们这一代人的成长年代,真正的诗歌课从来都是缺席的。</span>

</m-cell-media>
cell-media.vue
<template>

  <div class="m-cell-media-wrap">

    <a href="javascript:;">

      <div class="m-cell-media-top">

        <div class="m-cell-media">

          <div class="m-cell-title m-ellipsis-2">

            <slot name="title"></slot>

          </div>

          <div class="m-cell-detail m-ellipsis-2">

            <slot name='describe'></slot>

          </div>

        </div>

        <div class="m-pull-right right-img" :style="{'background-image':'url('+img+')'}">

        </div>

      </div>

      <div class="m-cell-media-bottom">

        <p v-if="author">作者:{{author}}</p>

        <p v-if="column">{{column}}</p>

      </div>

    </a>

  </div>

</template>

<script>

  export default {

    props: ['author', 'column', 'img']

  }

</script>

<style lang="less">

  .m-cell-media-wrap {

    display: flex;

    flex-direction: column;

    padding: 18px 20px;

    position: relative;

    &:after {

      content: '';

      position: absolute;

      left: 0;

      bottom: 0;

      right: 0;

      height: 1px;

      background: #eee;

      transform: scaleY(0.5);

    }

    .m-cell-media-top {

      display: flex;

      flex-direction: row;

      .m-cell-media {

        flex: 1;

        padding-right: 45px;

      }

      .m-cell-title {

        font-size: 17px;

        line-height: 22px;

        color: #333;

        font-weight: bold;

      }

      .m-cell-detail {

        font-size: 12px;

        padding-top: 12px;

        color: #939393;

      }

      .m-pull-right {

        width: 94px;

        height: 94px;

        overflow: hidden;

        background-position: center center;

        background-size: cover;

        img {

          width: 100%;

        }

      }

    }

    .m-cell-media-bottom {

      display: flex;

      justify-content: space-between;

      padding-top: 20px;

      margin-top: 12px;

      color: #bfbfbf;

      position: relative;

      &:before {

        content: '';

        position: absolute;

        top: 0;

        left: 0;

        width: 20px;

        height: 1px;

        background: #eee;

      }

    }

  }

</style>
.
vue2.0 之 douban (五)创建cell,media-cell组件的更多相关文章
- vue2.0:(五)、路由vue-router
好的,接下来,我们来写路由.用的是vue2.0的路由. 步骤一:配置main.js import Vue from 'vue'; import App from './App'; import rou ...
- vue 专题 vue2.0各大前端移动端ui框架组件展示
Vue 专题 一个数据驱动的组件,为现代化的 Web 界面而生.具有可扩展的数据绑定机制,原生对象即模型,简洁明了的 API 组件化 UI 构建 多个轻量库搭配使用 请访问链接: https://ww ...
- vue2.0 之 douban (三)创建header组件
1.分析 首页的header背景是绿色的,并且有一个搜索框,其他页面都是灰色的背景,在header的左侧,是一个返回按钮,右侧,有分享或者评论等图标,中间就是header的标题.我们先不做有搜索框的h ...
- vue2.0 之 douban (四)创建Swipe图片轮播组件
swiper中文文档:http://www.swiper.com.cn 1.我们在components文件夹里创建一个swipe组件,将需要用到的js以及css文件复制到assets/lib文件夹下, ...
- vue2.0 之 douban (二)创建自定义组件tabbar
1.大体布局 这个组件分为两部分:第一个是组件的外层容器,第二个是组件的子容器item,子组件里面又分为图片和文字组合.子组件有2个状态,一个默认灰色的状态,一个选中状态,我们来实现一下这个组件的布局 ...
- vue2.0 之 douban (六)axios的简单使用
由于项目中用到了豆瓣api,涉及到跨域访问,就需要在config的index.js添加代理,例如 proxyTable: { // 设置代理,解决跨域问题 '/api': { target: 'htt ...
- vue2.0 之 douban (一)框架搭建 及 整体布局
1.创建豆瓣项目 我们通过官方vue-cli初始化项目 vue init webpack douban 填写项目描述,作者,安装vue-router 初始化后,通过npm install安装依赖 cd ...
- vue2.0 之 douban (七)APP 打包
在打包之前需要修改一个地方,那就是config->index.js文件,修改assetsPublicPath: '/'为assetsPublicPath: './',截图如下 上面文件改好后,开 ...
- vue2.0 + vux (五)api接口封装 及 首页 轮播图制作
1.安装 jquery 和 whatwg-fetch (优雅的异步请求API) npm install jquery --save npm install whatwg-fetch --save 2. ...
随机推荐
- 21次C++作业
//第一题目 class A //A为基类 {public: void f1( ); int i; protected: void f2(); int j; private: int k; }; /* ...
- [Python3] 006 列表的常用方法
目录 一个篱笆三个桩,list 有--好多个桩 1. 列表的小伙伴们 (1) 召唤小伙伴 (2) 我给"他们"分了个组 2. 小伙伴们的"才艺展示" (1) & ...
- this,static,执行程序的顺序等等留意点
self.static 和 $this 的区别为了更好地理解 self.static 和 $this 的区别,先来看一个示例. <?phpclass A { protected $name = ...
- JAVA总结--正则表达式
正则表达式定义: pattern 对象是一个正则表达式的编译表示.Matcher 对象是对输入字符串进行解释和匹配操作的引擎.PatternSyntaxException 是一个非强制异常类,它表示一 ...
- Django设置允许跨域请求
方式一: 在中间件中 def process_response(self, request, response): response['Access-Control-Allow-Origin'] = ...
- Spring、Spring MVC、Struts2、、优缺点整理(转)
Spring 及其优点 大部分项目都少不了spring的身影,为什么大家对他如此青睐,而且对他的追捧丝毫没有减退之势呢 Spring是什么: Spring是一个轻量级的DI和AOP容器框架. 说它轻量 ...
- ZeroAccess分析
来源:http://bbs.pediy.com/showthread.php?t=141124&highlight=ZeroAccess 总序这分成四个部分的系列文章,是一个完全的一步一步来分 ...
- C++ 数组动态分配
数组的动态内存分配 #include <iostream> //一维数组 void oneDimensionalArray() { //定义一个长度为10的数组 int* array = ...
- vue路由定义
router 根据URL分配到对应的处理程序 单应用页面,vue开发中只有一个一面 例如我们在开发移动端的时候,正常情况下底部的tab有四个选项: 首页 home 发现 find 订 ...
- 第三讲JdbcRealm及Authentication Strategy
1.使用shiro框架来完成认证工作,默认情况下使用的是IniRealm.如果需要使用其他Realm,那么需要进行相关的配置. 2.ini配置文件讲解: [main] section是你配置应用程序的 ...