JS常见的表单验证,H5自带的验证和正则表达式的验证
H5验证
自带的验证无法满足需求:
<form action="" method="get">

    name:<input type="text" name="name"><br>

    email:<input type="email" name="email"><br>

    age:<input type="number" name="number"><br>

    <input type="submit">

</form>

几十输入不科学的数据依然能够通过验证
接下来是一个表单验证的案例
index.html
<!DOCTYPE html>

<html lang="en">

<head>

    <meta charset="UTF-8">

    <meta name="viewport" content="width=device-width, initial-scale=1.0">

    <title>Document</title>

    <style>

        *{

            margin:0;

            padding:0;

        }

        body{

            background-color: rgb(231,230,232);

        }

        .container{

            width:1000px;

            margin:50px auto;

            border-radius:5px;

            font-size:12px;

            box-shadow:3px 3px 3px #ccc;

            color:#333;

        }

        .container h3{

            background-color: rgb(97,134,213);

            text-align: center;

            color:#fff;

            padding:10px;

            border-radius:5px 5px 0 0;

            letter-spacing: .5em;

        }

        .item{

            height:49px;

            padding:10px 50px;

            background-color: #fff;

            border-bottom:1px solid #444;

            position: relative;

        }

        .item label{

            font-weight:bold;

            display: inline-block;

            margin-top:10px;

        }

        .item input{

            width:400px;

            height:20px;

            line-height:20px;

            border-radius:5px;

            border:1px solid #ccc;

            padding:5px;

            position: absolute;

            left:150px;

        }

        .item span{

            color:rgb(97,134,213);

        }

        /*设置placeholder字体颜色*/

        input::-webkit-input-placeholder {      /* WebKit browsers */

            color: #ccc;

            font-size:12px;

        }

        input:-moz-placeholder {                /* Mozilla Firefox 4 to 18 */

            color: #ccc;

            font-size:12px;

        }

        input::-moz-placeholder {               /* Mozilla Firefox 19+ */

            color: #ccc;

            font-size:12px;

        }

        input:-ms-input-placeholder {           /* Internet Explorer 10+ */

            color: #ccc;

            font-size:12px;

        }

        .submit-box{

            text-align: center;

            height:50px;

            line-height: 50px;

            padding:5px;

            background-color: #fff;

        }

        .submit-box .check{

            margin-right:10px;

        }

        .submit-box .submit{

            width:100px;

            height:30px;

            padding:5px;

            background-color: rgb(97,134,213);

            color:#fff;

            text-align: center;

            border-radius: 5px;

            border:1px solid #ddd;

            margin-left:10px;

            font-size:12px;

        }

        .tip{

            margin-top:5px;

        }

    </style>

</head>

<body>

<div class="container">

    <h3>---账户信息---</h3>

    <form action="" id="form">

        <div class="item">

            <label for=""><span>*</span> 用户名:</label>

            <input type="text" name="username" id="username" placeholder="用户设置成功后不可修改">

            <p class="tip"></p>

        </div>

        <div class="item">

            <label for=""><span>*</span> 登录密码:</label>

            <input type="password" name="pwd" id="pwd" placeholder="6-20位字母,数字或符号">

            <p class="tip"></p>

        </div>

        <div class="item">

            <label for=""><span>*</span> 确认密码:</label>

            <input type="password" name="repwd" id="repwd" placeholder="请再次输入密码">

            <p class="tip"></p>

        </div>

        <div class="item">

            <label for=""><span>*</span> 姓名:</label>

            <input type="text" name="Cname" id="Cname" placeholder="请输入姓名,中文且最多五位">

            <p class="tip"></p>

        </div>

        <div class="item">

            <label for=""><span>*</span> 身份证号:</label>

            <input type="text" name="idNum" id="idNum" placeholder="请输入身份证号">

            <p class="tip"></p>

        </div>

        <div class="item">

            <label for=""><span>*</span> 邮箱:</label>

            <input type="text" name="email" id="email" placeholder="请输入正确邮箱格式">

            <p class="tip"></p>

        </div>

        <div class="item">

            <label for=""><span>*</span> 手机号码:</label>

            <input type="text" name="phone" id="phone" placeholder="请输入您的手机号码">

            <p class="tip"></p>

        </div>

        <div class="submit-box">

            <input type="checkbox" class="check">

            <span>我已阅读并同意遵守规定</span>

            <input type="submit" value="确定提交" class="submit" id="submit">

        </div>

    </form>

</div>

<script src="index.js"></script>

</body>

</html>
index.js
var username=document.getElementById("username");

var pwd=document.getElementById("pwd");

var repwd=document.getElementById("repwd");

var Cname=document.getElementById("Cname");

var idNum=document.getElementById("idNum");

var email=document.getElementById("email");

var phone=document.getElementById("phone");

var submit=document.getElementById("submit");

var form=document.getElementById("form");

var tips=document.querySelectorAll(".tip");

var reg=/正则/;

var test1=false;

var test2=false;

var test3=false;

var test4=false;

var test5=false;

var test6=false;

var test7=false;

//验证用户名,失去焦点时触发

username.onblur=function(){

    var pattern=/^\w{6,18}$/;

    if(this.value==""){//this指代当前输入框

        tips[0].innerHTML="用户名不能为空";

        tips[0].style.color="red";

        test1=false;

    }else{

        if(pattern.exec(this.value)==null){

            tips[0].innerHTML="请输入6-18位数字、字母或下划线";

            tips[0].style.color="red";

            test1=false;

        }else{

            tips[0].innerHTML="格式正确";

            tips[0].style.color="green";

            test1=true;

        }

    }

}

//验证密码,失去焦点时触发

pwd.onblur=function(){

    var pattern=/^\w{6,18}$/;

    if(this.value==""){//this指代当前输入框

        tips[1].innerHTML="密码不能为空";

        tips[1].style.color="red";

        test2=false;

    }else{

        if(pattern.exec(this.value)==null){

            tips[1].innerHTML="请输入6-18位数字、字母或下划线";

            tips[1].style.color="red";

            test2=false;

        }else{

            tips[1].innerHTML="格式正确";

            tips[1].style.color="green";

            test2=true;

        }

    }

}

//确认密码,失去焦点时触发

repwd.onblur=function(){

    if(this.value==""){//this指代当前输入框

        tips[2].innerHTML="确认密码不能为空";

        tips[2].style.color="red";

        test3=false;

    }else{

        if(this.value!=pwd.value){

            tips[2].innerHTML="两次密码不一致";

            tips[2].style.color="red";

            test3=false;

        }else{

            tips[2].innerHTML="格式正确";

            tips[2].style.color="green";

            test3=true;

        }

    }

}

//验证中文名,失去焦点时触发

Cname.onblur=function(){

    var pattern=/^[\u4e00-\u9fa5]{2,5}$/;

    if(this.value==""){//this指代当前输入框

        tips[3].innerHTML="姓名不能为空";

        tips[3].style.color="red";

        test4=false;

    }else{

        if(pattern.exec(this.value)==null){

            tips[3].innerHTML="请输入2-5位中文名";

            tips[3].style.color="red";

            test4=false;

        }else{

            tips[3].innerHTML="格式正确";

            tips[3].style.color="green";

            test4=true;

        }

    }

}

//验证身份证,失去焦点时触发

idNum.onblur=function(){

    var pattern=/^\d{17}[0-9x]$/;

    if(this.value==""){//this指代当前输入框

        tips[4].innerHTML="身份证不能为空";

        tips[4].style.color="red";

        test5=false;

    }else{

        if(pattern.exec(this.value)==null){

            tips[4].innerHTML="身份证格式错误";

            tips[4].style.color="red";

            test5=false;

        }else{

            tips[4].innerHTML="格式正确";

            tips[4].style.color="green";

            test5=true;

        }

    }

}

//验证邮箱,失去焦点时触发

email.onblur=function(){

    //aa@qq.com

    var pattern=/^\w+@\w+(\.[a-zA-Z_]{2,4})+$/;

    if(this.value==""){//this指代当前输入框

        tips[5].innerHTML="邮箱不能为空";

        tips[5].style.color="red";

        test6=false;

    }else{

        if(pattern.exec(this.value)==null){

            tips[5].innerHTML="邮箱格式错误";

            tips[5].style.color="red";

            test6=false;

        }else{

            tips[5].innerHTML="格式正确";

            tips[5].style.color="green";

            test6=true;

        }

    }

}

//验证手机号,失去焦点时触发

phone.onblur=function(){

    var pattern=/^\d{11}$/;

    if(this.value==""){//this指代当前输入框

        tips[6].innerHTML="手机号不能为空";

        tips[6].style.color="red";

        test7=false;

    }else{

        if(pattern.exec(this.value)==null){

            tips[6].innerHTML="手机号格式错误";

            tips[6].style.color="red";

            test7=false;

        }else{

            tips[6].innerHTML="格式正确";

            tips[6].style.color="green";

            test7=true;

        }

    }

}

//前面所有数据正确时,才能提交

submit.onclick=function(){

    if(test1 && test2 && test3 && test4 && test5 && test6 && test7){

        form.submit();

    }else{

        alert("信息填写有误");

    }

}
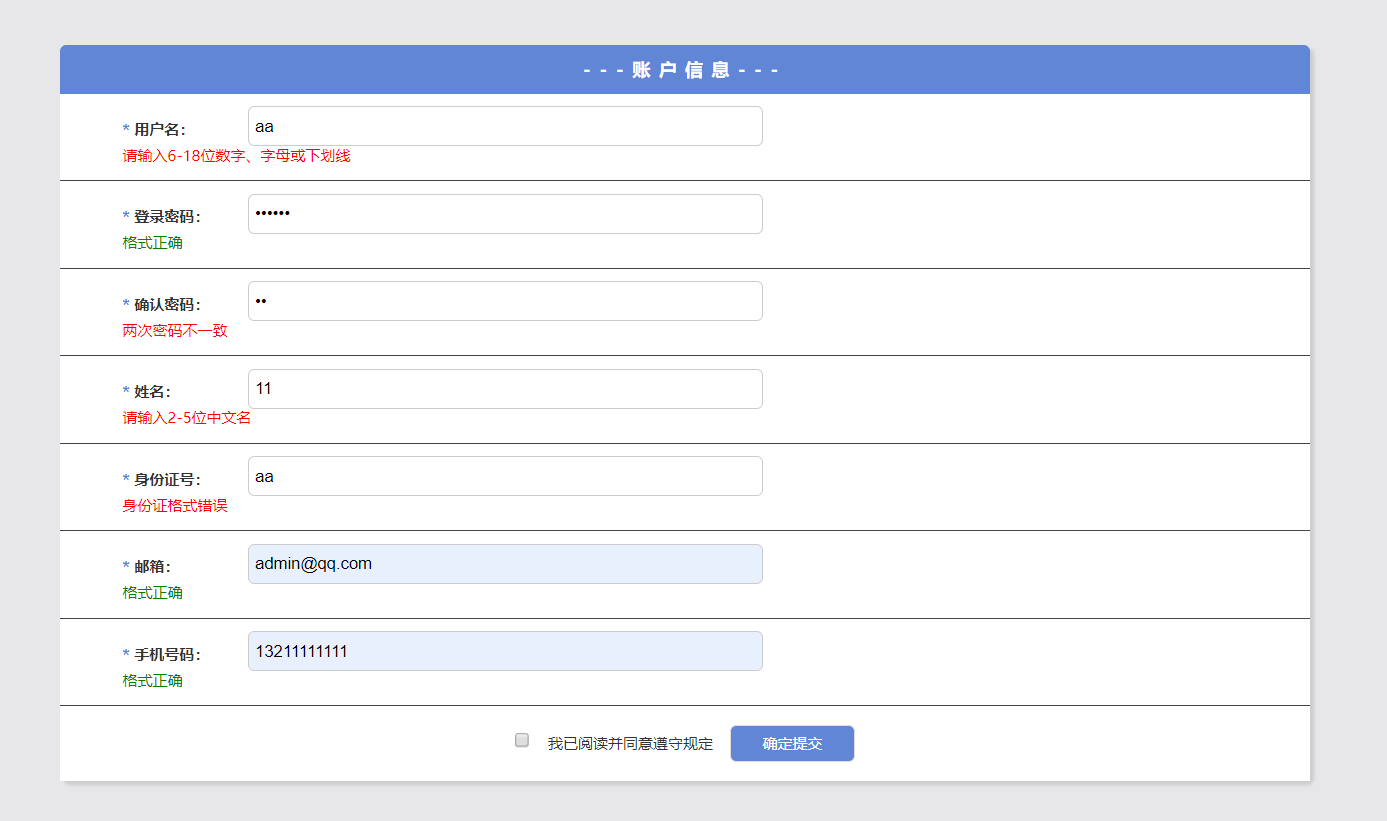
效果图
JS常见的表单验证,H5自带的验证和正则表达式的验证的更多相关文章
- js/jquery/插件表单验证
媳妇要学js,就收集一些资料给她. 1.js 表单验证 : http://hi.baidu.com/yanchao0901/item/161f563fb84ea5433075a1eb 2.jquery ...
- 表单验证—js循环所有表单验证
[封装为表单验证的专用js,所有表单页面都可以调用] 1.表单 <form id="regForm" method="post" action=" ...
- 关于vue.js element ui 表单验证 this.$refs[formName].validate()的问题
方法使用前需了解: 来自”和“小编的小提示: 首先打印一下this.$refs[formName],检查是否拿到了正确的需要验证的form. 其次在拿到了正确的form后,检查该form上添加 ...
- JS、jqueryie6浏览器下使用js无法提交表单的解决办法
-----------------------JS.jqueryie6浏览器下使用js无法提交表单的解决办法---------------------------------------------- ...
- js模拟form表单提交数据, js模拟a标签点击跳转,避开使用window.open引起来的浏览器阻止问题
js模拟form表单提交数据, js模拟a标签点击跳转,避开使用window.open引起来的浏览器阻止问题 js模拟form表单提交数据源码: /** * js模拟form表单提交 * @param ...
- 通过JS模拟select表单,达到美化效果[demo][转]
转自: http://www.cnblogs.com/dreamback/p/SelectorJS.html 通过JS模拟select表单,达到美化效果 Demo ------------------ ...
- JS 提交form表单
源码实例一:javascript 页面加裁时自动提交表单Form表单:<form method="post" id="myform" action=&qu ...
- 通过JS模拟select表单,达到美化效果[demo]
.m-form{background:#fff;padding:50px;font-family:12px/1.5 arial,\5b8b\4f53,sans-serif;} .m-form ul,. ...
- js重置form表单
CreateTime--2017年7月19日10:37:11Author:Marydon js重置form表单 需要使用的方法:reset() 示例: HTML部分 <form id=&qu ...
随机推荐
- SpringBoot配置国际化
1).国际化 1).编写国际化配置文件: 2).使用ResourceBundleMessageSource管理国际化资源文件 3).在页面使用fmt:message取出国际化内容 步骤: 1).编写国 ...
- 第二次作业hzw
第二次作业 | GIT地址 | 地址链接 | |--|--| |GIT用户名 | BRYANT333 | |学号后五位|24240| |博客地址|我的博客| |作业链接|第二次作业地址| 一.环境配置 ...
- Apache Hudi 0.5.1版本重磅发布
历经大约3个月时间,Apache Hudi 社区终于发布了0.5.1版本,这是Apache Hudi发布的第二个Apache版本,该版本中一些关键点如下 版本升级 将Spark版本从2.1.0升级到2 ...
- Linux中软件安装包的格式
一.Linux常用安装包及安装方法 1.安装包一般有四类: 1)tar包,如software-1.2.3-1.tar.gz.他是使用UNIX系统的打包工具tar打包的. 2)rpm包,如softwar ...
- lua 中 . 和 : 的区别
lua 中 . 和 : 的区别 首先在lua中使用":"定义的函数会自动传入一个名为self的变量,这个变量是隐含的,self同c++中的this一样,表示当前对象的指针:而&qu ...
- Centos 7 最小化部署svn版本控制(svn协议)
1.关闭selinux sh-4.2# sed -i 's/enforcing/disabled/' /etc/selinux/config sh-4.2# reboot 2.卸载防火墙 sh-4.2 ...
- docker启动redis端口映射错误问题解决
今天使用docker安装redis,使用的时候出现了一些问题.第一次安装好后,在虚拟机后台启动了redis,然后在连接虚拟机的redis的时候怎么也连不上.出现这种情况我第一反应是防火墙没有开启所以我 ...
- JDK源码之Boolean类分析
一 简介 boolean类型的封装类,将基本类型为boolean的值包装在一个对象中,实现序列化接口,和Comparable接口 额外提供了许多便捷方法,比较简单,直接贴代码分析 二 源码分析 //t ...
- python接口自动化测试 - 数据驱动DDT模块的简单使用
DDT简单介绍 名称:Data-Driven Tests,数据驱动测试 作用:由外部数据集合来驱动测试用例的执行 核心的思想:数据和测试代码分离 应用场景:一组外部数据来执行相同的操作 优点:当测试数 ...
- c++中重载运算符
重载运算符 1,成员函数运算符 运算符重载为类的成员函数一般格式如下 <函数类型> operator <运算符> (参数表) {函数体} 调用成员函数运算符如下 <对象名 ...