Scrapy框架实战-妹子图爬虫
Scrapy这个成熟的爬虫框架,用起来之后发现并没有想象中的那么难。即便是在一些小型的项目上,用scrapy甚至比用requests、urllib、urllib2更方便,简单,效率也更高。废话不多说,下面详细介绍下如何用scrapy将妹子图爬下来,存储在你的硬盘之中。关于Python、Scrapy的安装以及scrapy的原理这里就不作介绍,自行google、百度了解学习。
一、开发工具
Pycharm 2017
Python 2.7
Scrapy 1.5.0
requests
二、爬取过程
1、创建mzitu项目
进入"E:\Code\PythonSpider>"目录执行scrapy startproject mzitu命令创建一个爬虫项目:
scrapy startproject mzitu
执行完成后,生产目录文件结果如下:
 ├── mzitu

 │   ├── mzitu

 │   │   ├── __init__.py

 │   │   ├── items.py

 │   │   ├── middlewares.py

 │   │   ├── pipelines.py

 │   │   ├── settings.py

 │   │   └── spiders

 │   │       ├── __init__.py

 │   │       └── Mymzitu.py

 │   └── scrapy.cfg
2、进入mzitu项目,编写修改items.py文件
定义titile,用于存储图片目录的名称
定义img,用于存储图片的url
定义name,用于存储图片的名称
 # -*- coding: utf-8 -*-

 # Define here the models for your scraped items

 #

 # See documentation in:

 # https://doc.scrapy.org/en/latest/topics/items.html

 import scrapy

 class MzituItem(scrapy.Item):

     # define the fields for your item here like:

     title = scrapy.Field()

     img = scrapy.Field()

     name = scrapy.Field()
3、编写修改spiders/Mymzitu.py文件
 # -*- coding: utf-8 -*-

 import scrapy

 from mzitu.items import MzituItem

 from lxml import etree

 import requests

 import sys

 reload(sys)

 sys.setdefaultencoding('utf8')

 class MymzituSpider(scrapy.Spider):

     def get_urls():

         url = 'http://www.mzitu.com'

         headers = {}

         headers['User-Agent'] = 'Mozilla/5.0 (Windows NT 6.1; Win64; x64) AppleWebKit/537.36 (KHTML, like Gecko) Chrome/62.0.3202.94 Safari/537.36'

         r = requests.get(url,headers=headers)

         html = etree.HTML(r.text)

         urls = html.xpath('//*[@id="pins"]/li/a/@href')

         return urls

     name = 'Mymzitu'

     allowed_domains = ['www.mzitu.com']

     start_urls = get_urls()

     def parse(self, response):

         item = MzituItem()

         #item['title'] = response.xpath('//h2[@class="main-title"]/text()')[0].extract()

         item['title'] = response.xpath('//h2[@class="main-title"]/text()')[0].extract().split('(')[0]

         item['img'] = response.xpath('//div[@class="main-image"]/p/a/img/@src')[0].extract()

         item['name'] = response.xpath('//div[@class="main-image"]/p/a/img/@src')[0].extract().split('/')[-1]

         yield item

         next_url = response.xpath('//div[@class="pagenavi"]/a/@href')[-1].extract()

         if next_url:

             yield scrapy.Request(next_url, callback=self.parse)
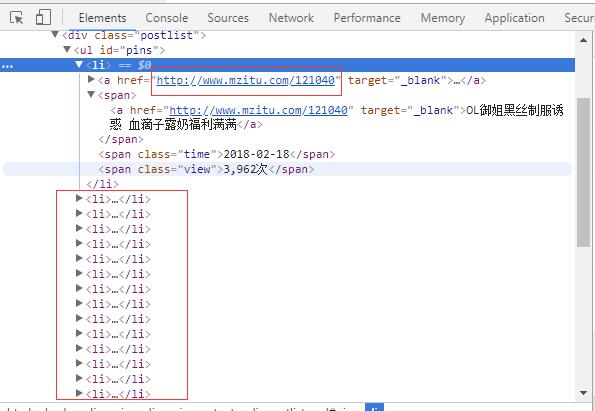
我们要爬取的是妹子图网站“最新”的妹子图片,对应的主url是http://www.mzitu.com,通过查看网页源代码发现每一个图片主题的url在<li>标签中,通过上面代码中get_urls函数可以获取,并且返回一个url列表,这里必须说明一下,用python写爬虫,像re、xpath、Beautiful Soup之类的模块必须掌握一个,否则根本无法下手。这里使用xpath工具来获取url地址,在lxml和scrapy中,都支持使用xpath。
     def get_urls():

         url = 'http://www.mzitu.com'

         headers = {}

         headers['User-Agent'] = 'Mozilla/5.0 (Windows NT 6.1; Win64; x64) AppleWebKit/537.36 (KHTML, like Gecko) Chrome/62.0.3202.94 Safari/537.36'

         r = requests.get(url,headers=headers)

         html = etree.HTML(r.text)

         urls = html.xpath('//*[@id="pins"]/li/a/@href')

         return urls
name定义爬虫的名称,allowed_domains定义包含了spider允许爬取的域名(domain)列表(list),start_urls定义了爬取了url列表。
 name = 'Mymzitu'

 allowed_domains = ['www.mzitu.com']

 start_urls = get_urls()
分析图片详情页,获取图片主题、图片url和图片名称,同时获取下一页,循环爬取:
     def parse(self, response):

         item = MzituItem()

         #item['title'] = response.xpath('//h2[@class="main-title"]/text()')[0].extract()

         item['title'] = response.xpath('//h2[@class="main-title"]/text()')[0].extract().split('(')[0]

         item['img'] = response.xpath('//div[@class="main-image"]/p/a/img/@src')[0].extract()

         item['name'] = response.xpath('//div[@class="main-image"]/p/a/img/@src')[0].extract().split('/')[-1]

         yield item

         next_url = response.xpath('//div[@class="pagenavi"]/a/@href')[-1].extract()

         if next_url:

             yield scrapy.Request(next_url, callback=self.parse)
4、编写修改pipelines.py文件,下载图片
 # -*- coding: utf-8 -*-

 # Define your item pipelines here

 #

 # Don't forget to add your pipeline to the ITEM_PIPELINES setting

 # See: https://doc.scrapy.org/en/latest/topics/item-pipeline.html

 import requests

 import os

 class MzituPipeline(object):

     def process_item(self, item, spider):

         headers = {

             'Referer': 'http://www.mzitu.com/'

         }

         local_dir = 'E:\\data\\mzitu\\' + item['title']

         local_file = local_dir + '\\' + item['name']

         if not os.path.exists(local_dir):

             os.makedirs(local_dir)

         with open(local_file,'wb') as f:

             f.write(requests.get(item['img'],headers=headers).content)

         return item
5、middlewares.py文件中新增一个RotateUserAgentMiddleware类
 class RotateUserAgentMiddleware(UserAgentMiddleware):

     def __init__(self, user_agent=''):

         self.user_agent = user_agent

     def process_request(self, request, spider):

         ua = random.choice(self.user_agent_list)

         if ua:

             request.headers.setdefault('User-Agent', ua)

     #the default user_agent_list composes chrome,IE,firefox,Mozilla,opera,netscape

     #for more user agent strings,you can find it in http://www.useragentstring.com/pages/useragentstring.php

     user_agent_list = [

         "Mozilla/5.0 (Windows NT 6.1; WOW64) AppleWebKit/537.1 (KHTML, like Gecko) Chrome/22.0.1207.1 Safari/537.1"\

         "Mozilla/5.0 (X11; CrOS i686 2268.111.0) AppleWebKit/536.11 (KHTML, like Gecko) Chrome/20.0.1132.57 Safari/536.11",\

         "Mozilla/5.0 (Windows NT 6.1; WOW64) AppleWebKit/536.6 (KHTML, like Gecko) Chrome/20.0.1092.0 Safari/536.6",\

         "Mozilla/5.0 (Windows NT 6.2) AppleWebKit/536.6 (KHTML, like Gecko) Chrome/20.0.1090.0 Safari/536.6",\

         "Mozilla/5.0 (Windows NT 6.2; WOW64) AppleWebKit/537.1 (KHTML, like Gecko) Chrome/19.77.34.5 Safari/537.1",\

         "Mozilla/5.0 (X11; Linux x86_64) AppleWebKit/536.5 (KHTML, like Gecko) Chrome/19.0.1084.9 Safari/536.5",\

         "Mozilla/5.0 (Windows NT 6.0) AppleWebKit/536.5 (KHTML, like Gecko) Chrome/19.0.1084.36 Safari/536.5",\

         "Mozilla/5.0 (Windows NT 6.1; WOW64) AppleWebKit/536.3 (KHTML, like Gecko) Chrome/19.0.1063.0 Safari/536.3",\

         "Mozilla/5.0 (Windows NT 5.1) AppleWebKit/536.3 (KHTML, like Gecko) Chrome/19.0.1063.0 Safari/536.3",\

         "Mozilla/5.0 (Macintosh; Intel Mac OS X 10_8_0) AppleWebKit/536.3 (KHTML, like Gecko) Chrome/19.0.1063.0 Safari/536.3",\

         "Mozilla/5.0 (Windows NT 6.2) AppleWebKit/536.3 (KHTML, like Gecko) Chrome/19.0.1062.0 Safari/536.3",\

         "Mozilla/5.0 (Windows NT 6.1; WOW64) AppleWebKit/536.3 (KHTML, like Gecko) Chrome/19.0.1062.0 Safari/536.3",\

         "Mozilla/5.0 (Windows NT 6.2) AppleWebKit/536.3 (KHTML, like Gecko) Chrome/19.0.1061.1 Safari/536.3",\

         "Mozilla/5.0 (Windows NT 6.1; WOW64) AppleWebKit/536.3 (KHTML, like Gecko) Chrome/19.0.1061.1 Safari/536.3",\

         "Mozilla/5.0 (Windows NT 6.1) AppleWebKit/536.3 (KHTML, like Gecko) Chrome/19.0.1061.1 Safari/536.3",\

         "Mozilla/5.0 (Windows NT 6.2) AppleWebKit/536.3 (KHTML, like Gecko) Chrome/19.0.1061.0 Safari/536.3",\

         "Mozilla/5.0 (X11; Linux x86_64) AppleWebKit/535.24 (KHTML, like Gecko) Chrome/19.0.1055.1 Safari/535.24",\

         "Mozilla/5.0 (Windows NT 6.2; WOW64) AppleWebKit/535.24 (KHTML, like Gecko) Chrome/19.0.1055.1 Safari/535.24"

     ]
6、settings.py设置
 # Obey robots.txt rules

 ROBOTSTXT_OBEY = False

 # Configure maximum concurrent requests performed by Scrapy (default: 16)

 CONCURRENT_REQUESTS = 100

 # Disable cookies (enabled by default)

 COOKIES_ENABLED = False

 DOWNLOADER_MIDDLEWARES = {

     'mzitu.middlewares.MzituDownloaderMiddleware': 543,

     'scrapy.downloadermiddlewares.useragent.UserAgentMiddleware':None,

     'mzitu.middlewares.RotateUserAgentMiddleware': 400,

 }
7、运行爬虫
进入E:\Code\PythonSpider\mzitu目录,运行scrapy crawl Mymzitu命令启动爬虫:
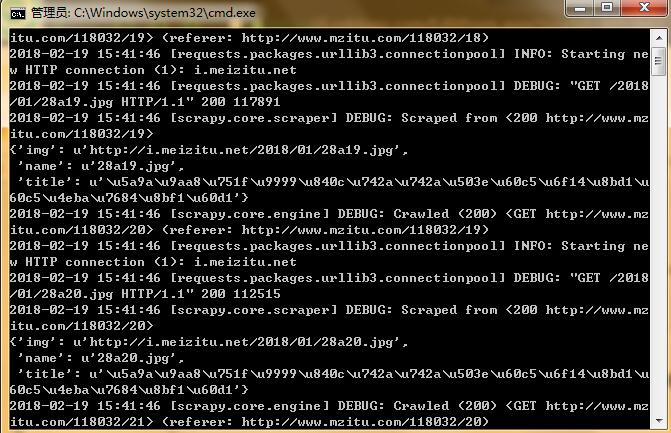
运行结果及完整代码详见:https://github.com/Eivll0m/PythonSpider/tree/master/mzitu
Scrapy框架实战-妹子图爬虫的更多相关文章
- 基于Scrapy框架的Python新闻爬虫
概述 该项目是基于Scrapy框架的Python新闻爬虫,能够爬取网易,搜狐,凤凰和澎湃网站上的新闻,将标题,内容,评论,时间等内容整理并保存到本地 详细 代码下载:http://www.demoda ...
- 使用scrapy框架做赶集网爬虫
使用scrapy框架做赶集网爬虫 一.安装 首先scrapy的安装之前需要安装这个模块:wheel.lxml.Twisted.pywin32,最后在安装scrapy pip install wheel ...
- [Python爬虫]煎蛋网OOXX妹子图爬虫(1)——解密图片地址
之前在鱼C论坛的时候,看到很多人都在用Python写爬虫爬煎蛋网的妹子图,当时我也写过,爬了很多的妹子图片.后来煎蛋网把妹子图的网页改进了,对图片的地址进行了加密,所以论坛里面的人经常有人问怎么请求的 ...
- python妹子图爬虫5千张高清大图突破防盗链福利5千张福利高清大图
meizitu-spider python通用爬虫-绕过防盗链爬取妹子图 这是一只小巧方便,强大的爬虫,由python编写 所需的库有 requests BeautifulSoup os lxml 伪 ...
- scrapy框架解读--深入理解爬虫原理
scrapy框架结构图: 组成部分介绍: Scrapy Engine: 负责组件之间数据的流转,当某个动作发生时触发事件 Scheduler: 接收requests,并把他们入队,以便后续的调度 Do ...
- 爬虫入门之Scrapy框架实战(新浪百科豆瓣)(十二)
一 新浪新闻爬取 1 爬取新浪新闻(全站爬取) 项目搭建与开启 scrapy startproject sina cd sina scrapy genspider mysina http://roll ...
- 爬虫 Scrapy框架 爬取图虫图片并下载
items.py,根据需求确定自己的数据要求 # -*- coding: utf-8 -*- # Define here the models for your scraped items # # S ...
- Python网络爬虫 | Scrapy爬取妹子图网站全站照片
根据现有的知识,写了一个下载妹子图(meizitu.com)Scrapy脚本,把全站两万多张照片下载到了本地. 网站的分析 网页的网址分析 打开网站,发现网页的网址都是以 http://www.mei ...
- 基于Scrapy框架的增量式爬虫
概述 概念:监测 核心技术:去重 基于 redis 的一个去重 适合使用增量式的网站: 基于深度爬取的 对爬取过的页面url进行一个记录(记录表) 基于非深度爬取的 记录表:爬取过的数据对应的数据指纹 ...
随机推荐
- nodeJS里面的模块
this 打开cmd,执行如下命令 nodeconsole.log(this); 输出如上信息,表示this是global,每个电脑的配置信息不一样的话,可能会有所差别的. 然后新建一个文件,写下如下 ...
- BC高精确度函数使用。
bc是Binary Calculator的缩写.bc*函数的参数都是操作数加上一个可选的 [int scale],比如string bcadd(string $left_operand, string ...
- DEDECMS 留言薄模块的使用方法
一.留言薄的安装 留言薄的安装过程和其他插件一样,首先我们进入后台模块管理列表,点击其对应的"安装": 以上步骤,我们完成了留言薄插件的安装. 二.留言薄的卸载 留言薄的卸载,同样 ...
- tree conflict svn 怎么解决
如果自己和其他人修改了同一个文件,而他已经更新到SVN,你commit时就会出现冲突,如何解决呢? 方法/步骤 使用SVN时,更新一个自己修改的文件到服务器,出现冲突,因为其他同事也修改了这个文件并且 ...
- java 三大框架
SSH即:Spring.Struts.HibernateSpring:功能强大的组件粘合济,能够将你的所有的java功能模块用配置文件的方式组合起来(还让你感觉不到spring的存在)成为一个完成的应 ...
- 我的java学习之路--Reflect专题
学习网址:http://www.imooc.com/video/3725 1.Class类的使用 class类 在面向对象的世界里,万事万物皆对象 java语言中,静态的成员.普通数据类型类不是对象. ...
- Spring Cloud Zuul网关 Filter、熔断、重试、高可用的使用方式。
时间过的很快,写springcloud(十):服务网关zuul初级篇还在半年前,现在已经是2018年了,我们继续探讨Zuul更高级的使用方式. 上篇文章主要介绍了Zuul网关使用模式,以及自动转发机制 ...
- 多IP服务器应用可以有效的降低成本
多IP的常规应用很多,SEO,EDM,VPN代理等.可以有效的解决成本,很多时候的租用一台高配置服务器通过XEN,hyper-V等虚拟化技术分割成VPS ,共用一台服务器就会大大的降低成本,这样就需要 ...
- Django_MTV视图
WEB服务请求流程? 用户请求通过url,url带着用户的用户信息封装成request,然后服务器收到url请求,激活获取url中带来的request,服务器处理request逻辑后,返回封装好的re ...
- linkin大话设计模式--常用模式总结
linkin大话设计模式--常用模式总结 一,常用设计模式定义 Abstract Factory(抽象工厂模式):提供一个创建一系列相关或相互依赖对象的接口,而无需指定它们具体的类. Adapter( ...