【转】Create Hello-JNI with Android Studio
【转】Create Hello-JNI with Android Studio
访问需要翻墙。
没有翻译成中文是因为图片很详细,看不懂英文,根据图片一步一步也能完成。另外开发人员应该具备阅读英文技术博客的能力。
1. Overview
In this codelab, you'll learn how to use Android Studio to start Android NDK project development.
2. Create Java Sample App
- Find and start Android Studio on your development system:
a) Linux: Run studio.sh from your installed location
b) OSX: Find studio installation in Application folder, double click to
start
If this is the first time you run this version of Android Studio on this
system, Android Studio will prompt to import from previous settings, just
select "I do not have a previous version of Studio or I do not want
to import my settings", "Welcome to Android Studio" will be
displayed.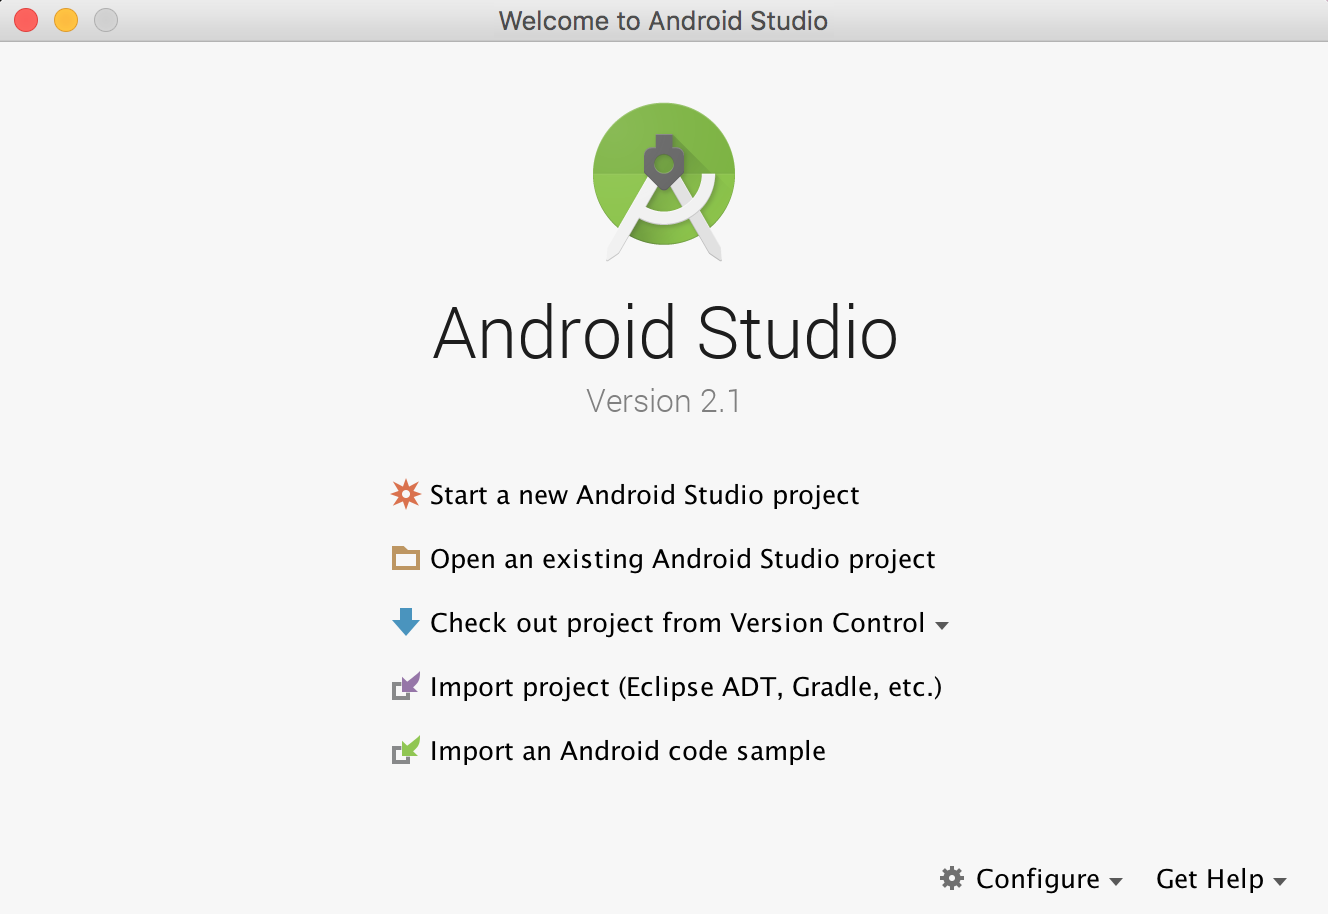
- Select "Start a new Android Studio
project". - On "New Project" page, change
"Application Name" to HelloAndroidJni, and leave the default
values for other fields.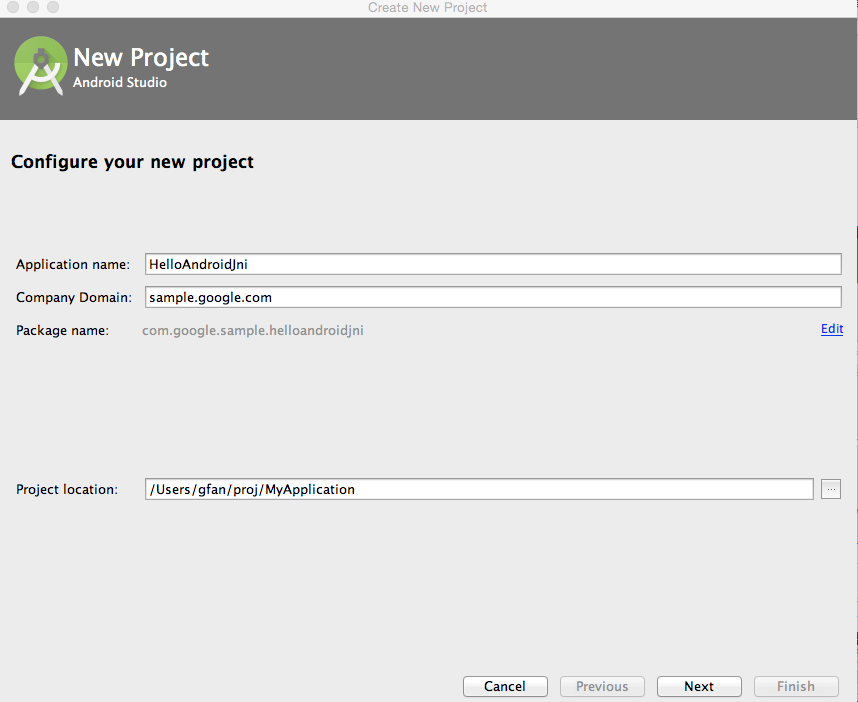
- Click "Next", select "Basic
Activity" as our template in "Add an Activity to Mobile"
page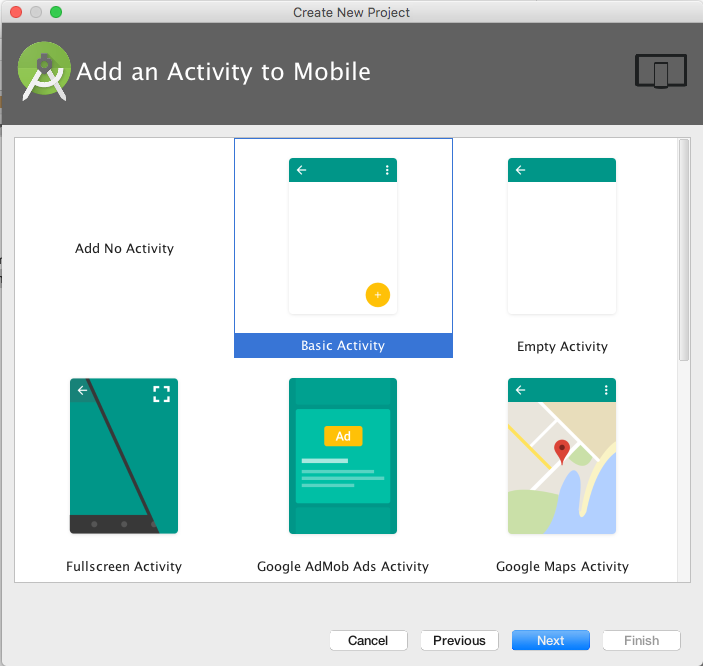
- Click "Next" all the way to
"Finish" to complete application creation.
This creates an Android "Hello World" Java app; your Android
Studio looks like: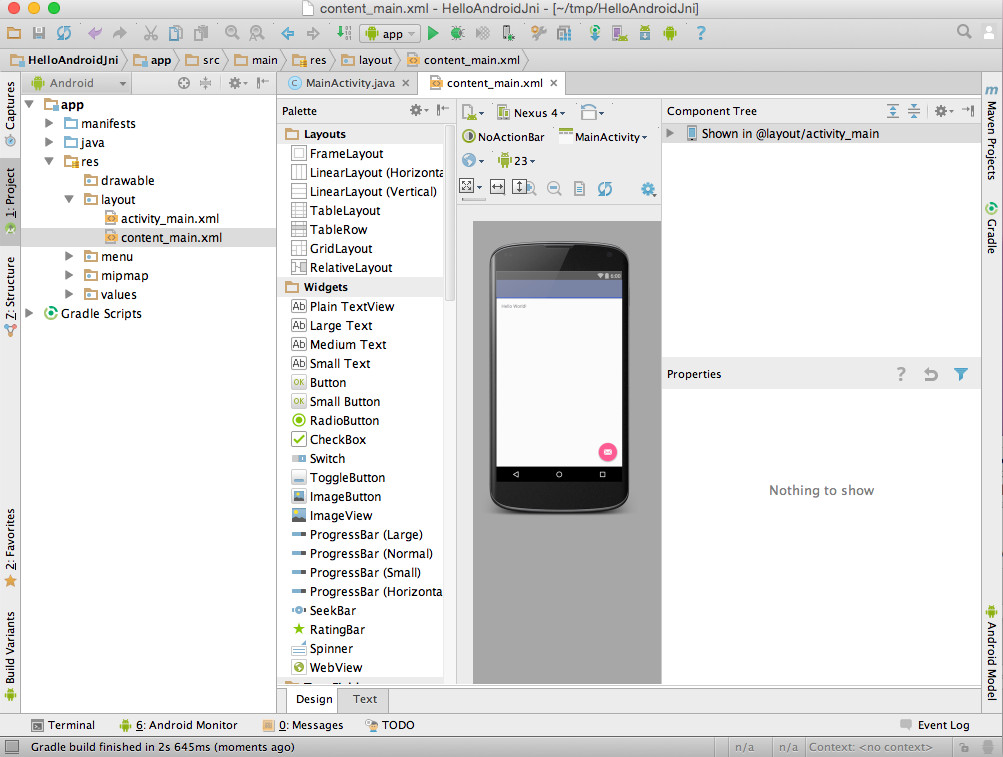
- (Optional) Connect your Android Device with
USB cable if you have device available; otherwise, create an Emulator when
Android Studio prompts you in the next step. - Sync

, Build

and Run , you will see the
following on your target device or Emulator:
- Configure the project to use gradle wrapper.
a) On Mac OS, menu "Android Studio" > "Preferences".
b) On Linux, menu "File" > "Settings".
c) Then "Build, Execution, Deployment" > "Build Tools"
> "Gradle".
d) Select "Use Default Gradle wrapper (recommended)", click
"OK".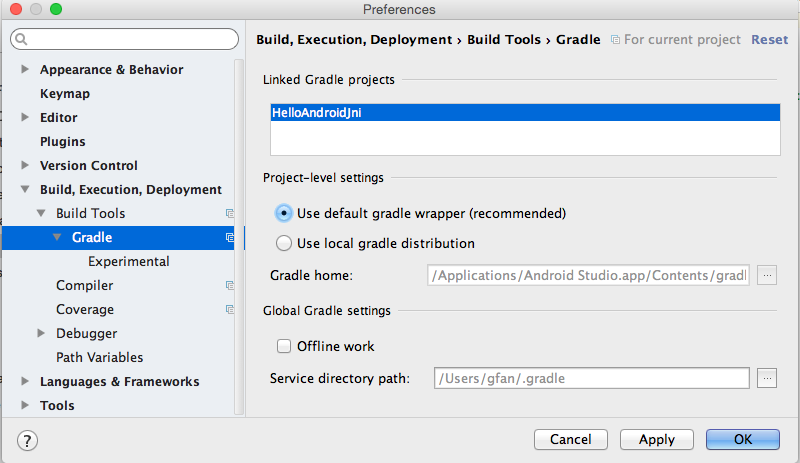
- Configure Android Studio to download NDK
a) Menu "Tools" > "Android" > "SDK Manager"
b) Select tab "SDK Tools"
c) Check "Android NDK"[ or "NDK"] if it is not checked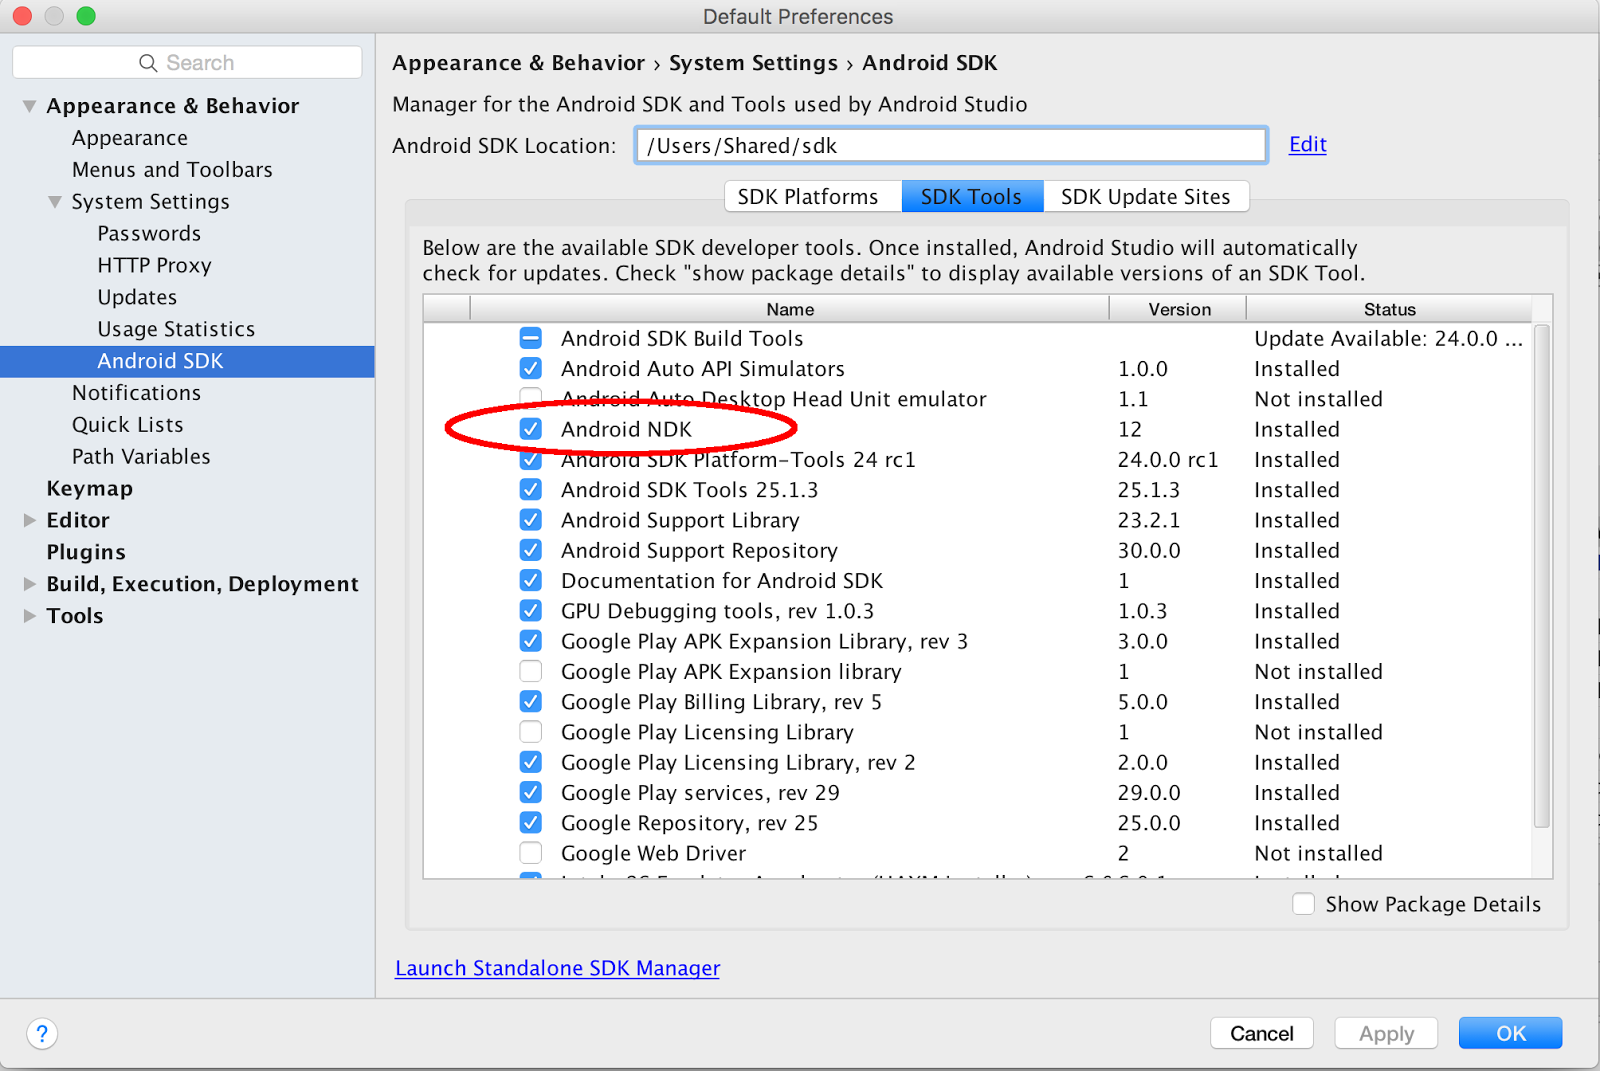
- Sync
 , Build
  and Run
  , you should see the same as in step 6.
3. Add
JNI Build Capability to HelloAndroidJni Project
Android Studio supports native
development via experimental plugin developed by Google, let's add it into our
project.
- Find the latest gradle-experimental plugin version[currently
is 0.7.2 at the writing]. Open project build.gradle in Android Studio's
"Project" window.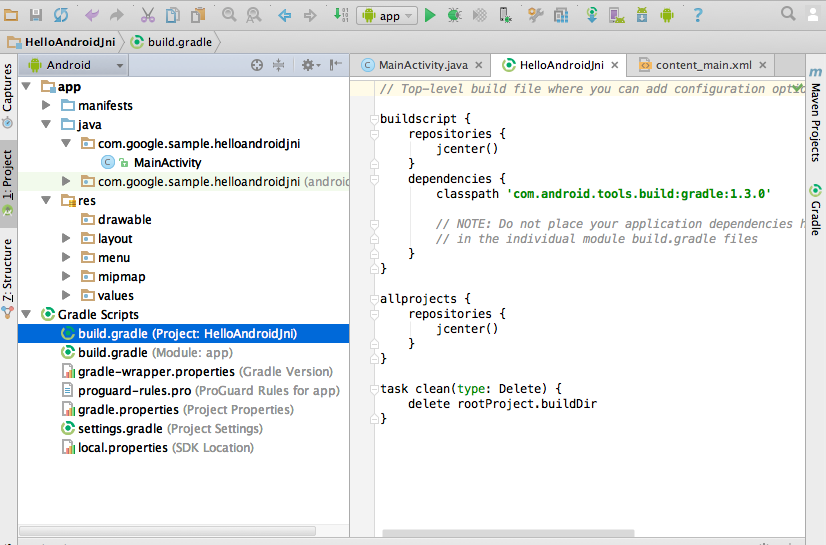
- Replace gradle plugin
classpath 'com.android.tools.build:gradle:2.1.0'
with your latest version[it does not have to be 0.7.2]:
classpath 'com.android.tools.build:gradle-experimental:0.7.2'
- Change to the latest gradle version (2.10 is required for plugin version 0.7.0).
Select Android Studio "Project" pane, "Gradle Scripts"
> "gradle-wrapper.properties (Gradle Version)" and change:
distributionUrl=https\://services.gradle.org/distributions/gradle-2.4-all.zip
to:
distributionUrl=https\://services.gradle.org/distributions/gradle-2.10-all.zip - Convert the auto-generated module build.gradle
to Gradle's component model DSL.
Select Android Studio "Project" pane > "Gradle
Scripts" > "build.gradle (Module: app)" and replace:
apply plugin: 'com.android.application'

android {

   compileSdkVersion 23

   buildToolsVersion "23.0.1"

   defaultConfig {

       applicationId "com.google.sample.helloandroidjni"

       minSdkVersion 22

       targetSdkVersion 23

       versionCode 1

       versionName "1.0"

   }

   buildTypes {

       release {

           minifyEnabled false

           proguardFiles getDefaultProguardFile('proguard-android.txt'), 'proguard-rules.pro'

       }

   }

}

// others below this line: no change
with:
apply plugin: 'com.android.model.application'

model {

   android {

       compileSdkVersion 23

       buildToolsVersion "23.0.3"

       defaultConfig {

           applicationId "com.google.sample.helloandroidjni"

           minSdkVersion.apiLevel 22

           targetSdkVersion.apiLevel 23

           versionCode 1

           versionName "1.0"

       }

       buildTypes {

           release {

               minifyEnabled false

               proguardFiles.add(file('proguard-android.txt'))

           }

       }

   }

}

// others below this line: no change
NOTE: the version numbers may be different on your system, and you do not need to change the version number -- just use them as is. Only changing the highlighted part would be fine!
- Sync
 , Build
  and Run
  . You should still see the same "Hello World" on your target device.
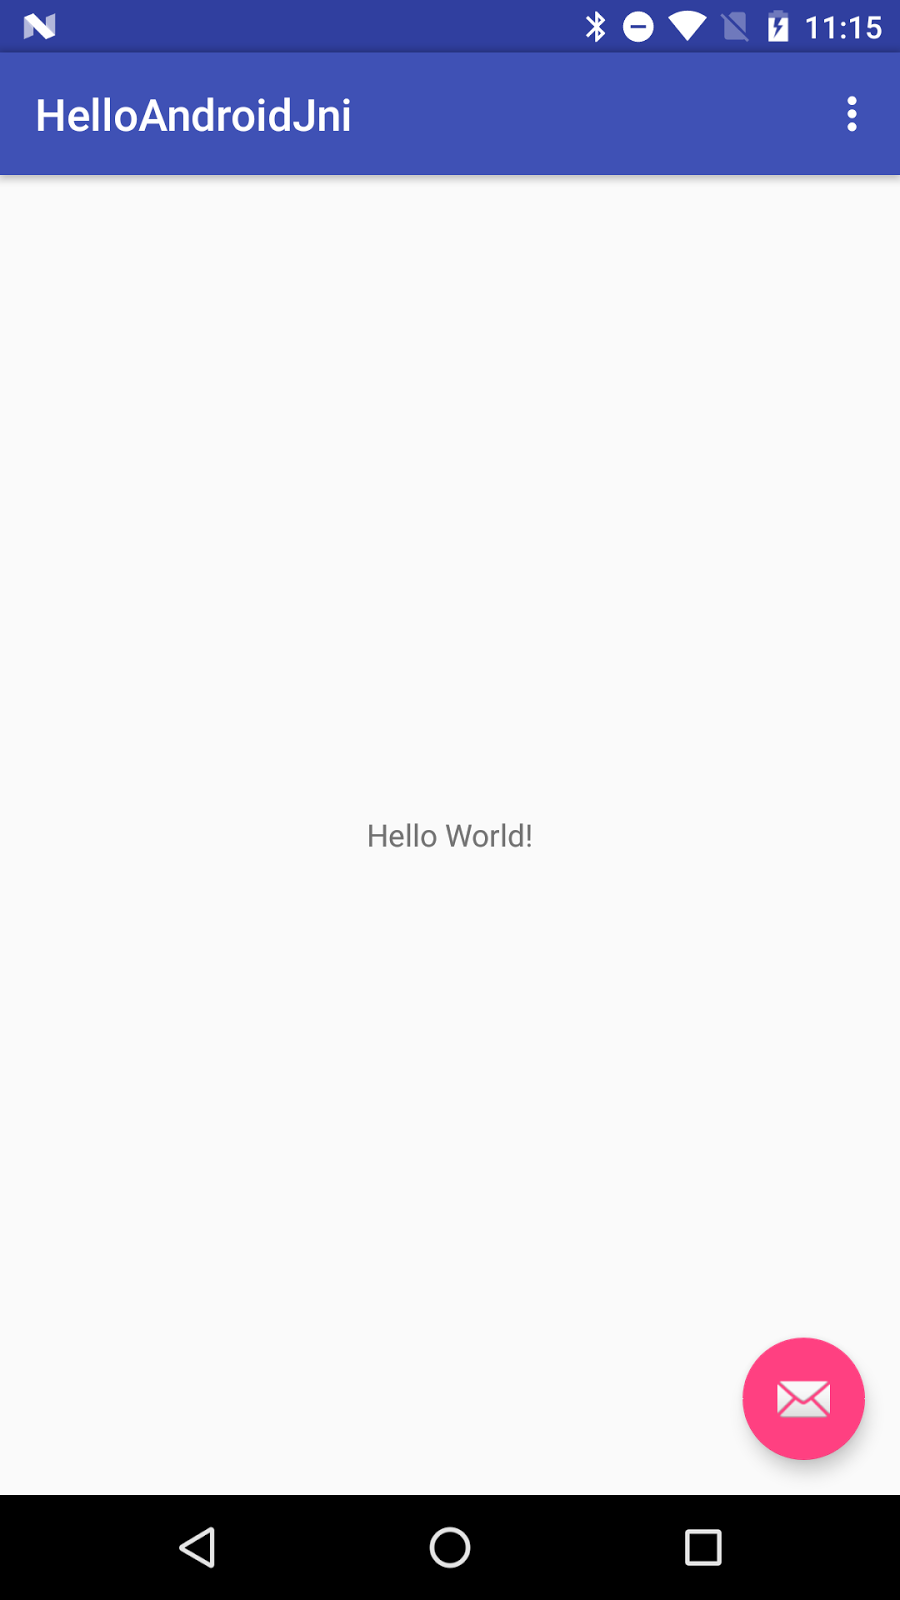
4. Add JNI Code Into Project
- Check the NDK Path.
Select the menu "File" > "Project Structure" >
"SDK Location", "Android NDK Location" if it is not
set yet, then click "...", and browse to your NDK location and
click "OK" (you may also choose "download").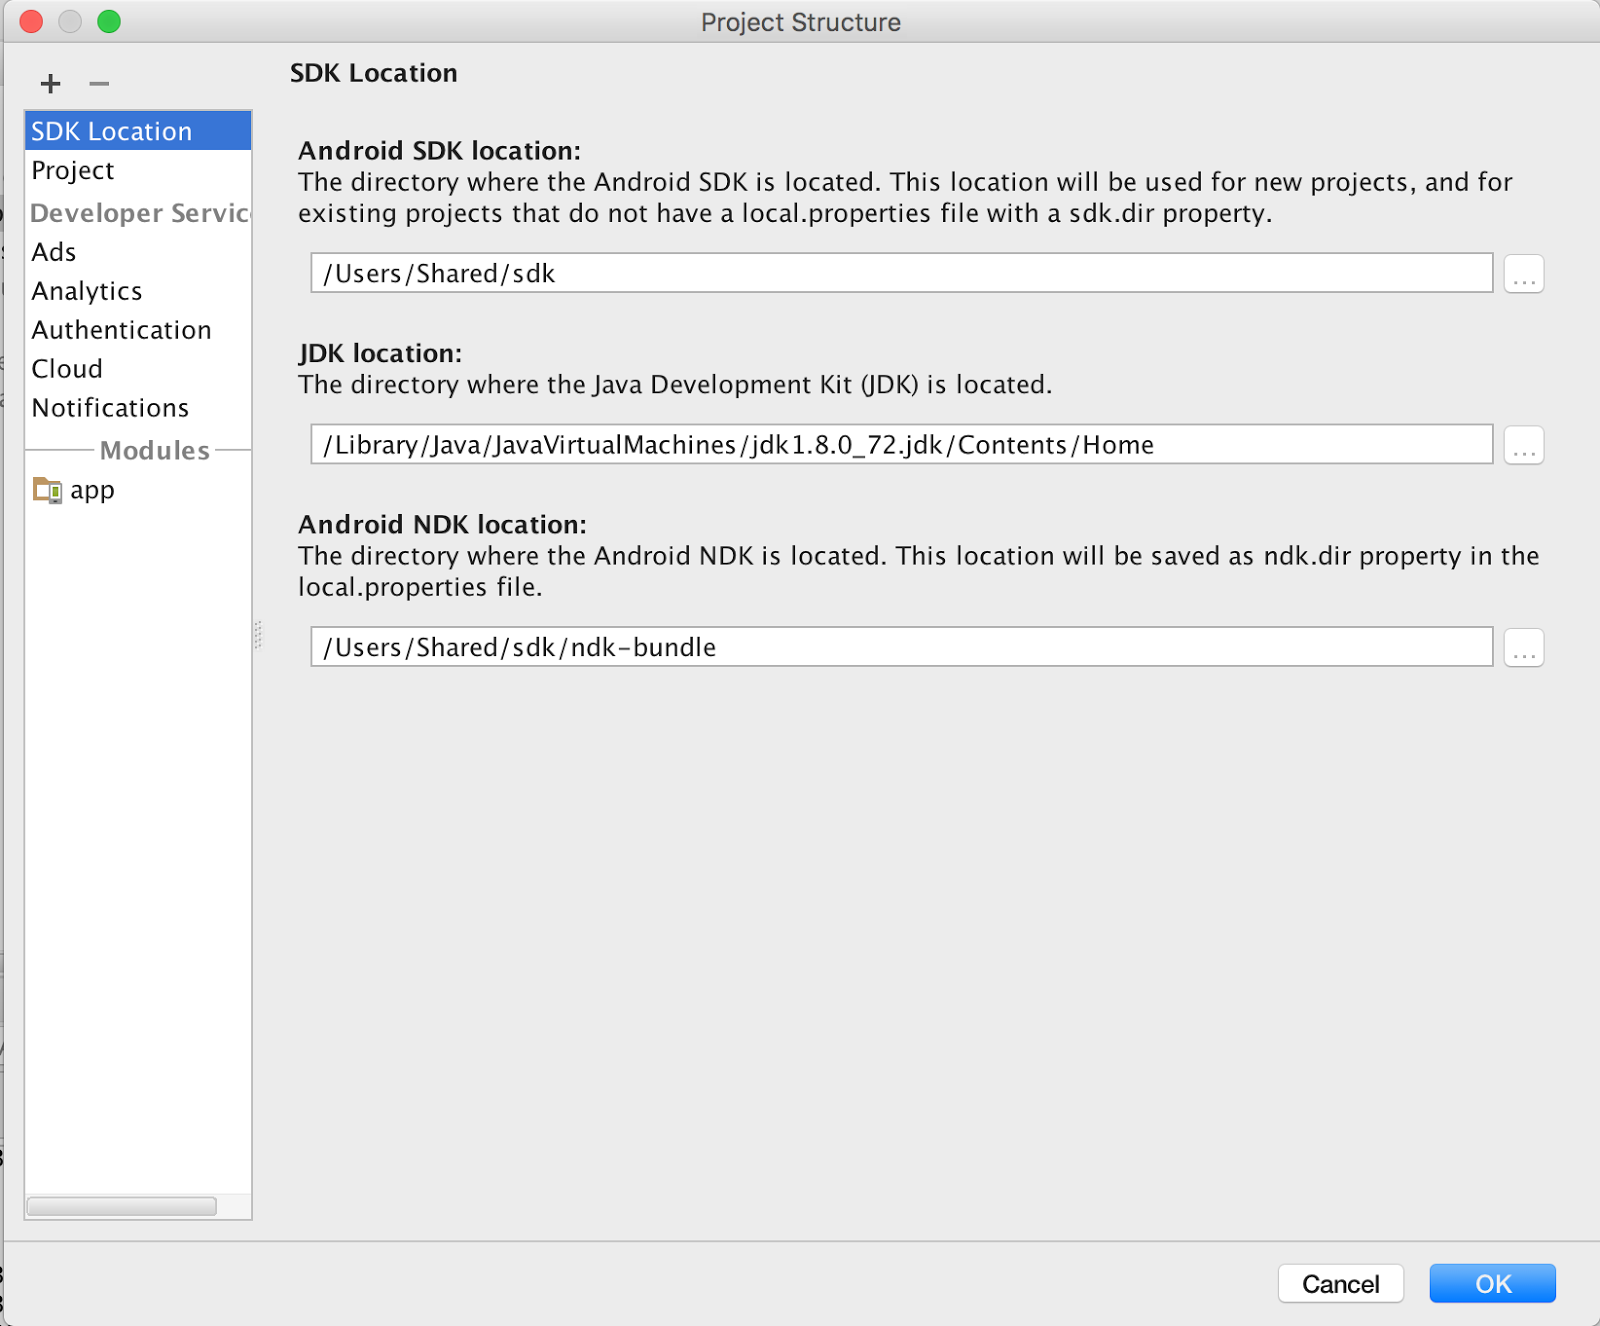
- Configure the module build.gradle to create
"hello-android-jni" shared lib.
Select Android Studio "Project" pane > "Gradle
Scripts" > "build.gradle (Module:app)", add the
following inside the "model" block, after "buildTypes" block.
buildTypes {

...

}

// New code

ndk {

    moduleName "hello-android-jni"

}

// New code finished
- Add JNI function and load jni shared lib into project.
Select Android Studio "Project" pane > "app" >
"java" > "com.google.sample.helloandroidjni" >
"MainActivity", and add JNI function getMsgFromJni() and
System.loadLibrary() to the end of class MainActivity.
...

   // new code

   static {

       System.loadLibrary("hello-android-jni");

   }

   publicnativeString getMsgFromJni();

   // new code done

} // class MainActivity
- Sync , Build , there should be no errors from Android Studio.
Note:
- make sure library name is the same as moduleName inside build.gradle
- The "Build" step is just to build, do not load the built apk yet; if you load it, it will crash since there is no native implementation for getMsgFromJni() yet
- Generate the C/C++ prototype function for jni function getMsgFromJni().
In MainActivity.java file, "getMsgFromJni()" is highlighed with
red because Android Studio could not find its implementation; let's get it
implemented:
- Select function "getMsgFromJni()".
- Wait for context aware menu prompt

to appear. - Click on
 to bring up the popup
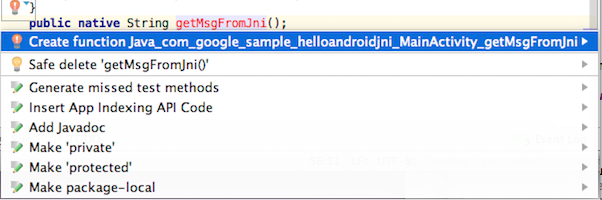
- Select "Create Function
Java_com_google_example_helloandroidjni_MainActivity_getMsgFromJni". - Android Studio creates a prototype function
for getMsgFromJNI() in hello-android-jni.c file under the "jni"
folder. Both got created at once!
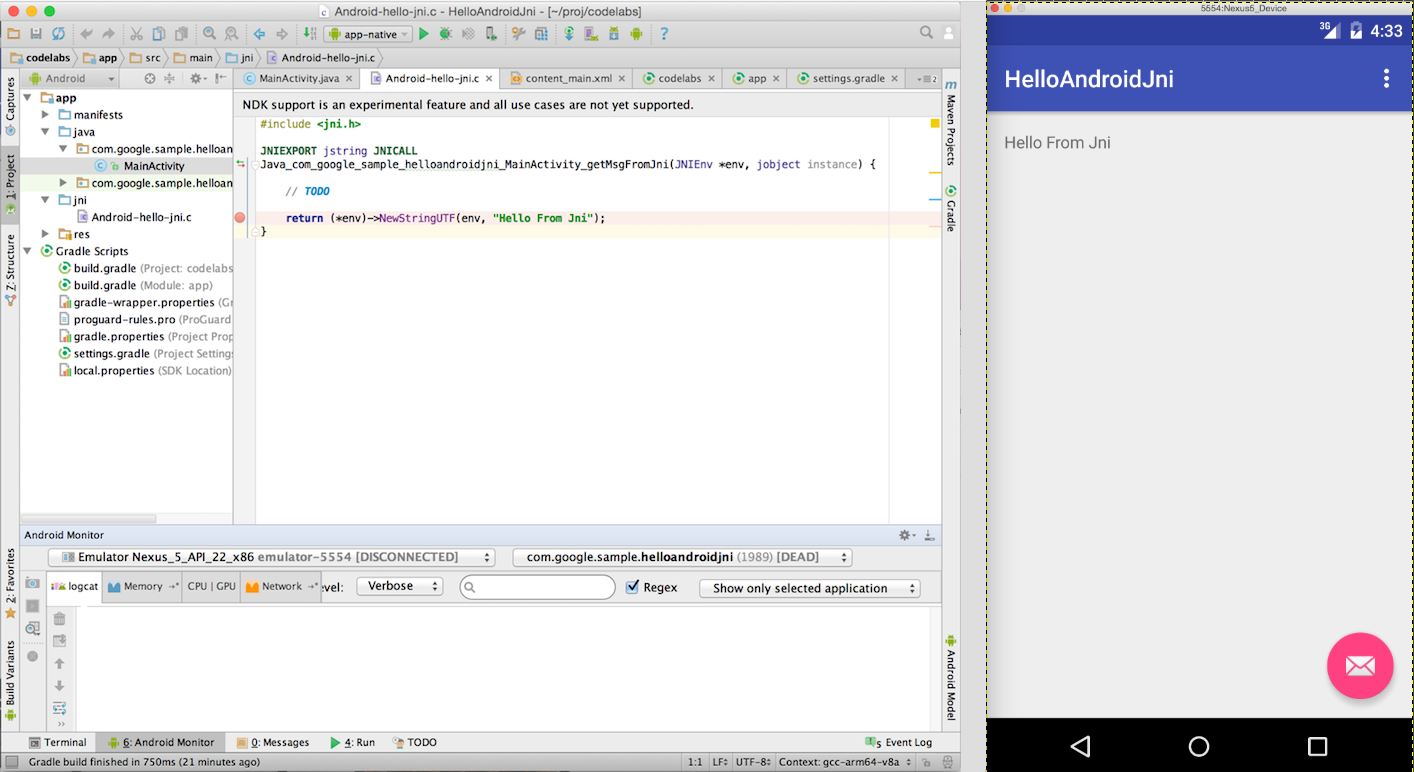
#include<jni.h>

JNIEXPORT jstring JNICALL

Java_com_google_sample_helloandroidjni_MainActivity_getMsgFromJni(JNIEnv *env, jobject instance) {

   // TODO

   return (*env)->NewStringUTF(env, returnValue);

}
- Replace "returnValue" in the above code with our own message:
// TODO

return (*env)->NewStringUTF(env, "Hello From Jni");
- Display our JNI message in the application.
- Add an ID to the existing TextView.
Open "Android Studio" pane, "res" >
"layout" > "content_main.xml"[if you have chosen
template "Empty Activity" in step "Create Java Sample
App", you file might be "activity_main.xml" instead],
select "design" view, and click or "Hello World",
inside "Properties" pane, put "@+id/jni_msgView" into "ID" field:[The other way is to directly add into "text" view, and put id
in with android:id="@+id/jni_msgView".] - Display our jni message in the TextView.
In MainActivity::onCreate() function, append following code to the end of
the function:
((TextView) findViewById(R.id.jni_msgView)).setText(getMsgFromJni());
- Click the Run
 button, you should see "Hello From Jni" in your target device.
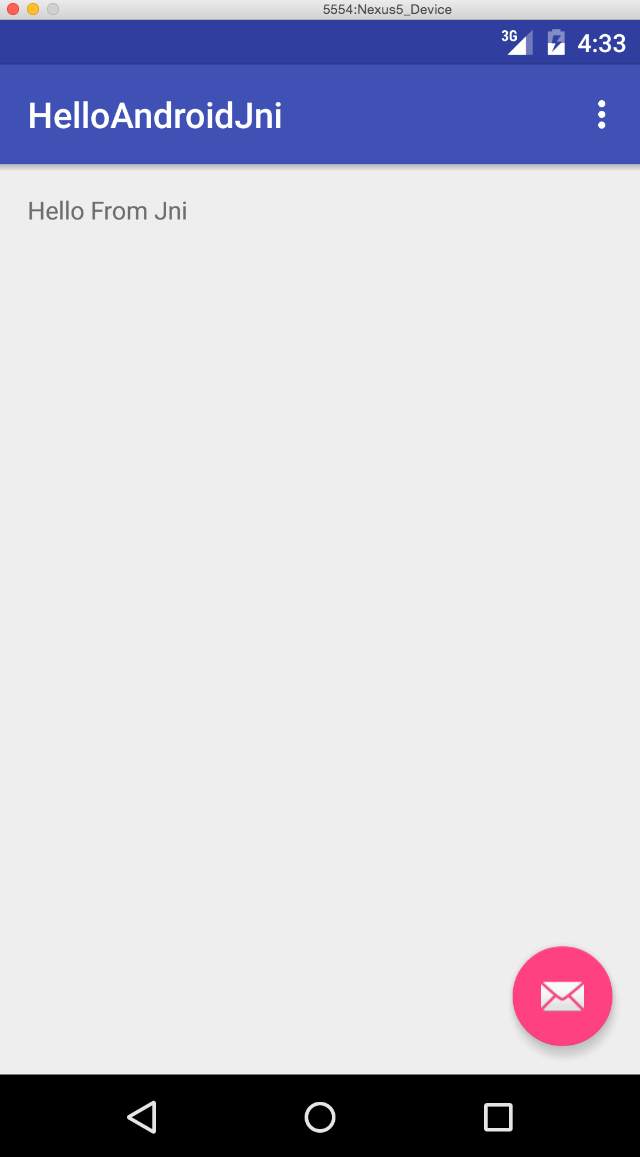
- Browse the Native Code
- Select "NewStringUTF" inside hello-android-jni.c, "right click" to bring up the pop-up menu.
- Select "Go To", and "Implementation(s)".
- You will see the function implementation of "NewStringUTF".
- Select other code to explore the native code browsing feature.
5. Debugging JNI Code
- Click the Run/Debug Configuration

[For Android Studio version earlier than 2.2, select . Android Studio
auto-generates this native debug configuration when it detects JNI code.
In this config, debug configurations are enabled by default. If is not visible, close
this project and reopen it with Android Studio, it will be there; Android
Studio version 2.2 integrated the debug functionality into app configure]. - Open hello-android-jni.c inside Android
Studio. - Click the left edge of the native code to set
a breakpoint: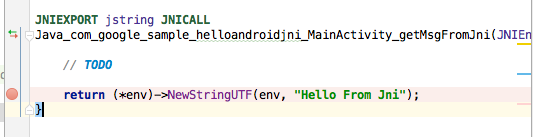
- Click the Debug button

, your android device should prompt "Waiting For
Debugger" message: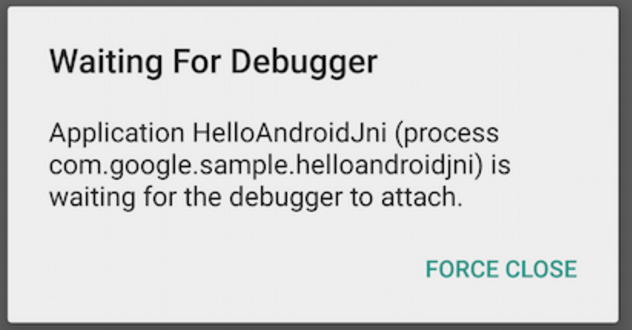
- Wait until Android Studio connects to the
debugger on your device ( it might take 1 - 2 minutes, depending on the
device and OS version ), and stops at the breakpoint.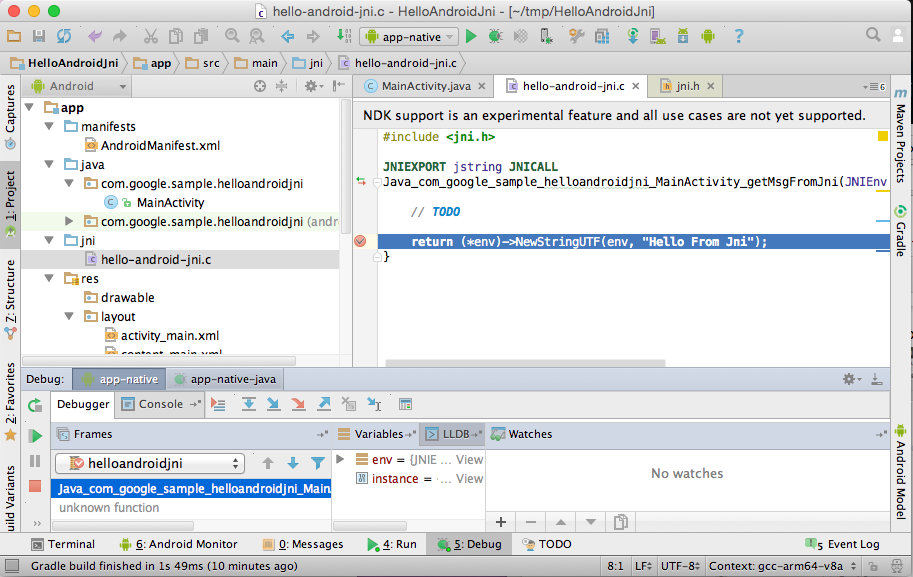
- Click "env" inside the
"Variables" window at the bottom pane of Android Studio to
observe contents of env pointer. - Click "+" at the bottom of the
"Watches" window (next to "Variables") and add "env", Android Studio will bring the content
of env into watch window. The values should be the
same as the values in "Variables" window. - Click the "F8" key to step over, and
menu "Run" > "Resume Program" to continue the
execution.
[Note: if you are using Android Studio
RC 1.5 or better, you can set a breakpoint on getMsgFromJni() in Java code and
"trace into" JNI code]
项目源码 https://github.com/leon-HM/HelloAndroidJni
【转】Create Hello-JNI with Android Studio的更多相关文章
- Co-Debugging JNI with Android Studio and Visual Studio
Tutorials > Android > Integration with other tools > Co-Debugging JNI with Android Studio a ...
- JNI 在Android Studio利用NDK编译运行一个简单的c库
NDK开发,其实是为了项目需要调用底层的一些C/C++的一些东西:另外就是为了效率更加高些.如果你在Eclipse+ADT下开发过NDK就能体会到要么是配置NDK还要下载Cygwin,配置Cygwin ...
- apk反编译(6)ProGuard 工具 android studio版官方教程[作用,配置,解混淆,优化示例]
ProGuard In this document Enabling ProGuard (Gradle Builds) Configuring ProGuard Examples Decoding O ...
- 第七章 : Git 介绍 (上)[Learn Android Studio 汉化教程]
Learn Android Studio 汉化教程 [翻译]Git介绍 Git版本控制系统(VCS)快速成为Android应用程序开发以及常规的软件编程领域内的事实标准.有别于需要中心服务器支持的早期 ...
- Android Studio 中关于NDK编译及jni header生成的问题
之前由于工作原因使用grails这个基于groovy的框架做项目,对groovy感觉很好. 基于groovy的gradle构建系统对我而言自然也是好的没得说. Android Studio 正式版出来 ...
- Android Studio使用JNI
0x01 前言 本文讲述使用Android Studio通过静态注册.动态注册使用JNI的方法,以及加载第三方so文件的方法 0x02 Android Studio静态注册的方式使用JNI 1. 添加 ...
- Android studio 配置JNI环境
Android studio配置jni开发环境,主要配置是两个build文件,以及新建一个jni文件,放c代码. 代码如下1: apply plugin: 'com.android.model.app ...
- Android Studio 项目中集成百度地图SDK报Native method not found: com.baidu.platform.comjni.map.commonmemcache.JNICommonMemCache.Create:()I错误
Android Studio 项目中集成百度地图SDK报以下错误: java.lang.UnsatisfiedLinkError: Native method not found: com.baidu ...
- 超级简单的Android Studio jni 实现(无需命令行)
1.配置Anroid Studio(这步是关键) 使用[command+,] 打开Preferences,选择External Tools,点击加号框如下图: Paste_Image.png 点击+号 ...
随机推荐
- darknet源码学习
darknet是一个较为轻型的完全基于C与CUDA的开源深度学习框架,其主要特点就是容易安装,没有任何依赖项(OpenCV都可以不用),移植性非常好,支持CPU与GPU两种计算方式.1.test源码( ...
- linux sdk配置
http://blog.csdn.net/wudj810818/article/details/51251408,环境变量配置不要用 SDK环境变量: export PATH=$PATH:/opt/a ...
- mysql函数之七:replace() MySQL批量替换指定字段字符串
mysql replace实例说明: UPDATE tb1 SET f1=REPLACE(f1, 'abc', 'def'); REPLACE(str,from_str,to_str) 在字符串 st ...
- React.js:template
ylbtech-React.js: 1.返回顶部 2.返回顶部 3.返回顶部 4.返回顶部 5.返回顶部 6.返回顶部 作者:ylbtech出处:http://ylbtec ...
- 查看Spring源码的方法
来自为知笔记(Wiz)
- <%@ Page Language="C#" AutoEventWireup="true" CodeFile="Login.aspx.cs" Inherits="Login" %>
<%@ Page Language="C#" AutoEventWireup="true" CodeFile="Login.aspx.cs&qu ...
- Subresource Integrity(子资源一致性)和JS DDos 攻击
以下文章转载自 http://www.cnblogs.com/zoucaitou/p/4505483.html 和 http://www.puronglong.com/blog//2015/04/12 ...
- python 三元表达式 列表推导式,生成器表达式。递归,匿名函数, 内置函数
三元表达式 三元表达式仅应用于: 1.条件成立返回一个值 2.条件不成立返回一个值 res = x if x>y else y print(res) name= input("姓名&g ...
- art-template在项目中的应用
art-template 是一个简约.超快的模板引擎.它采用作用域预声明的技术来优化模板渲染速度,从而获得接近 JavaScript 极限的运行性能,并且同时支持 NodeJS 和浏览器. 下面介绍在 ...
- 如何将基于对话框的MFC工程改成基于BCG的
1.stdafx.h 加入如下内容.BCGCBProInc.h间接导入了lib. 2.应用程序类的父类由CWinApp改成CBCGPWinApp.构造函数增加如下代码: 3.对话框的父类有CDialo ...