
run a Freight robot (1)
1. Freight robot

The Fetch and Freight Research Edition Robots are indoor laboratory robots.
Coordinate System
The coordinate frames for all links in the Fetch and Freight are defined with positive z-axis up, positive x-axis forward, and positive y-axis to the robot-left when Fetch is in the home pose. All joint angle conventions are chosen such that from the home pose, positive motion of the joint results in positive motion around a positive axis of a joint coordinate frame (i.e. right handed).
Access Panel
Fetch and Freight both have an access panel with 2 USB, an Ethernet, and an HD Video port. All of these ports are connected directly to the onboard computer. In addition, Fetch has an extra USB port on the head.
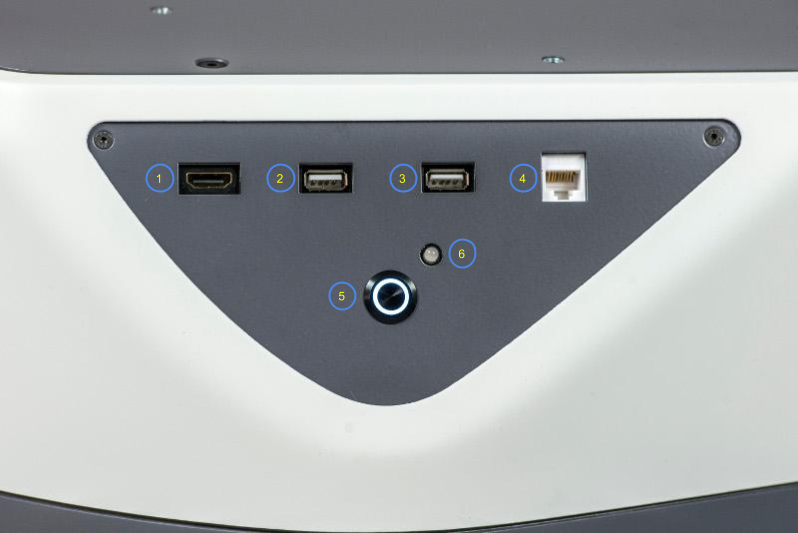
| Item # | Item Name |
|---|---|
| 1 | HD Video Port |
| 2 | USB Port 1 |
| 3 | USB Port 2 |
| 4 | Ethernet Port |
| 5 | Power Button |
| 6 | Charge Indicator Light |
The access panel is also the location of the power button which turns the robot on or off. This switch is connected to the mainboard and will only work if the power disconnect switch (the red one on the lower back of the robot) is in the ON position. Pressing the power button until it lights up with boot the robot, including the computer. To turn the robot off, press and hold the illuminated power button on the access panel until it starts blinking. The button will continue blinking until the computer has successfully shut down, and then power will be disconnected.
Base Laser
Both Fetch and Freight have a SICK TIM571 scanning range finder. The laser has a range of 25m, 220° field of view, 15Hz update rate and angular resolution of 1/3°. The laser publishes both distance and RSSI (Received Signal Strength Indication) to the base_scan topic.
IMU
The mainboard of Fetch and Freight have a 6-axis inertial measurement unit (IMU). The gyroscope within the IMU is capable of measuring +/-2000 degrees per second, while the accelerometers are capable of measuring +/-2g. See IMU Interface for details on the ROS API.
2. Using the Robot Joystick to Teleoperate a Freight robot
Each Fetch and Freight ship with a robot joystick. Whenever the robot drivers are running, so is joystick teleop. The joystick is capable of controlling the movement of the robot base, torso, head and gripper.
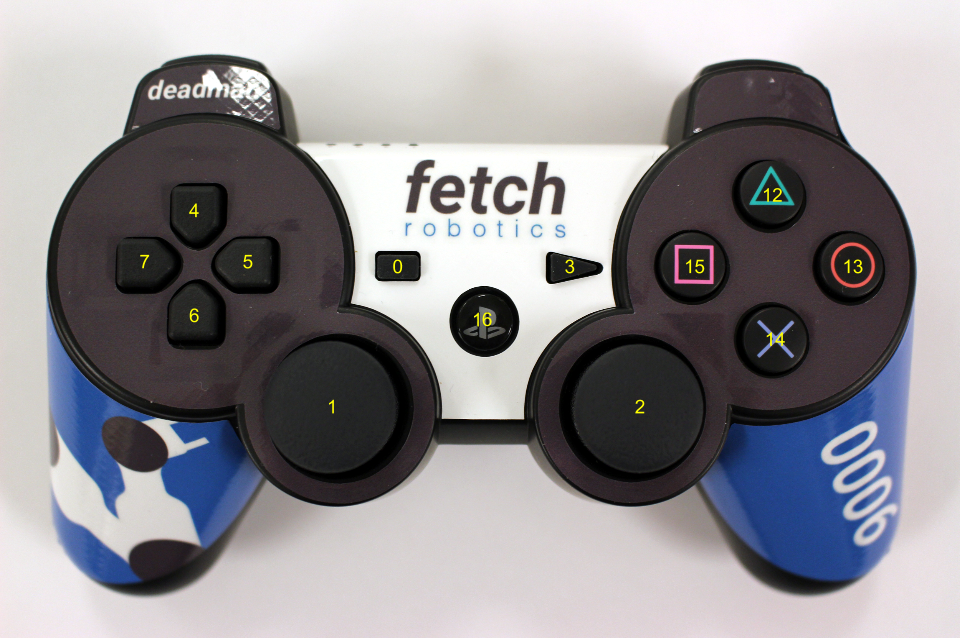
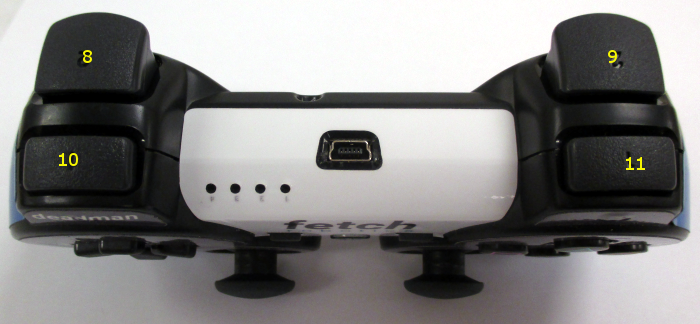
| Button # | Function (details below) |
|---|---|
| 0 | Open gripper |
| 1 | Control robot turning |
| 2 | Control forward/backward driving |
| 3 | Close gripper |
| 4 | Disable motor position holding |
| 5 | Not used |
| 6 | Arm tuck |
| 7 | Not used |
| 8 | Head control deadman |
| 9 | Not used |
| 10 | Primary deadman |
| 11 | Not used |
| 12 | Torso up |
| 13 | Not used |
| 14 | Torso down |
| 15 | Not used |
| 16 | Pair/unpair with robot |
To pair the controller with the robot, press the middle button (16) once the robot has powered on. The controller will vibrate once successful. To unpair, hold the button for 10 s. The LED indicator on top will turn off.
To drive the robot base, hold the primary deadman button (button 10 above) and use the two joysticks. The left joystick controls turning velocity while the right joystick controls forward velocity.
Reference:
Tutorial: Robot Teleop - http://docs.fetchrobotics.com/teleop.html
run a Freight robot (1)的更多相关文章
- run a Freight robot (2)
3. Network Setup Connecting Freight to a Monitor The easiest way to configure the wireless networki ...
- run a Freight robot (3)
5.Logging In Once the robot is turned on and the robot is on the network, ssh into the computer of t ...
- Simulating a Freight robot in Gazebo
Installation Before installing the simulation environment, make sure your desktop is setup with a st ...
- implement "slam_karto" package on a Freight robot
1. login ssh fetch@<robot ip or robot name> 2. set robot master modify .bashrc in robot's com ...
- 几个bat文件(关于robot freamwork安装)
如果安装后 没有这几文件,或者在运行后 提示 文件缺少这个文件 , 就需要手动创建. 一般文件在 :C:\Python27\Scripts 这个目录下 1.pybot.bat文件: @echo o ...
- robot framework + win7 64 上的安装
1.安装 python 2.7 2.cmd 管理模式 python -m pip install --upgrade pip pip install robotframework==3. ...
- Robot Framework(一)入门
1.1简介 Robot Framework是一个基于Python的,可扩展的关键字驱动的测试自动化框架,用于端到端验收测试和验收测试驱动开发(ATDD).它可用于测试分布式异构应用程序,其中验证需要涉 ...
- robotframework笔记19
后处理输出 使用时自动测试 在测试执行报告和日志生成,并使用它 分别允许创建自定义报告和日志以及结合 和合并的结果. 使用Rebot 简介 rebot [options] robot_outputs ...
- robotframework笔记1
机器人框架是一个基于Python的,可扩展的关键字驱动的自动化测试最终到终端的验收测试和验收测试驱动开发(ATDD)框架.它可用于检测分布式异类应用程序,其中,验证要求感人几种技术和接口. 下面列出了 ...
随机推荐
- systemctl 启动成功却提示没有权限(解决)
现象: systemctl 启动svnserve成功,却在提交svn时提示没有权限. systemctl 启动smb成功,却在samba访问时提示没有权限. 但手动启动svnserve和smb后,问题 ...
- Sublime Text设置快捷键让html文件在浏览器打开
一.安装View In Browser插件 快捷键 Ctrl+Shift+P(菜单栏Tools->Command Paletter),输入 pcip选中Install Package并回车,输入 ...
- CentOS6.5系统软件仓库及挂载NTFS
第一步:下载rpmforge,下载对应的版本,就是对应CentOS版本,还有32位与64位也要对应上.rpmforge拥有4000多种CentOS的软件包,被CentOS社区认为是最安全也是最稳定的一 ...
- linux用户栈内核栈的设置---进程的创建: fork/execve【转】
转自:http://blog.csdn.net/u011279649/article/details/18795547 版权声明:本文为博主原创文章,未经博主允许不得转载. 目录(?)[-] 应用层怎 ...
- [转]clrDateTime to Dynamics AX TransDate
转自:https://community.dynamics.com/ax/f/33/t/30791.aspx TransDate是一种只有日期,没有时间的类型 utcDateTime=Global:: ...
- javascript || and &&
<!DOCTYPE html PUBLIC "-//W3C//DTD XHTML 1.0 Transitional//EN" "http://www.w3.org/ ...
- IIS管理网站浏览
7.“/”应用程序中的服务器错误. 分析器错误 说明: 在分析向此请求提供服务所需资源时出错.请检查下列特定分析错误详细信息并适当地修改源文件.分析器错误消息: 文件“/Default.aspx.cs ...
- android 数据库操作详解
请看郭大神的八篇专栏,包含sql语句 android封装的databasehelper 和郭大神自己的LitePal 三种使用详解 http://blog.csdn.net/column/deta ...
- js获取随机色
方法一: var getRandomColor = function(){ return '#' + (function(color){ return (color += '0123456789abc ...
- [团队项目3.0]Scrum团队成立
Scrum团队成立 5.Scrum团队成立 5.1 团队名称,团队目标.团队口号.团队照: 5.2 角色分配 产品负责人: 决定开发内容和优先级排序,最大化产品以及开发团队工作的价值. Scrum M ...