SpringCloud实践引入注册中心+配置中心
随着服务数量的增多,尤其是多数项目涉及jni本地方法的调用,所需参数配置较多,同时内存溢出等维护问题时常发生.鉴于此,原tomcat集群的使用已难满足需求,而微服务的思想契合当前项目实践,特在服务端构建起高可用eureka_server注册中心集群/config_server配置中心集群,完成对应用和git配置文件的管理.同时考虑到服务器集群并发清洗数据的必要性,构建起了ribbon+zuul负载均衡集群(后续完成)并在实践中效果显著.整体而言,微服务的引用改善了项目开发和日常维护/迭代过程纷乱的现状.特整理注册中心和配置中心构建过程博客如下:
一 . 环境一览:
- 开发系统:Ubuntu 16.04 生产/测试系统:Cent OS 6
- 版本: SpringBoot 1.5.19 + SpringCloud Edgware.SR5 (idea构建自动匹配) + JDK 1.8
二 . 注册中心:
1.构建maven父工程 (便于开发环境项目管理),默认即可.
2.新建注册中心模块
new Module -> Spring Initializr --- Module SDK: 1.8 + Initializr Service URL - Default
-> Project Metadata:完成Group + Artifact + Version + Package的配置
-> Dependencies:
-> SpringBoot - 1.5.19
-> Cloud Discovery - Eureka Server
-> Finish
构建过程基于 IDEA新建Maven模块流程
3.启动类配置:
新增 @EnableEurekaServer 注解即可.
@EnableEurekaServer

@SpringBootApplication

public class RosettaEurekaServer1Application {

    public static void main( String[] args ) {

        SpringApplication.run(RosettaEurekaServer1Application.class,args);

    }

}
4.应用配置:
注意:此处构建为 eureka_server 集群 , 故而开发对自身的注册(单实例设置为false即可),同时默认注册中心为另一实例路径,具体配置如下:
server:

  port:

eureka:

  client:

    register-with-eureka: true # Eureka Server向自己注册

    fetch-registry: true

    service-url:

      defaultZone:

        http://127.0.0.1:8762/eureka

  server:

    enable-self-preservation: false

    wait-time-in-ms-when-sync-empty:

spring:

  application:

    name: resetta_eureka_server

  jackson:

    time-zone: GMT+
5.同上,构建另一eureka注册中心实例
结合4,配置如下 ( 注意: 实例名相同 ):
server:

  port:

eureka:

  client:

    register-with-eureka: true

    fetch-registry: true

    service-url:

      defaultZone:

        http://127.0.0.1:8761/eureka

  server:

    enable-self-preservation: false

    wait-time-in-ms-when-sync-empty:

spring:

  application:

    name: resetta_eureka_server

  jackson:

    time-zone: GMT+
6.构建 eureka_client 测试
1) 新建 eureka_client 模块:
同 二 - 2 , 只在 pom依赖环节改动如下:
Dependencies:
-> Spring Boot - 1.5.19
-> Cloud Discovery - Eureka Discovery
Finish
2) 启动类配置:
新增 @EnableDiscoveryClient 注解
@EnableDiscoveryClient

@SpringBootApplication

public class EurekaClientTestApplication {

    public static void main(String[] args) {

        SpringApplication.run(EurekaClientTestApplication.class, args);

    }

}
3) 应用配置:
注意:因由多个注册中心,故在配置时指定多个实例,具体如下:
eureka:

  client:

    service-url:

      defaultZone: http://127.0.0.1:8761/eureka, http://127.0.0.1:8762/eureka

server:

  port:

spring:

  application:

    name: eureka_client

  cloud:

    config:

      allow-override: true

      override-system-properties: false

# 在eureka集群中,需注意关闭安全组件

management:

  security:

    enabled: false
7.依次启动注册中心/测试实例
注:idea有一好用的实例启动视图 - RunDashbord . 如果实例启动未加载至该视图 , 可做以下修改
a. 找到项目根目录下 .idea - workspace.xml 配置文件
b. 找到文件夹下的 RunDashboard 组件, 设置 配置类型( configurationTypes )为 ( SpringBootApplicationConfigurationType )
c. 最终该组件配置如下:
<component name="RunDashboard">

    <option name="configurationTypes">

      <set>

        <option value="SpringBootApplicationConfigurationType" />

      </set>

    </option>

    <option name="ruleStates">

      <list>

        <RuleState>

          <option name="name" value="ConfigurationTypeDashboardGroupingRule" />

        </RuleState>

        <RuleState>

          <option name="name" value="StatusDashboardGroupingRule" />

        </RuleState>

      </list>

    </option>

</component>
d.Run Dashboard 视图启动效果如下:
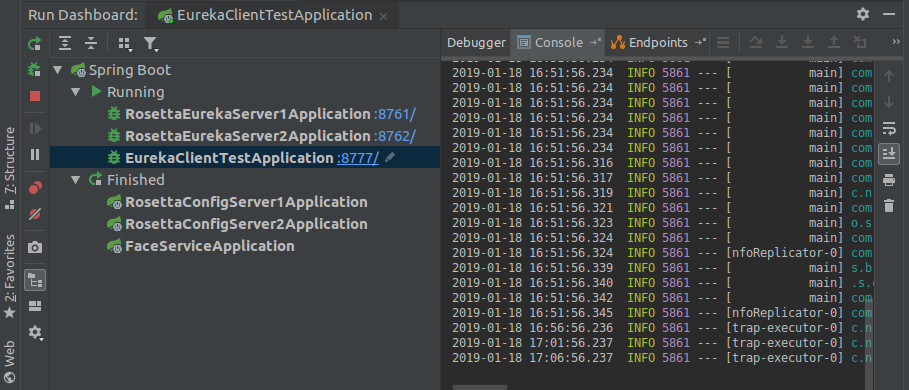
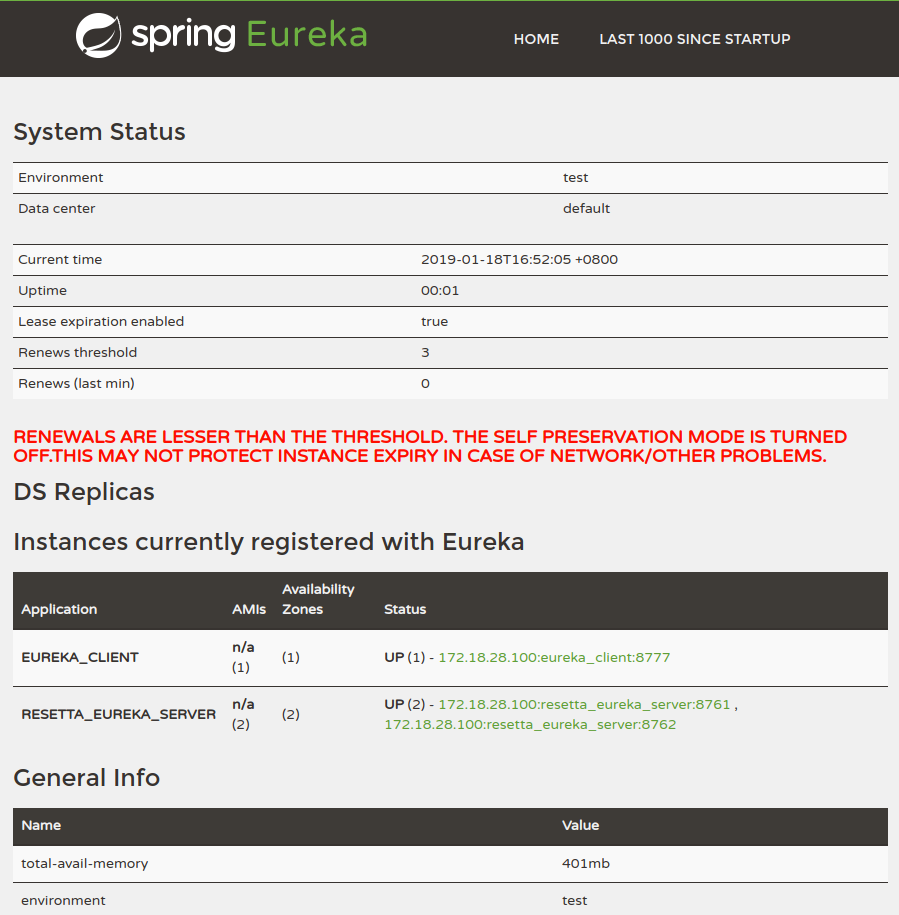
项目启动完毕后,进入 localhost:8761 / localhost:8762 查看各实例运行状态,截图如下:
三 . 配置中心
配置中心的构建,有些分歧,这里暂提供行之有效的终版也是简略版.
1. 基于 二 中 maven 父工程 , 新建配置中心 模块
同 二 - 2 , 只在 pom依赖环节改动如下:
Dependencies:
-> Spring Boot - 1.5.19
-> Cloud Config - Config Server
-> Cloud Discovery - Eureka Discovery
2. 启动类配置
新增 @EnableConfigServer / @EnableEurekaClient 注解 :
@EnableEurekaClient

@EnableConfigServer

@SpringBootApplication

public class RosettaConfigServer1Application {

    public static void main(String[] args) {

        SpringApplication.run(RosettaConfigServer1Application.class, args);

    }

}
3. 应用配置
eureka:

  client:

    service-url:

      defaultZone: http://172.18.28.100:8761/eureka, http://172.18.28.100:8762/eureka

server:

  port:

spring:

  application:

    name: rosetta_config_server

  cloud:

    config:

      server:

        git:

          uri: git@*.*.*.*:~/git/rosetta_cloud_config.git # 管理配置文件git服务器端路径

          search-paths: test # 对应的配置文件路径

          username: git

          password:

      label: master # 分支
4. 构建配置中心另一实例
同 3 , 除 端口不同
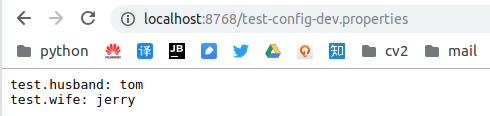
5. 启动测试 , 及 git服务端配置文件命名规约
Configuration Server 端点与配置文件的映射规则如下:
/{applicaiton}/{profile}[/{label}]

/{appllication}-{profile}.yml

/{label}/{application}-{profile}.yml

/{application}-{profile}.properties

/{label}/{application}-{profile}.properties
启动配置中心实例,根据上述规约测试配置信息如下:
6. Config Client 的使用
1) 根据 二 中 maven 父工程 , 新建配置客户端 模块:
pom依赖方面, 因需要时常刷新配置,故需采用 config client 结合 actuator的 /refresh的使用方式.依赖如下:
Dependencies:
Spring Boot - 1.5.19
Cloud Config - Config Client
Cloud Discovery - Eureka Discovery
Ops - Actuator
2) 启动类配置:
此处只需保留 @EnableEurekaClient 即可
3) 启动配置:
application.yml
management.security.enabled 置为 false , 免去调用/refresh时的权限验证
eureka:

  client:

    service-url:

      defaultZone: http://172.18.28.100:8761/eureka, http://172.18.28.100:8762/eureka

spring:

  application:

    name: test-config

server:

  port:

management:

  security:

    enabled: false
bootstrap.yml
spring:

  cloud:

    config:

      fail-fast: true

      label: master

      profile: dev

      discovery:

        enabled: true

        service-id: rosetta_config_server
4). 配置文件类:
@Component

@ConfigurationProperties(prefix = "test")

@RefreshScope

public class PersonConfigRemote {

    private String husband;

    private String wife;

    public String getHusband() {

        return husband;

    }

    public void setHusband(String husband) {

        this.husband = husband;

    }

    public String getWife() {

        return wife;

    }

    public void setWife(String wife) {

        this.wife = wife;

    }

}
5) 接口测试:
@RestController

@RequestMapping("/test")

public class TestConfig {

    @Autowired

    private PersonConfigRemote personConfigRemote;

    @GetMapping

    public String test(){

        return personConfigRemote.getHusband() + " --- " + personConfigRemote.getWife();

    }

}
6) 配置信息刷新
Spring提供了@ConfigurationProperties注解,可以将配置属性映射到一个JavaBean , 而且 Actuator 导出 /refresh 服务 , 每当调用这个服务的时候,被@ConfigurationProperties标注的Bean就会刷新属性值 .
注 : /refresh 为 POST 请求.
7) 测试
7. 追加
关于 Spring Cloud Bus + rabbit mq
新增pom:
<dependency>

            <groupId>org.springframework.cloud</groupId>

            <artifactId>spring-cloud-starter-bus-amqp</artifactId>

</dependency>
应用配置如下:
spring:

  application:

    name: rosetta_config_server

  cloud:

    bus:

      trace:

        enabled: true # 开启cloud bus的跟踪

  rabbitmq:

    host: 127.0.0.1

    port:

    username: guest

    password: guest

management:

  security:

    enabled: false
rabbit mq 安装使用 :
docker -> rabbit mq
docker pull rabbitmq:-management

docker run -d --hostname localhost --name myrabbit -p : -p : rabbitmq:-management

参数说明:

-d 后台进程运行

hostname RabbitMQ主机名称

name 容器名称

-p port:port 本地端口:容器端口

-p : http访问端口

-p : amqp访问端口
注:映射2个端口:15672是Web管理界面的端口;5672是MQ访问的端口。
实际应用中,调用 Config Client实例的 /bus/refresh 端点 , 注意 : POST 请求
SpringCloud实践引入注册中心+配置中心的更多相关文章
- springcloud 入门 8 (config配置中心)
Spring Cloud Config: 配置中心为了方便服务配置文件统一管理,实时更新,所以需要分布式配置中心组件,它就是Spring Cloud Config. 在分布式系统中,由于服务数量巨多, ...
- CoSky 高性能 服务注册/发现 & 配置中心
CoSky 基于 Redis 的服务治理平台(服务注册/发现 & 配置中心) Consul + Sky = CoSky CoSky 是一个轻量级.低成本的服务注册.服务发现. 配置服务 SDK ...
- 使用Alibaba的Nacos做为SpringCloud的注册和配置中心,并结合Sentinel+Nocos动态进行限流熔断
最近在学习阿里的Nacos组件以及Sentinel组件,折腾出了一个小demo. Git地址:https://github.com/yangzhilong/nacos-client 有兴趣的小伙伴可以 ...
- SpringCloud(6)分布式配置中心Spring Cloud Config
1.Spring Cloud Config 简介 在分布式系统中,由于服务数量巨多,为了方便服务配置文件统一管理,实时更新,所以需要分布式配置中心组件.在Spring Cloud中,有分布式配置中心组 ...
- SpringCloud基于消息总线的配置中心
@https://www.cnblogs.com/ityouknow/p/6931958.html Spring Cloud Bus Spring cloud bus通过轻量消息代理连接各个分布的节点 ...
- 微服务SpringCloud之Spring Cloud Config配置中心Git
微服务以单个接口为颗粒度,一个接口可能就是一个项目,如果每个项目都包含一个配置文件,一个系统可能有几十或上百个小项目组成,那配置文件也会有好多,对后续修改维护也是比较麻烦,就和前面的服务注册一样,服务 ...
- 微服务SpringCloud之Spring Cloud Config配置中心服务化
在前面两篇Spring Cloud Config配置中心的博客中都是需要指定配置服务的地址url:spring.cloud.config.uri,客户端都是直接调用配置中心的server端来获取配置文 ...
- 白话SpringCloud | 第八章:分布式配置中心的服务化及动态刷新
前言 上一章节,简单介绍了分布式配置中心Spring Cloud Config的使用.同时,我们也遗漏了一些问题,比如如何配置实时生效,当服务端地址变更或者集群部署时,如何指定服务端地址?回想,在服务 ...
- 微服务SpringCloud之Spring Cloud Config配置中心SVN
在回来的路上看到一个个的都抱着花,吃了一路的狗粮,原本想着去旁边的工业园里跑跑步呢,想想还是算了,人家过七夕,俺们过巴西.上一博客学习了Spring Cloud Config使用git作为配置中心,本 ...
随机推荐
- 做了面向互联网部署的Dynamics 365 CE更改AD FS的登录页面
摘要: 微软动态CRM专家罗勇 ,回复306或者20190307可方便获取本文,同时可以在第一间得到我发布的最新博文信息,follow me!我的网站是 www.luoyong.me . 默认情况下A ...
- ServiceHub.DataWarehouseHost.exe内存泄漏问题的处理
Visual Studio 2017的15.2版本在debug应用程序时,ServiceHub.DataWarehouseHost.exe会出现严重的内存泄漏的问题,一个小时左右,内存耗了将近8GB. ...
- Several ports (8005, 8080, 8009) required by Tomcat v9.0 Server at localhost
Several ports (8005, 8080, 8009) required by Tomcat v9.0 Server at localhost 问题:Tomcat服务器的端口被占用 解决: ...
- A Deep Learning-Based System for Vulnerability Detection
本篇文献作者提出了一种基于深度学习来检测软件漏洞的方案. 摘要:作者开始基于深度学习的漏洞检测研究,是为了减轻专家手工定义特性的繁琐任务,需要制定一些指导性原则来适用于深度学习去进行漏洞探 ...
- LeetCode算法题-Minimum Absolute Difference in BST(Java实现)
这是悦乐书的第253次更新,第266篇原创 01 看题和准备 今天介绍的是LeetCode算法题中Easy级别的第120题(顺位题号是530).给定具有非负值的二叉搜索树,找到任意两个节点的值之间的最 ...
- 如何用Nginx解决前端跨域问题?
前言 在开发静态页面时,类似Vue的应用,我们常会调用一些接口,这些接口极可能是跨域,然后浏览器就会报cross-origin问题不给调. 最简单的解决方法,就是把浏览器设为忽略安全问题,设置--di ...
- 认识多线程中start和run方法的区别?
一.认识多线程中的 start() 和 run() 1.start(): 先来看看Java API中对于该方法的介绍: 使该线程开始执行:Java 虚拟机调用该线程的 run 方法. 结果是两个线程并 ...
- springMVC使用HandlerMethodArgumentResolver 自定义解析器实现请求参数绑定方法参数
http://blog.csdn.net/truong/article/details/30971317 http://blog.csdn.net/fytain/article/details/439 ...
- jspdf生成pdf并在页面展示
jspdf调用ouput即可 https://blog.csdn.net/dragonzoebai/article/details/18243823 获取页面生成pdf:jspdf+html2canv ...
- python实现数据结构单链表
#python实现数据结构单链表 # -*- coding: utf-8 -*- class Node(object): """节点""" ...