
微服务SpringCloud之Spring Cloud Config配置中心SVN
在回来的路上看到一个个的都抱着花,吃了一路的狗粮,原本想着去旁边的工业园里跑跑步呢,想想还是算了,人家过七夕,俺们过巴西。上一博客学习了Spring Cloud Config使用git作为配置中心,本篇学习下使用svn作为配置中心。
一、Server 端
1.准备配置文件
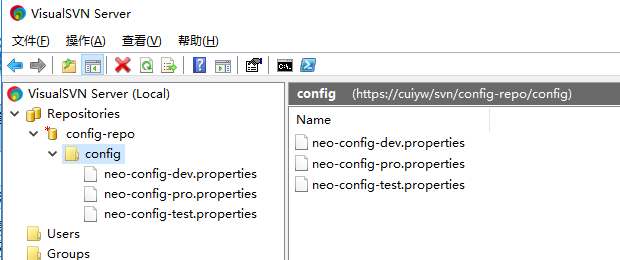
这里在本地电脑安装了下svn server,并在https://cuiyw/svn/config-repo/config目录下提交了上一博客的3个配置文件。
2.创建Spring Cloud Config SVN Server
这里创建了Spring Cloud Config Server项目,并在项目中引入spring-cloud-config-server、svnkit,具体pom.xml如下。
<?xml version="1.0" encoding="UTF-8"?>

<project xmlns="http://maven.apache.org/POM/4.0.0" xmlns:xsi="http://www.w3.org/2001/XMLSchema-instance"

    xsi:schemaLocation="http://maven.apache.org/POM/4.0.0 http://maven.apache.org/xsd/maven-4.0.0.xsd">

    <modelVersion>4.0.0</modelVersion>

    <parent>

        <groupId>org.springframework.boot</groupId>

        <artifactId>spring-boot-starter-parent</artifactId>

        <version>2.1.7.RELEASE</version>

        <relativePath/> <!-- lookup parent from repository -->

    </parent>

    <groupId>com.example</groupId>

    <artifactId>SpringCloudConfigSVNServer</artifactId>

    <version>0.0.1-SNAPSHOT</version>

    <packaging>war</packaging>

    <name>SpringCloudConfigSVNServer</name>

    <description>Demo project for Spring Boot</description>

    <properties>

        <java.version>1.8</java.version>

        <spring-cloud.version>Greenwich.SR2</spring-cloud.version>

    </properties>

    <dependencies>

        <dependency>

            <groupId>org.springframework.boot</groupId>

            <artifactId>spring-boot-starter-web</artifactId>

        </dependency>

        <dependency>

            <groupId>org.springframework.cloud</groupId>

            <artifactId>spring-cloud-config-server</artifactId>

        </dependency>

<!-- https://mvnrepository.com/artifact/org.tmatesoft.svnkit/svnkit -->

<dependency>

    <groupId>org.tmatesoft.svnkit</groupId>

    <artifactId>svnkit</artifactId>

    <version>1.9.3</version>

</dependency>

        <dependency>

            <groupId>org.springframework.boot</groupId>

            <artifactId>spring-boot-starter-tomcat</artifactId>

            <scope>provided</scope>

        </dependency>

        <dependency>

            <groupId>org.springframework.boot</groupId>

            <artifactId>spring-boot-starter-test</artifactId>

            <scope>test</scope>

        </dependency>

    </dependencies>

    <dependencyManagement>

        <dependencies>

            <dependency>

                <groupId>org.springframework.cloud</groupId>

                <artifactId>spring-cloud-dependencies</artifactId>

                <version>${spring-cloud.version}</version>

                <type>pom</type>

                <scope>import</scope>

            </dependency>

        </dependencies>

    </dependencyManagement>

    <build>

        <plugins>

            <plugin>

                <groupId>org.springframework.boot</groupId>

                <artifactId>spring-boot-maven-plugin</artifactId>

            </plugin>

        </plugins>

    </build>

</project>
3.配置文件
在application.properties中设置如下配置。需要配置spring.cloud.config.server.default-label= 否则会报No label found for: trunk错误。
server.port=8003

spring.application.name=spring-cloud-config-server

spring.cloud.config.server.svn.uri=https://cuiyw/svn/config-repo/config/

spring.cloud.config.server.svn.search-paths=

spring.cloud.config.server.svn.username=cuiyw

spring.cloud.config.server.svn.password=123456

spring.profiles.active=subversion

spring.cloud.config.server.default-label=
4.启动类配置
还是在main方法类中设置@EnableConfigServer注解。
5.测试
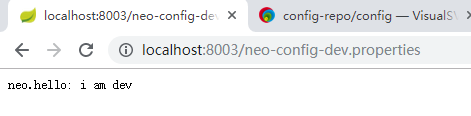
启动之后在浏览器中输入http://localhost:8003/neo-config-dev.properties,则显示该属性文件中的内容。
二、Client端
客户如果只是改动spring.cloud.config.uri=http://localhost:8003/,然后修改配置文件的值。将原来dev属性文件的neo.hello=i am dev改为neo.hello=i am dev new,其实还是不起作用的。Spring Cloud Config分服务端和客户端,服务端负责将git(svn)中存储的配置文件发布成REST接口,客户端可以从服务端REST接口获取配置。但客户端并不能主动感知到配置的变化,从而主动去获取新的配置。客户端如何去主动获取新的配置信息呢,springcloud已经给我们提供了解决方案,每个客户端通过POST方法触发各自的/refresh。
1.引入依赖
这里还需要在Client中引入依赖spring-boot-starter-actuator。
<dependency>

  <groupId>org.springframework.boot</groupId>

  <artifactId>spring-boot-starter-actuator</artifactId>

</dependency>
2.开启更新机制
需要给加载变量的类上面加载@RefreshScope,在客户端执行/refresh的时候就会更新此类下面的变量值
package com.example.demo;

import org.springframework.beans.factory.annotation.Value;

import org.springframework.cloud.context.config.annotation.RefreshScope;

import org.springframework.web.bind.annotation.RequestMapping;

import org.springframework.web.bind.annotation.RestController;

@RestController

@RefreshScope

public class HelloController {

    @Value("${neo.hello}")

    private String hello;

    @RequestMapping("/hello")

    public String from() {

        return this.hello;

    }

}
3.开启暴露端点
management.endpoints.web.exposure.include=*
4.测试
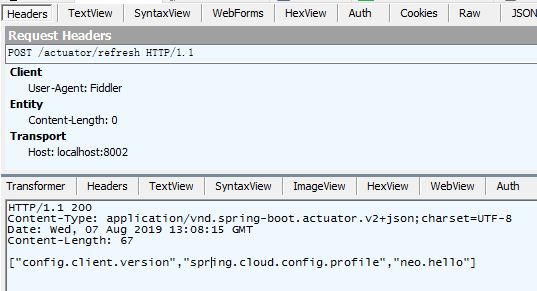
以post请求的方式来访问http://localhost:8002/actuator/refresh就会更新修改后的配置文件。
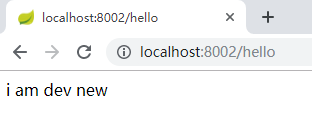
然后在浏览器中输入http://localhost:8002/hello时则会显示svn最新的属性值。
参考:
https://blog.csdn.net/qq_27385301/article/details/82899303
http://www.ityouknow.com/springcloud/2017/05/23/springcloud-config-svn-refresh.html
微服务SpringCloud之Spring Cloud Config配置中心SVN的更多相关文章
- 微服务SpringCloud之Spring Cloud Config配置中心Git
微服务以单个接口为颗粒度,一个接口可能就是一个项目,如果每个项目都包含一个配置文件,一个系统可能有几十或上百个小项目组成,那配置文件也会有好多,对后续修改维护也是比较麻烦,就和前面的服务注册一样,服务 ...
- 微服务SpringCloud之Spring Cloud Config配置中心服务化
在前面两篇Spring Cloud Config配置中心的博客中都是需要指定配置服务的地址url:spring.cloud.config.uri,客户端都是直接调用配置中心的server端来获取配置文 ...
- 跟我学SpringCloud | 第七篇:Spring Cloud Config 配置中心高可用和refresh
SpringCloud系列教程 | 第七篇:Spring Cloud Config 配置中心高可用和refresh Springboot: 2.1.6.RELEASE SpringCloud: Gre ...
- spring cloud --- config 配置中心 [本地、git获取配置文件]
spring boot 1.5.9.RELEASE spring cloud Dalston.SR1 1.前言 spring cloud config 配置中心是什么? 为了统一管理配 ...
- SpringCloud学习笔记(7):使用Spring Cloud Config配置中心
简介 Spring Cloud Config为分布式系统中的外部化配置提供了服务器端和客户端支持,服务器端统一管理所有配置文件,客户端在启动时从服务端获取配置信息.服务器端有多种配置方式,如将配置文件 ...
- Spring Cloud Config 配置中心实践过程中,你需要了解这些细节!
本文导读: Spring Cloud Config 基本概念 Spring Cloud Config 客户端加载流程 Spring Cloud Config 基于消息总线配置 Spring Cloud ...
- Spring Cloud Config 配置中心高可用
详细参见 <Spring Cloud 与 Docker微服务架构实战> p163-9.10 Spring Cloud Config 与 Eureka 配合使用 p163-9.12 Conf ...
- Spring Cloud Config 配置中心 自动加解密功能 jasypt方式
使用此种方式会存在一种问题:如果我配置了自动配置刷新,则刷新过后,加密过后的密文无法被解密.具体原因分析,看 SpringCloud 详解配置刷新的原理 使用 jasypt-spring-boot- ...
- Spring Cloud Config 配置中心
请将远程配置文件的格式写对: 比如使用 *.yml 或者 *.properties yml: testconfig: testvalue properties: testconfig=testvalu ...
随机推荐
- MySQL性能分析之Explain
目录 Explain基础 Explain进阶 Explain基础 关于explain命令相信大家并不陌生,具体用法和字段含义可以参考官网explain-output ,这里需要强调rows是核心指标, ...
- Android使用Camera2获取预览数据
一.Camera2简介 Camera2是Google在Android 5.0后推出的一个全新的相机API,Camera2和Camera没有继承关系,是完全重新设计的,且Camera2支持的功能也更加丰 ...
- Sublime Text 3 安装 BracketHighlighter
1 概述 由于最近在Sublime Text 3安装 BracketHighlighter遇到不少问题,其中踩了不少坑,因此总结下来,形成博客,希望能帮助更多的人 2 电脑环境 windows 10 ...
- 多线程与高并发(四)volatile关键字
上一篇学习了synchronized的关键字,synchronized是阻塞式同步,在线程竞争激烈的情况下会升级为重量级锁,而volatile是一个轻量级的同步机制. 前面学习了Java的内存模型,知 ...
- HDU 6019:MG loves gold(暴力set)
http://acm.hdu.edu.cn/showproblem.php?pid=6019 题意:给出n个颜色的物品,你每次取只能取连续的不同颜色的物品,问最少要取多少次. 思路:从头往后扫,用se ...
- 嵊州D1T4 cf1174E 占梦人
嵊州D1T4 cf1174E 此题为改编题,原题:cf1174E 占梦人 占梦人一个晚上会做 n 个梦,编号为 1 ∼ n,她可以安排做这 n 个梦的顺序. 假如她第一个做了编号为 x 的梦,那么她的 ...
- dockerfile 制作镜像
# Set the base image to UbuntuFROM ubuntu # File Author chenghanMAINTAINER chenghan ################ ...
- JavaScript控制语句结构、函数部分
HTML页面代码: <html> <head> <meta charset="UTF-8"> <title>HelloWorld&l ...
- css3系列之弹性盒子 flex
弹性盒子(伸缩盒) 注意,本篇会很长,非常长, 因为弹性盒子的知识点比较多 搜索 弹性盒子的属性 ctrl + F 如果觉得图太小, ctrl + +键 设置弹性盒子的属性: display:f ...
- vector是序列式容器而set是关联式容器。set包含0个或多个不重复不排序的元素。
1.vector是序列式容器而set是关联式容器.set包含0个或多个不重复不排序的元素.也就是说set能够保证它里面所有的元素都是不重复的.另外对set容器进行插入时可以指定插入位置或者不指定插入位 ...