SSH深度历险(六) 深入浅出----- Spring事务配置的五种方式
这对时间在学习SSH中Spring架构,Spring的事务配置做了详细总结,在此之间对Spring的事务配置只是停留在听说的阶段,总结一下,整体把控,通过这次的学习发觉Spring的事务配置只要把思路理清,还是比较好掌握的。
总结如下:
Spring配置文件中关于事务配置总是由三个组成部分,分别是DataSource、TransactionManager和代理机制这三部分,无论哪种配置方式,一般变化的只是代理机制这部分。
DataSource、TransactionManager这两部分只是会根据数据访问方式有所变化,比如使用Hibernate进行数据访问时,DataSource实际为SessionFactory,TransactionManager的实现为HibernateTransactionManager。
具体如下图:
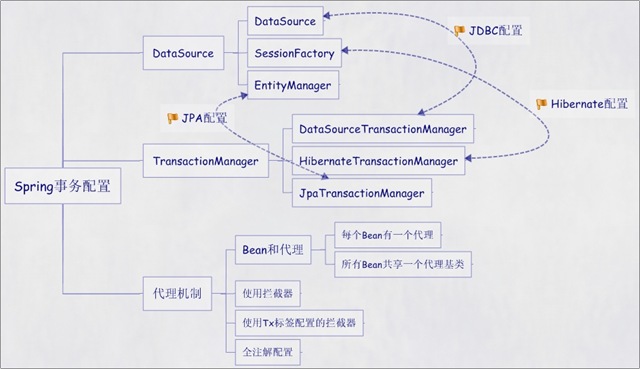
根据代理机制的不同,总结了五种Spring事务的配置方式,配置文件如下:
第一种方式:每个Bean都有一个代理
<span style="font-size:18px;"><span style="font-size:18px;"><?xml version="1.0" encoding="UTF-8"?>

<beans xmlns="http://www.springframework.org/schema/beans"

    xmlns:xsi="http://www.w3.org/2001/XMLSchema-instance"

    xmlns:context="http://www.springframework.org/schema/context"

    xmlns:aop="http://www.springframework.org/schema/aop"

    xsi:schemaLocation="http://www.springframework.org/schema/beans

           http://www.springframework.org/schema/beans/spring-beans-2.5.xsd

           http://www.springframework.org/schema/context

           http://www.springframework.org/schema/context/spring-context-2.5.xsd

           http://www.springframework.org/schema/aop http://www.springframework.org/schema/aop/spring-aop-2.5.xsd">

    <bean id="sessionFactory"

            class="org.springframework.orm.hibernate3.LocalSessionFactoryBean">

        <property name="configLocation" value="classpath:hibernate.cfg.xml" />

        <property name="configurationClass" value="org.hibernate.cfg.AnnotationConfiguration" />

    </bean>

    <!-- 定义事务管理器(声明式的事务) -->

    <bean id="transactionManager"

        class="org.springframework.orm.hibernate3.HibernateTransactionManager">

        <property name="sessionFactory" ref="sessionFactory" />

    </bean>

    <!-- 配置DAO -->

    <bean id="userDaoTarget" class="com.bluesky.spring.dao.UserDaoImpl">

        <property name="sessionFactory" ref="sessionFactory" />

    </bean>

    <bean id="userDao"

        class="org.springframework.transaction.interceptor.TransactionProxyFactoryBean">

           <!-- 配置事务管理器 -->

           <property name="transactionManager" ref="transactionManager" />

        <property name="target" ref="userDaoTarget" />

         <property name="proxyInterfaces" value="com.bluesky.spring.dao.GeneratorDao" />

        <!-- 配置事务属性 -->

        <property name="transactionAttributes">

            <props>

                <prop key="*">PROPAGATION_REQUIRED</prop>

            </props>

        </property>

    </bean>

</beans></span></span>
第二种方式:所有Bean共享一个代理基类
<span style="font-size:18px;"><span style="font-size:18px;"><span style="font-size:18px;"><?xml version="1.0" encoding="UTF-8"?>

<beans xmlns="http://www.springframework.org/schema/beans"

    xmlns:xsi="http://www.w3.org/2001/XMLSchema-instance"

    xmlns:context="http://www.springframework.org/schema/context"

    xmlns:aop="http://www.springframework.org/schema/aop"

    xsi:schemaLocation="http://www.springframework.org/schema/beans

           http://www.springframework.org/schema/beans/spring-beans-2.5.xsd

           http://www.springframework.org/schema/context

           http://www.springframework.org/schema/context/spring-context-2.5.xsd

           http://www.springframework.org/schema/aop http://www.springframework.org/schema/aop/spring-aop-2.5.xsd">

    <bean id="sessionFactory"

            class="org.springframework.orm.hibernate3.LocalSessionFactoryBean">

        <property name="configLocation" value="classpath:hibernate.cfg.xml" />

        <property name="configurationClass" value="org.hibernate.cfg.AnnotationConfiguration" />

    </bean>

    <!-- 定义事务管理器(声明式的事务) -->

    <bean id="transactionManager"

        class="org.springframework.orm.hibernate3.HibernateTransactionManager">

        <property name="sessionFactory" ref="sessionFactory" />

    </bean>

    <bean id="transactionBase"

            class="org.springframework.transaction.interceptor.TransactionProxyFactoryBean"

            lazy-init="true" abstract="true">

        <!-- 配置事务管理器 -->

        <property name="transactionManager" ref="transactionManager" />

        <!-- 配置事务属性 -->

        <property name="transactionAttributes">

            <props>

                <prop key="*">PROPAGATION_REQUIRED</prop>

            </props>

        </property>

    </bean>

    <!-- 配置DAO -->

    <bean id="userDaoTarget" class="com.bluesky.spring.dao.UserDaoImpl">

        <property name="sessionFactory" ref="sessionFactory" />

    </bean>

    <bean id="userDao" parent="transactionBase" >

        <property name="target" ref="userDaoTarget" />

    </bean>

</beans></span></span></span>
第三种方式:使用拦截器
<span style="font-size:18px;"><span style="font-size:18px;"><span style="font-size:18px;"><?xml version="1.0" encoding="UTF-8"?>

<beans xmlns="http://www.springframework.org/schema/beans"

    xmlns:xsi="http://www.w3.org/2001/XMLSchema-instance"

    xmlns:context="http://www.springframework.org/schema/context"

    xmlns:aop="http://www.springframework.org/schema/aop"

    xsi:schemaLocation="http://www.springframework.org/schema/beans

           http://www.springframework.org/schema/beans/spring-beans-2.5.xsd

           http://www.springframework.org/schema/context

           http://www.springframework.org/schema/context/spring-context-2.5.xsd

           http://www.springframework.org/schema/aop http://www.springframework.org/schema/aop/spring-aop-2.5.xsd">

    <bean id="sessionFactory"

            class="org.springframework.orm.hibernate3.LocalSessionFactoryBean">

        <property name="configLocation" value="classpath:hibernate.cfg.xml" />

        <property name="configurationClass" value="org.hibernate.cfg.AnnotationConfiguration" />

    </bean>

    <!-- 定义事务管理器(声明式的事务) -->

    <bean id="transactionManager"

        class="org.springframework.orm.hibernate3.HibernateTransactionManager">

        <property name="sessionFactory" ref="sessionFactory" />

    </bean>

    <bean id="transactionInterceptor"

        class="org.springframework.transaction.interceptor.TransactionInterceptor">

        <property name="transactionManager" ref="transactionManager" />

        <!-- 配置事务属性 -->

        <property name="transactionAttributes">

            <props>

                <prop key="*">PROPAGATION_REQUIRED</prop>

            </props>

        </property>

    </bean>

    <bean class="org.springframework.aop.framework.autoproxy.BeanNameAutoProxyCreator">

        <property name="beanNames">

            <list>

                <value>*Dao</value>

            </list>

        </property>

        <property name="interceptorNames">

            <list>

                <value>transactionInterceptor</value>

            </list>

        </property>

    </bean>

    <!-- 配置DAO -->

    <bean id="userDao" class="com.bluesky.spring.dao.UserDaoImpl">

        <property name="sessionFactory" ref="sessionFactory" />

    </bean>

</beans></span></span></span>
第四种方式:使用tx标签配置的拦截器
<span style="font-size:18px;"><span style="font-size:18px;"><span style="font-size:18px;"><?xml version="1.0" encoding="UTF-8"?>

<beans xmlns="http://www.springframework.org/schema/beans"

    xmlns:xsi="http://www.w3.org/2001/XMLSchema-instance"

    xmlns:context="http://www.springframework.org/schema/context"

    xmlns:aop="http://www.springframework.org/schema/aop"

    xmlns:tx="http://www.springframework.org/schema/tx"

    xsi:schemaLocation="http://www.springframework.org/schema/beans

           http://www.springframework.org/schema/beans/spring-beans-2.5.xsd

           http://www.springframework.org/schema/context

           http://www.springframework.org/schema/context/spring-context-2.5.xsd

           http://www.springframework.org/schema/aop http://www.springframework.org/schema/aop/spring-aop-2.5.xsd

           http://www.springframework.org/schema/tx http://www.springframework.org/schema/tx/spring-tx-2.5.xsd">

    <context:annotation-config />

    <context:component-scan base-package="com.bluesky" />

    <bean id="sessionFactory"

            class="org.springframework.orm.hibernate3.LocalSessionFactoryBean">

        <property name="configLocation" value="classpath:hibernate.cfg.xml" />

        <property name="configurationClass" value="org.hibernate.cfg.AnnotationConfiguration" />

    </bean>

    <!-- 定义事务管理器(声明式的事务) -->

    <bean id="transactionManager"

        class="org.springframework.orm.hibernate3.HibernateTransactionManager">

        <property name="sessionFactory" ref="sessionFactory" />

    </bean>

    <tx:advice id="txAdvice" transaction-manager="transactionManager">

        <tx:attributes>

            <tx:method name="*" propagation="REQUIRED" />

        </tx:attributes>

    </tx:advice>

    <aop:config>

        <aop:pointcut id="interceptorPointCuts"

            expression="execution(* com.bluesky.spring.dao.*.*(..))" />

        <aop:advisor advice-ref="txAdvice"

            pointcut-ref="interceptorPointCuts" />

    </aop:config>

</beans></span></span></span>
第五种方式:全注解
<span style="font-size:18px;"><span style="font-size:18px;"><span style="font-size:18px;"><?xml version="1.0" encoding="UTF-8"?>

<beans xmlns="http://www.springframework.org/schema/beans"

    xmlns:xsi="http://www.w3.org/2001/XMLSchema-instance"

    xmlns:context="http://www.springframework.org/schema/context"

    xmlns:aop="http://www.springframework.org/schema/aop"

    xmlns:tx="http://www.springframework.org/schema/tx"

    xsi:schemaLocation="http://www.springframework.org/schema/beans

           http://www.springframework.org/schema/beans/spring-beans-2.5.xsd

           http://www.springframework.org/schema/context

           http://www.springframework.org/schema/context/spring-context-2.5.xsd

           http://www.springframework.org/schema/aop http://www.springframework.org/schema/aop/spring-aop-2.5.xsd

           http://www.springframework.org/schema/tx http://www.springframework.org/schema/tx/spring-tx-2.5.xsd">

    <context:annotation-config />

    <context:component-scan base-package="com.bluesky" />

    <tx:annotation-driven transaction-manager="transactionManager"/>

    <bean id="sessionFactory"

            class="org.springframework.orm.hibernate3.LocalSessionFactoryBean">

        <property name="configLocation" value="classpath:hibernate.cfg.xml" />

        <property name="configurationClass" value="org.hibernate.cfg.AnnotationConfiguration" />

    </bean>

    <!-- 定义事务管理器(声明式的事务) -->

    <bean id="transactionManager"

        class="org.springframework.orm.hibernate3.HibernateTransactionManager">

        <property name="sessionFactory" ref="sessionFactory" />

    </bean>

</beans></span></span></span>
此时在DAO上需加上@Transactional注解,如下:
<span style="font-size:18px;"><span style="font-size:18px;"><span style="font-size:18px;">package com.bluesky.spring.dao;

import java.util.List;

import org.hibernate.SessionFactory;

import org.springframework.beans.factory.annotation.Autowired;

import org.springframework.orm.hibernate3.support.HibernateDaoSupport;

import org.springframework.stereotype.Component;

import com.bluesky.spring.domain.User;

@Transactional

@Component("userDao")

public class UserDaoImpl extends HibernateDaoSupport implements UserDao {

    public List<User> listUsers() {

        return this.getSession().createQuery("from User").list();

    }

}</span></span></span>
总结
XML配置方式
优点:
1. XML配置方式进一步降低了耦合,使得应用更加容易扩展,即使对配置文件进一步修改也不需要工程进行修改和重新编译。
2.在处理大的业务量的时候,用XML配置应该更加好一些。因为XML更加清晰的表明了各个对象之间的关系,各个业务类之间的调用。同时spring的相关配置也能一目了然。
当然,有人会说,用XML配置,在大的业务量时候会使得XML文件过大,不容易查看。这一点我们完全可以利用业务分解书写多个XML配置文件就可以了。
缺点:
配置文件读取和解析需要花费一定的时间,配置文件过多的时候难以管理,无法对配置的正确性进行校验,增加了测试难度。
annotation配置的优缺点:
优点:
1. 在class文件中,可以降低维护成本,annotation的配置机制很明显简单
2. 不需要第三方的解析工具,利用java反射技术就可以完成任务
3. 编辑期可以验证正确性,差错变得容易
4. 提高开发效率
缺点:
1. 如果需要对于annotation进行修改,那么要重新编译整个工程
2. 业务类之间的关系不如XML配置那样容易把握。
3. 如果在程序中annotation比较多,直接影响代码质量,对于代码的简洁度有一定的影响。
SSH内容很多,先从宏观把控,在项目中历练……多多总结、思路清晰;为了提高系统的灵活性与降低维护成本,提高效率使用到了很多的配置文件来回调用、返回,涉及到很多联系,这个时候真的有必要画图,一切尽在图中展示吧,画出自己的思维方式。
SSH深度历险(六) 深入浅出----- Spring事务配置的五种方式的更多相关文章
- Spring事务配置的五种方式(转发)
Spring事务配置的五种方式(原博客地址是http://www.blogjava.net/robbie/archive/2009/04/05/264003.html)挺好的,收藏转发 前段时间对Sp ...
- Spring事务配置的五种方式和spring里面事务的传播属性和事务隔离级别
转: http://blog.csdn.net/it_man/article/details/5074371 Spring事务配置的五种方式 前段时间对Spring的事务配置做了比较深入的研究,在此之 ...
- Spring事务配置的五种方式(转载)
Spring配置文件中关于事务配置总是由三个组成部分,分别是DataSource.TransactionManager和代理机制这三部分,无论哪种配置方式,一般变化的只是代理机制这部分. DataSo ...
- Spring事务配置的五种方式
Spring配置文件中关于事务配置总是由三个组成部分,分别是DataSource.TransactionManager和代理机制这三部分,无论哪种配置方式,一般变化的只是代理机制这部分. DataSo ...
- Spring事务配置的五种方式 -- 越往后需要Spring版本越高
第五种 基本零配置 个人感觉第四种也可以 Spring配置文件中关于事务配置总是由三个组成部分,分别是DataSource.TransactionManager和代理机制这三部分,无论哪种配置方式, ...
- Spring事务配置的五种方式(转)
前段时间对Spring的事务配置做了比较深入的研究,在此之间对Spring的事务配置虽说也配置过,但是一直没有一个清楚的认识.通过这次的学习发觉Spring的事务配置只要把思路理清,还是比较好掌握的. ...
- Spring事务配置的五种方式 巨全!不看后悔,一看必懂!
前段时间对Spring的事务配置做了比较深入的研究,在此之间对Spring的事务配置虽说也配置过,但是一直没有一个清楚的认识.通过这次的学习发觉Spring的事务配置只要把思路理清,还是比较好掌握的. ...
- (转)Spring事务配置的五种方式
前段时间对Spring的事务配置做了比较深入的研究,在此之间对Spring的事务配置虽说也配置过,但是一直没有一个清楚的认识.通过这次的学习发觉Spring的事务配置只要把思路理清,还是比较好掌握的. ...
- [JavaEE] Spring事务配置的五种方式
前段时间对Spring的事务配置做了比较深入的研究,在此之间对Spring的事务配置虽说也配置过,但是一直没有一个清楚的认识.通过这次的学习发觉Spring的事务配置只要把思路理清,还是比较好掌握的. ...
随机推荐
- BZOJ4942【noi2017】整数
题目背景 在人类智慧的山巅,有着一台字长为10485761048576 位(此数字与解题无关)的超级计算机,著名理论计算机科 学家P博士正用它进行各种研究.不幸的是,这天台风切断了电力系统,超级计算机 ...
- 某些情况下调用函数为什么要在函数名前加“(void)”
我们知道,在定义函数时,加在函数名前的"void"表示该函数没有返回值.但在调用时,在函数名前加"(void)"的作用又是什么呢? 最明显的一点就是表示程序并不 ...
- Tensorflow从入门到精通之——Tensorflow基本操作
前边的章节介绍了什么是Tensorflow,本节将带大家真正走进Tensorflow的世界,学习Tensorflow一些基本的操作及使用方法.同时也欢迎大家关注我们的网站和系列教程:http://ww ...
- js 输入密码框遇到的问题
上次公司项目需要用到密码输入框,如图所示: 首先设计是设置六个div,然后放置六个input. 动态方面然根据键盘onkey事件进行判断,当按键放松时使前一个input失去焦点,下一个input获取焦 ...
- Linux下安装java的jdk和配置环境变量
每次感觉配这个超级简单 但是每次都要查下 记一下好了 Linux下安装jdk,步骤如下 1:下载jdk包:本章使用的为后缀为tar.gz的文件(不需要安装),如jdk-8u111-linux-x64. ...
- 关于centos版本安装ethereum钱包
安装go wget https://studygolang.com/dl/golang/go1.9.linux-amd64.tar.gz --no-check-certificatetar -zxvf ...
- ubuntu 卸载从源码安装的 emacs
由于配置问题想卸了重装. 解压并进入你的源码所在目录: ./configure sudo make uninstall Done Reference: http://askubuntu.com/que ...
- 存出和载入Docker镜像
存出镜像 如果要导出镜像到本地文件,可以使用 docker save 命令. $ sudo docker images REPOSITORY TAG IMAGE ID CREATED VIRTUAL ...
- Sybase identity 字段
1.identity Oracle, DB2, pgSQL中都有sequence的概念,这个概念比Identity先进很多,在Sybase中没有Sequence对象,与之相对应的是Identity 2 ...
- hexo常用命令
Hexo 约有二十个命令,但普通用户经常使用的只有下列几个: hexo s hexo s是hexo server的缩写,命令效果一致:启动本地服务器,用于预览主题.默认地址: http://local ...