
学习ASP.NET Core Blazor编程系列二十六——登录(5)
九、模拟登录
登录的本质原理同网页应用是一样的,一般的流程是:
用户打开登页--》输入账号密码后提交表单--》服务端验证成功后生成cookie信息写入浏览器--》之后用户访问页面时浏览器会带上此cookie信息作为用户标识--》服务端解析此cookie信息就能识别这个用户了。
在webapi出现之后,出现了JWT这样的认证方式,原理大同小异,相同的是, 认证信息都是保存在请求头中传递的,不同是JWT中的认证信息需要编码写入请求头之后再发送请求,不像浏览器,发送请求时会自动带上cookie信息,不需要编码。
Blazor中的登录流程可以分成几下几个步骤:
- 启用验证
- 制作自定义AuthenticationStateProvider
- 修改App.razor
- 使用AuthorizeView和进行登录验证和角色授权
自定义AuthenticationStateProvider
首先来理解一下什么是AuthenticationStateProvider。AuthenticationStateProvider是一个抽象类,由Microsoft.AspNetCore.Components.Authorization类库提供,主要用来提供当前用户的认证状态信息。既然是抽象类,我们需要自定义一个它的子类,由于是模拟登录,进行登录流程的验证,因此我们先来做一个测试的Provider来试试。
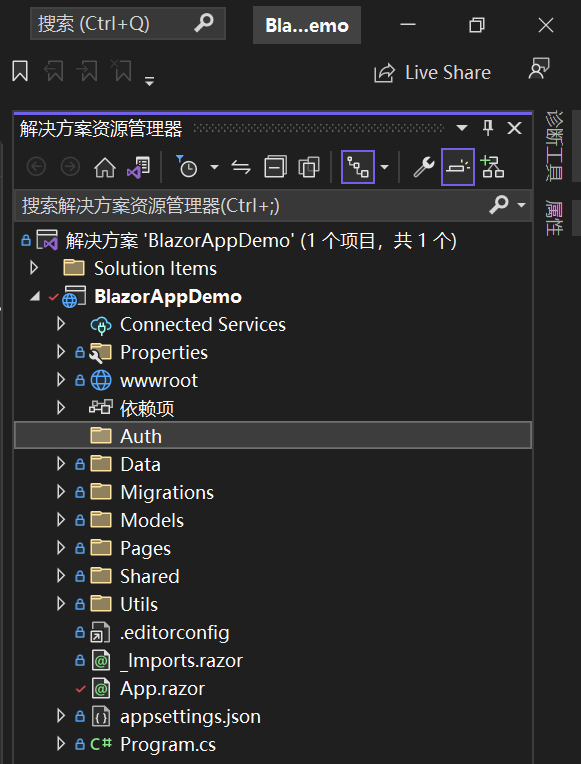
1. 在Visual Studio 2022的解决方案资源管理器中,在项目名称“BlazorAppDemo”上单击鼠标右键,在弹出菜单中选择“添加—>新建文件夹”,并将之命名为“Auth”。如下图。
2. 在Visual Studio 2022的解决方案资源管理器中,鼠标左键选中“Auth”文件夹,右键单击,在弹出菜单中选择“添加—>类”,并将类命名为“ImitateAuthStateProvider”。 AuthStateProvider类的最核心方法是 Task<AuthenticationState> GetAuthenticationStateAsync()。基于最简单的登录机制,我们的扩展提供程序如下。具体代码如下:
using BlazorAppDemo.Models;

using Microsoft.AspNetCore.Components.Authorization;

using System.Security.Claims;

namespace BlazorAppDemo.Auth

{

    public class ImitateAuthStateProvider : AuthenticationStateProvider

    {

        bool isLogin = false;

        public override Task<AuthenticationState> GetAuthenticationStateAsync()

        {

            if (isLogin)

            {

                var claims = new List<Claim>()

            {

                new Claim(ClaimTypes.Name,"user"),

                new Claim(ClaimTypes.Role, "admin")

            };

                var anonymous = new ClaimsIdentity(claims, "testAuthType");

                return Task.FromResult(new AuthenticationState(new ClaimsPrincipal(anonymous)));

            }

            else

            {

            var anonymous = new ClaimsIdentity();

            return Task.FromResult(new AuthenticationState(new ClaimsPrincipal(anonymous)));

        }

        }

        public void Login(UserInfo request)

        {

            if (request.UserName == "user" && request.Password == "111111")

                isLogin = true;

            NotifyAuthenticationStateChanged(GetAuthenticationStateAsync());

        }

    }

}
ImitateAuthStateProvider继承AuthenticationStateProvider,并重写GetAuthenticationStateAsync方法。
- var anonymous = new ClaimsIdentity();:我们现在进行模拟登录,先做一个匿名的使用者,所以ClaimsIdentity的构造方法中不传参数。
- 返回AuthenticationState。
- 我们给ClaimsIdentity一个List<Claim>属性,其中有使用者的名字和角色,表示我们已登录成功。
3. 在Visual Studio 2022的解决方案资源管理器中,使用鼠标双击在文本编辑器中打开Program.cs文件,使用
builder.Services.AddScoped<ImitateAuthStateProvider>();

builder.Services.AddScoped<AuthenticationStateProvider>(implementationFactory =>

implementationFactory.GetRequiredService<ImitateAuthStateProvider>());
;这二行代码使用DI方式注入ImitateAuthStateProvider。具体代码如下:
using BlazorAppDemo.Data;

using BlazorAppDemo.Models;

using Microsoft.AspNetCore.Components;

using Microsoft.AspNetCore.Components.Web;

using Microsoft.Extensions.Configuration;

using Microsoft.EntityFrameworkCore;

using Microsoft.Extensions.Hosting;

using Microsoft.AspNetCore.Components.Authorization;

using BlazorAppDemo.Auth;

var builder = WebApplication.CreateBuilder(args);

// Add services to the container.

builder.Services.AddRazorPages();

builder.Services.AddServerSideBlazor();

builder.Services.AddSingleton<WeatherForecastService>();

System.Console.WriteLine(ConfigHelper.Configuration["ConnectionStrings:BookContext"]);

builder.Services.AddDbContextFactory<BookContext>(opt =>

    opt.UseSqlServer(ConfigHelper.Configuration["ConnectionStrings:BookContext"]));

//builder.Services.AddScoped<AuthenticationStateProvider, ImitateAuthStateProvider>();

builder.Services.AddScoped<ImitateAuthStateProvider>();

builder.Services.AddScoped<AuthenticationStateProvider>(implementationFactory =>

implementationFactory.GetRequiredService<ImitateAuthStateProvider>());

var app = builder.Build();

// Configure the HTTP request pipeline.

if (!app.Environment.IsDevelopment())

{

    app.UseExceptionHandler("/Error");

    // The default HSTS value is 30 days. You may want to change this for production scenarios, see https://aka.ms/aspnetcore-hsts.

    app.UseHsts();

}

using (var scope = app.Services.CreateScope())

{

    var services = scope.ServiceProvider;

    try

    {

        Console.WriteLine("数据库开始初始化。");

        var context = services.GetRequiredService<BookContext>();

        // requires using Microsoft.EntityFrameworkCore;

        context.Database.Migrate();

        // Requires using RazorPagesMovie.Models;

        SeedData.Initialize(services);

        Console.WriteLine("数据库初始化结束。");

    }

    catch (Exception ex)

    {

        var logger = services.GetRequiredService<ILogger<Program>>();

        logger.LogError(ex, "数据库数据初始化错误.");

    }

}

app.UseHttpsRedirection();

app.UseStaticFiles();

app.UseRouting();

app.MapBlazorHub();

app.MapFallbackToPage("/_Host");

app.Run();
修改App.razor
现在我们已经完成了登录认证的Provider了,接下來要做的事情,就是让我们的页面上的组件,可以获取登录信息,来决定是登录用户是否已经授权。这一步请参数之前的“七、修改路由与启动页面”。
修改Login.razor页面进行登录
在Visual Studio 2022的文本编辑器中打开Login.razor组件文件,我们将鼠标定位到@code中的SubmitHandler方法 ,写上我们登录成功的代码。具体代码如下:
@page "/Login"

@using BlazorAppDemo.Auth;

@using BlazorAppDemo.Models

@using BlazorAppDemo.Utils

@layout LoginLayout

@inject NavigationManager NavigationManager

@inject ImitateAuthStateProvider AuthStateProvider;

<div class="card align-items-center">

    <div class="card-body my-2">

        <h3>Login</h3>

        <hr />

        <EditForm  Model="loginModel" OnValidSubmit="SubmitHandler" OnInvalidSubmit="InvalidHandler">

            <DataAnnotationsValidator />

            <div class="form-group">

                <label for="userName">  @HtmlHelper.GetDisplayName(loginModel ,m=> m.UserName)</label>

                <InputText @bind-Value="loginModel.UserName" class="form-control" id="userName" />

                <ValidationMessage For="()=>loginModel.UserName" />

            </div>

            <div class="form-group">

                <label for="pwd"> @HtmlHelper.GetDisplayName(loginModel ,m=> m.Password)</label>

                <InputPassword @bind-Value="loginModel.Password" class="form-control" id="pwd" />

                <ValidationMessage For="()=>loginModel.Password" />

            </div>

            <span class="form-control-plaintext"></span>

            <div class="form-group row">

                <div class="col-sm-10">

            <button class="btn btn-primary">登录</button>

                </div>

            </div>

        </EditForm>

    </div>

</div>

@code {

    private UserInfo loginModel = new UserInfo();

    bool isAuthLoading = false;

    private void SubmitHandler()

    {

        Console.WriteLine($"用户名:{loginModel.UserName} ,密码:{loginModel.Password}");

         isAuthLoading = true;

    try {

         AuthStateProvider.Login(new UserInfo() {

                    UserName = loginModel.UserName,

                    Password =loginModel.Password

        });

            NavigationManager.NavigateTo("/Index");

    } catch (Exception ex) {

         Console.WriteLine(ex.Message);

    } finally {

        isAuthLoading = false;

    }

    }

    private void InvalidHandler()

    {

        Console.WriteLine($"用户名: {loginModel.UserName} ,密码:{loginModel.Password}");

    }

}
登录并显示当前用户
1.在Visual Studio 2022的文本编辑器中打开MainLayout.razor组件文件,在AuthorizeView中显示当前登录用户,具体代码如下:
2.在Visual Studio 2022的菜单栏上,找到“调试-->开始调试”或是按F5键,Visual Studio 2022会生成BlazorAppDemo应用程序,浏览器中会Login登录页面。
@using BlazorAppDemo.Pages

@inherits LayoutComponentBase

<PageTitle>BlazorAppDemo</PageTitle>

<div class="page">

    <div class="sidebar">

        <NavMenu />

    </div>

    <main>

        <AuthorizeView>

            <Authorized>

              <div class="top-row px-4">

            <a href="https://docs.microsoft.com/aspnet/" target="_blank">About</a>

            <p>

       你好, @context.User.Identity.Name!

      </p>

        </div>

        <article class="content px-4">

                    @Body

        </article>

            </Authorized>

            <NotAuthorized>

                <div style="margin: 120px 0; width:100%; text-align: center; color: red;">

                    <span style="font-size:20px">检测到登录超时,请重新<a href="/login" style="text-decoration:underline">登录</a>!

</span>

                </div>

                <RedirectToLogin></RedirectToLogin>

            </NotAuthorized>

        </AuthorizeView>

    </main>

</div>
3.我们在用户名输入框中输入用户名,在密码输入框中输入密码,点击“登录”按钮,进行模拟登录。我们进入了系统。如下图。 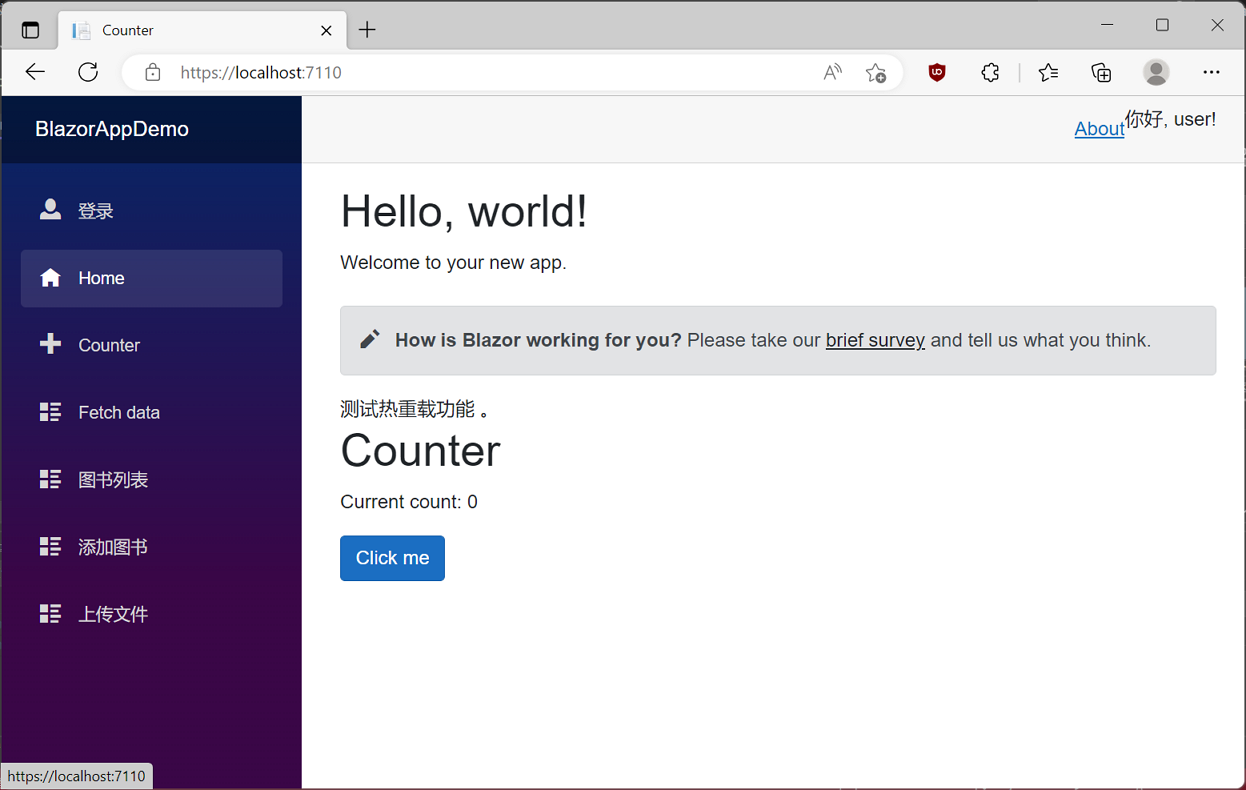
到此为止,我们已经实现了Blazor的登录认证流程,接下来我们要来实现通过jwt进行登录。
学习ASP.NET Core Blazor编程系列二十六——登录(5)的更多相关文章
- 学习ASP.NET Core Blazor编程系列二十二——登录(1)
学习ASP.NET Core Blazor编程系列文章之目录 学习ASP.NET Core Blazor编程系列一--综述 学习ASP.NET Core Blazor编程系列二--第一个Blazor应 ...
- 学习ASP.NET Core Blazor编程系列二十——文件上传(完)
学习ASP.NET Core Blazor编程系列文章之目录 学习ASP.NET Core Blazor编程系列一--综述 学习ASP.NET Core Blazor编程系列二--第一个Blazor应 ...
- 学习ASP.NET Core Blazor编程系列二十一——数据刷新
学习ASP.NET Core Blazor编程系列文章之目录 学习ASP.NET Core Blazor编程系列一--综述 学习ASP.NET Core Blazor编程系列二--第一个Blazor应 ...
- 学习ASP.NET Core Blazor编程系列二十三——登录(2)
学习ASP.NET Core Blazor编程系列文章之目录 学习ASP.NET Core Blazor编程系列一--综述 学习ASP.NET Core Blazor编程系列二--第一个Blazor应 ...
- 学习ASP.NET Core Blazor编程系列二十三——登录(3)
学习ASP.NET Core Blazor编程系列文章之目录 学习ASP.NET Core Blazor编程系列一--综述 学习ASP.NET Core Blazor编程系列二--第一个Blazor应 ...
- 学习ASP.NET Core Blazor编程系列二——第一个Blazor应用程序(中)
学习ASP.NET Core Blazor编程系列一--综述 学习ASP.NET Core Blazor编程系列二--第一个Blazor应用程序(上) 四.创建一个Blazor应用程序 1. 第一种创 ...
- 学习ASP.NET Core Blazor编程系列二——第一个Blazor应用程序(下)
学习ASP.NET Core Blazor编程系列一--综述 学习ASP.NET Core Blazor编程系列二--第一个Blazor应用程序(上) 学习ASP.NET Core Blazor编程系 ...
- 学习ASP.NET Core Blazor编程系列二——第一个Blazor应用程序(完)
学习ASP.NET Core Blazor编程系列一--综述 学习ASP.NET Core Blazor编程系列二--第一个Blazor应用程序(上) 学习ASP.NET Core Blazor编程系 ...
- 学习ASP.NET Core Blazor编程系列二——第一个Blazor应用程序(上)
学习ASP.NET Core Blazor编程系列一--综述 一.概述 Blazor 是一个生成交互式客户端 Web UI 的框架: 使用 C# 代替 JavaScript 来创建信息丰富的交互式 U ...
- 022年9月12日 学习ASP.NET Core Blazor编程系列三——实体
学习ASP.NET Core Blazor编程系列一--综述 学习ASP.NET Core Blazor编程系列二--第一个Blazor应用程序(上) 学习ASP.NET Core Blazor编程系 ...
随机推荐
- win10+vs2019 编译webrtc m108
不能访问外网途径的捷径 已经下载好的资源,可以直接生成工程: https://pan.baidu.com/s/14plvXZD_qX9nn441RbsCwA?pwd=ww8c 该资源可以跳过的步骤 步 ...
- qt quick工程升级,qmake工程升级至cmake
升级原因 由于音视频工作需要,qt6比qt5的video相关更看重效率. 升级中遇到的问题 在开发的过程中,为了更快速的进行开发,对业务其他不需要代码运行效率的地方使用qml+js的方式进行编写.在升 ...
- Aspose.Cells实现excel预览
在WEB项目中经常遇到excel文档在线预览的需求,基本的解决思路有以下几大类:excel文档转PDF.excel文档直接转html.后台读取excel数据返回给前端利用Excel效果的表格插件如 ...
- 关于linux mint新增加的鼠标样式的示例图片不能正确显示的解决办法
前言 我相信你在linux mint 做鼠标主题美化的时候一定遇到过这样的问题 没错!!! 下载的鼠标的主题的示例图片不能正确显示,当然这样虽然不影响正常的鼠标主题更换使用,但是对于我这种强迫症来说简 ...
- form enctype="multipart/form-data" ajax 文件上传
<form method="post" enctype="multipart/form-data" id="resource"> ...
- kubernetes数据持久化StorageClass动态供给(二)
存储类的好处之一便是支持PV的动态供给,它甚至可以直接被视作为PV的创建模版,用户用到持久性存储时,需要通过创建PVC来绑定匹配的PV,此类操作需求较大,或者当管理员手动创建的PV无法满足PVC的所有 ...
- 基础css样式
目录 css层叠样式表 css选择器 伪类选择器 选择器生效优先级 css字体颜色背景 设置宽高 边框 display属性 div盒子模型 float漂浮 溢出overflow 定位(position ...
- [奶奶看了都会]ChatGPT保姆级注册教程
大家好,我是小卷 最近几天OpenAI发布的ChatGPT聊天机器人火出天际了,连着上了各个平台的热搜榜.这个聊天机器人最大的特点是模仿人类说话风格同时回答大量问题. 有人说ChatGPT是真正的人工 ...
- Jenkins服务器上创建项目和配置
大体步骤:General(基础配置)-->源码管理-->构建触发器-->构建环境-->构建-->构建后操作 1.创建一个工程 2.General(基础配置) 仅需填写标准 ...
- MySQL事务(四大特征)-存储过程
目录 一:事务 1.四大特性(ACID) 2.事物存在的必要性(真实比喻) 3.如何使用事务 4.开启事务-回滚-确认 二:事务案例实战 1.模拟消费 2.创建 3.插入数据 4.开启事务 5.修改操 ...