SpringBoot(二) - 核心配置文件
1、application.properties 和 application.yml 配置文件格式区别
1.1 文件格式
application.properties
# 端口号

server.port=8096
application.yml
# 服务端口

server:

  port: 8096
1.2 区别
- properties的优先级高于yml,同等配置,高优先级会覆盖低优先级,不同的配置时互补配置(增补,不管哪个配置文件中有,都可以生效);
- properties的核心语法是:通过 . 作为层级分隔符,配置值是用 = ,比如 server.port=9096
yml的核心语法是:通过层级+缩进的方式,同一给等级,缩进是相同的,配置使用key: value方式- server:
port: 8096 #注意值前面必须有空格
- server:
- 小结:yml格式配置,可以简化配置内容,层次清晰,更适合作为核心配置文件;
2、自定义配置
2.1 配置信息 yml 语法
注意:值前面必须有空格;
2.1.1 基本类型数据
user:

  userId: kh96

  user-Name: gala # 支持松散绑定

  user_age: 17

  adult: true # 是否成年

  salary: 9696.0

  userTel: 13501020304

  birthday: 2002/10/11 10:10:10

  email: kh96@163.com
2.1.2 数组,List,Set
user:

	hobbies:    # 爱好 list集合

        - springboot

        - linux

        - mysql

        - ssm

        - jvaweb

        - springvloud

    #行内写法

    #hobbies:[springboot,linux,mysql,ssm,jvaweb,springvloud]
2.1.3 Map
user:

	carMap:   # 爱车 map 集合

        bnm: 宝马325

        audi: 奥迪A41

        benz: 奔驰C200

    #行内写法

    #carMap:{bnm: 宝马325;audi: 奥迪A41;benz: 奔驰C200}
2.1.4 实体参数
user:

    userRole:

        role-id: R96 ${random.uuid} #${}可以去一些内置的自定义参数

        role_name: root
2.1.5 值的写法
2.1.5.1 单引号:
会转义特殊字符。
user:

	msg: '你好!\n小可爱!'
输出:
你好!\n小可爱!
2.1.5.2 双引号:
不会转义字符里的特殊字符,特殊字符仍然是本身的意思
user:

	msg: "你好!\n小可爱!"
输出:
你好!

小可爱!
2.2 获取 配置信息
2.2.1 批量自动读取
使用注解@ConfigurationProperties(prefix = "xxx") ,必须配合@Component 注解获取在核心启动类上使用 @EnableConfigurationProperties(配置属性读取类.class)使用;
特点:支持松散绑定(可以自动识别驼峰,-,_),支持复杂类型绑定(实体,集合-list,set,array,map等),支持数据格式校验;
@Component + @ConfigurationProperties(prefix = "user")

或

@Component

+

@EnableConfigurationProperties(UserProperties.class) //写在主启动类上
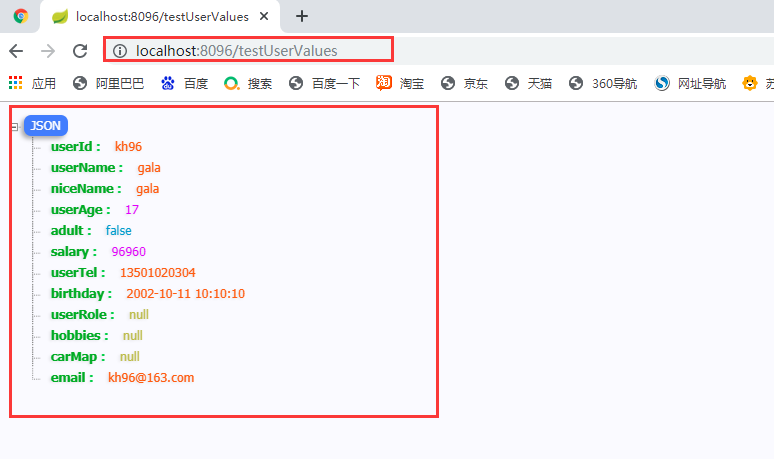
2.2.1.1 UserProperties
@Data

@Component //第一个写法,使用普通组件

@ConfigurationProperties(prefix = "user")  //不能单独使用,必须配合@EnableConfigurationProperties 或指定为spring容器中的普通组件

public class UserProperties {

    //用户编号

    private String userId;

    //用户名

    private String userName;

    //用户年龄

    private Integer userAge;

    //是否成年

    private boolean adult;

    //工资

    private  double salary;

    //联系方式

    private String userTel;

    //生日

    @JsonFormat(pattern = "yyyy-MM-dd HH:mm:ss",timezone = "GMT+8") //springMVC将将数据转成json格式,时间格式规则

    private Date birthday;

    //用户角色

    private UserRole userRole; //实体参数

    //爱好

    private List<String> hobbies;

    //爱车

    private Map<String,String> carMap;

    //邮箱

    @Email //邮箱格式校验

    private String email;

}
2.2.1.1.2 运行结果:

2.2.2 单个手动读取
用法:使用注解@Value("${xxx.xxx}");
特点:写法灵活,可以指定默认值等,但是不支持松散绑定,单个读取的配置要求指定的读取属性key必须和自定义配置一直,否者报错;
@Component + @ConfigurationProperties(prefix = "user")
2.2.2.1 UserProperties
@Data

@Component

@PropertySource(value = "classpath:user.properties")

//@EnableConfigurationProperties(UserProperties.class) //第二种方式,核心启动类上,增加指定开启自动配置读取,但是一般不怎么使用,且容易忘记

public class UserProperties {

    //用户编号

    @Value("${user.userId}")

    private String userId;

    //用户名

    @Value("${user.user-Name}")

    private String userName;

    //昵称

	@Value("#{userValues.userName}") //获取的是容器中已有的实体的值

	//@Value("#{'xiaoming'}") //可以赋默认值

    private String niceName;

    //用户年龄

        @Value("${user.user_age}")

//    @Value("16") //直接赋值

    private Integer userAge;

    //是否成年

    @Value("#{(${user.user_age}>17)?true:false}") //spel 表达式

    private boolean adult;

    //工资

    @Value("#{${user.salary}*10}")  //#{} 和 ${}套用

    private  double salary;

    //联系方式

    @Value("${user.userTel}")

    private String userTel;

    //生日

    @JsonFormat(pattern = "yyyy-MM-dd HH:mm:ss",timezone = "GMT+8") //springMVC将将数据转成json格式,时间格式规则

    @Value("${user.birthday}")

    private Date birthday;

    //用户角色

    //@Value("${user.userRole}")  //不可以单个手动获取石参数

    private UserRole userRole; //实体参数

    //爱好

    //@Value("${user.hobbies}") //不可以单个手动获取复杂参数

    private List<String> hobbies;

    //爱车

    //@Value("${user.carMap}")

    private Map<String,String> carMap;

    //邮箱

    @Email //邮箱格式校验

    @Value("${user.email:abc@kgc.com}") //添加默认值,配置信息没有就使用默认值

    private String email;

}
2.2.2.2运行结果:
2.2.3 ${} 和 #{} 的区别
- ${}:用于读取核心配置文件中的自定义配置,也可以给属性指定默认值 (${xxx.xx:default值});
- #{}:不可以读取核心配置文件中的自定义配置,可以给属性发指定默认值#{default值} (可以使用表达式),还可以读取容器中已用实体的属性值;
- 两种读取自定义配置的方式,是可以混用的,但是实际开发中,尽量使用其中一种,,一般都是少量配置,单个读取,多个读取,使用批量读取;
3、自定义配置文件并获取配置信息
3.1xxx.properties
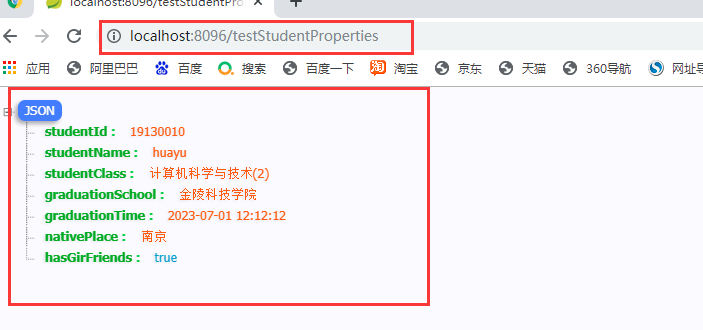
3.1.1 student.properties
student.studentId=19130010

student.studentName=huayu

student.studentClass=计算机科学与技术(2)

student.graduationSchool=金陵科技学院

student.graduationTime=2023/7/1 12:12:12

student.nativePlace=南京

student.hasGirFriends=true
3.1.2 StudentProperties.java
@Data

@Component

@ConfigurationProperties(prefix = "student")

public class StudentProperties {

    // 学号

    private String studentId;

    // 姓名

    private String studentName;

    // 班级

    private String studentClass;

    // 毕业院校

    private String graduationSchool;

    // 毕业时间

    @JsonFormat(pattern = "yyyy-MM-dd HH:mm:ss",timezone = "GMT+8")

    private Date graduationTime;

    // 籍贯

    private String nativePlace;

    // 有没有女朋友

    private boolean hasGirFriends;

}
3.1.3 StudentValues.java
@Data

@Component //第一个写法,使用普通组件

@PropertySource(value = "classpath:student.properties")//单个从student.properties 中获取参数

public class StudentValues {

    // 学号

    @Value("${student.studentId}")

    private String studentId;

    // 姓名

    @Value("${student.studentName}")

    private String studentName;

    // 班级

    @Value("${student.studentClass}")

    private String studentClass;

    // 毕业院校

    @Value("${student.graduationSchool}")

    private String graduationSchool;

    // 毕业时间

    @JsonFormat(pattern = "yyyy-MM-dd HH:mm:ss",timezone = "GMT+8")

    @Value("${student.graduationTime}")

    private Date graduationTime;

    // 籍贯

    @Value("${student.nativePlace}")

    private String nativePlace;

    // 有没有女朋友

    @Value("${student.hasGirFriends}")

    private boolean hasGirFriends;

}
3.2 xxx.yml
3.2.1 student.yml
student:

  studentId: 19130010

  studentName: huayu

  studentClass: 计算机科学与技术(2)

  graduationSchool: 金陵科技学院

  graduationTime: 2023/7/1 12:12:12

  nativePlace: 南京

  hasGirFriends: true
3.2.2 StudentProperties.java
@Data

@Component

@ConfigurationProperties(prefix = "student")

@PropertySource(value = "classpath:student.yml",encoding = "utf-8",factory = YamlPropertySourceFactory.class) //从自定义的 student.yml 中获取

public class StudentProperties {

......

}
3.2.3 StudentValues.java
@Data

@Component

@PropertySource(value = "classpath:my.yml", factory = YamlPropertySourceFactory.class) //从自定义的 student.yml 中获取

public class StudentValues {

......

}
3.2.4 YamlPropertySourceFactory.java yml配置映射类
@PropertySource读取不能直接自定义yaml配置文件,需要自定义一个继承 PropertySourceFactory 的 YamlPropertySourceFactory 编写配置映射类
public class YamlPropertySourceFactory implements PropertySourceFactory {

    @Override

    public PropertySource<?> createPropertySource(String name, EncodedResource encodedResource) {

        Resource resource = encodedResource.getResource();

        YamlPropertiesFactoryBean factory = new YamlPropertiesFactoryBean();

        factory.setResources(resource);

        Properties props = factory.getObject();

        return new PropertiesPropertySource(resource.getFilename(), props);

    }

}
3.3 测试
3.3.1 testStudentProperties
3.3.2 testStudentValues

4、*@Configuration配置类的用法,可以实现自定义组件加入容器
4.1 实体
@Data

@Builder

@AllArgsConstructor

@NoArgsConstructor

public class UserRole {

    //角色

    private String roleId;

    //角色名称

    private String roleName;

}
4.2 UserRoleConfig 配置类
@Configuration //凡是被此注解修饰的类,就是一个配置类,在项目启动是,自动加载,功能跟spring的核心配置文件xml文件是同等的

public class UserRoleConfig {

    //手动添加自定义对象,放入容器中以前spring框架,通过xml配置文件,添加<bean id="xx" class="xx">...</bran>

    @Bean //标注的方法,会自动将当前方法返回的实例对象放入容器中,默认的bean的id值就是方法名

    public UserRole userRole1(){

        return UserRole.builder()

                .roleId("R001")

                .roleName("admin")

                .build();

    }

    @Bean

    public UserRole userRole2(){

        return UserRole.builder()

                .roleId("R002")

                .roleName("admin")

                .build();

    }

}
4.3 测试类
@RestController

public class SpringBootConfigController {

    @Autowired

    @Qualifier("userRole2")

    UserRole userRole;

    //可以实现自定义实体加入容器

    @GetMapping("/testUserRole")

    public UserRole testUserRole(){

        return userRole;

    }

}
运行结果:

5、激活环境
5.1 多套环境配置文件
激活环境 (实际开发中,主要有三个环境:开发环境,测试环境,生产环境(线上环境),还有一个环境,灰度环境,也是线上环境,叫预上限环境);
好处:可以隔离不同环境的不同配置,需要使用哪个环境,就直接切换核心配置文件;
application-devp.properties

application-prod.properties

application-test.properties
5.2 激活环境
active: test # 指定当前的profiles值,环境是什么是通过核心配置文件名中,application-${profiles},profiles写的是什么就是什么环境;
spring:

  profiles:

    active: test  #激活测试环境
6、核心配置文件加载位置
优先级从高到底依次为:

    项目根路径下的config目录

    项目根路径下

    类路径(resource)下的

    类路径(resource)下
注意:模块项目的 项目根路径 是 父项目的根路径;

7、邮件发送 和 短信测试发送
7.1 邮件发送
7.1.1 依赖
<!--   spring-boot-starter-mail start  -->

<dependency>

    <groupId>org.springframework.boot</groupId>

    <artifactId>spring-boot-starter-mail</artifactId>

</dependency>

<!--   spring-boot-starter-mail end  -->
7.1.2 邮件配置信息
7.1.3 类里面写配置信息
配置信息直接写在 对象里面;
@GetMapping("/sendEmail")

public String sendEmail(@RequestParam(value = "setToEmail",required = false) String setToEmail){

    System.out.println("--------------[mail/mailSend] start------------------");

    try {

        MimeMessage message=javaMailSender.createMimeMessage();

        MimeMessageHelper helper=new MimeMessageHelper(message,true);

        helper.setFrom("2663092414@qq.com","2663092414");

        helper.setTo(setToEmail);

        helper.setSubject("KH-96-王松—核心配置文件读取");

        helper.setText("正在使用SpringBoot读取自定义核心配置,发送邮件成功!<br/>"+studentProperties.toString(),true);

        javaMailSender.send(message);

    } catch (Exception e) {

        System.out.println("邮件发送失败"+ e.getMessage());

        e.printStackTrace();

    }

    System.out.println("--------------[mail/mailSend] end------------------");

    return studentProperties.toString();

}

//实例化javaMailSender 并写入配置信息

private static JavaMailSenderImpl javaMailSender;

static {

    javaMailSender = new JavaMailSenderImpl();

    javaMailSender.setHost("smtp.qq.com");//链接服务器

    //javaMailSender.setPort(25);//默认使用25端口发送

    javaMailSender.setUsername("2663092414@qq.com");//账号

    javaMailSender.setPassword("dwxlbkrmdyagebhe");//授权码

    javaMailSender.setDefaultEncoding("UTF-8");

    Properties properties = new Properties();

    //properties.setProperty("mail.debug", "true");//启用调试

    //properties.setProperty("mail.smtp.timeout", "1000");//设置链接超时

    //设置通过ssl协议使用465端口发送、使用默认端口(25)时下面三行不需要

    properties.setProperty("mail.smtp.auth", "true");//开启认证

    properties.setProperty("mail.smtp.socketFactory.port", "465");//设置ssl端口

    properties.setProperty("mail.smtp.socketFactory.class", "javax.net.ssl.SSLSocketFactory");

    javaMailSender.setJavaMailProperties(properties);

}
7.1.4 application.yaml中写配置信息
7.1.4.1 application.yaml
spring:

  mail:

    default-encoding: UTF-8

    host: smtp.qq.com

    port: 587

    username: xxxxxx@qq.com

    password: 授权码
7.1.4.2 请求方法
@GetMapping("/sendEmail2")

public String sendEmail2(@RequestParam(value = "setToEmail",required = false) String setToEmail){

    SimpleMailMessage mailMessage = new SimpleMailMessage();

    mailMessage.setFrom("xxxxxx@qq.com"); //发送邮箱

    mailMessage.setTo("xxxxxx@qq.com"); //目标邮箱

    mailMessage.setText("你好 hello world");

    mailMessage.setSubject("测试 Springboot 邮箱服务");

    mailSender.send(mailMessage);

    return "====完成发送!====";

}
7.2 短信测试发送
7.2.1 依赖
<!-- SMS star -->

<dependency>

    <groupId>com.aliyun</groupId>

    <artifactId>dysmsapi20170525</artifactId>

    <version>2.0.9</version>

</dependency>

<dependency>

    <groupId>com.aliyun</groupId>

    <artifactId>tea</artifactId>

    <version>1.1.14</version>

</dependency>

<!-- SMS end -->
7.2.2 代码
其中:accessKeyId ,accessKeySecret 填写自己的用户 AccessKey,最好用子用户 AccessKey;
public class Sample {

    /**

     * 使用AK&SK初始化账号Client

     *

     * @param accessKeyId

     * @param accessKeySecret

     * @return Client

     * @throws Exception

     */

    public static com.aliyun.dysmsapi20170525.Client createClient(String accessKeyId, String accessKeySecret) throws Exception {

        com.aliyun.teaopenapi.models.Config config = new com.aliyun.teaopenapi.models.Config()

                // 您的 AccessKey ID

                .setAccessKeyId(accessKeyId)

                // 您的 AccessKey Secret

                .setAccessKeySecret(accessKeySecret);

        // 访问的域名

        config.endpoint = "dysmsapi.aliyuncs.com";

        return new com.aliyun.dysmsapi20170525.Client(config);

    }

    public static void main(String[] args_) throws Exception {

        java.util.List<String> args = java.util.Arrays.asList(args_);

        com.aliyun.dysmsapi20170525.Client client = Sample.createClient("accessKeyId", "accessKeySecret");  //accessKeyId ,accessKeySecret 填写自己的用户信息

        com.aliyun.dysmsapi20170525.models.SendSmsRequest sendSmsRequest = new com.aliyun.dysmsapi20170525.models.SendSmsRequest()

                .setSignName("阿里云短信测试")

                .setTemplateCode("SMS_154950909")

                .setPhoneNumbers("发送短信的手机号")

                .setTemplateParam("{\"code\":\"131313\"}");

        com.aliyun.teautil.models.RuntimeOptions runtime = new com.aliyun.teautil.models.RuntimeOptions();

        try {

            // 复制代码运行请自行打印 API 的返回值

            SendSmsResponse sendSmsResponse = client.sendSmsWithOptions(sendSmsRequest, runtime);

        } catch (TeaException error) {

            // 如有需要,请打印 error

            String errerMsg = Common.assertAsString(error.message);

        } catch (Exception _error) {

            TeaException error = new TeaException(_error.getMessage(), _error);

            // 如有需要,请打印 error

            String errorMsg = Common.assertAsString(error.message);

        }

    }

}
SpringBoot(二) - 核心配置文件的更多相关文章
- springboot的核心配置文件
一.springboot主要配置文件种类 1.bootstrap (.yml或.properties) 2.application(.yml或.properties) 二.bootstrap与appl ...
- springboot(二十)-配置文件 bootstrap和application区别
用过 Spring Boot 的都知道在 Spring Boot 中有以下两种配置文件 bootstrap (.yml 或者 .properties) application (.yml 或者 .pr ...
- SpringBoot(二) SpringBoot核心配置文件application.yml/properties
我们都知道在Spring中有着application.xml文件对Spring进行相关配置,通过web.xml中的contextConfigLocation指定application.xml文件所在位 ...
- SpringBoot学习<二>——SpringBoot的默认配置文件application和多环境配置
一.SpringBoot的默认文件appliction 上一篇文章已经说明,springboot启动会内嵌tomcat,端口也是默认的8080,如果我们想要改变端口如果做呢? 在springboot项 ...
- MyBatis学习总结(二)——MyBatis核心配置文件与输入输出映射
在上一章中我们学习了<MyBatis学习总结(一)——ORM概要与MyBatis快速起步>,这一章主要是介绍MyBatis核心配置文件.使用接口+XML实现完整数据访问.输入参数映射与输出 ...
- Springboot学习:核心配置文件
核心配置文件介绍 SpringBoot使用一个全局配置文件,配置文件名是固定的 application.properties application.yml 配置文件的作用:修改SpringBoot自 ...
- 【Nginx(二)】Nginx目录结构和常用的命令以及核心配置文件
Nginx的目录结构: 默认的安装路径 : /usr/local/nginx 安装完成后,Nginx的目录结构如下: conf: #所有配置文件的目录 nginx.conf #默认的主要配置文件 ...
- Springboot读取自定义配置文件的几种方法
一.读取核心配置文件 核心配置文件是指在resources根目录下的application.properties或application.yml配置文件,读取这两个配置文件的方法有两种,都比较简单. ...
- Springboot 日志、配置文件、接口数据如何脱敏?老鸟们都是这样玩的!
一.前言 核心隐私数据无论对于企业还是用户来说尤其重要,因此要想办法杜绝各种隐私数据的泄漏.下面陈某带大家从以下三个方面讲解一下隐私数据如何脱敏,也是日常开发中需要注意的: 配置文件数据脱敏 接口返回 ...
随机推荐
- [LNOI2022]盒
\(LNOI2022\)盒 由于是加的形式,那么可以套路的拆贡献,枚举每条边的贡献就好了 \(40pts\) //比较显然的事情 //首先确定了一个B数组之后 //最小的移动应该是 //设左右两侧比原 ...
- 基于ABP的AppUser对象扩展
在ABP中AppUser表的数据字段是有限的,现在有个场景是和小程序对接,需要在AppUser表中添加一个OpenId字段.今天有个小伙伴在群中遇到的问题是基于ABP的AppUser对象扩展后,用 ...
- Springboot Jpa: [mysql] java.sql.SQLException: Duplicate entry 'XXX' for key 'PRIMARY'
前言 1.问题背景 偶尔会出现登录请求出错的情况,一旦失败就会短时间内再也登录不上,更换浏览器或者刷新可能会暂时解决这个问题. 项目运行日志如下: 2022-07-21 09:43:40.946 DE ...
- 让Python更优雅更易读(第一集)
变量和注释 1.变量 在编写变量尽量要让其清晰只给,让人清除搞清楚代码的意图 下方两段代码作用完全一样,但第二段代码是不是更容易让人理解 value = s.strip() username = in ...
- Java NIO全面详解(看这篇就够了)
很多技术框架都使用NIO技术,学习和掌握Java NIO技术对于高性能.高并发网络的应用是非常关键的@mikechen NIO简介 NIO 中的 N 可以理解为 Non-blocking,不单纯是 N ...
- CF1019B The hat (二分)
题面 题解 如果位置为i的人与对面的差是x,i+1位置由于只能+1或-1,所以i+1位置与对面的差就是x.x+2或x-2,可以发现,奇偶性不变. 所以只要判断出是奇差,就可以直接输出"! - ...
- 大家都能看得懂的源码 - ahooks 是怎么处理 DOM 的?
本文是深入浅出 ahooks 源码系列文章的第十三篇,该系列已整理成文档-地址.觉得还不错,给个 star 支持一下哈,Thanks. 本篇文章探讨一下 ahooks 对 DOM 类 Hooks 使用 ...
- axios的content-type是自动设置的
一. axios参数的传递方式 首先我们要知道 参数传递一般有两种,一种是 使用 params, 另一种是 data的方式,有很多的时候我们看到的前端代码是这样的. 1. get请求: ...
- 【三维地图】开发攻略 —— 详解“GeoJSON”技术和应用场景
GeoJSON ,一个用于存储地理信息的数据格式.GoeJSON对象可以表示几何.特征或特征集合,支持:点.线.面.多点.多线.多面和几何集合.在基于平面地图,三维地图中都需要用到的一种数据类型. 由 ...
- 058_末晨曦Vue技术_过渡 & 动画之过渡的类名
进入/离开 & 列表过渡 点击打开视频讲解更加详细 概述 Vue 在插入.更新或者移除 DOM 时,提供多种不同方式的应用过渡效果.包括以下工具: 在 CSS 过渡和动画中自动应用 class ...