如何实现将拖动物体限制在某个圆形内--实现方式vue3.0
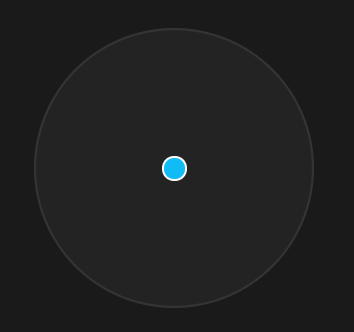
如何实现蓝色小圆可拖动,并且边界限制在灰色大圆内?如下所示
需求源自 业务上遇到一个组件需求,设计师设计了一个“脸型整合器”根据可拖动小圆的位置与其它脸型的位置关系计算融合比例
如图
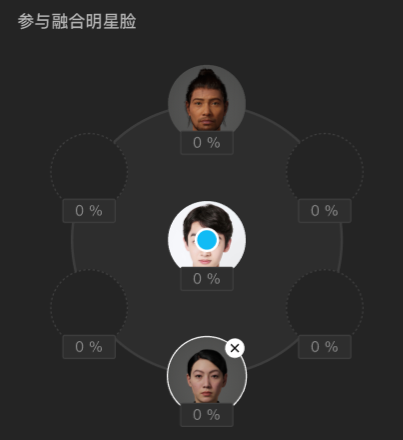
我们先把具体的人脸功能去掉再分析
中间的蓝色小圆可由鼠标拖动,但拖动需要限制在大的圆形内
以下代码全部为 vue3.0版本,如果你是vue2.0, react,或者原生js ,实现原理都一样
第一步 先画出UI
我们的蓝色可拖动小圆点 pointer = ref(null) 为 小圆点dom的 引用
<template>

  <div class="face-blender-container">

    <div class="blender-circle">

      <div

        class="blend-pointer"

        ref="pointer"

        :style="{

          left: `${pointerPosition.x}px`,

          top: `${pointerPosition.y}px`,

        }"

      ></div>

    </div>

  </div>

</template>

<script>

import { onMounted, reactive, ref, toRefs } from "vue";

export default {

  setup() {

    const BLENDER_BORDER_WIDTH = 2; // 圆形混合器边宽

    const BLENDER_RADIUS = 224 * 0.5 - BLENDER_BORDER_WIDTH; // 圆形混合器半径

    // 圆形混合器中心点

    const center = {

      x: BLENDER_RADIUS,

      y: BLENDER_RADIUS,

    };

    const state = reactive({

      pointerPosition: { x: center.x, y: center.y },

    });

    const pointer = ref(null);

    return {

      ...toRefs(state),

      pointer,

    };

  },

};

</script>

<style lang="less" scoped>

@stageDiameter: 360px;

@blenderCircleDiameter: 224px;

@PointerDiameter: 20px;

.face-blender-container {

  position: relative;

  width: @stageDiameter;

  height: @stageDiameter;

}

.blender-circle {

  position: absolute;

  left: 50%;

  top: 50%;

  margin-left: @blenderCircleDiameter * -0.5;

  margin-top: @blenderCircleDiameter * -0.5;

  width: @blenderCircleDiameter;

  height: @blenderCircleDiameter;

  border-radius: @blenderCircleDiameter;

  background: rgba(255, 255, 255, 0.04);

  border: 2px solid rgba(255, 255, 255, 0.08);

}

.blend-pointer {

  position: absolute;

  left: 50%;

  top: 50%;

  width: @PointerDiameter;

  height: @PointerDiameter;

  margin-left: @PointerDiameter * -0.5;

  margin-top: @PointerDiameter * -0.5;

  border-radius: @PointerDiameter;

  background: #11bbf5;

  border: 2px solid #ffffff;

  z-index: 10;

}

</style>
ui 如图(整体背景为黑色)
第二步 实现小圆点的无限制拖动
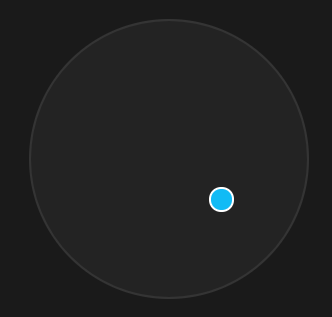
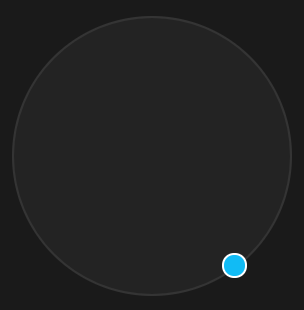
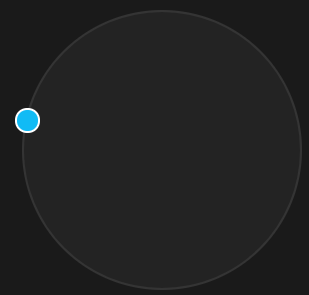
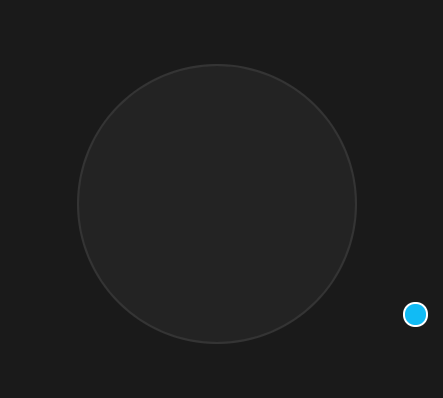
此时小圆点是可以拖到圆外的如图
// 可拖动圆型指示器

    const initPointer = () => {

      const pointerDom = pointer.value;

      pointerDom.onmousedown = (e) => {

        // 鼠标按下,计算当前元素距离可视区的距离

        const originX = e.clientX - pointerDom.offsetLeft - POINTER_RADIUS;

        const originY = e.clientY - pointerDom.offsetTop - POINTER_RADIUS;

        document.onmousemove = function (e) {

          // 通过事件委托,计算移动的距离

          const left = e.clientX - originX;

          const top = e.clientY - originY;

          state.pointerPosition.x = left

          state.pointerPosition.y = top

        };

        document.onmouseup = function (e) {

          document.onmousemove = null;

          document.onmouseup = null;

        };

      };

    };

    onMounted(() => {

      initPointer();

    });
注意是在onMouted 勾子内初始化的可拖动代码
第三步 实现小圆点的限制在大圆内拖动
由于是要限制在圆形内,与限制在方形内的通常计算方法不一样
关键点是计算鼠标 mousemove 时与大圆中心点的弧度 radian 与 距离 dist
弧度公式
dx = x2 - x1
dy = y2 - y1
radian = Math.atan2(dy, dx)
距离公式
dist = Math.sqrt(dx * dx + dy * dy)
当计算出了弧度与距离后,则要计算具体位置了
圆形位置公式
x = 半径 * Math.cos(弧度) + 中心点x
y = 半径 * Math.sin(弧度) + 中心点y
可以看出在圆形公式内控制或限制半径,就限制了小圆的可拖动最大半径范围,所以需要判断,当dist距离大于等于半径时,计算圆形公式内的半径设置为大圆半径即可
具体代码
// 计算 x y

    const getPositionByRadian = (radian, radius) => {

      const x = radius * Math.cos(radian) + center.x;

      const y = radius * Math.sin(radian) + center.y;

      return { x, y };

    };

    // 可拖动圆形指示器

    const initPointer = () => {

      const pointerDom = pointer.value;

      pointerDom.onmousedown = (e) => {

        // 鼠标按下,计算当前元素距离可视区的距离

        const originX = e.clientX - pointerDom.offsetLeft - POINTER_RADIUS;

        const originY = e.clientY - pointerDom.offsetTop - POINTER_RADIUS;

        document.onmousemove = function (e) {

          // 通过事件委托,计算移动的距离

          const left = e.clientX - originX;

          const top = e.clientY - originY;

          const dx = left - center.x;

          const dy = top - center.y;

          // 计算当前鼠标与中心点的弧度

          const radian = Math.atan2(dy, dx);

          // 计算当前鼠标与中心点距离

          const dist = Math.sqrt(dx * dx + dy * dy);

          const radius = dist >= BLENDER_RADIUS ? BLENDER_RADIUS : dist;

          // 根据半径与弧度计算 x, y

          const { x, y } = getPositionByRadian(radian, radius);

          state.pointerPosition.x = x

          state.pointerPosition.y = y

        };

        document.onmouseup = function (e) {

          document.onmousemove = null;

          document.onmouseup = null;

        };

      };

    };
这样就实现了最大可拖动范围限制在大圆边界
整体代码
<template>

  <div class="face-blender-container">

    <div class="blender-circle">

      <div

        class="blend-pointer"

        ref="pointer"

        :style="{

          left: `${pointerPosition.x}px`,

          top: `${pointerPosition.y}px`,

        }"

      ></div>

    </div>

  </div>

</template>

<script>

import { onMounted, reactive, ref, toRefs } from "vue";

export default {

  setup() {

    const BLENDER_BORDER_WIDTH = 2; // 圆形混合器边宽

    const BLENDER_RADIUS = 224 * 0.5 - BLENDER_BORDER_WIDTH; // 圆形混合器半径

    const POINTER_RADIUS = 20 * 0.5; // 可拖动指示器半径

    // 圆形混合器中心点

    const center = {

      x: BLENDER_RADIUS,

      y: BLENDER_RADIUS,

    };

    const state = reactive({

      pointerPosition: { x: center.x, y: center.y },

    });

    const pointer = ref(null);

    // 计算 x y

    const getPositionByRadian = (radian, radius) => {

      const x = radius * Math.cos(radian) + center.x;

      const y = radius * Math.sin(radian) + center.y;

      return { x, y };

    };

    // 可拖动圆型指示器

    const initPointer = () => {

      const pointerDom = pointer.value;

      pointerDom.onmousedown = (e) => {

        // 鼠标按下,计算当前元素距离可视区的距离

        const originX = e.clientX - pointerDom.offsetLeft - POINTER_RADIUS;

        const originY = e.clientY - pointerDom.offsetTop - POINTER_RADIUS;

        document.onmousemove = function (e) {

          // 通过事件委托,计算移动的距离

          const left = e.clientX - originX;

          const top = e.clientY - originY;

          const dx = left - center.x;

          const dy = top - center.y;

          // 计算当前鼠标与中心点的弧度

          const radian = Math.atan2(dy, dx);

          // 计算当前鼠标与中心点距离

          const dist = Math.sqrt(dx * dx + dy * dy);

          const radius = dist >= BLENDER_RADIUS ? BLENDER_RADIUS : dist;

          // 根据半径与弧度计算 x, y

          const { x, y } = getPositionByRadian(radian, radius);

          state.pointerPosition.x = x

          state.pointerPosition.y = y

        };

        document.onmouseup = function (e) {

          document.onmousemove = null;

          document.onmouseup = null;

        };

      };

    };

    onMounted(() => {

      initPointer();

    });

    return {

      ...toRefs(state),

      pointer,

    };

  },

};

</script>

<style lang="less" scoped>

@stageDiameter: 360px;

@blenderCircleDiameter: 224px;

@faceCircleDiameter: 64px;

@PointerDiameter: 20px;

.face-blender-container {

  position: relative;

  width: @stageDiameter;

  height: @stageDiameter;

}

.blender-circle {

  position: absolute;

  left: 50%;

  top: 50%;

  margin-left: @blenderCircleDiameter * -0.5;

  margin-top: @blenderCircleDiameter * -0.5;

  width: @blenderCircleDiameter;

  height: @blenderCircleDiameter;

  border-radius: @blenderCircleDiameter;

  background: rgba(255, 255, 255, 0.04);

  border: 2px solid rgba(255, 255, 255, 0.08);

}

.blend-pointer {

  position: absolute;

  left: 50%;

  top: 50%;

  width: @PointerDiameter;

  height: @PointerDiameter;

  margin-left: @PointerDiameter * -0.5;

  margin-top: @PointerDiameter * -0.5;

  border-radius: @PointerDiameter;

  background: #11bbf5;

  border: 2px solid #ffffff;

  z-index: 10;

}

</style>
至于其它计算距离,计算反比例的脸形整合业务代码,就不放了
脸形容器的位置还是用圆形公式算出来
各个脸形容器与小圆点距离,距离还是用距离公式得出
知道各个距离了就可以根据业务需要算比例了
转载入注明博客园池中物 willian12345@126.com sheldon.wang
github: https://github.com/willian12345
如何实现将拖动物体限制在某个圆形内--实现方式vue3.0的更多相关文章
- unity3d用鼠标拖动物体的一段代码
1 2 3 4 5 6 7 8 9 10 11 12 13 14 15 16 17 18 19 20 21 22 23 24 25 26 27 28 这是一段拖动物体的代码,比较简洁明了,对了解uni ...
- 在unity中用鼠标实现在场景中拖动物体,用鼠标滚轮实现缩放
在场景中添加一个Plan,Camera,Directional Light,Cube.添加两个脚本scrollerScirpt(挂在Camera),CubeDragScript(挂在Cube上). 1 ...
- unity鼠标拖动物体旋转
using System.Collections; using System.Collections.Generic; using UnityEngine; /// <summary> / ...
- Unity 检测物体是否在相机视野范围内
需求: 类似NPC血条,当NPC处于摄像机视野内,血条绘制,且一直保持在NPC头顶. 开始: 网上查找资料,然后编写代码: public RectTransform rectBloodPos; voi ...
- Unity3d 判断物体是否在可见范围内
unity中自带两个回调函数: void OnBecameVisible()//当物体可见时,回调一次. void OnBecameInvisible()//当物体不可见时,回调一次. 在untiy编 ...
- unity中实现物体在一定角度范围内来回旋转
using System.Collections; using System.Collections.Generic; using UnityEngine; public class Rotate : ...
- unity3d中检测一个物体是否在摄像机视野范围内
这个脚本最好是把模型对象的锚点设置在最低点.好了直接上脚本.可以直接复制代码,把CS文件拖到一个Camera上,然后把目标拖到targetTran中去就行了. using UnityEngine; u ...
- Unity3D 几个基本动画(控制物体移动、旋转、缩放)
Transform基本移动函数: 1.指定方向移动: //移动速度 float TranslateSpeed = 10f; //Vector3.forward 表示"向前" tra ...
- TriggerPrefab 拖拽物体
模拟经营类游戏 有一个特点,就是 拖拽物体.常见的有<帝国><红警><部落战争><凯撒大帝>等等 2d 拖拽 大部分都是 用 OnDrag 方法来 拖动 ...
随机推荐
- 基于HTML5的拓扑图编辑器(2)
继续来说编辑器的需求, 前面介绍了拖拽创建节点.以及连线的方法,并加入到了其后的 Qunee 类库,实际应用中需要更多功能,Qunee 的拓扑图编辑器也在逐渐完善,一方面增加多种编辑交互,一方面提供数 ...
- 大数据学习之路又之从csv文件到sql文件的操作过程
根据前几天的测试,简单的做个总结 csv文件的字段说明: 1.将csv文件上传到虚拟机中 在SecureCRT中点击,创建目录,直接把文件从本地拖拽进去 我放在了/linmob/data的路径下,所以 ...
- 用SimpleDateFormat求出哪天是星期几,如2008-11-11
题目5: 巧妙利用SimpleDateFormat求出: 2008-11-11是星期几?import java.text.ParseException;import java.text.SimpleD ...
- 使用cookie/session实现简单的用户信息的保存
cookie一般用来存储非关键信息 , 用户名和密码等敏感信息一般采用session 来存储:cookie和session的最大区别是当服务器端存储session 之后,用户再次请求时候只是请求了一个 ...
- Java报错:Failed to execute goal org.eclipse.jetty:jetty-maven-plugin:9.4.26.v20200117:run (default-cli) on project ssm-mybatis-plus: Failure
修改一下端口就好了,不要用80端口. <plugin> <groupId>org.eclipse.jetty</groupId> <!--嵌入式Jetty的M ...
- python---两个栈实现一个队列
class Solution: """两个栈实现一个队列""" def __init__(self): # 接收栈 self.accept_ ...
- 讲解CPU之NUMA硬件体系以及机制(lscpu查看相关信息)
先看看从系统层面反映出来的numa cpu信息.采样机器为实体机.80核.128内存. [root@ht2 src]# lscpu Architecture: x86_64 #x86架构下的64位 C ...
- kubectl scale sts
使用scale 不单单是扩容还可以:1.动态扩展服务,增加承载能力2.如果出现pod异常,可以利用这种方式,增加pod,再删除原来的pod 比如:pod所在宿主机网络或者宿主机死掉注: 但是一旦有某个 ...
- SpringMVC 解析(五)URI链接处理
URI在网络请求中必不可少,Spring提供了一些工具类用于解析或者生成URL,比如根据参数生成GET的URL等.本文会对Spring MVC中的URI工具进行介绍,本文主要参考Spring官方文档. ...
- Java学习day16
IO流即输入/输出流,按数据类型分为:字节流和字符流 与IO有关的操作最后都要释放,使用close方法 以字节流形式写入数据后需要换行可以添加换行符,注意旧版系统之间识别的换行符不相同,旧版Windo ...