CentOS7部署ES(单机)
一、创建路径,解压
## 创建路径
[root@localhost /]# cd /data
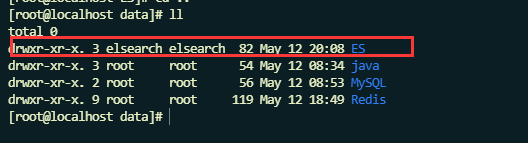
[root@localhost data]# mkdir ES
## 解压
[root@localhost data]# cd ES
[root@localhost ES]# ls
elasticsearch-8.11.3-linux-x86_64.tar.gz
[root@localhost ES]# tar -zxvf elasticsearch-8.11.3-linux-x86_64.tar.gz
## 创建数据和日志文件夹
[root@localhost ES]# mkdir /data/ES/elasticsearch-8.11.3/data
[root@localhost ES]# mkdir /data/ES/elasticsearch-8.11.3/log
二、添加用户elsearch
## 新增es用户

[root@localhost ES]# useradd elsearch

## 为es用户设置密码

[root@localhost ES]# passwd elsearch

Changing password for user elsearch.

New password:

BAD PASSWORD: The password contains the user name in some form

Retype new password:

passwd: all authentication tokens updated successfully.

## 如果错了,可以删除再加

## userdel -r elsearch

## 将ES目录更改为elsearch用户权限

[root@localhost ES]# chown elsearch:elsearch /data/ES/ -R
三、修改\config\elasticsearch.yml文件
[root@localhost data]# cd /data/ES/elasticsearch-8.11.3/config/

[root@localhost config]# ls

elasticsearch-plugins.example.yml  elasticsearch.yml  jvm.options  jvm.options.d  log4j2.properties  role_mapping.yml  roles.yml  users  users_roles

[root@localhost config]# vim elasticsearch.yml
修改内容
# ======================== Elasticsearch Configuration =========================

#放开node.name,集群模式下,放开cluster.name

node.name: node-1

# 数据存储和日志存储路径放开注释

path.data: /data/ES/elasticsearch-8.11.3/data

path.logs: /data/ES/elasticsearch-8.11.3/log

# 设置ip地址,任务网络均可访问

network.host: 0.0.0.0

# 放开http.port:9200

http.port: 9200

# Enable security features

# 启用或禁用X-Pack安全功能

xpack.security.enabled: false

xpack.security.enrollment.enabled: true

# Enable encryption for HTTP API client connections, such as Kibana, Logstash, and Agents

xpack.security.http.ssl.enabled: true

xpack.security.http.ssl.keystore.path: certs/http.p12

# Enable encryption and mutual authentication between cluster nodes

xpack.security.transport.ssl.enabled: true

xpack.security.transport.ssl.verification_mode: certificate

xpack.security.transport.ssl.keystore.path: certs/transport.p12

xpack.security.transport.ssl.truststore.path: certs/transport.p12

cluster.initial_master_nodes: ["node-1"]

## 跨域资源共享设置

http.cors.enabled: true

http.cors.allow-origin: "*"

http.cors.allow-methods: OPTIONS, HEAD, GET, POST, PUT, DELETE

http.cors.allow-headers: "X-Requested-With, Content-Type, Content-Length, X-User"

#----------------------- END SECURITY AUTO CONFIGURATION -------------------------
说明:在Elasticsearch中如果,network.host不是localhost或者127.0.0.1的话,就会认为是生产环境,会对环境的要求比较高,我们的测试环境不一定能够满足,一般情况下需要修改两处配置,如下:
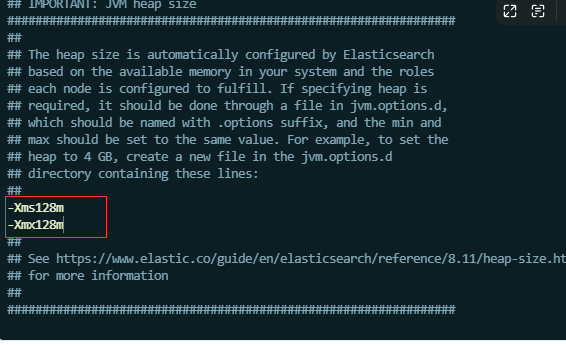
1、修改jvm启动参数jvm.options
[root@kaduoxi config]# vim jvm.options

-Xms128m    #根据自己机器情况修改

-Xmx128m
一个进程在VMAs(虚拟内存区域)创建内存映射量最大数量(/etc/sysctl.conf)
[root@kaduoxi config]# vim /etc/sysctl.conf

vm.max_map_count=655360

#配置生效

[root@kaduoxi config]# sysctl -p
四、启动ES服务
## 切换用户,启动es

[root@localhost config]# su - elsearch

[elsearch@localhost ~]$ cd /data/ES/elasticsearch-8.11.3/bin

[elsearch@localhost bin]$ ./elasticsearch
五、防火墙
#在root用户下关闭防火墙:

#centos6,关闭方式

chkconfig iptables off

#centos7,关闭方式

systemctl stop firewalld.service

## 查看防火墙所有端口

[root@localhost ES]#  firewall-cmd --zone=public --list-ports

## 放开端口6379

[root@localhost ES]#  sudo firewall-cmd --zone=public --add-port=9100/tcp --permanent

success

[root@localhost ES]#  sudo firewall-cmd --zone=public --add-port=9200/tcp --permanent

success

## 刷新防火墙

[root@localhost ES]#  firewall-cmd --reload

success
六、安装elasticsearch-head
[elsearch@kaduoxi bin]$ su - root

Password:

Last login: Mon Jan  8 15:45:04 CST 2024 on pts/0

[root@kaduoxi ~]# docker pull mobz/elasticsearch-head:5

5: Pulling from mobz/elasticsearch-head

75a822cd7888: Pull complete

57de64c72267: Pull complete

4306be1e8943: Pull complete

871436ab7225: Pull complete

0110c26a367a: Pull complete

1f04fe713f1b: Pull complete

723bac39028e: Pull complete

7d8cb47f1c60: Pull complete

7328dcf65c42: Pull complete

b451f2ccfb9a: Pull complete

304d5c28a4cf: Pull complete

4cf804850db1: Pull complete

Digest: sha256:55a3c82dd4ba776e304b09308411edd85de0dc9719f9d97a2f33baa320223f34

Status: Downloaded newer image for mobz/elasticsearch-head:5

docker.io/mobz/elasticsearch-head:5

[root@kaduoxi ~]# docker create --name elasticsearch-head -p 9100:9100 mobz/elasticsearch-head:5

66e6629b1c465d1d14a04d9ff0a19931b9c220dcbff41439b23b244f686cdcf7

[root@kaduoxi ~]# docker start elasticsearch-head

elasticsearch-head

[root@kaduoxi ~]#
问题
问题1:缺少证书
[2024-03-08T03:38:35,255][ERROR][o.e.b.Elasticsearch      ] [node-1] fatal exception while booting Elasticsearch

org.elasticsearch.ElasticsearchSecurityException: failed to load SSL configuration [xpack.security.transport.ssl] - cannot read configured [PKCS12] keystore (as a truststore) [/itcast/es/elasticsearch-8.11.3/config/certs/transport.p12] because the file does not exist
解决:
 cd /data/ES/elasticsearch-8.11.3/bin

 ## 两次回车

[elsearch@localhost bin]$ ./elasticsearch-certutil ca

## 连续回车

[elsearch@localhost bin]$ /data/ES/elasticsearch-8.11.3/bin/elasticsearch-certutil cert --ca /data/ES/elasticsearch-8.11.3/elastic-stack-ca.p12

## 切换root,config下创建certs文件夹

[root@localhost bin]# mv /data/ES/elasticsearch-8.11.3/elastic-certificates.p12 /data/ES/elasticsearch-8.11.3/config/certs/transport.p12

[root@localhost bin]# cp /data/ES/elasticsearch-8.11.3/config/certs/transport.p12 /data/ES/elasticsearch-8.11.3/config/certs/http.p12

[root@localhost bin]# cd ..

[root@localhost elasticsearch-8.11.3]# chmod -R +755 config/certs/
问题2:配置文件设置
[3] bootstrap checks failed. You must address the points described in the following [3] lines before starting Elasticsearch. For more information see [https://www.elastic.co/guide/en/elasticsearch/reference/8.11/bootstrap-checks.html]bootstrap check failure [1] of [3]: max file descriptors [4096] for elasticsearch process is too low, increase to at least [65535]; for more information see [https://www.elastic.co/guide/en/elasticsearch/reference/8.11/_file_descriptor_check.html]

bootstrap check failure [2] of [3]: max number of threads [3766] for user [elsearch] is too low, increase to at least [4096]; for more information see [https://www.elastic.co/guide/en/elasticsearch/reference/8.11/max-number-threads-check.html]

bootstrap check failure [3] of [3]: max virtual memory areas vm.max_map_count [65530] is too low, increase to at least [262144]; for more information see [https://www.elastic.co/guide/en/elasticsearch/reference/8.11/_maximum_map_count_check.html]

[2024-05-12T20:44:23,381][WARN ][o.e.n.Node               ] [node-1] unexpected exception while waiting for http server to closejava.util.concurrent.ExecutionException: java.lang.IllegalStateException: Can't move to stopped state when not started

        at java.base/java.util.concurrent.FutureTask.report(FutureTask.java:122)

        at java.base/java.util.concurrent.FutureTask.get(FutureTask.java:191)

        at org.elasticsearch.server@8.11.3/org.elasticsearch.node.Node.prepareForClose(Node.java:1776)

        at org.elasticsearch.server@8.11.3/org.elasticsearch.bootstrap.Elasticsearch.shutdown(Elasticsearch.java:468)

        at java.base/java.lang.Thread.run(Thread.java:1583)

See logs for more details.
解决:
## max number of threads [3766] for user [elsearch] is too low

参考官网:

https://www.elastic.co/guide/en/elasticsearch/reference/8.11/bootstrap-checks.html

[root@localhost config]# vim /etc/security/limits.conf

# 最大线程数

elsearch       -       nproc       4096

root       -       nproc       4096

[root@localhost config]# sudo systemctl daemon-reload

## 修改max_file_descriptors

[root@localhost config]# vim /etc/security/limits.conf

# 最大文件描述符  配置内容   *表示所有用户生效

* soft nofile 65536

* hard nofile 65536

## 重新登录即可生效

## 可使用命令查看是否生效

[root@localhost ~]# ulimit  -H -n

## 修改max_map_count

[root@kaduoxi config]# vim /etc/sysctl.conf

vm.max_map_count=655360

#配置生效

[root@kaduoxi config]# sysctl -p
CentOS7部署ES(单机)的更多相关文章
- 阿里云ECS部署ES
背景 最近越来越多的公司把业务搬迁到云上,公司也有这个计划,自己抽时间在阿里云和Azure上做了一些小的尝试,现在把阿里云上部署ES和kibana记录下来.为以后做一个参考,也希望对其他人有帮助. 这 ...
- docker 快速部署ES集群 spark集群
1) 拉下来 ES集群 spark集群 两套快速部署环境, 并只用docker跑起来,并保存到私库. 2)弄清楚怎么样打包 linux镜像(或者说制作). 3)试着改一下,让它们跑在集群里面. 4) ...
- 在 CentOS7 部署 ELK8.0.1
在 CentOS7 部署 ELK8.0.1 目录 在 CentOS7 部署 ELK8.0.1 1 下载软件: 2 环境准备: 2.1 关闭防火墙和SELinux 2.2 修改Linux最大打开文件数 ...
- [原]CentOS7部署osm2pgsql
转载请注明原作者(think8848)和出处(http://think8848.cnblogs.com) 部署Postgresql和部署PostGis请参考前两篇文章 本文主要参考GitHub上osm ...
- centos7 部署ssserver
centos7 部署shadowsocks服务端 为什么要选centos7? 以后centos7 肯定是主流,在不重要的环境还是尽量使用新系统吧 centos7 的坑 默认可能会有firewall 或 ...
- centos7 部署 docker compose
=============================================== 2019/4/10_第1次修改 ccb_warlock == ...
- centos7 部署 docker ce
=============================================== 2019/4/9_第1次修改 ccb_warlock === ...
- centos7 部署 open-falcon 0.2.0
=============================================== 2019/4/29_第3次修改 ccb_warlock 更新 ...
- centos7 部署 docker、shipyard
=============================================== 2019/4/9_第3次修改 ccb_warlock 更新说 ...
- centos7 部署 docker swarm
=============================================== 2019/4/9_第3次修改 ccb_warlock 更新说 ...
随机推荐
- 4 JavaScript数组和对象
4 数组和对象 在JS中创建数组非常简单. 直接[ ]即可. 也可以用正规军的new Array(). 不过效果都是一样的. var as = [11,22,33,44,55]; var bs = n ...
- Qt 5.12.10 国际化
网上有资料但是不全,所以这里记录一份比较全的 1.创建项目 2.编辑 demo.cpp 这里写button用来做国际化示例,运行软件后是这个样子 #include "demo.h" ...
- MogDB 使用样本数据集Mogila
MogDB 使用样本数据集 Mogila MogDB 提供了一个样本数据集 Mogila,本数据集借鉴了适用于 MySQL 的Sakila 示例数据库.Sakila最初由 MySQL AB 文档团队的 ...
- 直播预告丨Hello HarmonyOS进阶课程第四课——ArkUI动画开发
为了帮助初识HarmonyOS的开发者快速入门,我们曾推出Hello HarmonyOS系列课程,从最基础的配置IDE和创建Hello World开始,详细介绍HarmonyOS基础.开发环境搭建.I ...
- 重新点亮shell————awk函数[十五]
前言 简单介绍一下awk函数. 正文 算术函数 字符串函数 自定义函数 例子: 结 awk就到这里了.
- 重新整理数据结构与算法(c#)—— 顺序存储二叉树[十九]
前言 二叉树顺序存bai储是二叉树的一种存储方式.将二du叉树存储在一zhi个数组中,通过存储元素的下dao标反映元素之间的父子关系. 正文 这个概念比较简单,比如一个节点的在数组的index是x,那 ...
- 重新整理数据结构与算法(c#)—— 树的节点删除[十八]
前言 你好这里的一个删除,指的是如果删除的叶子节点则直接删除,如果删除的是非叶子节点,则删除的是这颗子树. 这样删除的场景并不多,这种删除方式了解即可. 十七和十六没有放树图,把树图放一下. 正文 节 ...
- Linux_aarch64_head.S到main.c的环境建立
PS:要转载请注明出处,本人版权所有. PS: 这个只是基于<我自己>的理解, 如果和你的原则及想法相冲突,请谅解,勿喷. 环境说明 无 前言 最开始,我仅仅是对linux比较感兴 ...
- Java实现银行存取款
"感谢您阅读本篇博客!如果您觉得本文对您有所帮助或启发,请不吝点赞和分享给更多的朋友.您的支持是我持续创作的动力,也欢迎留言交流,让我们一起探讨技术,共同成长!谢谢!" 代码 `` ...
- 力扣275(jav&python)-H 指数 II(中等)
题目: 给你一个整数数组 citations ,其中 citations[i] 表示研究者的第 i 篇论文被引用的次数,citations 已经按照 升序排列 .计算并返回该研究者的 h 指数. h ...