java利用myeclipse自带三大框架搭建三大框架(Hibernate+Struts2+Spring)过程详解
搭建过程因人而异,我的搭建过程大致是这样的:
1.创建一个javaweb项目;
2.导入Spring框架,上图:
2.1: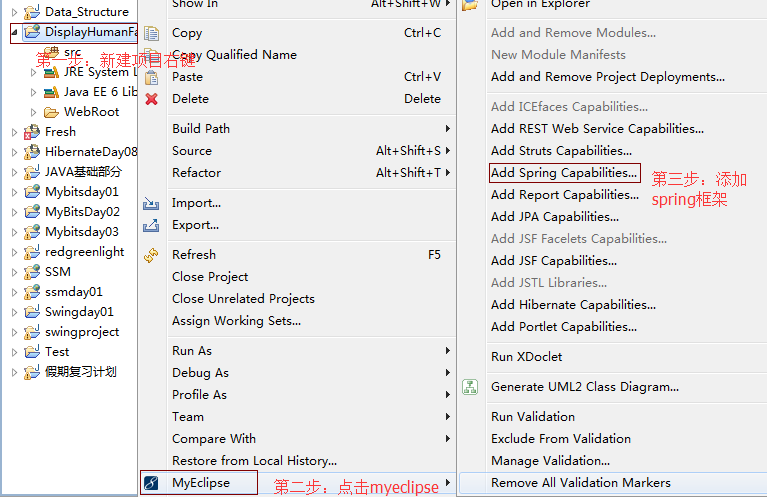
2.2:
2.3: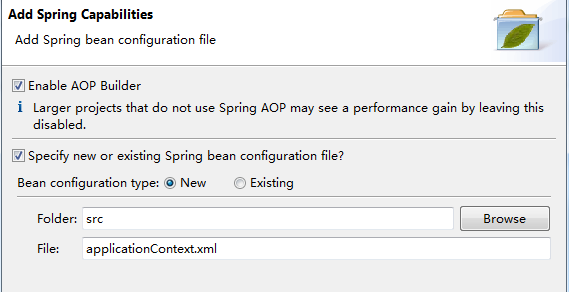
3.导入struts2框架,上图:
3.1: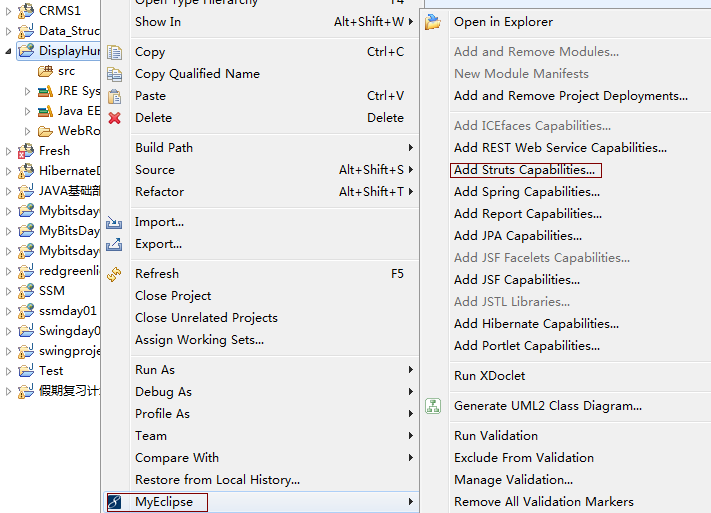
3.2: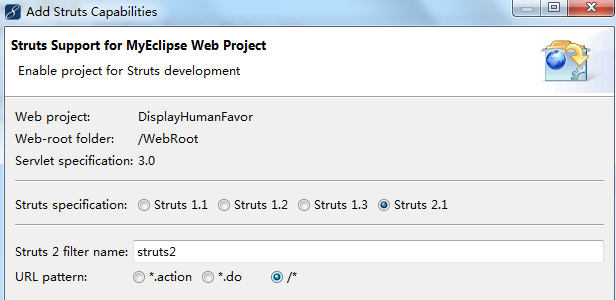
next:
3.3: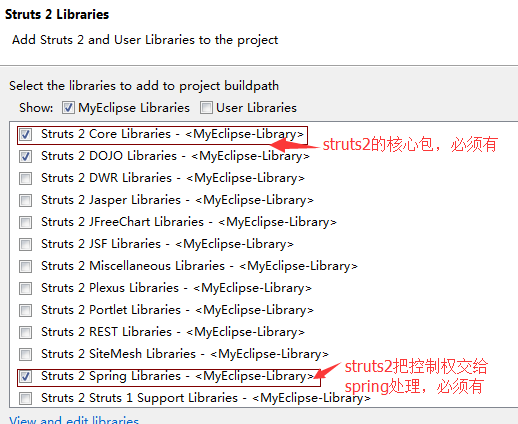
4.导入Hibernate框架,说明:由于hibernate属于持久层,和数据库密切相关,所以需要我们提前出创建好数据库对应视图,然后再开始下面的操做。上图:
4.1: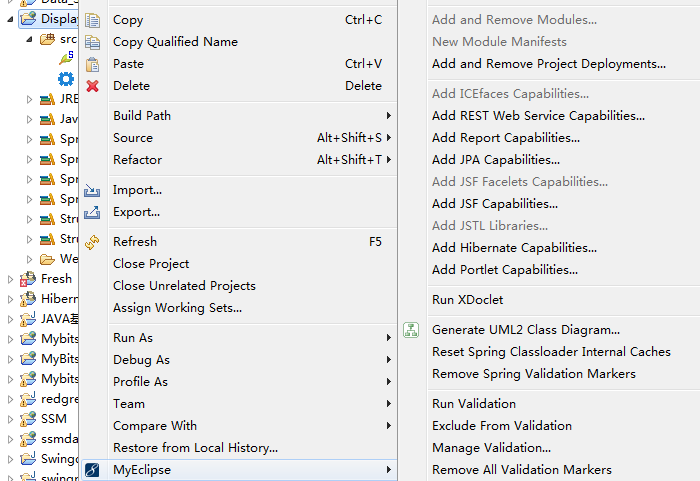
4.2: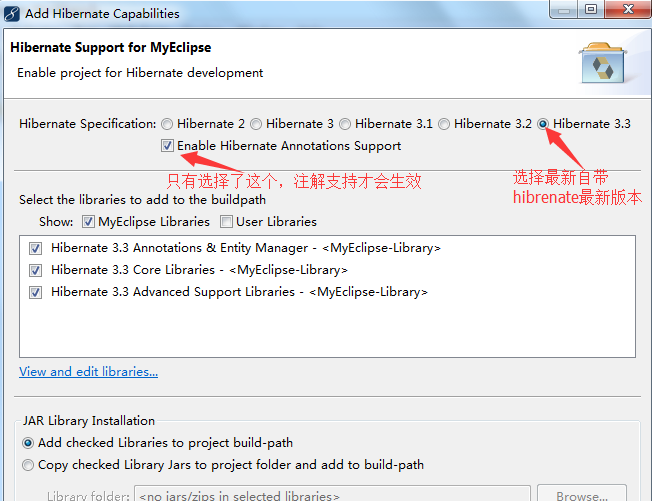
4.3:
4.4: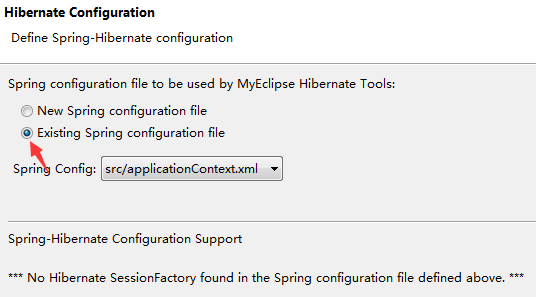
4.5: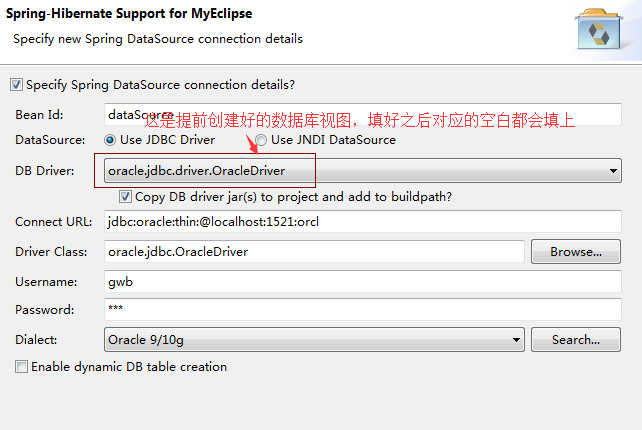
4.6: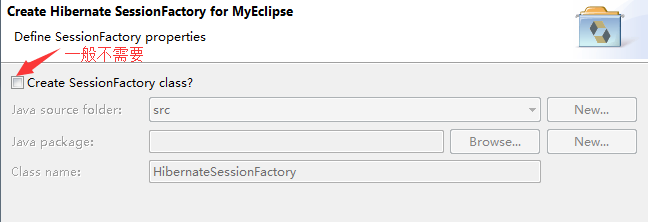
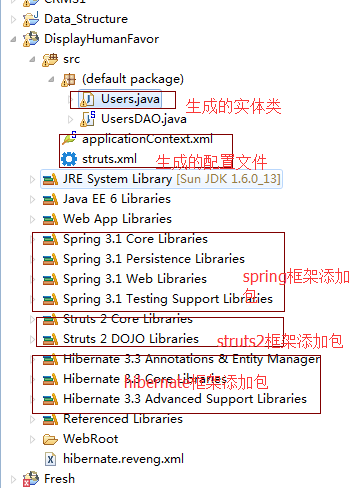
4.7:利用数据库相关表和hibernate的orm生成实体类和对应配置文件信息
4.7.1: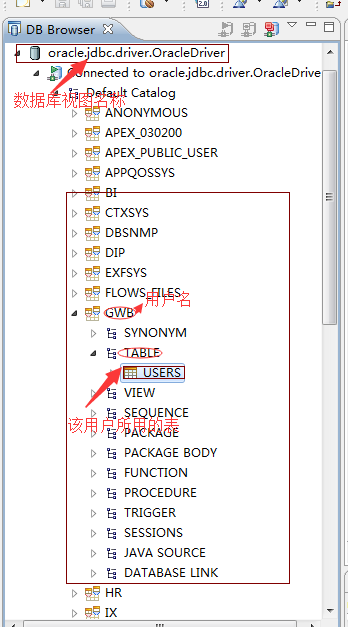
4.7.2: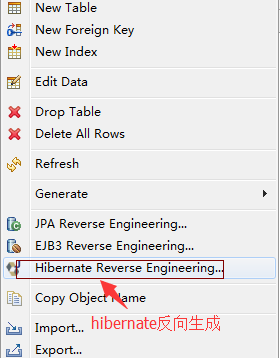
4.7.3: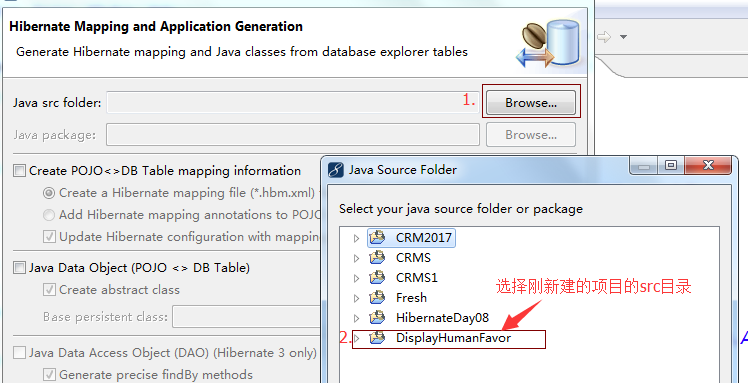
4.7.4: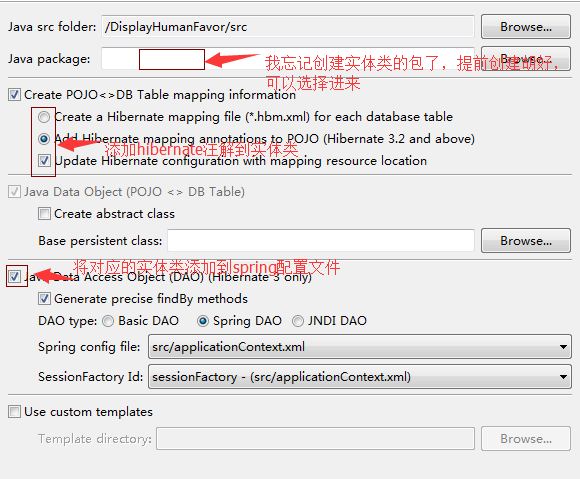
4.7.5: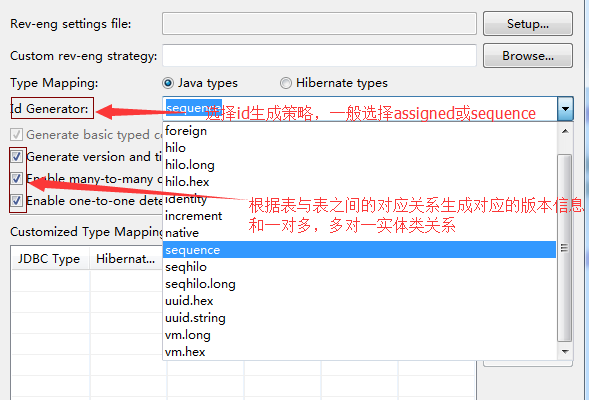
4.7.6: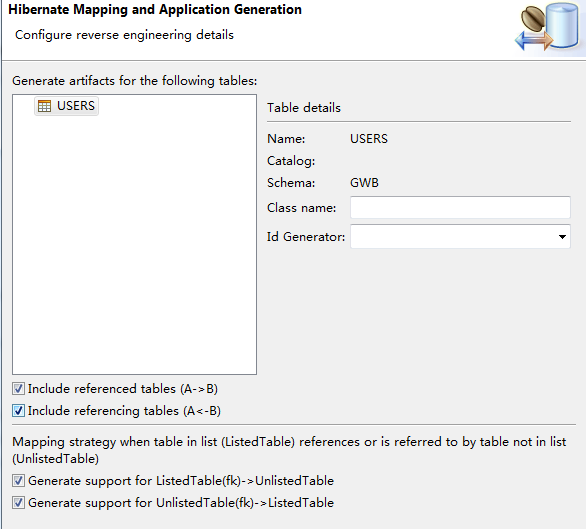
5.查看初步搭建结果:
6.进一步对配置文件进行配置:
6.1:配置struts.xml文件
6.1.1:选择要修改的配置文件路径进行修改
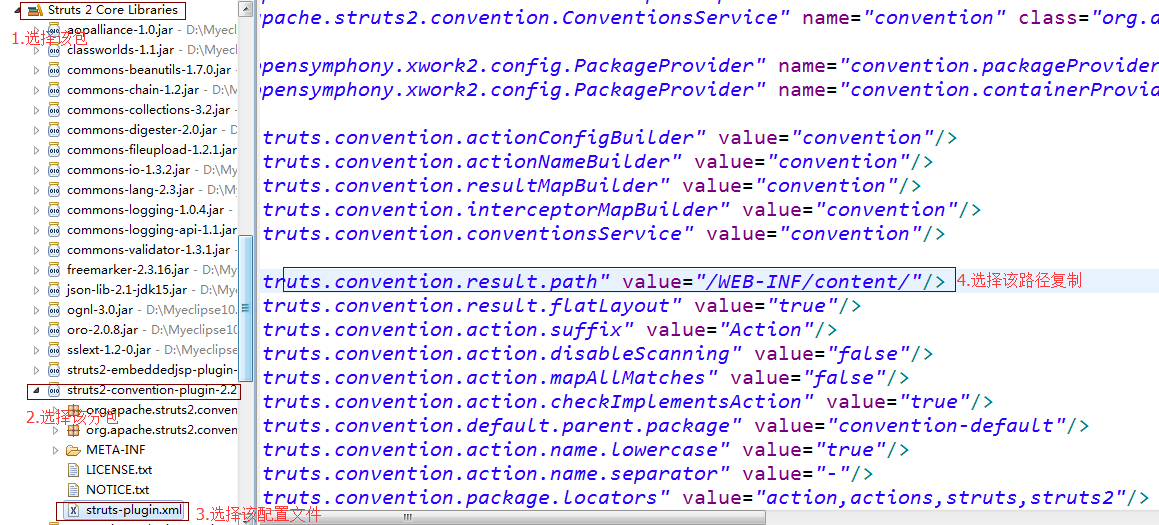
6.1.2:配置struts.xml文件
<?xml version="1.0" encoding="UTF-8" ?>

<!DOCTYPE struts PUBLIC "-//Apache Software Foundation//DTD Struts Configuration 2.1//EN" "http://struts.apache.org/dtds/struts-2.1.dtd">

<struts>

<!--将struts的控制权交给spring -->

<constant name="struts.objectFactory" value="spring"></constant>

<!-- 修改默认路径为该项目跟路径 -->

<constant name="struts.convention.result.path" value="/"/>

</struts>
6.2.修改application.xml文件
6.2.1原文件
<?xml version="1.0" encoding="UTF-8"?>

<beans

    xmlns="http://www.springframework.org/schema/beans"

    xmlns:xsi="http://www.w3.org/2001/XMLSchema-instance"

    xmlns:p="http://www.springframework.org/schema/p"

    xsi:schemaLocation="http://www.springframework.org/schema/beans http://www.springframework.org/schema/beans/spring-beans-3.1.xsd">

    <bean id="dataSource"

        class="org.apache.commons.dbcp.BasicDataSource">

        <property name="driverClassName"

            value="oracle.jdbc.OracleDriver">

        </property>

        <property name="url"

            value="jdbc:oracle:thin:@localhost:1521:orcl">

        </property>

        <property name="username" value="gwb"></property>

        <property name="password" value="gwb"></property>

    </bean>

    <bean id="sessionFactory"

        class="org.springframework.orm.hibernate3.annotation.AnnotationSessionFactoryBean">

        <property name="dataSource">

            <ref bean="dataSource" />

        </property>

        <property name="hibernateProperties">

            <props>

                <prop key="hibernate.dialect">

                    org.hibernate.dialect.Oracle9Dialect

                </prop>

            </props>

        </property>

    </bean>

    <bean id="UsersDAO" class="UsersDAO">

        <property name="sessionFactory">

            <ref bean="sessionFactory" />

        </property>

    </bean></beans>
6.2.2.修改后application.xml文件:
<?xml version="1.0" encoding="UTF-8"?>

<beans

    xmlns="http://www.springframework.org/schema/beans"

    xmlns:xsi="http://www.w3.org/2001/XMLSchema-instance"

    xmlns:p="http://www.springframework.org/schema/p"

    xmlns:context="http://www.springframework.org/schema/context"

    xmlns:tx="http://www.springframework.org/schema/tx"

    xsi:schemaLocation="http://www.springframework.org/schema/beans

     http://www.springframework.org/schema/beans/spring-beans-3.1.xsd

     http://www.springframework.org/schema/context

     http://www.springframework.org/schema/context/spring-context-3.1.xsd

     http://www.springframework.org/schema/tx

     http://www.springframework.org/schema/tx/spring-tx-3.1.xsd">

<!--添加注解支持  -->

<context:annotation-config></context:annotation-config>

<!-- 添加注解扫描支持 -->

<context:component-scan base-package="com.cn"></context:component-scan>

<!-- 添加事务注解支持 -->

<tx:annotation-driven transaction-manager="transactionManager"/>

    <bean id="dataSource"

        class="org.apache.commons.dbcp.BasicDataSource">

        <property name="driverClassName"

            value="oracle.jdbc.OracleDriver">

        </property>

        <property name="url"

            value="jdbc:oracle:thin:@localhost:1521:orcl">

        </property>

        <property name="username" value="gwb"></property>

        <property name="password" value="gwb"></property>

    </bean>

    <!--配置事务管理器 -->

    <bean id="transactionManager" class="org.springframework.orm.hibernate3.HibernateTransactionManager">

        <property name="sessionFactory">

           <ref bean="sessionFactory"/>

        </property>

    </bean>

    <!-- 添加HibernateTemplate模板 -->

    <bean id="hibernateTemplate" class="org.springframework.orm.hibernate3.HibernateTemplate">

        <property name="sessionFactory">

           <ref bean="sessionFactory"/>

        </property>

    </bean>

    <bean id="sessionFactory"

        class="org.springframework.orm.hibernate3.annotation.AnnotationSessionFactoryBean">

        <property name="dataSource">

            <ref bean="dataSource" />

        </property>

        <property name="hibernateProperties">

            <props>

                <prop key="hibernate.dialect">

                    org.hibernate.dialect.Oracle9Dialect

                </prop>

            </props>

        </property>

        <property name="annotatedClasses">

            <list>

                <value>com.cn.entity.Users</value>

            </list>

        </property>

    </bean>

    <bean id="UsersDAO" class="UsersDAO">

        <property name="sessionFactory">

            <ref bean="sessionFactory" />

        </property>

    </bean></beans>
6.3.修改web.xml文件
6.3.1修改前
<?xml version="1.0" encoding="UTF-8"?>

<web-app version="3.0"

    xmlns="http://java.sun.com/xml/ns/javaee"

    xmlns:xsi="http://www.w3.org/2001/XMLSchema-instance"

    xsi:schemaLocation="http://java.sun.com/xml/ns/javaee

    http://java.sun.com/xml/ns/javaee/web-app_3_0.xsd">

  <display-name></display-name>

  <welcome-file-list>

    <welcome-file>index.jsp</welcome-file>

  </welcome-file-list>

  <filter>

      <filter-name>struts2</filter-name>

      <filter-class>

          org.apache.struts2.dispatcher.ng.filter.StrutsPrepareAndExecuteFilter

      </filter-class>

  </filter>

  <filter-mapping>

      <filter-name>struts2</filter-name>

      <url-pattern>/*</url-pattern>

  </filter-mapping></web-app>
6.3.2.修改后
<?xml version="1.0" encoding="UTF-8"?>

<web-app version="3.0"

    xmlns="http://java.sun.com/xml/ns/javaee"

    xmlns:xsi="http://www.w3.org/2001/XMLSchema-instance"

    xsi:schemaLocation="http://java.sun.com/xml/ns/javaee

    http://java.sun.com/xml/ns/javaee/web-app_3_0.xsd">

<!-- 添加Spring上下文参数 -->

 <context-param>

  <param-name>contextConfigLocation</param-name>

  <param-value>classpath:applicationContext.xml</param-value>

 </context-param>

 <filter>

  <filter-name>struts2</filter-name>

  <filter-class>org.apache.struts2.dispatcher.ng.filter.StrutsPrepareAndExecuteFilter</filter-class>

 </filter>

 <filter>

  <filter-name>OpenSessionInView</filter-name>

  <filter-class>org.springframework.orm.hibernate3.support.OpenSessionInViewFilter</filter-class>

 </filter>

 <!-- 添加Spring的上下文环境监听 -->

 <listener>

  <listener-class>org.springframework.web.context.ContextLoaderListener</listener-class>

 </listener>

  <display-name></display-name>

  <welcome-file-list>

    <welcome-file>index.jsp</welcome-file>

  </welcome-file-list>

  <filter>

      <filter-name>struts2</filter-name>

      <filter-class>

          org.apache.struts2.dispatcher.ng.filter.StrutsPrepareAndExecuteFilter

      </filter-class>

  </filter>

   <filter-mapping>

  <filter-name>struts2</filter-name>

  <url-pattern>/*</url-pattern>

 </filter-mapping>

 </web-app>
java利用myeclipse自带三大框架搭建三大框架(Hibernate+Struts2+Spring)过程详解的更多相关文章
- 一步一步使用ABP框架搭建正式项目系列教程之本地化详解
返回总目录<一步一步使用ABP框架搭建正式项目系列教程> 本篇目录 扯扯本地化 ABP中的本地化 小结 扯扯本地化 本节来说说本地化,也有叫国际化.全球化的,不管怎么个叫法,反正道理都是一 ...
- go微服务框架go-micro深度学习 rpc方法调用过程详解
摘要: 上一篇帖子go微服务框架go-micro深度学习(三) Registry服务的注册和发现详细解释了go-micro是如何做服务注册和发现在,服务端注册server信息,client获取serv ...
- go微服务框架go-micro深度学习(五) stream 调用过程详解
上一篇写了一下rpc调用过程的实现方式,简单来说就是服务端把实现了接口的结构体对象进行反射,抽取方法,签名,保存,客户端调用的时候go-micro封请求数据,服务端接收到请求时,找到需要调用调 ...
- 《手把手教你》系列基础篇(九十一)-java+ selenium自动化测试-框架设计基础-Logback实现日志输出-下篇(详解教程)
1.简介 为了方便查看和归档:(1)不同包的日志可能要放到不同的文件中,如service层和dao层的日志:(2)不同日志级别:调试.信息.警告和错误等也要分文件输出.所以宏哥今天主要介绍和分享的是: ...
- apache-storm-1.0.2.tar.gz的集群搭建(3节点)(图文详解)(非HA和HA)
不多说,直接上干货! Storm的版本选取 我这里,是选用apache-storm-1.0.2.tar.gz apache-storm-0.9.6.tar.gz的集群搭建(3节点)(图文详解) 为什么 ...
- RPC框架调用过程详解
RPC框架调用过程详解 2017年09月16日 21:14:08 荷叶清泉 阅读数 6275 版权声明:本文为博主原创文章,遵循CC 4.0 BY-SA版权协议,转载请附上原文出处链接和本声明. ...
- Java生鲜电商平台-APP/小程序接口传输常见的加密算法及详解
Java生鲜电商平台-APP/小程序接口传输常见的加密算法及详解 说明:Java生鲜电商平台-APP/小程序接口传输常见的加密算法及详解,加密算法,是现在每个软件项目里必须用到的内容. 广泛应用在包括 ...
- Hadoop MapReduce执行过程详解(带hadoop例子)
https://my.oschina.net/itblog/blog/275294 摘要: 本文通过一个例子,详细介绍Hadoop 的 MapReduce过程. 分析MapReduce执行过程 Map ...
- java使用POI操作XWPFDocument中的XWPFRun(文本)对象的属性详解
java使用POI操作XWPFDocument中的XWPFRun(文本)对象的属性详解 我用的是office word 2016版 XWPFRun是XWPFDocument中的一段文本对象(就是一段文 ...
随机推荐
- java XML-RPC
1.XML-RPC简介 xml rpc是使用http协议做为传输协议的rpc机制,使用xml文本的方式传输命令和数据.一个rpc系统,必然包括2个部分:1.rpc client,用来向rpc serv ...
- 对于URL中文和特殊字符的处理方法
1.中文的处理方法 NSString* string1 = @"https://www.cloudsafe.com/文件夹"; NSString* string2 = [strin ...
- Algorithm: Euclid's algorithm of finding GCD
寻找最大公约数方法 代码如下: int gcd (int a, int b) { return b ? gcd (b, a % b) : a; } 应用:求最小公倍数 代码如下: int lcm (i ...
- hdu1015 Safecracker —— 回溯
题目链接:http://acm.hdu.edu.cn/showproblem.php?pid=1015 代码1: #include<stdio.h>//hdu1015 #include&l ...
- .cxx_destruct crash
开发过程中遇到 YXTBaseLabelCell .cxx_destruct崩溃,查了下,会在调用类的dealloc方法时调用cxx_destruct,于是看了下代码,找dealloc可能会崩溃的原因 ...
- python实现路由追踪,并生成追踪图片
#!/usr/bin/env python # -*- coding: utf-8 -*- import os,sys,time,subprocess import warnings,logging ...
- Loadrunner脚本自动关联和手动关联
关于Loadrunner关联一.什么时候需要关联 1.关联的含义 关联(correlation):在脚本回放过程中,客户端发出请求,通过关联函数所定义的左右边界值(也就是关联规则),在服 ...
- ffmpeg full help
Hyper fast Audio and Video encoder usage: ffmpeg [options] [[infile options] -i infile]... {[outfile ...
- 常见的LINUX发行版安装libiconv库方法
今天编译程序,发现程序报错,如下 cannot find -liconv collect2: ld returned 1 exit status 或者 undefined reference to ` ...
- plsql导入csv数据,未响应,invalid identifier
问题分析: 1.确保cvs字段名与表字段名一致,不要有空格 2.cvs字段对应表字段的大写,确保表字段都是大写 3.如果字段能对应上,plsql会自动识别出来