
Directx11教程(10) 画一个简易坐标轴
本篇教程中,我们将在三维场景中,画一个简易的坐标轴,分别用红、绿、蓝三种颜色表示x,y,z轴的正向坐标轴。
为此,我们要先建立一个AxisModelClass类,来表示坐标轴顶点。
现在系统类之间的关系图如下:
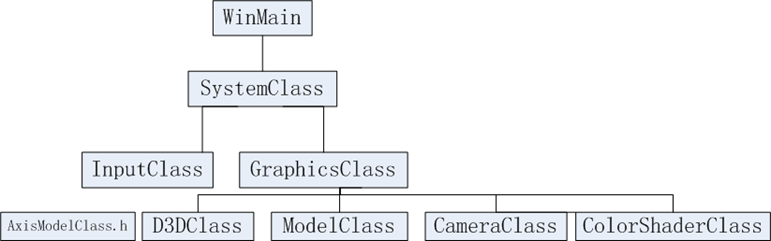
AxisModelClass类和前面的ModelClass类相似,只是创建顶点缓冲和索引缓冲时,指定了3条线段,表示三个坐标轴。
AxisModelClass.h的主要代码如下:
#pragma once
#include <d3d11.h>
#include <d3dx10math.h>
#include "common.h"
class AxisModelClass
{
…
void RenderBuffers(ID3D11DeviceContext*);
//顶点缓冲和顶点索引缓冲
ID3D11Buffer *m_vertexBuffer, *m_indexBuffer;
int m_vertexCount, m_indexCount;
};
AxisModelClass.cpp的主要代码如下:
#include "AxisModelClass.h"
…
bool AxisModelClass::InitializeBuffers(ID3D11Device* device)
{
VertexType* vertices;
unsigned long* indices;
D3D11_BUFFER_DESC vertexBufferDesc, indexBufferDesc;
D3D11_SUBRESOURCE_DATA vertexData, indexData;
HRESULT result;
//首先,我们创建2个临时缓冲存放顶点和索引数据,以便后面使用。.
// 设置顶点缓冲大小为6
m_vertexCount = 6;
// 设置索引缓冲大小.
m_indexCount = 6;
// 创建顶点临时缓冲.
vertices = new VertexType[m_vertexCount];
if(!vertices)
{
return false;
}
// 创建索引缓冲.
indices = new unsigned long[m_indexCount];
if(!indices)
{
return false;
}
// 设置顶点数据.
//x轴,红色
vertices[0].position = D3DXVECTOR3(0.0f, 0.0f, 0.0f);
vertices[0].color = RED;
vertices[1].position = D3DXVECTOR3(10.0f, 0.0f, 0.0f);
vertices[1].color = RED;
//y轴,绿色
vertices[2].position = D3DXVECTOR3(0.0f, 0.0f, 0.0f);
vertices[2].color = GREEN;
vertices[3].position = D3DXVECTOR3(0.0f, 10.0f, 0.0f);
vertices[3].color = GREEN;
//z轴,蓝色
vertices[4].position = D3DXVECTOR3(0.0f, 0.0f, 0.0f);
vertices[4].color = BLUE;
vertices[5].position = D3DXVECTOR3(0.0f, 0.0f, 10.0f);
vertices[5].color = BLUE;
// 设置索引缓冲数据.
indices[0] = 0;
indices[1] = 1;
indices[2] = 2;
indices[3] = 3;
indices[4] = 4;
indices[5] = 5;
…
return true;
}
void AxisModelClass::RenderBuffers(ID3D11DeviceContext* deviceContext)
{
unsigned int stride;
unsigned int offset;
// 设置顶点缓冲跨度和偏移.
stride = sizeof(VertexType);
offset = 0;
//在input assemberl阶段绑定顶点缓冲,以便能够被渲染
deviceContext->IASetVertexBuffers(0, 1, &m_vertexBuffer, &stride, &offset);
//在input assemberl阶段绑定索引缓冲,以便能够被渲染
deviceContext->IASetIndexBuffer(m_indexBuffer, DXGI_FORMAT_R32_UINT, 0);
// 设置体元语义,渲染线段,画出坐标轴
注意:这儿指定画的体元为线段列表
deviceContext->IASetPrimitiveTopology(D3D11_PRIMITIVE_TOPOLOGY_LINELIST);
return;
}
为了使用颜色宏定义,我么去掉了上篇文章在ModelClass.h 中定义的颜色,而新建一个common.h文件,
ModelClass.h中将包含common.h
ModelClass.h代码改变如下:
#pragma once
#include <d3d11.h>
#include <d3dx10math.h>
#include "common.h"
class ModelClass
{
…
};
common.h的代码如下:
//定义一些常用颜色
#include <d3d11.h>
#include <d3dx10math.h>
const D3DXVECTOR4 WHITE(1.0f, 1.0f, 1.0f, 1.0f);
const D3DXVECTOR4 BLACK(0.0f, 0.0f, 0.0f, 1.0f);
const D3DXVECTOR4 RED(1.0f, 0.0f, 0.0f, 1.0f);
const D3DXVECTOR4 GREEN(0.0f, 1.0f, 0.0f, 1.0f);
const D3DXVECTOR4 BLUE(0.0f, 0.0f, 1.0f, 1.0f);
const D3DXVECTOR4 YELLOW(1.0f, 1.0f, 0.0f, 1.0f);
const D3DXVECTOR4 CYAN(0.0f, 1.0f, 1.0f, 1.0f); //蓝绿色
const D3DXVECTOR4 MAGENTA(1.0f, 0.0f, 1.0f, 1.0f); //洋红色
const D3DXVECTOR4 BEACH_SAND(1.0f, 0.96f, 0.62f, 1.0f);
const D3DXVECTOR4 LIGHT_YELLOW_GREEN(0.48f, 0.77f, 0.46f, 1.0f);
const D3DXVECTOR4 DARK_YELLOW_GREEN(0.1f, 0.48f, 0.19f, 1.0f);
const D3DXVECTOR4 DARKBROWN(0.45f, 0.39f, 0.34f, 1.0f);
GraphicsClass.h修改的代码如下:
#pragma once
…
#include "modelclass.h"
#include "AxisModelClass.h"
#include "colorshaderclass.h"
…
class GraphicsClass
{
…
ModelClass* m_Model;
AxisModelClass* m_AxisModel;
ColorShaderClass* m_ColorShader;
};
GraphicsClass.cpp代码如下:
#include "GraphicsClass.h"
GraphicsClass::GraphicsClass(void)
{
m_D3D = 0;
m_Camera = 0;
m_Model = 0;
m_AxisModel = 0;
m_ColorShader = 0;
}
bool GraphicsClass:: Initialize(int screenWidth, int screenHeight, HWND hwnd)
{
…
// 创轴建模型对象.
m_AxisModel = new AxisModelClass;
if(!m_AxisModel)
{
return false;
}
// 初始化坐标轴模型对象.
result = m_AxisModel->Initialize(m_D3D->GetDevice());
if(!result)
{
MessageBox(hwnd, L"Could not initialize the axis model object.", L"Error", MB_OK);
return false;
}
…
return true;
}
bool GraphicsClass::Frame()
{
bool result;
// 调用Render函数,渲染3D场景
// Render是GraphicsClass的私有函数.
result = Render();
if(!result)
{
return false;
}
return true;
}
bool GraphicsClass::Render()
{
D3DXMATRIX viewMatrix, projectionMatrix, worldMatrix;
bool result;
// 设置framebuffer.为浅蓝色
m_D3D->BeginScene(0.0f, 0.0f, 0.5f, 1.0f);
// 得到3个矩阵.
m_Camera->getViewMatrix(&viewMatrix);
m_D3D->GetWorldMatrix(worldMatrix);
m_D3D->GetProjectionMatrix(projectionMatrix);
m_AxisModel->Render(m_D3D->GetDeviceContext());
// 用shader渲染.
result = m_ColorShader->Render(m_D3D->GetDeviceContext(), m_AxisModel->GetIndexCount(), worldMatrix, viewMatrix, projectionMatrix);
if(!result)
{
return false;
}
// 把模型顶点和索引缓冲放入管线,准备渲染.
m_Model->Render(m_D3D->GetDeviceContext());
// 用shader渲染.
result = m_ColorShader->Render(m_D3D->GetDeviceContext(), m_Model->GetIndexCount(), worldMatrix, viewMatrix, projectionMatrix);
if(!result)
{
return false;
}
//把framebuffer中的图像present到屏幕上.
m_D3D->EndScene();
return true;
}
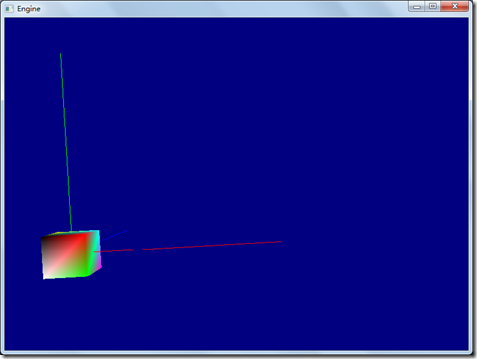
程序执行后,如下图所示:
完整的代码请参考:
工程文件myTutorialD3D11_9
代码下载:
http://files.cnblogs.com/mikewolf2002/myTutorialD3D11.zip
Directx11教程(10) 画一个简易坐标轴的更多相关文章
- Directx11教程(19) 画一个简单的地形
原文:Directx11教程(19) 画一个简单的地形 通常我们在xz平面定义一个二维的网格,然后y的值根据一定的函数计算得到,比如正弦.余弦函数的组合等等,可以得到一个看似不错的地形或者 ...
- Directx11教程(7) 画一个颜色立方体
原文:Directx11教程(7) 画一个颜色立方体 前面教程我们通过D3D11画了一个三角形,本章我们将画一个颜色立方体,它的立体感更强.主要的变动是ModelClass类,在Model ...
- Directx11教程(6) 画一个简单的三角形(2)
原文:Directx11教程(6) 画一个简单的三角形(2) 在上篇教程中,我们实现了在D3D11中画一个简单的三角形,但是,当我们改变窗口大小时候,三角形形状却随着窗口高宽比例改变而改变, ...
- Directx11教程(5) 画一个简单的三角形(1)
原文:Directx11教程(5) 画一个简单的三角形(1) 在本篇教程中,我们将通过D3D11画一个简单的三角形.在D3D11中,GPU的渲染主要通过shader来操作(当然还有一些操作 ...
- Directx11教程(56) 建立一个skydome
原文:Directx11教程(56) 建立一个skydome 本章建立一个skydome(天空穹),主要学习如何使用cube mapping. cube map就是把六张纹理当作 ...
- Directx11教程(11) 增加一个debug宏
原文:Directx11教程(11) 增加一个debug宏 现在我们在common.h中增加一个debug的宏,在每个d3d11函数后调用,如果d3d函数出错,它能够给出程序中错误的代码行 ...
- Directx11教程(9) 增加一个TimerClass类
原文:Directx11教程(9) 增加一个TimerClass类 在上篇教程代码的基础上,我们增加一个TimerClass类,这个类的功能很简单,就是可以计算相邻2帧的时间差.利用这个时间 ...
- 使用Python画一个带坐标轴的圆
Download Microsoft Visual Studio Microsoft Visual Studio enables you develop your python Application ...
- Directx11教程40 纹理映射(10)
原文:Directx11教程40 纹理映射(10) 本章尝试使用纹理行列式,或者说纹理数组,在ps中,使用2个纹理,最终的像素颜色,是光照颜色*纹理1采样颜色*纹理2采样颜色,主要是想达到如 ...
随机推荐
- 机器学习入门:K-近邻算法
机器学习入门:K-近邻算法 先来一个简单的例子,我们如何来区分动作类电影与爱情类电影呢?动作片中存在很多的打斗镜头,爱情片中可能更多的是亲吻镜头,所以我们姑且通过这两种镜头的数量来预测这部电影的主题. ...
- python 当文件目录不存在时,如何自动创建
import os if not os.path.exists('foldername'): os.mkdir('foldername')
- Docker(一)简介及核心概念
1.简介 Docker是一个开源的应用容器引擎:是一个轻量级容器技术: Docker支持将软件编译成一个镜像:然后在镜像中各种软件做好配置,将镜像发布出去,其他使用者可以直接使用这个镜像: 运行中的这 ...
- .NET2.0引用.NET3.5的System.Core.dll&Dapper在.NET2.0下的配置
微软MSDN对.NET2.0,3.0,3.5的描述: .NET Framework 版本 2.0.3.0 和 3.5 是使用同一 CLR 版本 (CLR 2.0) 生成的. 这些版本表示单个安装的连续 ...
- Python程序的执行过程
1. Python是一门解释型语言? 我初学Python时,听到的关于Python的第一句话就是,Python是一门解释性语言,我就这样一直相信下去,直到发现了*.pyc文件的存在.如果是解释型语言, ...
- LUOGU P3111 [USACO14DEC]牛慢跑Cow Jog_Sliver
传送门 解题思路 比较简单的一道思路题,首先假设他们没有前面牛的限制,算出每只牛最远能跑多远.然后按照初位置从大到小扫一遍,如果末位置大于等于前面的牛,那么就说明这两头牛连一块了. 代码 #inclu ...
- Git的基本了解与使用、向github提交代码
#Git的基本了解与使用.向github提交代码- git:是一个版本控制系统.- github:一个代码托管提供商.开源网站.是一个面向开源及私有软件项目的托管平台,因为支持Git作为唯一的版本库格 ...
- vmware的Linux虚拟机ping不通外网的解决办法
转载自:https://blog.csdn.net/l_l_b_/article/details/79409843 1.点击此处编辑 2.选择虚拟网络编辑器 3.点击更改设置 4.选择v8 并将使用本 ...
- LintCode_453 将二叉树拆成链表
题目 将一棵二叉树按照前序遍历拆解成为一个假链表.所谓的假链表是说,用二叉树的 right 指针,来表示链表中的 next 指针. 样例 1 \ 1 2 / \ \ 2 5 => 3 / \ \ ...
- CentOS7 下的 firewall 用法
1.firewalld的基本使用 启动: systemctl start firewalld 查看状态: systemctl status firewalld 停止: systemctl disab ...