
WPF实现截图(仿微信截图)
WPF开发者QQ群: 340500857 | 微信群 -> 进入公众号主页 加入组织
每日一笑
肚子疼,去厕所排便,结果什么都没拉出来。看着自己坐在马桶上痛苦又努力却一无所获的样子,仿佛看到了自己平凡的一生。
前言
有小伙伴需要在软件反馈窗体增加截图功能需求,所以今天来实现一个仿微信的截图。
欢迎转发、分享、点赞,谢谢大家~。
效果预览(更多效果请下载源码体验)
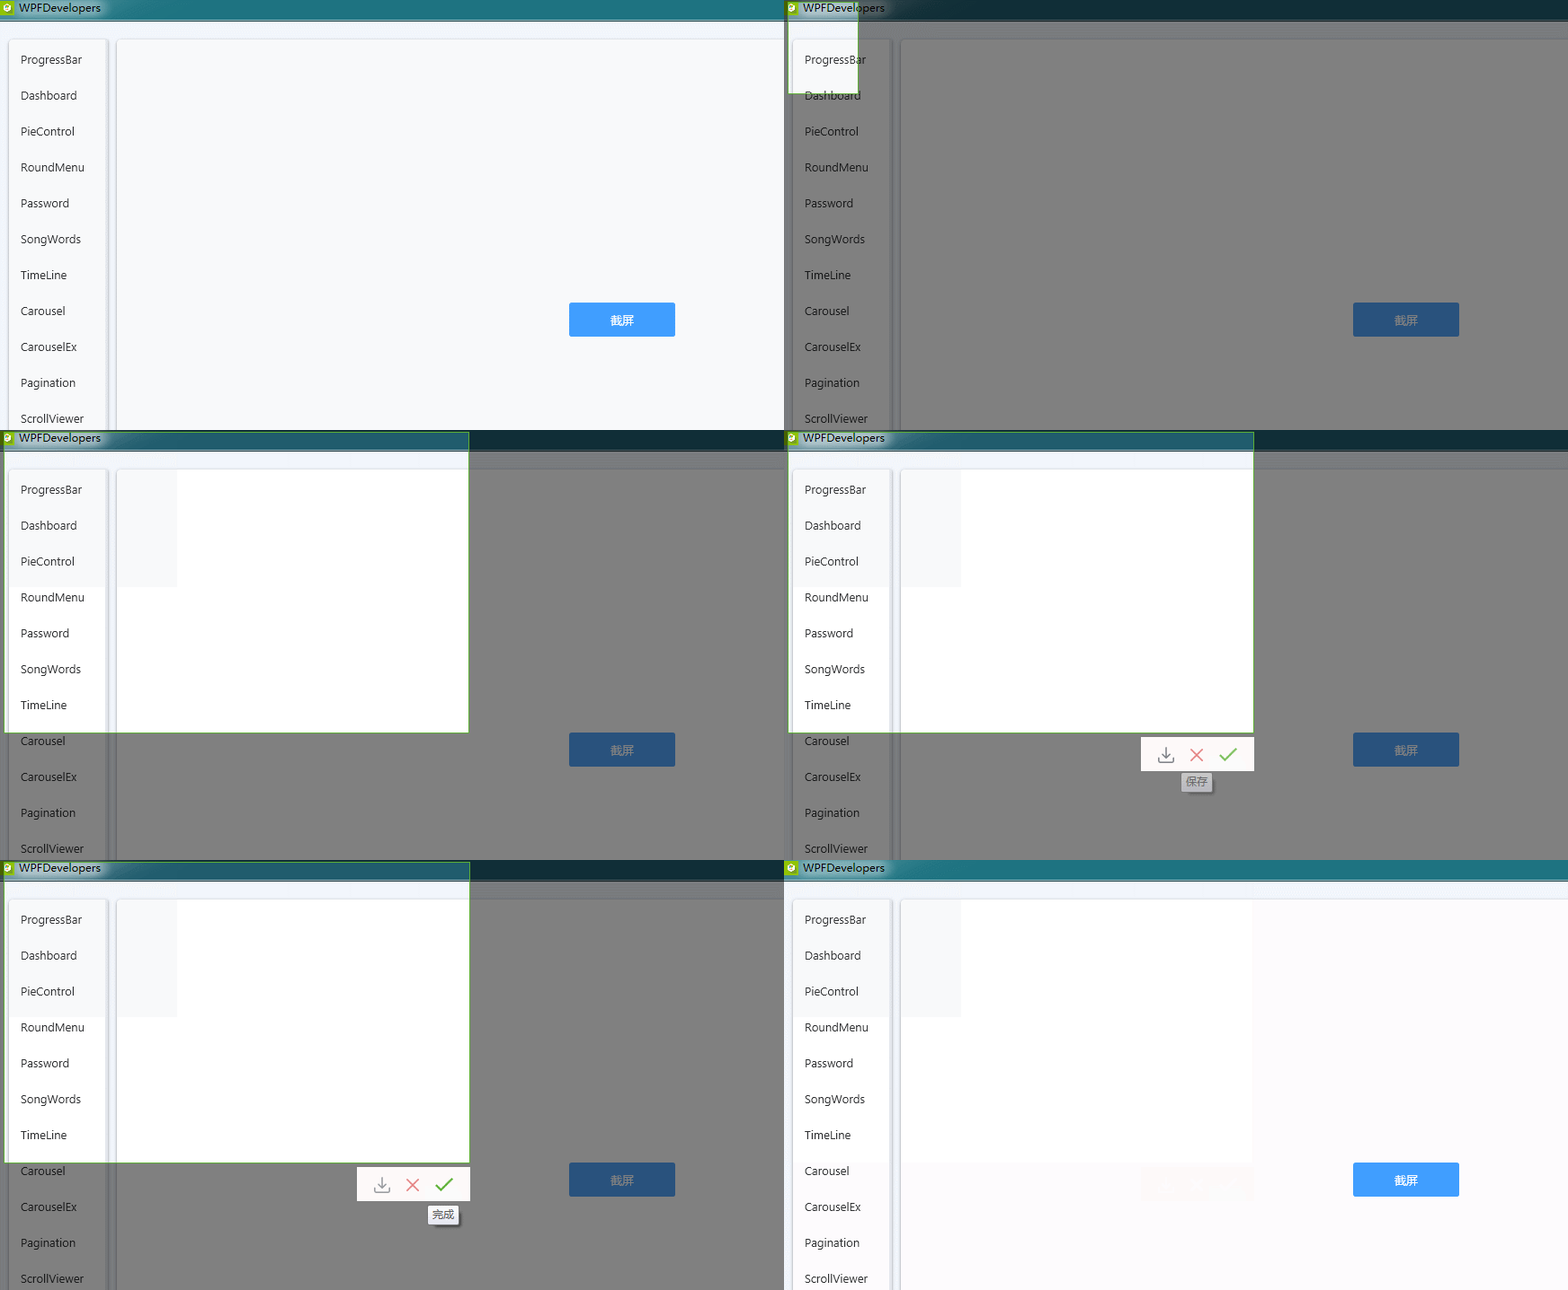
一、ScreenCut.cs 代码如下
using Microsoft.Win32;

using System;

using System.Collections.Generic;

using System.Drawing.Drawing2D;

using System.Drawing.Text;

using System.Linq;

using System.Text;

using System.Windows;

using System.Windows.Controls;

using System.Windows.Input;

using System.Windows.Media;

using System.Windows.Media.Imaging;

using System.Windows.Shapes;

namespace WPFDevelopers.Controls

{

    [TemplatePart(Name = CanvasTemplateName, Type = typeof(Canvas))]

    [TemplatePart(Name = RectangleLeftTemplateName, Type = typeof(Rectangle))]

    [TemplatePart(Name = RectangleTopTemplateName, Type = typeof(Rectangle))]

    [TemplatePart(Name = RectangleRightTemplateName, Type = typeof(Rectangle))]

    [TemplatePart(Name = RectangleBottomTemplateName, Type = typeof(Rectangle))]

    [TemplatePart(Name = BorderTemplateName, Type = typeof(Border))]

    [TemplatePart(Name = WrapPanelTemplateName, Type = typeof(WrapPanel))]

    [TemplatePart(Name = ButtonSaveTemplateName, Type = typeof(Button))]

    [TemplatePart(Name = ButtonCancelTemplateName, Type = typeof(Button))]

    [TemplatePart(Name = ButtonCompleteTemplateName, Type = typeof(Button))]

    public class ScreenCut : Window

    {

        private const string CanvasTemplateName = "PART_Canvas";

        private const string RectangleLeftTemplateName = "PART_RectangleLeft";

        private const string RectangleTopTemplateName = "PART_RectangleTop";

        private const string RectangleRightTemplateName = "PART_RectangleRight";

        private const string RectangleBottomTemplateName = "PART_RectangleBottom";

        private const string BorderTemplateName = "PART_Border";

        private const string WrapPanelTemplateName = "PART_WrapPanel";

        private const string ButtonSaveTemplateName = "PART_ButtonSave";

        private const string ButtonCancelTemplateName = "PART_ButtonCancel";

        private const string ButtonCompleteTemplateName = "PART_ButtonComplete";

        private Canvas _canvas;

        private Rectangle _rectangleLeft, _rectangleTop, _rectangleRight, _rectangleBottom;

        private Border _border;

        private WrapPanel _wrapPanel;

        private Button _buttonSave,_buttonCancel, _buttonComplete;

        private Rect rect;

        private Point pointStart, pointEnd;

        private bool isMouseUp = false;

        static ScreenCut()

        {

            DefaultStyleKeyProperty.OverrideMetadata(typeof(ScreenCut), new FrameworkPropertyMetadata(typeof(ScreenCut)));

        }

        public override void OnApplyTemplate()

        {

            base.OnApplyTemplate();

            _canvas = GetTemplateChild(CanvasTemplateName) as Canvas;

            _rectangleLeft = GetTemplateChild(RectangleLeftTemplateName) as Rectangle;

            _rectangleTop = GetTemplateChild(RectangleTopTemplateName) as Rectangle;

            _rectangleRight = GetTemplateChild(RectangleRightTemplateName) as Rectangle;

            _rectangleBottom = GetTemplateChild(RectangleBottomTemplateName) as Rectangle;

            _border = GetTemplateChild(BorderTemplateName) as Border;

            _wrapPanel = GetTemplateChild(WrapPanelTemplateName) as WrapPanel;

            _buttonSave = GetTemplateChild(ButtonSaveTemplateName) as Button;

            if (_buttonSave != null)

                _buttonSave.Click += _buttonSave_Click;

            _buttonCancel = GetTemplateChild(ButtonCancelTemplateName) as Button;

            if (_buttonCancel != null)

                _buttonCancel.Click += _buttonCancel_Click;

            _buttonComplete = GetTemplateChild(ButtonCompleteTemplateName) as Button;

            if (_buttonComplete != null)

                _buttonComplete.Click += _buttonComplete_Click;

            this._canvas.Background = new ImageBrush(ChangeBitmapToImageSource(CaptureScreen()));

            _rectangleLeft.Width = _canvas.Width;

            _rectangleLeft.Height = _canvas.Height;

        }

        private void _buttonSave_Click(object sender, RoutedEventArgs e)

        {

            SaveFileDialog dlg = new SaveFileDialog();

            dlg.FileName = $"WPFDevelopers{DateTime.Now.ToString("yyyyMMddHHmmss")}.jpg";

            dlg.DefaultExt = ".jpg";

            dlg.Filter = "image file|*.jpg";

            if (dlg.ShowDialog() == true)

            {

                BitmapEncoder pngEncoder = new PngBitmapEncoder();

                pngEncoder.Frames.Add(BitmapFrame.Create(CutBitmap()));

                using (var fs = System.IO.File.OpenWrite(dlg.FileName))

                {

                    pngEncoder.Save(fs);

                    fs.Dispose();

                    fs.Close();

                }

            }

            Close();

        }

        private void _buttonComplete_Click(object sender, RoutedEventArgs e)

        {

            Clipboard.SetImage(CutBitmap());

            Close();

        }

        CroppedBitmap CutBitmap()

        {

            var renderTargetBitmap = new RenderTargetBitmap((int)_canvas.Width,

  (int)_canvas.Height, 96d, 96d, System.Windows.Media.PixelFormats.Default);

            renderTargetBitmap.Render(_canvas);

            return  new CroppedBitmap(renderTargetBitmap, new Int32Rect((int)rect.X, (int)rect.Y, (int)rect.Width, (int)rect.Height));

        }

        private void _buttonCancel_Click(object sender, RoutedEventArgs e)

        {

            Close();

        }

        protected override void OnPreviewKeyDown(KeyEventArgs e)

        {

            if (e.Key == Key.Escape)

                Close();

        }

        protected override void OnPreviewMouseLeftButtonDown(MouseButtonEventArgs e)

        {

            if (!isMouseUp)

            {

                _wrapPanel.Visibility = Visibility.Hidden;

                pointStart = e.GetPosition(_canvas);

                pointEnd = pointStart;

                rect = new Rect(pointStart, pointEnd);

            }

        }

        protected override void OnPreviewMouseMove(MouseEventArgs e)

        {

            if (e.LeftButton == MouseButtonState.Pressed && !isMouseUp)

            {

                var current = e.GetPosition(_canvas);

                MoveAllRectangle(current);

            }

        }

        protected override void OnPreviewMouseLeftButtonUp(MouseButtonEventArgs e)

        {

            if (!isMouseUp)

            {

                _wrapPanel.Visibility = Visibility.Visible;

                Canvas.SetLeft(this._wrapPanel, rect.X + rect.Width - this._wrapPanel.ActualWidth);

                Canvas.SetTop(this._wrapPanel, rect.Y + rect.Height + 4);

                isMouseUp = true;

            }

        }

        void MoveAllRectangle(Point current)

        {

            pointEnd = current;

            rect = new Rect(pointStart, pointEnd);

            this._rectangleLeft.Width = rect.X;

            this._rectangleLeft.Height = _canvas.Height;

            Canvas.SetLeft(this._rectangleTop, this._rectangleLeft.Width);

            this._rectangleTop.Width = rect.Width;

            double h = 0.0;

            if (current.Y < pointStart.Y)

                h = current.Y;

            else

                h = current.Y - rect.Height;

            this._rectangleTop.Height = h;

            Canvas.SetLeft(this._rectangleRight, this._rectangleLeft.Width + rect.Width);

            this._rectangleRight.Width = _canvas.Width - (rect.Width + this._rectangleLeft.Width);

            this._rectangleRight.Height = _canvas.Height;

            Canvas.SetLeft(this._rectangleBottom, this._rectangleLeft.Width);

            Canvas.SetTop(this._rectangleBottom, rect.Height + this._rectangleTop.Height);

            this._rectangleBottom.Width = rect.Width;

            this._rectangleBottom.Height = _canvas.Height - (rect.Height + this._rectangleTop.Height);

            this._border.Height = rect.Height;

            this._border.Width = rect.Width;

            Canvas.SetLeft(this._border, rect.X);

            Canvas.SetTop(this._border, rect.Y);

        }

        System.Drawing.Bitmap CaptureScreen()

        {

            var bmpCaptured = new System.Drawing.Bitmap((int)SystemParameters.PrimaryScreenWidth, (int)SystemParameters.PrimaryScreenHeight, System.Drawing.Imaging.PixelFormat.Format24bppRgb);

            using (System.Drawing.Graphics g = System.Drawing.Graphics.FromImage(bmpCaptured))

            {

                g.SmoothingMode = SmoothingMode.AntiAlias;

                g.CompositingQuality = CompositingQuality.HighQuality;

                g.InterpolationMode = InterpolationMode.HighQualityBicubic;

                g.TextRenderingHint = TextRenderingHint.ClearTypeGridFit;

                g.PixelOffsetMode = PixelOffsetMode.HighQuality;

                g.CopyFromScreen(0, 0, 0, 0, bmpCaptured.Size, System.Drawing.CopyPixelOperation.SourceCopy);

            }

            return bmpCaptured;

        }

        [System.Runtime.InteropServices.DllImport("gdi32.dll")]

        public static extern bool DeleteObject(IntPtr hObject);

        ImageSource ChangeBitmapToImageSource(System.Drawing.Bitmap bitmap)

        {

            IntPtr hBitmap = bitmap.GetHbitmap();

            ImageSource wpfBitmap = System.Windows.Interop.Imaging.CreateBitmapSourceFromHBitmap(

                hBitmap,

                IntPtr.Zero,

                Int32Rect.Empty,

                BitmapSizeOptions.FromEmptyOptions());

            if (!DeleteObject(hBitmap))

            {

                throw new System.ComponentModel.Win32Exception();

            }

            return wpfBitmap;

        }

    }

}
二、ScreenCut.xaml 代码如下
<ResourceDictionary xmlns="http://schemas.microsoft.com/winfx/2006/xaml/presentation"

                    xmlns:x="http://schemas.microsoft.com/winfx/2006/xaml"

                    xmlns:controls="clr-namespace:WPFDevelopers.Controls">

    <ResourceDictionary.MergedDictionaries>

        <ResourceDictionary Source="Basic/ControlBasic.xaml"/>

        <ResourceDictionary Source="../Styles/Styles.Buttons.xaml"/>

    </ResourceDictionary.MergedDictionaries>

    <Style x:Key="RectangleStyle" TargetType="{x:Type Rectangle}">

        <Setter Property="Fill" Value="{StaticResource BlackSolidColorBrush}"/>

        <Setter Property="Opacity" Value=".5"/>

</Style>

    <Style TargetType="{x:Type controls:ScreenCut}" BasedOn="{StaticResource ControlBasicStyle}">

        <Setter Property="WindowState" Value="Maximized"/>

        <Setter Property="WindowStyle" Value="None"/>

        <Setter Property="Template">

            <Setter.Value>

                <ControlTemplate TargetType="{x:Type controls:ScreenCut}">

                    <Canvas x:Name="PART_Canvas"

            Width="{Binding Source={x:Static SystemParameters.PrimaryScreenWidth}}"

            Height="{Binding Source={x:Static SystemParameters.PrimaryScreenHeight}}">

                        <Rectangle x:Name="PART_RectangleLeft" Style="{StaticResource RectangleStyle}"/>

                        <Rectangle x:Name="PART_RectangleTop" Style="{StaticResource RectangleStyle}"/>

                        <Rectangle x:Name="PART_RectangleRight" Style="{StaticResource RectangleStyle}"/>

                        <Rectangle x:Name="PART_RectangleBottom" Style="{StaticResource RectangleStyle}"/>

                        <Border x:Name="PART_Border" BorderBrush="{StaticResource SuccessPressedSolidColorBrush}"

                                BorderThickness="1"/>

                        <WrapPanel x:Name="PART_WrapPanel"

                                   Visibility="Hidden" Panel.ZIndex="99"

                                   Height="38" Background="{StaticResource WhiteSolidColorBrush}"

                                   VerticalAlignment="Center">

                            <Button x:Name="PART_ButtonSave" Style="{StaticResource PathButton}"

                                    ToolTip="保存" Margin="10,0,0,0">

                                <Button.Content>

                                    <Path Fill="{StaticResource InfoPressedSolidColorBrush}"

                                          Width="18" Height="18" Stretch="Fill"

                                          Data="{StaticResource PathSave}"/>

                                </Button.Content>

                            </Button>

                            <Button x:Name="PART_ButtonCancel" Style="{StaticResource PathButton}"

                                    ToolTip="取消">

                                <Button.Content>

                                    <Path Fill="{StaticResource DangerPressedSolidColorBrush}"

                                          Width="14" Height="14" Stretch="Fill"

                                          Data="{StaticResource PathCancel}"/>

                                </Button.Content>

                            </Button>

                            <Button x:Name="PART_ButtonComplete"  Style="{StaticResource PathButton}"

                                    ToolTip="完成" Margin="0,0,10,0">

                                <Button.Content>

                                    <Path Fill="{StaticResource SuccessPressedSolidColorBrush}"

                                          Width="20" Height="15" Stretch="Fill"

                                          Data="{StaticResource PathComplete}"/>

                                </Button.Content>

                            </Button>

                        </WrapPanel>

                    </Canvas>

                </ControlTemplate>

            </Setter.Value>

        </Setter>

</Style>

</ResourceDictionary>
三、ScreenCutExample.xaml 代码如下
 var screenCut = new ScreenCut();

   screenCut.ShowDialog();
更多教程欢迎关注微信公众号:

WPF开发者QQ群: 340500857
blogs: https://www.cnblogs.com/yanjinhua/p/14345136.html
源码Github:https://github.com/yanjinhuagood/WPFDevelopers.git
gitee:https://gitee.com/yanjinhua/WPFDevelopers.git
WPF实现截图(仿微信截图)的更多相关文章
- WPF 截图控件之绘制方框与椭圆(四) 「仿微信」
前言 接着上周写的截图控件继续更新 绘制方框与椭圆. 1.WPF实现截屏「仿微信」 2.WPF 实现截屏控件之移动(二)「仿微信」 3.WPF 截图控件之伸缩(三) 「仿微信」 正文 有开发者在B站反 ...
- WPF 截图控件之绘制箭头(五)「仿微信」
前言 接着上周写的截图控件继续更新 绘制箭头. 1.WPF实现截屏「仿微信」 2.WPF 实现截屏控件之移动(二)「仿微信」 3.WPF 截图控件之伸缩(三) 「仿微信」 4.WPF 截图控件之绘制方 ...
- WPF 截图控件之文字(七)「仿微信」
前言 接着上周写的截图控件继续更新添加 文字. 1.WPF实现截屏「仿微信」 2.WPF 实现截屏控件之移动(二)「仿微信」 3.WPF 截图控件之伸缩(三) 「仿微信」 4.WPF 截图控件之绘制方 ...
- WPF 截图控件之画笔(八)「仿微信」
前言 接着上周写的截图控件继续更新添加 画笔. 1.WPF实现截屏「仿微信」 2.WPF 实现截屏控件之移动(二)「仿微信」 3.WPF 截图控件之伸缩(三) 「仿微信」 4.WPF 截图控件之绘制方 ...
- WPF 截图控件之移除控件(九)「仿微信」
WPF 截图控件之移除控件(九)「仿微信」 WPF 截图控件之移除控件(九)「仿微信」 作者:WPFDevelopersOrg 原文链接: https://github.com/WPFDevelope ...
- WPF C#截图功能 仿qq截图
原文:WPF C#截图功能 仿qq截图 先上效果图 源码下载地址:http://download.csdn.net/detail/candyvoice/9788099 描述:启动程序,点击窗口butt ...
- wp仿系统截图
wp上直接调用CameraCaptureTask,并没有参数设置截图大小,刚好项目需求要截成正方型,于是写了个仿系统截图的demo出来. 截图如下: 需要做的逻辑运算为: 1.初始化照片时:判 ...
- Android -- 真正的 高仿微信 打开网页的进度条效果
(本博客为原创,http://www.cnblogs.com/linguanh/) 目录: 一,为什么说是真正的高仿? 二,为什么要搞缓慢效果? 三,我的实现思路 四,代码,内含注释 五,使用方法与截 ...
- GSD_WeiXin(高仿微信)应用源码
高仿微信计划:已经实现功能 1.微信首页(cell侧滑编辑.下拉眼睛动画.下拉拍短视频.点击进入聊天详情界面) 2.通讯录(联系人字母排序.搜索界面) 3.发现(朋友圈) 4.我(界面) 待实现功能( ...
随机推荐
- 【spring 注解驱动开发】spring组件注册
尚学堂spring 注解驱动开发学习笔记之 - 组件注册 组件注册 1.@Configuration&@Bean给容器中注册组件 2.@ComponentScan-自动扫描组件&指定扫 ...
- C# 简单的对称加密
const string KEY_64 = "HuidTeac";//注意了,是8个字符 const string IV_64 = "HuidTeac"; pu ...
- SoutceTree用户名或者密码输入错误解决方案
soutceTree在拉取代码时候需要输入账户名或者密码,如果一时输入错了,可以这样修改: 1.找到这个目录:C:\Users\Administrator\AppData\Local\Atlassia ...
- ubuntu18.04 开机启动/停止服务
ubuntu18.04 开机启动/停止服务 一.删除一个服务 如果要删除一个服务,使用uodate-rc.d(参数-f是强制删除符号链接) update-rc.d -f apache2 remove ...
- 刷题-力扣-113. 路径总和 II
113. 路径总和 II 题目链接 来源:力扣(LeetCode) 链接:https://leetcode-cn.com/problems/path-sum-ii 著作权归领扣网络所有.商业转载请联系 ...
- sychronized
说一下 synchronized 底层实现原理? synchronized可以保证方法或者代码块在运行时, 同一时刻只有一个方法可以进入到临界区, 同时它还可以保证共享变量的内存可见性. Java中每 ...
- js函数和封装
$就是jquery对象,$()就是jQuery(),在里面可以传参数,作用就是获取元素 js对象与jQuery对象的区别:jQuery对象是一个数组,jQuery对象转为js对象:[0] 取第一个即可 ...
- [leetcode]1109. 航班预订统计(击败100%用户算法-差分数组的详解)
执行用时2ms,击败100%用户 内存消耗52.1MB,击败91%用户 这也是我第一次用差分数组,之前从来没有碰到过,利用差分数组就是利用了差分数组在某一区间内同时加减情况,只会改变最左边和最右边+1 ...
- k8s 探针 exec多个判断条件条件 多个检测条件
背景 1,之前我们的yaml文件里面有就绪探针. 2,探针是检测一个文件是否生成,生成了说明服务正常. 3,现在要加一个检测,也是一个文件是否存在并且不为空. 4,只有两个条件同时满足了 服务才算正常 ...
- 关于notepad++使用的那些事儿
时间:2019-04-11 整理:PangYuaner 标题:Notepad++正则表达式语法 地址:https://www.cnblogs.com/kekec/p/5255475.html 标题:N ...