ROS naviagtion analysis: costmap_2d--LayeredCostmap
博客转自:https://blog.csdn.net/u013158492/article/details/50490490
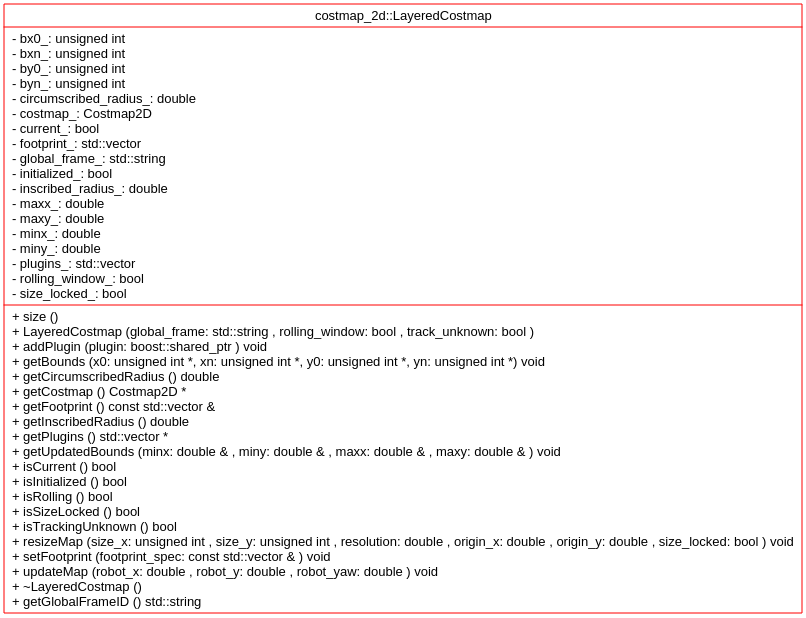
在数据成员中,有两个重要的变量:Costmap2D costmap_和 std::vector<boost::shared_ptr<Layer> > plugins_ 。
这个类相对比较简单,首先来看构造函数:
LayeredCostmap::LayeredCostmap(std::string global_frame, bool rolling_window, bool track_unknown) :

    costmap_(), global_frame_(global_frame), rolling_window_(rolling_window), initialized_(false), size_locked_(false)

{

  if (track_unknown)

    costmap_.setDefaultValue(255);

  else

    costmap_.setDefaultValue(0);

}
调用costmap_ 的setDefaultValue 方法,实际上设定了类costmap_2d 的一个成员变量default_value_ 这个值在class costmap_2d 中是这样使用的:memset(costmap_, default_value_, size_x_ * size_y_ * sizeof(unsigned char)),实际存储地图的变量就是class costmap_2d 的 costmap_ 数据成员。析构函数中,所有的操作就是弹出plugin: plugins_.pop_back()。函数LayeredCostmap::resizeMap 就是给class costmap_2d 的 costmap_ 成员的大小重新做分配。然后根据plugin对每一层的地图调用其父类Costmap2D成员的initial 方法,实际效果就是将plugin所指向的每一层地图的大小都设置为和LayeredCostmap::costmap_ 数据成员一样的空间大小。
{

  size_locked_ = size_locked;

  costmap_.resizeMap(size_x, size_y, resolution, origin_x, origin_y);

  for (vector<boost::shared_ptr<Layer> >::iterator plugin = plugins_.begin(); plugin != plugins_.end();

      ++plugin)

  {

    (*plugin)->matchSize();

  }

}
函数 LayeredCostmap::updateMap 完成对每一层地图的更新,更新过程分为两步updateBounds和updateCosts
void LayeredCostmap::updateMap(double robot_x, double robot_y, double robot_yaw)

{

  if (rolling_window_)

  {

    double new_origin_x = robot_x - costmap_.getSizeInMetersX() / 2;

    double new_origin_y = robot_y - costmap_.getSizeInMetersY() / 2;

    costmap_.updateOrigin(new_origin_x, new_origin_y);

  }

  if (plugins_.size() == 0)

    return;

  minx_ = miny_ = 1e30;

  maxx_ = maxy_ = -1e30;

  for (vector<boost::shared_ptr<Layer> >::iterator plugin = plugins_.begin(); plugin != plugins_.end();

      ++plugin)

  {

    (*plugin)->updateBounds(robot_x, robot_y, robot_yaw, &minx_, &miny_, &maxx_, &maxy_);

  }

  int x0, xn, y0, yn;

  costmap_.worldToMapEnforceBounds(minx_, miny_, x0, y0);

  costmap_.worldToMapEnforceBounds(maxx_, maxy_, xn, yn);

  x0 = std::max(0, x0);

  xn = std::min(int(costmap_.getSizeInCellsX()), xn + 1);

  y0 = std::max(0, y0);

  yn = std::min(int(costmap_.getSizeInCellsY()), yn + 1);

  ROS_DEBUG("Updating area x: [%d, %d] y: [%d, %d]", x0, xn, y0, yn);

  if (xn < x0 || yn < y0)

    return;

  {

    // Clear and update costmap under a single lock

    boost::unique_lock<Costmap2D::mutex_t> lock(*(costmap_.getMutex()));

    costmap_.resetMap(x0, y0, xn, yn);

    for (vector<boost::shared_ptr<Layer> >::iterator plugin = plugins_.begin(); plugin != plugins_.end();

        ++plugin)

    {

      (*plugin)->updateCosts(costmap_, x0, y0, xn, yn);

    }

  }

}
这里我们来看这两个更新过程参数:
(*plugin)->updateBounds(robot_x, robot_y, robot_yaw, &minx_, &miny_, &maxx_, &maxy_);

(*plugin)->updateCosts(costmap_, x0, y0, xn, yn);
更新Bounds过程由于传入的参数是&minx_, &miny_, &maxx_, &maxy_ 构成了一个矩形范围。由于针对不同的类的实例,调用不同的类的方法。对于Static Map:
{

  if (!map_received_ || !(has_updated_data_ || has_extra_bounds_))

    return;

  useExtraBounds(min_x, min_y, max_x, max_y);

  double wx, wy;

  mapToWorld(x_, y_, wx, wy);

  *min_x = std::min(wx, *min_x);

  *min_y = std::min(wy, *min_y);

  mapToWorld(x_ + width_, y_ + height_, wx, wy);

  *max_x = std::max(wx, *max_x);

  *max_y = std::max(wy, *max_y);

  has_updated_data_ = false;

}
Static map 只在第一次做更新,Bounds 范围是整张Map的大小,而且在UpdateBounds过程中没有对Static Map层的数据做过任何的更新。而对于 ObstacleLayer::updateBounds :主要的操作是更新Obstacles Map层的数据,然后才是更新Bounds
std::vector<Observation> observations, clearing_observations;

  // get the marking observations

  current = current && getMarkingObservations(observations);

  // get the clearing observations

  current = current && getClearingObservations(clearing_observations);

  // update the global current status

  current_ = current;

  // raytrace freespace

  for (unsigned int i = 0; i < clearing_observations.size(); ++i)

  {

    raytraceFreespace(clearing_observations[i], min_x, min_y, max_x, max_y);

  }

  for (std::vector<Observation>::const_iterator it = observations.begin(); it != observations.end(); ++it)

  {

    const Observation& obs = *it;

    const pcl::PointCloud<pcl::PointXYZ>& cloud = *(obs.cloud_);

    for (unsigned int i = 0; i < cloud.points.size(); ++i)

    {

      double px = cloud.points[i].x, py = cloud.points[i].y, pz = cloud.points[i].z;

      // now we need to compute the map coordinates for the observation

      unsigned int mx, my;

      if (!worldToMap(px, py, mx, my))

      {

        continue;

      }

      unsigned int index = getIndex(mx, my);

      costmap_[index] = LETHAL_OBSTACLE;

      touch(px, py, min_x, min_y, max_x, max_y);

    }

  }

  updateFootprint(robot_x, robot_y, robot_yaw, min_x, min_y, max_x, max_y);
对于InflationLayer::updateBounds 则保持上一次的min_x, min_y, max_x, max_y 。
对于VoxelLayer::updateBounds 更新过程和 ObstacleLayer::updateBounds 基本一致,只是增加了z 作为判断是否将2d地图的点设定为LETHAL_OBSTACLE 。
updateCosts: 完成updateBounds 后,开始调用(*plugin)->updateCosts(costmap_, x0, y0, xn, yn)。函数的第一个参数是指的master map,后面的bounds是对每个plugin自己维护的map的更新界限做设定。这里需要分析每一个单独的costmap和master map是哪些类在维护。
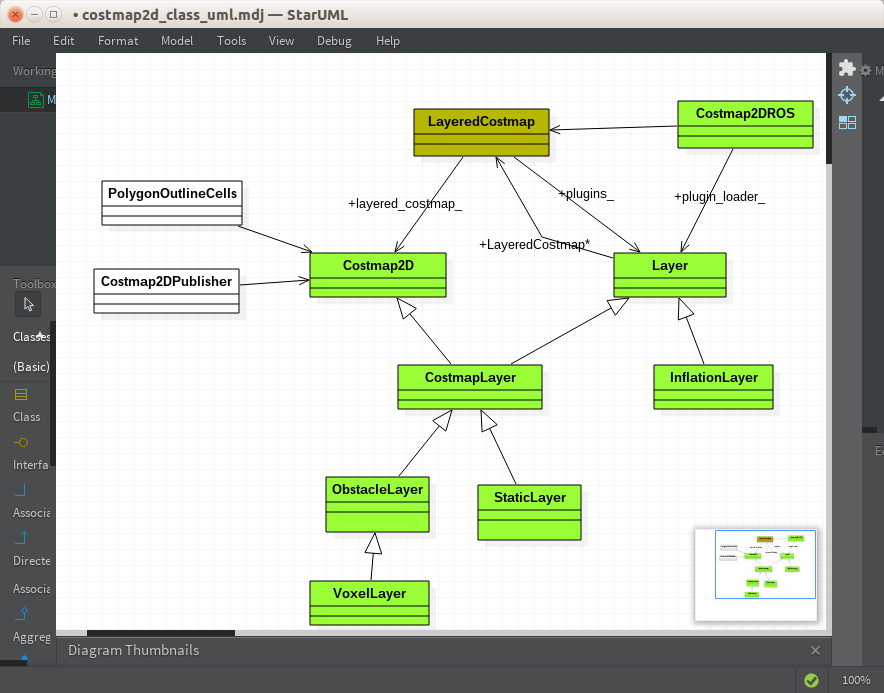
Master map: 这是由类LayeredCostmap 的 Costmap2D costmap_ 维护。 StaticLayer StaticLayer VoxelLayer: 这些类是继承于Costmap2D ,因此可以直接操作Costmap2D 的数据成员 unsigned char* costmap_;。因此可以看成每一层地图都是类Costmap2D 的一个实例。 InflationLayer 没有继承于Costmap2D 是因为这个类并不需要维护一张自己的地图,它仅仅是需要直接操作master map的数据就可以了。
每个plugin调用自己代表的层的updateCosts方法: StaticLayer 和ObstacleLayer 基本上都是调用了CostmapLayer::updateWithOverwrite,CostmapLayer::updateWithTrueOverwrite, CostmapLayer::updateWithMax 等方法。因为CostmapLayer 是这两个的父类。 但是InflationLayer::updateCosts 则不同,因为它既没有自己层的map实例,也不是从CostmapLayer 继承而来。它的updateCosts 是这个类的核心操作。关于他的updateCosts 操作,将在InflationLayer 篇具体分析这个算法的实现过程,这个算法实现了对障碍物膨胀操作。函数bool LayeredCostmap::isCurrent() 主要的操作是对操作的实时性提供保证,提供是否发生超时的信息。
bool current = (ros::Time::now() - last_updated_).toSec() <= expected_update_rate_.toSec();
函数void LayeredCostmap::setFootprint(conststd::vector<geometry_msgs::Point>& footprint_spec)
{

  footprint_ = footprint_spec;

  costmap_2d::calculateMinAndMaxDistances(footprint_spec, inscribed_radius_, circumscribed_radius_);

  for (vector<boost::shared_ptr<Layer> >::iterator plugin = plugins_.begin(); plugin != plugins_.end();

      ++plugin)

  {

    (*plugin)->onFootprintChanged();

  }

}
inscribed_radius_, circumscribed_radius_ 是计算得到的机器人尺寸的内切圆和外切圆半径。
这里重点关注InflationLayer 类是如何调用onFootprintChanged() 的。对于其他类型的plugin实例来说,其本身并没有重载这个函数,所以都是调用的Layer类的空函数virtual void onFootprintChanged() {}。
  cell_inflation_radius_ = cellDistance(inflation_radius_);

  computeCaches();
函数computeCaches()
void InflationLayer::computeCaches()

{

  if (cell_inflation_radius_ == 0)

    return;

  // based on the inflation radius... compute distance and cost caches

  if (cell_inflation_radius_ != cached_cell_inflation_radius_)

  {

    deleteKernels();

    cached_costs_ = new unsigned char*[cell_inflation_radius_ + 2];

    cached_distances_ = new double*[cell_inflation_radius_ + 2];

    for (unsigned int i = 0; i <= cell_inflation_radius_ + 1; ++i)

    {

      cached_costs_[i] = new unsigned char[cell_inflation_radius_ + 2];

      cached_distances_[i] = new double[cell_inflation_radius_ + 2];

      for (unsigned int j = 0; j <= cell_inflation_radius_ + 1; ++j)

      {

        cached_distances_[i][j] = hypot(i, j);

      }

    }

    cached_cell_inflation_radius_ = cell_inflation_radius_;

  }

  for (unsigned int i = 0; i <= cell_inflation_radius_ + 1; ++i)

  {

    for (unsigned int j = 0; j <= cell_inflation_radius_ + 1; ++j)

    {

      cached_costs_[i][j] = computeCost(cached_distances_[i][j]);

    }

  }

}
在函数定义中,维护两个指针:
cached_costs_ = new unsigned char*[cell_inflation_radius_ + 2];

cached_distances_ = new double*[cell_inflation_radius_ + 2];
第一阶段,计算出cached_distances_: cached_distances_[i][j] = hypot(i, j); ,其中i j 的范围都是0:cell_inflation_radius_ + 1。
第二阶段,通过计算得到的cached_distances_ 计算cached_costs_:cached_costs_[i][j] = computeCost(cached_distances_[i][j])。通过这个操作,现在可以任意给出在0-cell_inflation_radius_ cell范围的两个cells的costs,以后对地图做膨胀时,只需要查看某个cell(i1,j1)和obstacle cell(i,j)的下标就可以通过查表知道这个cell的代价是多少。这个表的大小仅仅和机器人的几何尺寸相关,一旦机器人尺寸发生改变,这个函数就需要再次被调用。
OK, LayeredCostmap的分析就这么多了~相信这样来来回回反复的分析这些类之间的调用关系,对于理解costmap_2d这个小怪兽是必要的。
ROS naviagtion analysis: costmap_2d--LayeredCostmap的更多相关文章
- ROS naviagtion analysis: costmap_2d--Costmap2DROS
博客转载自:https://blog.csdn.net/u013158492/article/details/50485418 在上一篇文章中moveBase就有关于costmap_2d的使用: pl ...
- ROS naviagtion analysis: move_base
博客转载自:https://blog.csdn.net/u013158492/article/details/50483123 这是navigation的第一篇文章,主要通过分析ROS代码级实现,了解 ...
- ROS naviagtion analysis: costmap_2d--ObstacleLayer
博客转载自:https://blog.csdn.net/u013158492/article/details/50493676 构造函数 ObstacleLayer() { costmap_ = NU ...
- ROS naviagtion analysis: costmap_2d--StaticLayer
博客转载自:https://blog.csdn.net/u013158492/article/details/50493246 从UML中能够看到,StaticLayer主要是在实现Layer层要求实 ...
- ROS naviagtion analysis: costmap_2d--CostmapLayer
博客转自:https://blog.csdn.net/u013158492/article/details/50493220 这个类是为ObstacleLayer StaticLayer voxelL ...
- ROS naviagtion analysis: costmap_2d--Layer
博客转载自:https://blog.csdn.net/u013158492/article/details/50493113 这个类中有一个LayeredCostmap* layered_costm ...
- ROS naviagtion analysis: costmap_2d--Costmap2D
博客转载自:https://blog.csdn.net/u013158492/article/details/50492506 Costmap2D是存储地图数据的父类.真正的地图数据就存储在数据成员u ...
- costmap_2d 解析
costmap_2d这个包提供了一种2D代价地图的实现方案,该方案利用输入的传感器数据,构建数据2D或者3D代价地图(取决于是否使用基于voxel的实现),并根据占用网格和用户定义的膨胀半径计算2D代 ...
- ROS探索总结(十三)——导航与定位框架
导航与定位是机器人研究中的重要部分. 一般机器人在陌生的环境下需要使用激光传感器(或者深度传感器转换成激光数据),先进行地图建模,然后在根据建立的地图进行导航.定位.在ROS中也有很多 ...
随机推荐
- hibernate缓存机制详解
hiberante面试题—hibernate缓存机制详解 这是面试中经常问到的一个问题,可以按照我的思路回答,准你回答得很完美.首先说下Hibernate缓存的作用(即为什么要用缓存机制),然后再 ...
- 分布式使用Redis
为什么我们做分布式使用Redis? https://www.cnblogs.com/yaodengyan/p/9717080.html 绝大部分写业务的程序员,在实际开发中使用 Redis 的时候,只 ...
- C语言内存对齐对则
这篇文章讲的非常好 : http://blog.csdn.net/hairetz/article/details/4084088 用空间换时间, 规则 : 每个数据成员存储的起始位置都要是它的整数 ...
- TypeError: parse() got an unexpected keyword argument 'transport_encoding' 安装tensor后报错
TypeError: parse() got an unexpected keyword argument 'transport_encoding' 巨蛋疼,出这个问题后,老夫真是醉了,mmp,最后在 ...
- Free Online SQL Formatter
SQL Formatter Web Service Free Online SQL Formatter SQL Parser engine used by SQL formatter 今日找了几个在线 ...
- Linux修改数据库的访问权限
以下方法可以帮助你解决这个问题了,下面的语句功能是,建立一个用户为monitor密码admin权限为和root一样.允许任意主机连接.这样你可以方便进行在本地远程操作数据库了. CREATE USER ...
- 完整的CRUD——javaweb
1,总体架构 index是进去的页面, 可以跳转Insert的增加页面,operatePerson是根据传进来的URI来判断增删改查的页面, DbManager.java是封装的数据库操作类, Pag ...
- 利用bat合并两个hex文件
单片机程序如果有IAP功能的话,就会生成两个hex文件,一个是Boot,一个是App,如果给让生产烧录两个文件,就会降低生产效率,所以在烧录前最好将两个文件合并成一个文件,烧录一次即可,合并方法如下: ...
- datasnap 上传/下载大文件(本Demo以图传片文件为例)
好久没写技术文了 datasnap传大流. 完整代码,同时感谢叶兄传流的指点,(只公开十天) 附:下面代码,转载请注明出处 ::code 服务端: function TServerMethods1.D ...
- shell中字体变色
在linux中给字体使用数字代码变色 字体颜色代码:重置0 ,黑色30,红色31,绿色32,黄色33,蓝色34,洋红35,青色36,浅灰37 效果代码:1m加粗 2m加下划线 5m闪动效果 7m ...