
ROS naviagtion analysis: costmap_2d--Costmap2DROS
博客转载自:https://blog.csdn.net/u013158492/article/details/50485418
在上一篇文章中moveBase就有关于costmap_2d的使用: planner_costmap_ros_是用于全局导航的地图,controller_costmap_ros_是局部导航用的地图,地图类型为经过ROS封装的costmap_2d::Costmap2DROS*。
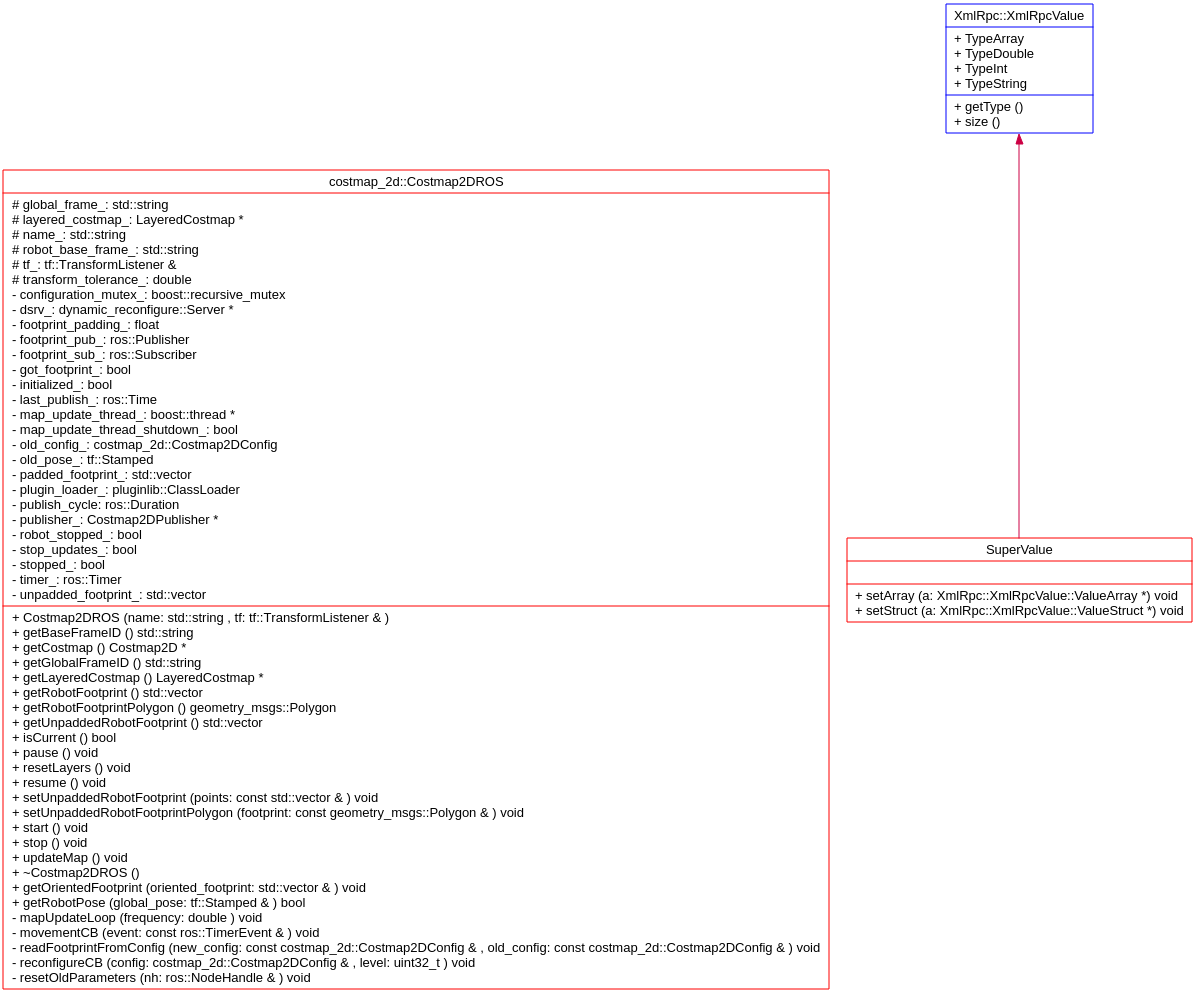
ROS Costmap2DROS类的UML
看看这个类的成员变量:LayeredCostmap* layered_costmap_; pluginlib::ClassLoader<Layer> plugin_loader_; 这两个最重要的成员变量,而LayeredCostmap类又包含了Costmap2D costmap_; 这个数据成员。

类之间的关系
绿色的是核心代码,从ROS用户的角度,只需要调用Costmap2DROS这个类,因为这个类已经把所有关于地图的操作都封装好了。不过我这里是分析底层算法实现,就不得不写得很长很长。

所以还是先回到对Costmap2DROS这个类的分析,然后再进一步一层一层的分析其他的类。这些类完成了对机器人地图的表示和操作,因此其数据结构和算法都很有分析的价值。首先是构造函数Costmap2DROS::Costmap2DROS(std::string name, tf::TransformListener& tf), 因此必须提供一个tf参数。tf参数需要提供以下两个坐标系的关系:
// get two frames

  private_nh.param("global_frame", global_frame_, std::string("/map"));

  private_nh.param("robot_base_frame", robot_base_frame_, std::string("base_link"));
如果没有找到这两个坐标系的关系或者超时,则构造函数会一直阻塞在这里:
while (ros::ok()

&& !tf_.waitForTransform(global_frame_,robot_base_frame_,ros::Time(), ros::Duration(0.1), ros::Duration(0.01),&tf_error))

  {

    ros::spinOnce();

    if (last_error + ros::Duration(5.0) < ros::Time::now())

    {

      last_error = ros::Time::now();

    }

    tf_error.clear();

  }
然后加入各个层次的地图:
if (private_nh.hasParam("plugins"))

  {

    XmlRpc::XmlRpcValue my_list;

    private_nh.getParam("plugins", my_list);

    for (int32_t i = 0; i < my_list.size(); ++i)

    {

      std::string pname = static_cast<std::string>(my_list[i]["name"]);

      std::string type = static_cast<std::string>(my_list[i]["type"]);

      ROS_INFO("Using plugin \"%s\"", pname.c_str());

      boost::shared_ptr<Layer> plugin =lugin_loader_.createInstance(type);

      layered_costmap_->addPlugin(plugin);

      plugin->initialize(layered_costmap_, name + "/" + pname, &tf_);

    }

  }
boost::shared_ptr<Layer> plugin = plugin_loader_.createInstance(type); 这行会创建一个以 type为类类型的实例变量,然后让plugin这个指针指向这个实例。
layered_costmap_->addPlugin(plugin);
然后layered_costmap_ 将这些类型的地图都加入,addPlugin 实现:
void addPlugin(boost::shared_ptr<Layer> plugin)

{

  plugins_.push_back(plugin);

}
这里的关系是:Costmap2DROS 有一个layered_costmap_ 数据成员,然后layered_costmap_ 又有一个std::vector<boost::shared_ptr<Layer> > plugins_; 成员,因此可以将各个子类的实例化对象的指针交给父类Layer 指针plugins_ 管理。
plugin->initialize(layered_costmap_, name + "/" + pname, &tf_);
这行将会对实例初始化,实际执行是plugin调用的父类Layer的方法void Layer::initialize(LayeredCostmap* parent, std::string name, tf::TransformListener *tf) 。
实际上父类Layer有一个成员变量为LayeredCostmap* layered_costmap_的指针,因此通过LayeredCostmap* layered_costmap_指针指向了具体的子类,比如ObstacleLayer StaticLayer InflationLayer 等。
然后设置footprint:footprint_sub_ = private_nh.subscribe(topic, 1, &Costmap2DROS::setUnpaddedRobotFootprintPolygon, this) ,回调函数setUnpaddedRobotFootprintPolygon 实际调用的是成员函数:
void Costmap2DROS::setUnpaddedRobotFootprint(const std::vector<geometry_msgs::Point>& points)

{

  unpadded_footprint_ = points;

  padded_footprint_ = points;

  padFootprint(padded_footprint_, footprint_padding_);//这个函数是在padded_footprint_基础上膨胀,增加了footprint_padding_

  layered_costmap_->setFootprint(padded_footprint_);

}

//以下是在footprint.cpp中的定义:

void padFootprint(std::vector<geometry_msgs::Point>& footprint, double padding)

{

  // pad footprint in place

  for (unsigned int i = 0; i < footprint.size(); i++)

  {

    geometry_msgs::Point& pt = footprint[ i ];

    pt.x += sign0(pt.x) * padding;

    pt.y += sign0(pt.y) * padding;

  }

}
然后声明了一个timer,定时检测机器人是否在移动:
// Create a time r to check if the robot is moving

robot_stopped_ = false;

timer_ = private_nh.createTimer(ros::Duration(.1),&Costmap2DROS::movementCB, this);
这里回调函数movementCB 实现,是通过比较前后两个pose的差,判断机器人是否在移动:
void Costmap2DROS::movementCB(const ros::TimerEvent &event)

{

  tf::Stamped < tf::Pose > new_pose;

  if (!getRobotPose(new_pose))

  {

    robot_stopped_ = false;

  }

  else if (fabs((old_pose_.getOrigin() - new_pose.getOrigin()).length()) < 1e-3

      && fabs(old_pose_.getRotation().angle(new_pose.getRotation())) < 1e-3)

  {

    old_pose_ = new_pose;

    robot_stopped_ = true;

  }

  else

  {

    old_pose_ = new_pose;

    robot_stopped_ = false;

  }

}
在构造函数末尾,开启参数动态配置:
dsrv_ = new dynamic_reconfigure::Server<Costmap2DConfig>(ros::NodeHandle("~/" + name));

dynamic_reconfigure::Server<Costmap2DConfig>::CallbackType cb = boost::bind(&Costmap2DROS::reconfigureCB, this, _1, _2);

dsrv_->setCallback(cb);
回调函数reconfigureCB 除了对一些类成员的配置值做赋值以外,还会开启一个更新map的线程
map_update_thread_ = new boost::thread(boost::bind(&Costmap2DROS::mapUpdateLoop, this, map_update_frequency));
更新map的线程函数定义:
void Costmap2DROS::mapUpdateLoop(double frequency)

{

  if (frequency == 0.0)    return;

  ros::NodeHandle nh;

  ros::Rate r(frequency);

  while (nh.ok() && !map_update_thread_shutdown_)

  {

    struct timeval start, end;

    double start_t, end_t, t_diff;

    gettimeofday(&start, NULL);

    updateMap();

    gettimeofday(&end, NULL);

    start_t = start.tv_sec + double(start.tv_usec) / 1e6;

    end_t = end.tv_sec + double(end.tv_usec) / 1e6;

    t_diff = end_t - start_t;

    ROS_DEBUG("Map update time: %.9f", t_diff);

    if (publish_cycle.toSec() > 0 && layered_costmap_->isInitialized())

    {

      unsigned int x0, y0, xn, yn;

      layered_costmap_->getBounds(&x0, &xn, &y0, &yn);

      publisher_->updateBounds(x0, xn, y0, yn);

      ros::Time now = ros::Time::now();

      if (last_publish_ + publish_cycle < now)

      {

        publisher_->publishCostmap();

        last_publish_ = now;

      }

    }

    r.sleep();

    // make sure to sleep for the remainder of our cycle time

    if (r.cycleTime() > ros::Duration(1 / frequency))

      ROS_WARN("Map update loop missed its desired rate of %.4fHz... the loop actually took %.4f seconds", frequency,

               r.cycleTime().toSec());

  }

}
核心功能在于调用updateMap()
void Costmap2DROS::updateMap()

{

  if (!stop_updates_)

  {

    // get global pose

    tf::Stamped < tf::Pose > pose;

    if (getRobotPose (pose))

    {

      double x = pose.getOrigin().x(),

             y = pose.getOrigin().y(),

             yaw = tf::getYaw(pose.getRotation());

      layered_costmap_->updateMap(x, y, yaw);

      initialized_ = true;

    }

  }

}
函数layered_costmap_->updateMap(x, y, yaw)定义
void LayeredCostmap::updateMap(double robot_x, double robot_y, double robot_yaw)

{

  // if we're using a rolling buffer costmap... we need to update the origin using the robot's position

  if (rolling_window_)

  {

    double new_origin_x = robot_x - costmap_.getSizeInMetersX() / 2;

    double new_origin_y = robot_y - costmap_.getSizeInMetersY() / 2;

    costmap_.updateOrigin(new_origin_x, new_origin_y);

  }

  if (plugins_.size() == 0)

    return;

  minx_ = miny_ = 1e30;

  maxx_ = maxy_ = -1e30;

  for (vector<boost::shared_ptr<Layer> >::iterator plugin = plugins_.begin(); plugin != plugins_.end();

      ++plugin)

  {

    (*plugin)->updateBounds(robot_x, robot_y, robot_yaw, &minx_, &miny_, &maxx_, &maxy_);

  }

  int x0, xn, y0, yn;

  costmap_.worldToMapEnforceBounds(minx_, miny_, x0, y0);

  costmap_.worldToMapEnforceBounds(maxx_, maxy_, xn, yn);

  x0 = std::max(0, x0);

  xn = std::min(int(costmap_.getSizeInCellsX()), xn + 1);

  y0 = std::max(0, y0);

  yn = std::min(int(costmap_.getSizeInCellsY()), yn + 1);

  ROS_DEBUG("Updating area x: [%d, %d] y: [%d, %d]", x0, xn, y0, yn);

  if (xn < x0 || yn < y0)

    return;

  {

    // Clear and update costmap under a single lock

    boost::unique_lock<Costmap2D::mutex_t> lock(*(costmap_.getMutex()));

    costmap_.resetMap(x0, y0, xn, yn);

    for (vector<boost::shared_ptr<Layer> >::iterator plugin = plugins_.begin(); plugin != plugins_.end();

        ++plugin)

    {

      (*plugin)->updateCosts(costmap_, x0, y0, xn, yn);

    }

  }

  bx0_ = x0;

  bxn_ = xn;

  by0_ = y0;

  byn_ = yn;

  initialized_ = true;

}
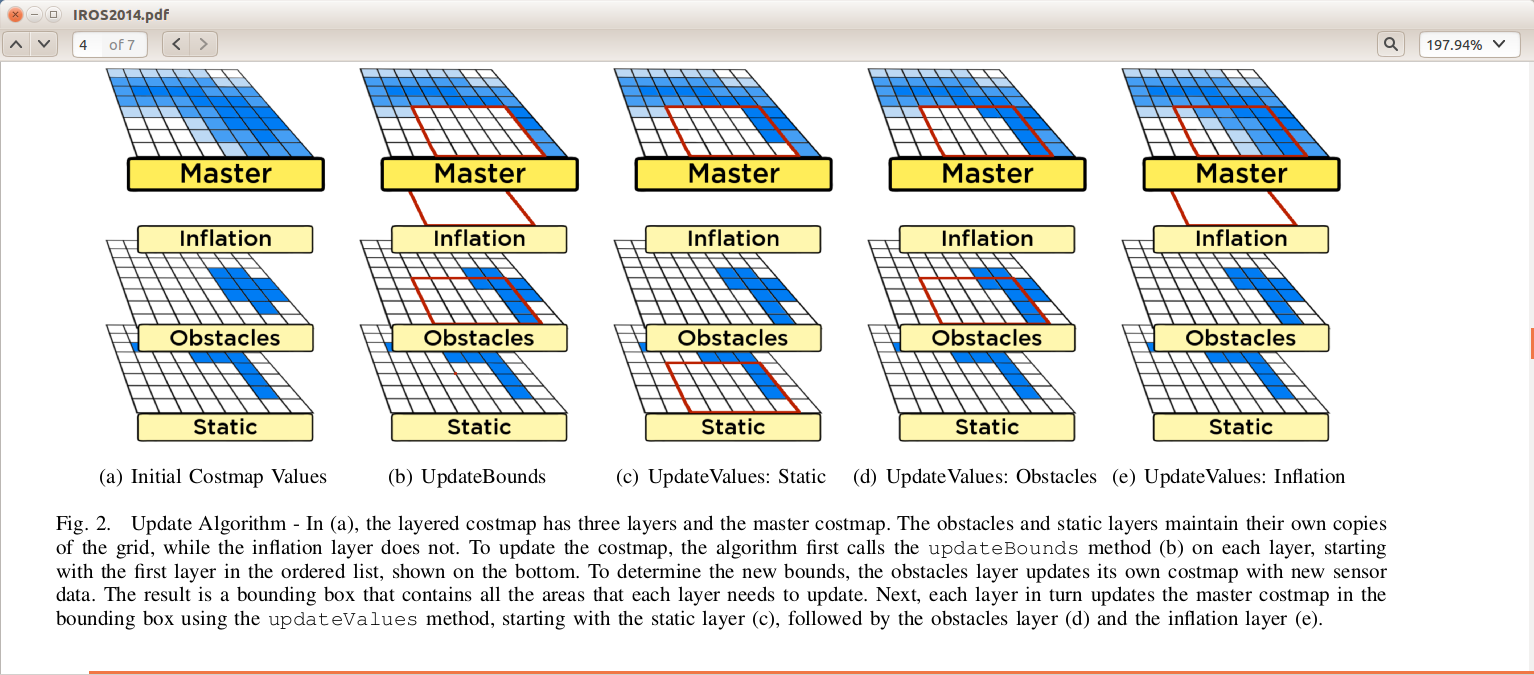
updateMap 分为两个阶段,第一个阶段是UpdateBounds
(*plugin)->updateBounds(robot_x, robot_y, robot_yaw, &minx_, &miny_, &maxx_, &maxy_);
这个阶段会更新每个Layer的更新区域,这样在每个运行周期内减少了数据拷贝的操作时间。
第二个阶段是 UpdateCosts
(*plugin)->updateCosts(costmap_, x0, y0, xn, yn);
这个阶段将逐一拷贝数据到Master Map,关于Master Map是如何得到的,见下图,图来源于David Lu的Paper《Layered Costmaps for Context-Sensitive Navigation》
函数void Costmap2DROS::start()
void Costmap2DROS::start()

{

  std::vector < boost::shared_ptr<Layer> > *plugins = layered_costmap_->getPlugins();

  // check if we're stopped or just paused

  if (stopped_)

  {

    // if we're stopped we need to re-subscribe to topics

    for (vector<boost::shared_ptr<Layer> >::iterator plugin = plugins->begin(); plugin != plugins->end();

        ++plugin)

    {

      (*plugin)->activate();

    }

    stopped_ = false;

  }

  stop_updates_ = false;

  // block until the costmap is re-initialized.. meaning one update cycle has run

  ros::Rate r(100.0);

  while (ros::ok() && !initialized_)

    r.sleep();

}
这里通过成员变量layered_costmap_拿到类LayeredCostmap的数据成员std::vector<boost::shared_ptr<Layer> > plugins_; ,然后调用这个Layer 的子类的方法(*plugin)->activate();
函数Costmap2DROS::stop()
void Costmap2DROS::stop()

{

  stop_updates_ = true;

  std::vector < boost::shared_ptr<Layer> > *plugins = layered_costmap_->getPlugins();

  // unsubscribe from topics

  for (vector<boost::shared_ptr<Layer> >::iterator plugin = plugins->begin(); plugin != plugins->end();

      ++plugin)

  {

    (*plugin)->deactivate();

  }

  initialized_ = false;

  stopped_ = true;

}
函数Costmap2DROS::resetLayers()
void Costmap2DROS::resetLayers()

{

  Costmap2D* top = layered_costmap_->getCostmap();

  top->resetMap(0, 0, top->getSizeInCellsX(), top->getSizeInCellsY());

  std::vector < boost::shared_ptr<Layer> > *plugins = layered_costmap_->getPlugins();

  for (vector<boost::shared_ptr<Layer> >::iterator plugin = plugins->begin(); plugin != plugins->end();++plugin)

  {

    (*plugin)->reset();

  }

}
函数Costmap2DROS::getRobotPose
bool Costmap2DROS::getRobotPose(tf::Stamped<tf::Pose>& global_pose) const

{

  global_pose.setIdentity();

  tf::Stamped < tf::Pose > robot_pose;

  robot_pose.setIdentity();

  robot_pose.frame_id_ = robot_base_frame_;

  robot_pose.stamp_ = ros::Time();

  // get the global pose of the robot

  tf_.transformPose(global_frame_, robot_pose, global_pose);

}
这里只需要指定global_pose 和 robot_pose 各自的frame_id_ 就可以通过tf_.transformPose(global_frame_, robot_pose, global_pose)获得 global_pose 。
函数 Costmap2DROS::getOrientedFootprint(std::vector<geometry_msgs::Point>& oriented_footprint) const 完成将机器人坐标系下的机器人轮廓点的坐标转化为机器人在当前全局坐标系下的轮廓点的值。具体定义如下:
void transformFootprint(double x, double y, double theta, const std::vector<geometry_msgs::Point>& footprint_spec,

                        std::vector<geometry_msgs::Point>& oriented_footprint)

{

  // build the oriented footprint at a given location

  oriented_footprint.clear();

  double cos_th = cos(theta);

  double sin_th = sin(theta);

  for (unsigned int i = 0; i < footprint_spec.size(); ++i)

  {

    geometry_msgs::Point new_pt;

    new_pt.x = x + (footprint_spec[i].x * cos_th - footprint_spec[i].y * sin_th);

    new_pt.y = y + (footprint_spec[i].x * sin_th + footprint_spec[i].y * cos_th);

    oriented_footprint.push_back(new_pt);

  }

}
到此,基本上 Costmap2DROS 的定义就这么多了。不过其中类和类之间的调用关系依然还是很复杂,因此需要需要分析plugin原理,才能真正知道这些类的关系是如何实现的。 接下来分析costma_2d的其他类。
ROS naviagtion analysis: costmap_2d--Costmap2DROS的更多相关文章
- ROS naviagtion analysis: move_base
博客转载自:https://blog.csdn.net/u013158492/article/details/50483123 这是navigation的第一篇文章,主要通过分析ROS代码级实现,了解 ...
- ROS naviagtion analysis: costmap_2d--ObstacleLayer
博客转载自:https://blog.csdn.net/u013158492/article/details/50493676 构造函数 ObstacleLayer() { costmap_ = NU ...
- ROS naviagtion analysis: costmap_2d--StaticLayer
博客转载自:https://blog.csdn.net/u013158492/article/details/50493246 从UML中能够看到,StaticLayer主要是在实现Layer层要求实 ...
- ROS naviagtion analysis: costmap_2d--LayeredCostmap
博客转自:https://blog.csdn.net/u013158492/article/details/50490490 在数据成员中,有两个重要的变量:Costmap2D costmap_和 s ...
- ROS naviagtion analysis: costmap_2d--CostmapLayer
博客转自:https://blog.csdn.net/u013158492/article/details/50493220 这个类是为ObstacleLayer StaticLayer voxelL ...
- ROS naviagtion analysis: costmap_2d--Layer
博客转载自:https://blog.csdn.net/u013158492/article/details/50493113 这个类中有一个LayeredCostmap* layered_costm ...
- ROS naviagtion analysis: costmap_2d--Costmap2D
博客转载自:https://blog.csdn.net/u013158492/article/details/50492506 Costmap2D是存储地图数据的父类.真正的地图数据就存储在数据成员u ...
- move_base代码学习一
System overview move_base 源码 API nav_core BaseGlobalPlanner BaseLocalPlanner RecoveryBehavior Recove ...
- ROS导航之地图costmap_2d与bresenham算法
读者可以参读http://wiki.ros.org/costmap_2d costmap_2d: 无论是激光雷达还是如kinect 或xtion pro深度相机作为传感器跑出的2D或3D SLAM ...
随机推荐
- 因实现本地浏览器访问nginx修改配置文件后,安装vsftpd失败
解决方法如下(修改dns配置) vi /etc/resolv.conf 在此文件最后加入:nameserver 8.8.8.8 如果没有vi编辑器可用: echo "nameserver 8 ...
- ORA-12541:无监听错误解决办法
http://jingyan.baidu.com/article/03b2f78c7a0ab75ea237ae33.html 1. 从开始菜单中打开“Oracle Net Configuratio ...
- mysql编译参数详解
mysql编译参数详解(./configure) 1.--prefix=PREFIX:指定程序安装路径: 2.--enable-assembler:使用汇编模式:(文档说明:compiling i ...
- 蓝桥杯 算法训练 ALGO-114 黑白无常
算法训练 黑白无常 时间限制:1.0s 内存限制:256.0MB 问题描述 某寝室的同学们在学术完之后准备玩一个游戏:游戏是这样的,每个人头上都被贴了一张白色或者黑色的纸,现在每个人都会说一句 ...
- python开发模块基础:正则表达式
一,正则表达式 1.字符组:[0-9][a-z][A-Z] 在同一个位置可能出现的各种字符组成了一个字符组,在正则表达式中用[]表示字符分为很多类,比如数字.字母.标点等等.假如你现在要求一个位置&q ...
- linux 下 进程和线程的区别
1.进程与线程 进程是程序执行时的一个实例,即它是程序已经执行到课中程度的数据结构的汇集.从内核的观点看,进程的目的就是担当分配系统资源(CPU时间.内存等)的基本单位. 线程是进程的一个执行流,是C ...
- mysql安装与基本管理
一.MySQL介绍 MySQL是一个关系型数据库管理系统,由瑞典MySQL AB 公司开发,目前属于 Oracle 旗下公司.MySQL 最流行的关系型数据库管理系统,在 WEB 应用方面MySQL是 ...
- Android:通过滤镜实现点击图片变暗效果
实现点击图片(ImageView)变暗效果,有一个较简单的方法,就是讲目标图片设置为背景图片(setBackground),再创建一个selector.xml文件,里面放置一张普通状态时的透明图片,一 ...
- 什么是Ajax和JSON,它们的优缺点
什么是Ajax??? 术语Ajax用来描述一组技术,它使浏览器可以为用户提供更为自然的浏览体验. Ajax它是“Asynchronous JavaScript + XML的简写” 定义Ajax: Aj ...
- Playbooks 中的错误处理
Topics Playbooks 中的错误处理 忽略错误的命令 控制对失败的定义 覆写更改结果 Ansible 通常默认会确保检测模块和命令的返回码并且会快速失败 – 专注于一个错误除非你另作打算. ...