
吴裕雄 python 神经网络——TensorFlow 输入数据处理框架
import tensorflow as tf

files = tf.train.match_filenames_once("E:\\MNIST_data\\output.tfrecords")

filename_queue = tf.train.string_input_producer(files, shuffle=False)

# 读取文件。

reader = tf.TFRecordReader()

_,serialized_example = reader.read(filename_queue)

# 解析读取的样例。

features = tf.parse_single_example(

    serialized_example,

    features={

        'image_raw':tf.FixedLenFeature([],tf.string),

        'pixels':tf.FixedLenFeature([],tf.int64),

        'label':tf.FixedLenFeature([],tf.int64)

    })

decoded_images = tf.decode_raw(features['image_raw'],tf.uint8)

retyped_images = tf.cast(decoded_images, tf.float32)

labels = tf.cast(features['label'],tf.int32)

#pixels = tf.cast(features['pixels'],tf.int32)

images = tf.reshape(retyped_images, [784])

min_after_dequeue = 10000

batch_size = 100

capacity = min_after_dequeue + 3 * batch_size

image_batch, label_batch = tf.train.shuffle_batch([images, labels], batch_size=batch_size, capacity=capacity, min_after_dequeue=min_after_dequeue)

def inference(input_tensor, weights1, biases1, weights2, biases2):

    layer1 = tf.nn.relu(tf.matmul(input_tensor, weights1) + biases1)

    return tf.matmul(layer1, weights2) + biases2

# 模型相关的参数

INPUT_NODE = 784

OUTPUT_NODE = 10

LAYER1_NODE = 500

REGULARAZTION_RATE = 0.0001

TRAINING_STEPS = 5000

weights1 = tf.Variable(tf.truncated_normal([INPUT_NODE, LAYER1_NODE], stddev=0.1))

biases1 = tf.Variable(tf.constant(0.1, shape=[LAYER1_NODE]))

weights2 = tf.Variable(tf.truncated_normal([LAYER1_NODE, OUTPUT_NODE], stddev=0.1))

biases2 = tf.Variable(tf.constant(0.1, shape=[OUTPUT_NODE]))

y = inference(image_batch, weights1, biases1, weights2, biases2)

# 计算交叉熵及其平均值

cross_entropy = tf.nn.sparse_softmax_cross_entropy_with_logits(logits=y, labels=label_batch)

cross_entropy_mean = tf.reduce_mean(cross_entropy)

# 损失函数的计算

regularizer = tf.contrib.layers.l2_regularizer(REGULARAZTION_RATE)

regularaztion = regularizer(weights1) + regularizer(weights2)

loss = cross_entropy_mean + regularaztion

# 优化损失函数

train_step = tf.train.GradientDescentOptimizer(0.01).minimize(loss)

# 初始化会话,并开始训练过程。

with tf.Session() as sess:

    # tf.global_variables_initializer().run()

    sess.run((tf.global_variables_initializer(),tf.local_variables_initializer()))

    coord = tf.train.Coordinator()

    threads = tf.train.start_queue_runners(sess=sess, coord=coord)

    # 循环的训练神经网络。

    for i in range(TRAINING_STEPS):

        if i % 1000 == 0:

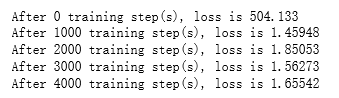
            print("After %d training step(s), loss is %g " % (i, sess.run(loss)))

        sess.run(train_step)

    coord.request_stop()

    coord.join(threads)
吴裕雄 python 神经网络——TensorFlow 输入数据处理框架的更多相关文章
- 吴裕雄 python 神经网络——TensorFlow 循环神经网络处理MNIST手写数字数据集
#加载TF并导入数据集 import tensorflow as tf from tensorflow.contrib import rnn from tensorflow.examples.tuto ...
- 吴裕雄 python 神经网络——TensorFlow 使用卷积神经网络训练和预测MNIST手写数据集
import tensorflow as tf import numpy as np from tensorflow.examples.tutorials.mnist import input_dat ...
- 吴裕雄 python 神经网络——TensorFlow 训练过程的可视化 TensorBoard的应用
#训练过程的可视化 ,TensorBoard的应用 #导入模块并下载数据集 import tensorflow as tf from tensorflow.examples.tutorials.mni ...
- 吴裕雄 python 神经网络——TensorFlow实现搭建基础神经网络
import numpy as np import tensorflow as tf import matplotlib.pyplot as plt def add_layer(inputs, in_ ...
- 吴裕雄 python 神经网络——TensorFlow图片预处理调整图片
import numpy as np import tensorflow as tf import matplotlib.pyplot as plt def distort_color(image, ...
- 吴裕雄 python 神经网络TensorFlow实现LeNet模型处理手写数字识别MNIST数据集
import tensorflow as tf tf.reset_default_graph() # 配置神经网络的参数 INPUT_NODE = 784 OUTPUT_NODE = 10 IMAGE ...
- 吴裕雄 python 神经网络——TensorFlow 数据集高层操作
import tempfile import tensorflow as tf train_files = tf.train.match_filenames_once("E:\\output ...
- 吴裕雄 python 神经网络——TensorFlow 图像预处理完整样例
import numpy as np import tensorflow as tf import matplotlib.pyplot as plt def distort_color(image, ...
- 吴裕雄 python 神经网络——TensorFlow 花瓣分类与迁移学习(4)
# -*- coding: utf-8 -*- import glob import os.path import numpy as np import tensorflow as tf from t ...
随机推荐
- selenium的元素定位方法-By
如果在定位元素属性中包含了如ID等元素属性,那么在一个测试中,定位方法具体有哪几种,可以参考by模块中的By类,By的代码如下: class By(object): """ ...
- 【做题笔记】洛谷P1955[NOI2015]程序自动分析
第一道蓝题祭- 注意到本题中判断的是下标,即,并不是真的判断 \(i\) 是否等于 \(j\) 显然考虑并查集,把所有标记为"相等"的数放在一个集合里,然后最后扫一遍每个数,如果有 ...
- SSG (slow global), TTG (typical global) and FFG (fast global)
https://semiwiki.com/x-subscriber/clk-design-automation/4481-variation-alphabet-soup/ n response, fo ...
- python面试的100题(1)
题目:有一个jsonline格式的文件file.txt大小约为10K def get_lines(): with open('file.txt','rb') as f: return f.readli ...
- HBase 启动后HMaster进程自动消失
原因分析 1.hadoop 与 hbase 版本不兼容,导致的异常. 2.log日志信息显示 org.apache.hadoop.hbase.TableExistsException: hbase:n ...
- 【音乐欣赏】《Sunflower》 - Post Malone / Swae Lee
曲名:Sunflower 作者:Post Malone.Swae Lee [00:02.29]Ayy, ayy, ayy, ayy (ooh) [00:09.49]Ooh, ooh, ooh, ohh ...
- Educational Codeforces Round 78 (Rated for Div. 2)E(构造,DFS)
DFS,把和当前结点相连的点全都括在当前结点左右区间里,它们的左端点依次++,然后对这些结点进行DFS,优先对左端点更大的进行DFS,这样它右端点会先括起来,和它同层的结点(后DFS的那些)的区间会把 ...
- Python常用数据类型转换
常用的数据类型转换 目标 了解类型转换的作用 掌握常用的类型转换 函数 说明 int(x [,base ]) 将x转换为一个整数 long(x [,base ]) 将x转换为一个长整数 float(x ...
- yum grouplist 安装gnome桌面环境
经常,我们如果需要安装一些比较复杂的软件时,都会在安装操作系统的时候直接勾选,然后进行安装.但是,有的时候,等操作系统安装完了才发现有遗漏的软件没有安装. 这个时候,yum就要出来救场了.使用yu ...
- Hadoop3.1.1源码Client详解 : 写入准备-RPC调用与流的建立
该系列总览: Hadoop3.1.1架构体系——设计原理阐述与Client源码图文详解 : 总览 关于RPC(Remote Procedure Call),如果没有概念,可以参考一下RMI(Remot ...